Archive | July 2024

Hi There!


Today I’m sharing a card using KLM Digital DesignPre-colored Toad 1 from the new July 2024 release. This stamp is pre-coloured and can be used in so many different ways. You just have to use your imagination!

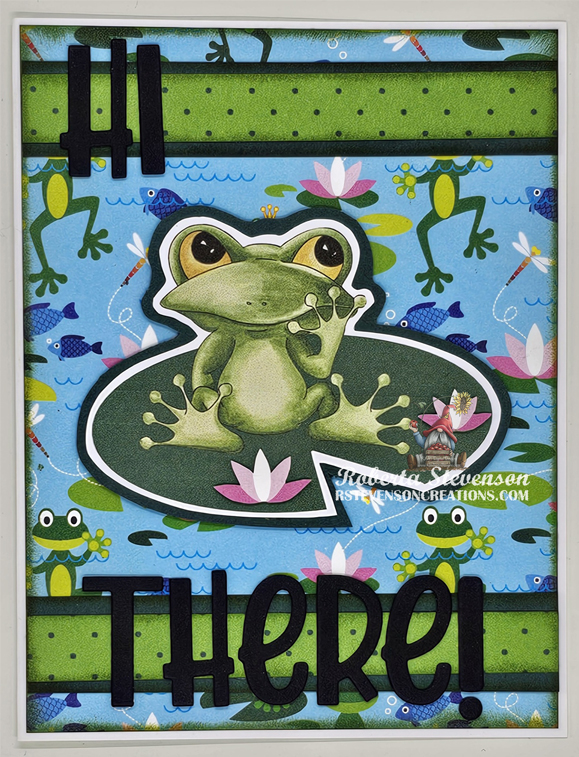
I began with a card base of 5.5″ x 4.25″ using Hammermill – Premium Cardstock 110 lb. cardstock.  For the background, I cut Reminisce – The Menagerie Kit paper to the sizes of 5-3/8″ x 4-1/8″ and 2 pieces at .5″ x 4-1/8″. Recollections – Green cardstock was cut to the size of .75″ x 4-1/8″.  All of the edges were inked with Tim Holtz Distress Inks – Peeled Paint and then applied to the base card using double-sided tape.

The image was imported into Microsoft Word and I wanted the toad to be sitting on a lily pad, so within Microsoft Word, I added in an oval shape and then a triangular shape. The oval shape was made green and the triangle shape was made white. I positioned the toad where I wanted it to go and then printed out the combined image onto Copic Marker X-Press It Blending Card.  Once the completed image was printed, I fussy cut around the image and attached it to some Recollections – Green cardstock with some tape and liquid glue. Once again, I fussy cut around the image. From the patterned paper, I also cut a couple of the lily pad flowers and popped them up on the lily pad using U-Line Double-Sided Foam Tape. Using a Cuttlebug, Lawn Fawn Lawn Cuts – Henry’s 123s, Lawn Fawn Lawn Cuts – Henry’s ABCs and Recollections – Black cardstock, I die cut the sentiment twice and then glued the pieces together. For the exclamation mark, I die cut 5 so that the dot would be at the same height as the other letters.

The card was now ready to assemble. I applied U-Line Double-Sided Foam Tape to the finished image and popped it up onto the centre of the card. Liquid glue was added to the centre of each letter and they were adhered to the base card.

Card Recipe:

Stamp:  KLM Digital DesignPre-colored Toad 1

Sentiment: Lawn Fawn Lawn Cuts – Henry’s 123s, Lawn Fawn Lawn Cuts – Henry’s ABCs

Inks: HP Printer Grayscale, Tim Holtz Distress Inks – Peeled Paint

Paper: Copic Marker X-Press It Blending Card, Hammermill – Premium Cardstock 110 lb., Reminisce – The Menagerie Kit 1 (12″ x 12″), Recollections – Black cardstock, Recollections – Green cardstock

Miscellaneous: U-Line Double-Sided Foam Tape

Hope you like it and have a great week!

You can find more cards to inspire you at KLM Designs, KLM Digital Design Team and KLM Digital Designs on the Facebook Fan page from the rest of our design team.

Pansies Floral Basket!


Today I’m sharing a card using KLM Digital DesignFloral Basket – Pansies from the new July 2024 release. This stamp also comes with 2 other sentiments, “You Grow Girl!” and “Let me plant one on ya!“.

I began with a card base of 5.5″ x 4.25″ using Hammermill – Premium Cardstock 110 lb. cardstock. Recollections – Matte Gold Foil cardstock was cut to the same size and then adhered directly to the base using double-sided tape. Kate Knight – Spring Fling Designer Paper was cut to the size of 5.25″ x 4″. With a finger dauber and Tim Holtz Distress Ink – Prize Ribbon, I inked around  the outer edges. The finished piece was applied to the base using double-sided tape.

The image and sentiment were imported into Microsoft Word and printed out onto Copic Marker X-Press It Blending Card.  I wanted 2 of the top flowers to pop, so I cropped them in Microsoft Word and printed them out as well. Copics were used to colour in the image and then it was fussy cut leaving a thin white border around it. I applied this to Recollections – Black cardstock and then fussy cut again. This piece was then applied to Recollections – Matte Gold Foil cardstock and the fussy cut one last time. The sentiment was fussy cut and applied to Recollections – Matte Gold Foil cardstock and fussy cut again. With Recollections – Blue cardstock, I cut a piece to be the size of 5.25″ x 1.25″ and then inked around the edges with Tim Holtz Distress Ink – Prize Ribbon. From the Recollections – Matte Gold Foil cardstock, I cut 2 strips of 5.5″ x 1/8″.

The card was now ready to assemble. I applied U-Line Double-Sided Foam Tape to the finished image, sentiment and 2 flowers and positioned them to where I wanted then to go. With double-sided tape, I adhered the blue strip to the bottom of the card. Liquid glue was applied to the 2 thin gold strips and they were placed above and below the blue strip. The sentiment, flower basket and 2 flowers were then popped up onto the card. Lastly, I added in some bling using Buttons Galore & More – Blueberry gems.

Card Recipe:

Stamp and Sentiment:  KLM Digital DesignFloral Basket – Pansies

Inks: HP Printer Grayscale, Tim Holtz Distress Ink – Prize Ribbon

Paper: Copic Marker X-Press It Blending Card, Hammermill – Premium Cardstock 110 lb., Recollections – Matte Gold Foil cardstock, Kate Knight – Spring Fling Designer Paper Stack (Cardmaking & Papercraft 2012), Recollections – Blue cardstock

Miscellaneous: U-Line Double-Sided Foam Tape, Buttons Galore & More – Blueberry gems

Image coloured with Copic Markers:

Leaves: G16, YG25, YG23, YG21

Flowers: E15, Y17, Y15, Y11, Y08, V09, V06, V04, RV14, RV13, RV11, B79, B66, B63

Basket: YR27, YR24, YR23, YR21

Hope you like it and have a great week!

You can find more cards to inspire you at KLM Designs, KLM Digital Design Team and KLM Digital Designs on the Facebook Fan page from the rest of our design team.