Archive | November 2020

Mistletoe Santa Gnome!!


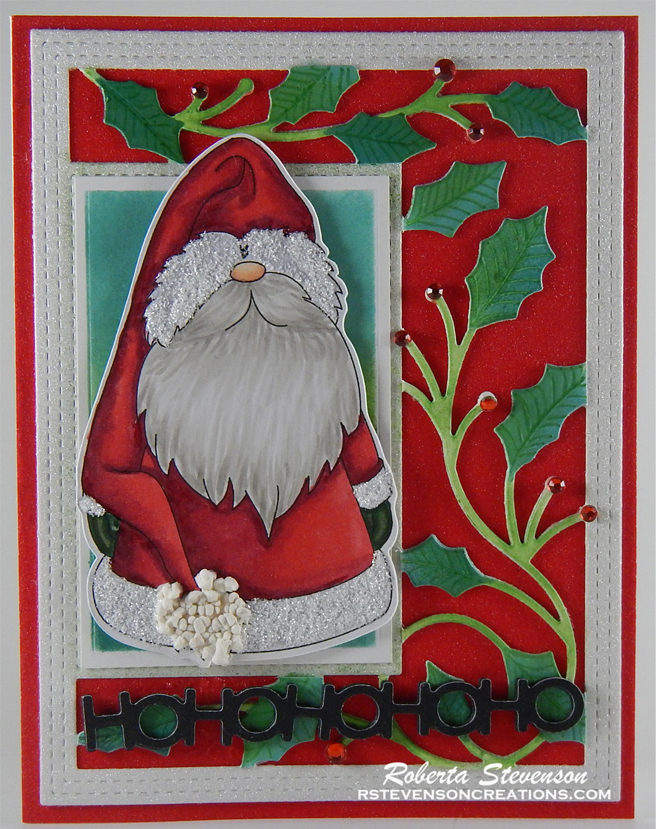
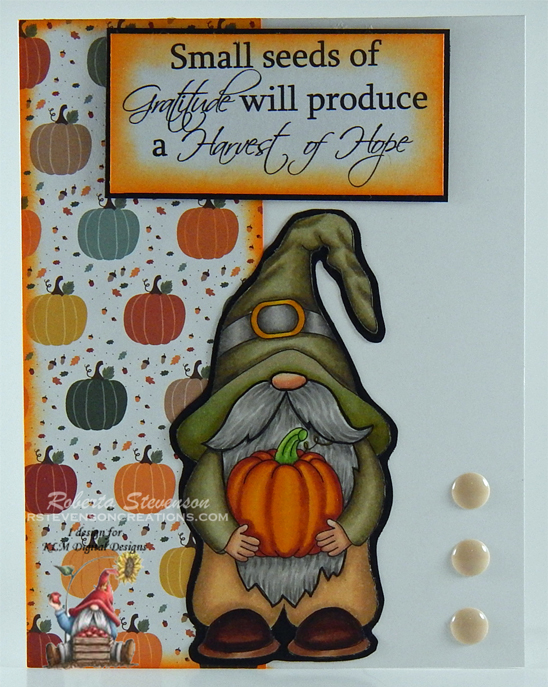
Today, I’m sharing another super adorable gnome from KLM Digital Designs November release called Mistletoe Santa Gnome. The image comes with 3 different sentiments, “Merry Christmas”, which I’ve used on my card and also, “Believe” and “ho-ho-ho”. This Santa gnome is out taking a stroll and enjoying the magic of Christmas and winter.

I decided to colour this Santa in non-traditional colours. To make the card, I printed out the main image onto Copic Marker X-Press It Blending Card using my HP Printer. I used my Brother Scan and Cut to cut around the image and coloured it in with Copic markers. Then I applied Nuvo Glitter Accents – Fresh Snowfall to the all of the trimming and set it aside to dry.

I used AC White paper to create the base shape of the card 6″ x 6″. Then I applied Stampin’ Up – Snowflake Splendor Designer Series Paper cut to the same size directly to the base. I had a spare cut-out from American Crafts – “Holiday” paper in which I had used My Creative Time -Stitched Squares Inside and Out to die cut the centre. I trimmed it a little bit on all sides to create a border. I took a small scrap of Recollections – Christmas Inkjet Printable Glitter Paper and tore it across the top to imitate snow caps. This I adhered to the back of the die-cut panel. Then, I glued the entire piece down on to the background. I also made sure that I didn’t use any glue towards the tops of the snow.

The sentiment was brought into Microsoft Word and I adjusted the width to be .95″. This allowed me to use the 1″ die from Lifestyle Crafts Cutting Dies – Nesting Circles to die cut the sentiment after it was printed out. I inked around the edges of the sentiment with Tim Holtz Distress Inks – Peacock Feathers and applied Clear – Wink of Stella over top of it to make it sparkle. The snowflakes were all die cut from Signature Collection by Sara Davies – Winter Wonderland Snowflake Quartet.

The remainder of the card was now ready to put together. I glued the Gnome directly to the background paper and moved it slightly under the snow. I added glue to each of the snowflakes and placed them directly onto the backgrounds. Lastly, I popped up the sentiment with 3M VHB – 2 sided tape.

Card Recipe:

Stamp and Sentiment: Mistletoe Santa Gnome (KLM Digital Designs)

Inks: HP Printer Grayscale, Tim Holtz Distress Inks – Peacock Feathers

Paper: Copic Marker X-Press It Blending Card, Stampin’ Up – Snowflake Splendor Designer Series Paper, Recollections – Christmas Inkjet Printable Glitter Paper – 8.5 x 11″, American Crafts – “Holiday” 6 x 6 in. (15.2 cm x 15.2 cm)

Die Cut: My Creative Time -Stitched Squares Inside and Out, Lifestyle Crafts Cutting Dies – Nesting Circles, Signature Collection by Sara Davies – Winter Wonderland Snowflake Quartet

Tools: 3M VHB – 2 sided tape, Clear – Wink of Stella, Nuvo Glitter Accents – Fresh Snowfall, Gelly Roll Sakura #8 Pen, Cuttlebug

Image coloured with Copic Markers:

Skin: E000, E00, E04, E11, E21

Beard: W4, W3, W2, W1, W0, W00

Hat and Coat: BG49, BG18, BG15, BG13, BG11, Gelly Roll Sakura #8 Pen

Mitts: BG78, BG75, BG72

Holly, Pine Needles and Berries: R59, R35, G46, G43, G29, YG01, Gelly Roll Sakura #8 Pen

Hope you like it and have a great week!

Check out KLM Designs for some great savings this month.

Offer good until 12/07/20
25% OFF ALL PHOTOPOLYMER STAMPS
USE COUPON CODE: BLACKFRIDAY

You can find more cards to inspire you at KLM Designs, KLM Digital Design Team and KLM Digital Designs on the Facebook Fan page from the rest of our design team.

Gobble Till You Wobble!!


Our American friends are celebrating Thanksgiving this week and I couldn’t resist sharing this adorable little Harvest I Gnome from KLM Digital Designs new November release. The image comes with 3 different sentiments, “Gobble ‘Til You Wobble”, which I’ve used on my card and also, “Seasons of Thanks” and “Give Thanks”.

I decided to make this card a fun easel card. I love the little gnome and the sentiment that came with it. Here is a close-up of the gnome.

To make the card, I printed out the main image onto Copic Marker X-Press It Blending Card using my HP Printer. I used my Brother Scan and Cut to cut around the image and coloured it in with Copic markers.

I used Hammermill paper to create the base shape of the card 8.5″ x 4.25″. I scored the paper at 5.5″ and 8.25″.  I also, cut some Hammerill paper to be 5.5″ x 4.25″. I cut the Gnome background paper to the same size using PhotoPlay – Gnome for the Holidays Thanksgiving. I also used this same paper for the inside of the card. The oval was die cut using my Cuttlebug and Elizabeth Craft – Accordian Circle Card 769 using Pebbles – Harvest paper. The sentiment was die cut with My Creative Time – Rectangle Frame Dies. Tim Holtz Distress Ink – Carved Pumpkin ink was used to ink around all of the edges of the pieces.

The card was now ready to put together. I adhered the Gnome background paper to the Hammermill 5.5″ x 4.25″ separate piece that was cut earlier. The Pebbles – Harvest paper was attached to the inside of the card. I popped up the oval background with 3M VHB – 2 sided tape.

To finish off the card, I added a added an Action Wobble Spring, so that this little Harvest Gnome could gobble till he wobbled. LOL!

Card Recipe:

Stamp and Sentiment: Harvest I Gnome (KLM Digital Designs)

Inks: HP Printer Grayscale, Tim Holtz Distress Ink – Carved Pumpkin

Paper: Copic Marker X-Press It Blending Card, Hammermill – Premium Colour 100 lb., PhotoPlay – Gnome for the Holidays Thanksgiving, Pebbles – Harvest 6″x6″ (15.2×15.2 cm)

Die Cut: Elizabeth Craft – Accordian Circle Card 769, My Creative Time – Rectangle Frame Dies

Tools: 3M VHB – 2 sided tape, Action Wobble Spring

Image coloured with Copic Markers:

Skin: E000, E00, E04, E11, E21

Beard: E08, YR18, YR15, YR12

Hat and Coat: E79, E77, E74, T7, T5, T3

Straw: Y35, YR21, YR20

Pumpkin and Stem: E08,YR18, YR16, YR12, Y08

Vegetables and Fruit: V28, V25, V22, E87, E84, YG93, YG63, YG61, YG25, YG11, YG01, YG00, G28, YR24, YR23, R27, R14, Y18

Leaves, Vines and Acorn: YG23, YG17, YG13, YG11, YG03, G28,  YR14, R14, YR23, YR24, E97, E93, E87, E84, E37, E35, E33

Box Container: E57, E55, E53

Hope you like it and have a great week!

Check out KLM Designs for some great savings this month.

Wrap up your holiday cards! Offer good until 11/27/20
25% OFF ALL DIGITAL STAMPS
USE COUPON CODE: PRETURKERY

You can find more cards to inspire you at KLM Designs, KLM Digital Design Team and KLM Digital Designs on the Facebook Fan page from the rest of our design team.

Nutcracker – Seasons Greetings!!!


It’s Wednesday, and this week I’m sharing a Christmas card featuring Nutcracker – M104 from (High Hopes Rubber Stamps) paired with the sentiment Seasons Greetings – F300A (High Hopes Rubber Stamps). It’s always fun to use Nutcrackers at Christmas time, that is if your parents let you play with them? LOL! Do you use your nutcrackers if you have one or are they strictly for decoration?

To create the card this week, I stamped the main image using my MISTI and Memento – Tuxedo Black ink onto Copic Marker X-Press It Blending Card. Then I die cut the image using Creative Expression Craft Dies by Sue Wilson – Noble Dies – Double Pierced Ovals and my Cuttlebug. The image was then coloured in with Copic Markers.

I stamped the sentiment using VersaMark Ink and then embossed it with Ranger – Super Fine Gold Embossing Powder. This was then heated using my Marvy Uchida – Embossing Heat Tool.  I used the same die cuts to cut the remaining ovals. I used PhotoPlay – Christmas Memories for the main background paper and cut it to 6″ x 6″. I edged around the main background, background patterned oval and sentiment with Tim Holtz Distress Ink – Mowed Lawn. To create the ribbon, I used some scrap red cardstock, Crafts – Sparkling Stickers – 02-3068629 – Gold and white cardstock. For the Sparkling stickers, I first attached the paper to some white cardstock to give it more stability. Once the pieces for the ribbons were created, I ran all of them through my Xyron Create a Sticker to make it easier to adhere the layers to each other.

The card was now ready to assemble, I attached the main background to a card base of 6″ x 6″. I layered all of the rectangles to create my ribbon and also added the sentiment to this ribbon as well. I then placed this directly onto the base card. The ovals were all popped up using 3M VHB – 2 sided tape.

Card Recipe:

Stamp: Nutcracker – M104 (High Hopes Rubber Stamps)

Sentiment: Seasons Greetings – F300A (High Hopes Rubber Stamps)

Inks: Memento – Tuxedo Black, VersaMark, Tim Holtz Distress Ink – Mowed Lawn

Paper: Copic Marker X-Press It Blending Card, Hammermill – Premium Colour 100 lb., Crafts – Sparkling Stickers – 02-3068629 – Red, PhotoPlay – Christmas Memories (6″x6″), Crafts – Sparkling Stickers – 02-3068629 – Gold

Die Cuts: Creative Expression Craft Dies by Sue Wilson – Noble Dies – Double Pierced Ovals

Embossing Powder: Ranger – Super Fine Gold Embossing powder

Tools and Miscellaneous: MISTI – Most Incredible Stamping Tool, Cuttlebug, Marvy Uchida – Embossing Heat Tool, Xyron Create a Sticker

Image coloured with Copic Markers:

Skin: E21, E11, E04, E00, E000, R22, R21, R20, C1

Hair and Beard: E49, E47, E44, E43

Hat and Outfit: R59, R39, R37, R35, G99, G21, YG67, YG17, E15, Y35, YR24, Y08, Yellow gem

Boots: C10, C8, C7, C6, C5, C3

Hope you like it and have a fantastic week!

You can find lots of inspiration from the Design Team Divas at the High Hopes blog, and the High Hopes Rubber Stamps Facebook Fan page plus you can also follow us on
Instagram, Twitter and Pinterest.

Sending You Tidings


Today, I’m featuring a Christmas card by Dreamerland Crafts using their stamp set called Sending You Tidings – D19072. Growing up in the North, we used to get a lot of snow. I always love looking out the window and seeing the snow fall and how beautiful it looks on the houses and trees. Driving in it, not so much, but everything else about winter, I love. LOL!

To make this card, I cut some Copic Marker X-Press It Blending Card to the size of 4.75″ x 3.5″ using my Cuttlebug and My Creative Time – Rectangle Frame Layers Dies. Then using my MISTI and Memento – Tuxedo Black, I stamped the image first onto the paper and then again on to Post-It Note to create a mask. I fussy cut around the mask and placed it to the side to use a little later. I then proceeded to colour in my image with Copic markers.

Once the colouring of the image was complete, I was ready to create the sky. To accomplish this, the mask that I had set aside earlier was placed over top of the coloured image. A mixture of Tim Holtz Distress Inks were then used: Black Soot, Chipped Sapphire, Blueprint Sketch and Dusty Concord inks. Once, the background was completed, I stamped the sentiment from the same stamp set using my MISTI and VersaMark ink. The sentiment was then embossed with Ranger Embossing Powder White – Extra Fine Detail and Marvy Uchida – Embossing Heat Tool was used to heat set the embossing powder.

I was now ready to add the final finishing touches. To do this, I added in the snowflakes and stars using Gelly Roll Sakura #10, #8 and #5 Pens. Stickles – Cool Mint was added to the little lady’s hat, pom-pom and coat cuffs. Gina K Designs – Glitz Glitter Gel was applied with a spatula along the bottom of the card to create some sparkling snow and also to the top of the chimney with a Q-Tip. I also coloured in the little snowflake in the sky with Gelly Roll Sakura #10 pen and then Gelly Roll Stardust – Clear to make it sparkle. I set the card aside to let the glitter dry for a few hours.

For the card base I used Recollections – Winter 4.25″ x 5.5 and edged around all of the sides with Tim Holtz Distress Ink – Iced Spruce. I die cut Hot Buy Craft Smart – Holiday Glitz Glitter Paper to the size 3.75″ x 5″ using My Creative Time – Rectangle Frame Dies and Cuttlebug. This was adhered directly onto the base using 3M VHB – 2 sided tape. Once the glitter was completely dry, I layered the completed image on top of the second layer using 3M VHB – 2 sided tape.

Card Recipe:

Stamp and Sentiment:  Sending You Tidings – D19072 (Dreamerland Crafts)

Inks: Memento – Tuxedo Black, VersaMark, Tim Holtz Distress Ink – Black Soot, Tim Holtz Distress Ink – Chipped Sapphire, Tim Holtz Distress Ink – Blueprint Sketch, Tim Holtz Distress Inks – Dusty Concord, Tim Holtz Distress Ink – Iced Spruce

Paper: Copic Marker X-Press It Blending Card, Hammermill – Premium Colour 100 lb., Hot Buy Craft Smart – Holiday Glitz Glitter Paper 12″ x 12″, Recollections – Winter 4.25″ x 5.5″ (Assorted Box of Cards)

Embossing Powder: Ranger Embossing Powder White – Extra Fine Detail

Die Cuts: My Creative Time – Rectangle Frame Die Layers – MCT-D274, My Creative Time – Rectangle Frame Dies

Tools: MISTI – Most Incredible Stamping Tool, Marvy Uchida – Embossing Heat Tool, Stickles – Cool Mint, Gelly Roll Sakura #8 Pen, 3M VHB – 2 sided tape, Cuttlebug

Image coloured with Copic Markers:

Face: E21, E11, E04, E00, E000, R22, R20, Eyes – Sakura Glaze – Black

Hair: E47, E44, E43

Hat, Jacket, Mitts, Bear’s Scarf:  BG49, BG15, BG13, BG11, Stickles – Cool Mint

Leggings: C7, C5

Boots: E27, E25, E23, E21

Bear: E35, E34, E33, E31, E30, R22, R20, Eyes and Noses – Sakura Glaze – Black

Bow and Girl’s Scarf: R59, R39, R37, R35

Present: Y17, Y15, Y08, Y04

Chimney: E99, E97, E08, E07, E13, C4, C2

Snow: Gina K Designs – Glitz Glitter Gel, Gelly Roll Sakura #8 Pen, Gelly Roll Sakura #5 Pen

Hope you like it and have a great week!

You can find more cards to inspire you at Dreamerland Crafts and Pointer Scrapbooking on the Facebook Fan pages from the rest of our design team.

HoHoHoHoHo!!


Today I’m sharing  Santa Gnome (KLM Digital Designs) image from the new November release. This adorable little Gnome comes with 3 different sentiments. “Believe In The Magic”, “Happy Holidays” and “Christmas Blessing”.

I printed out the main image onto Copic Marker X-Press It Blending Card using my HP Printer. I used my Brother Scan and Cut to cut around the image and coloured it in with Copic markers. The background was die cut using Hot Buy Craft Smart – Holiday Glitz Glitter Paper and Hammermill – Premium Colour 100 lb. paper. I coloured the vines and leaves from the Hammermill die cut with various Tim Holtz Distress inks listed below and then fussy cut them out. Glue was applied to the reverse side of the die cut and then it was placed on top of the original Glitz Paper die cut. Crafts – Self-Adhesive Rhinestones were then applied to the berries on the vine.

For the background, I used the Hammermill paper to create a card base of 5.5″ x 4.25″. Then I applied Crafts – Sparkling Stickers red paper to the base. I then adhered the vine and frame directly to the background using glue. Lastly, I die cut the sentiment 5 times using black cardstock and the 1 time with Tonic Studios – Craft Perfect – Onyx Black Pearlescent. I ran all off the die cuts through my Xyron Create a Sticker to make it easier to apply them on top of each other. This created an embossed effect. I then added this on top of the vine base. The main image was then added to the card using 3M VHB – 2 sided tape.

To finish off the card, I added some Marvy – Liquid Applique to the big pom-pom and heat set it with my Marvy Uchida – Embossing Heat Tool to puff it up. Lastly, some Stickles – Frosted Lace was added to the hat, cuffs and coat trim.

Card Recipe:

Stamp: Santa Gnome (KLM Digital Designs)

Inks: HP Printer Grayscale, Tim Holtz Distress Ink – Evergreen Bough, Tim Holtz Distress Ink – Mowed Lawn, Tim Holtz Distress Ink – Pine Needles

Paper: Copic Marker X-Press It Blending Card, Hammermill – Premium Colour 100 lb., Tonic Studios – Craft Perfect – Onyx Black Pearlescent, Hot Buy Craft Smart – Holiday Glitz Glitter Paper 12″ x 12″, Crafts – Sparkling Stickers – 02-3068629

Die Cut: Poppystamps – Holly Vine Sidekick Frame – Christmas Craft Die

Tools: 3M VHB – 2 sided tape, Stickles – Frosted Lace, Marvy – Liquid Applique, Crafts – Self-Adhesive Rhinestones – 02-3006207, Xyron Create a Sticker, Marvy Uchida – Embossing Heat Tool

Image coloured with Copic Markers:

Skin: E000, E00, E04, E11, E21

Beard: W3, W2, W1, W0, W00

Hat and Coat: E59, E39, E37, E35, Stickles – Frosted Lace, Marvy – Liquid Applique

Mitts: YG67, YG63, G28

Holly Leaves and Stems: Tim Holtz Distress Ink – Evergreen Bough, Tim Holtz Distress Ink – Mowed Lawn, Tim Holtz Distress Ink – Pine Needles, Atayou Spica – Twinkling Like The Stars – Melon – 06, Atayou Spica – Twinkling Like The Stars – Mint – 17, Atayou Spica – Twinkling Like The Stars – Olive – 07

Hope you like it and have a great week!

Check out KLM Designs for some great savings this month.

Wrap up your holiday cards! Offer good until 11/27/20
25% OFF ALL DIGITAL STAMPS
USE COUPON CODE: PRETURKERY

You can find more cards to inspire you at KLM Designs, KLM Digital Design Team and KLM Digital Designs on the Facebook Fan page from the rest of our design team.

Santa in the Chimney!!!


It’s Wednesday, and this week I’m sharing a Christmas card featuring Santa in Chimney – S202 from (High Hopes Rubber Stamps) paired with the sentiment Bold – From One Flake – K201 (High Hopes Rubber Stamps). December is almost here and Santa is on his way to deliver all of the goodies to everyone. Hope your not on the naughty list. LOL!

To create the card this week, I stamped the main image and then coloured it in with Copic Markers. I stamped the image again and used it as a mask. I have a magnetic cutting mat, so I just used a very strong magnet to hold the mask down. Then I used multiple Tim Holtz Distress Inks to create the sky.

Once the sky was created, I removed the mask and used My Creative Time – Rectangle Frame to die cut the image. I added the sentiment using the top half of the sentiment stamp only. To do this, using my MISTI to get a good clean stamped image, I used VersaMark Ink and then embossed it with Ranger Embossing Powder White – Extra Fine Detail. This was then heated using Marvy Uchida – Embossing Heat Tool.

To finish off my background, I added in some snowflakes and stars using Gelly Roll Sakura #10 Pen and Gelly Roll Sakura #5 Pen. For the eyes and notches on the belt, Sakura Glaze – Black ink was used. For the snow on the roof top, Gina K Designs – Glitz Glitter Gel was applied with a little sprinkle of Martha Stewart Crafts – Crystal Fine Glitter. Stickles was added to the hat, collar and cuffs of Santa’s outfit.

To create the layers, I first die cut Hot Buy Craft Smart – Holiday Glitz Glitter Paper with My Creative Time – Rectangle Frame Layers and then the dark blue panel with My Creative Time – Rectangle Frame dies. For the card, I used Hammermill – Premium Colour 100 lb. paper, which was cut at 8.5″ x 5.5″ and then scored at 4.25″ and to create a base card of 4.25″ x 5.5″.

To assemble the remainder of the card. I placed the dark blue layer directly to the base using double-sided tape. The silver layer was applied the same way. The coloured image was then popped up using 3M VHB – 2 sided tape.

Card Recipe:

Stamp: Santa in Chimney – S202 (High Hopes Rubber Stamps)

Sentiment: Bold – From One Flake – K201 (High Hopes Rubber Stamps)

Inks: Memento – Tuxedo Black, Tim Holtz Distress Inks – Black Soot, Dusty Concord, Blueprint Sketch and Chipped Sapphire, VersaMark

Paper: Copic Marker X-Press It Blending Card, Hot Buy Craft Smart – Holiday Glitz Glitter Paper 12″ x 12″, Dark Blue Cardstock, Hammermill – Premium Colour 100 lb.

Die Cuts: My Creative Time – Rectangle Frame Layers, My Creative Time – Rectangle Frame Dies

Embossing Powder: Ranger Embossing Powder White – Extra Fine Detail

Glitter: Martha Stewart Crafts – Crystal Fine Glitter, Gina K Designs – Glitz Glitter Gel, Stickles

Tools and Miscellaneous: MISTI – Most Incredible Stamping Tool, Cuttlebug, Marvy Uchida – Embossing Heat Tool

Image coloured with Copic Markers:

Skin: E21, E11, E04, E00, E000, R22, R21, R20

Hair: W3, W2, W1, W00

Hat and Outfit: R59, R39, R37, R35

Belt: C9, C7, C5, C4, E15, YR24, Y35, Y08

Mitts: C9, C7, C4

Sack: G94, G28, G09, G07, G05, YG67, YG63, YG61

Chimney: E99, E97, E13, E08, T5, T3, T1

Hope you like it and have a fantastic week!

You can find lots of inspiration from the Design Team Divas at the High Hopes blog, and the High Hopes Rubber Stamps Facebook Fan page plus you can also follow us on
Instagram, Twitter and Pinterest.

Winter Wonderland


Sharing a card I made from the Kit and Clowder October 2020 Markers Class called “Winter Wonderland”. I really love snow and nature and this class combined both of those loves for me. The class challenged me in a lot of ways, but I am so happy with the final results. I decided to turn this finished image into a Christmas card.

Alyce is such a wonderful instructor as she takes you through chapter by chapter breaking down everything and she is very easy to follow. I am sure that I will be doing this class a few more times. One for more practice and two because I LOVE this image so much! LOL!

To complete the card, I ran the image through my Xyron Creative Station to change it into a sticker as I wanted it lay completely flat on the black cardstock that I was adhering it to. I stamped out the sentiment using the stamp from Rosewood Frog’s Whiskers Ink called May Your Christmas – G1089 with VersaMark ink and then used Ranger Embossing Powder White – Extra Fine Detail. This was then heated with my Marvy Uchida – Embossing Heat Tool. I just thought this sentiment went so well with the image.

I cut some AC White Cardstock and scored it to be 6″ x 6″. Then I added some glue to the back panel of my image and mounted it directly to the base. I used 3M VHB – 2 sided tape to pop up the sentiment and then added some embellishments to complete the card.

Card Recipe:

Stamp: Deer Scene – Kit and Clowder Class (LeeHollandArt)

Sentiments: May Your Christmas – G1089 (Rosewood Frog’s Whiskers Ink)

Class Videos: Kit and Clowder October 2020 Markers Class called “Winter Wonderland”

Hope you like it and have a great week!

Little Cup of Cocoa


Coffee Loving Cardmakers is currently hosting the 2020 Fall / Winter Coffee Lovers Blog Hop! For my Fourth entry into this hop, I chose this loveable snowman in a hot tub of Cocoa called Snow Yummy – S182  by High Hopes Rubber Stamps. For the sentiments I used High Hopes Rubber Stamps, Cup of Cocoa – M009 and Holiday All Year – H200.

The image was stamped with Memento – Tuxedo Black ink onto Copic Marker X-Press It Blending Card using my MISTI to give me a nice clean image. The image was coloured with copic markers and then I fussy cut around it. I used a black marker to go around all of the edges where I had cut out the image.

I cut Hammermill – Premium Colour 100 lb. paper to be 4.25″ x 11″. Then I scored the paper at 5.5″ and again at 8.25″. (2.75″ from the original score line). I cut another piece of the cardstock at 4.25″ x 5.5″ to be the front panel. I then cut Stampin’ Up – Snowflake Splendor Designer Series Paper to be 4.25″ x 5″ and used double-side tape to place it directly to the front panel piece. Hot Buy Craft Smart – Holiday Glitz Glitter Paper was used to create the snow. I cut it 4.25″ wide and then just tore a piece across the width to create the shape. I used double-sided tape to adhere this directly to the bottom of the front panel.

The sentiments were then added with Versa Fine – Onyx Black and embossed with Ranger – Clear Super Fine Detail embossing powder. This was then heat set with Marvy Uchida – Embossing Heat Tool. To create the rectangles, I used  My Creative Time – Rectangle Frame Layers  for the patterned paper and My Creative Time – Rectangle Frame Dies for the background rectangle using Hot Buy – Recollections – Jewel Tones. Next, I ran the small sentiment and the coloured image through my Xyron Creative Station to create stickers out of them. This made it easer to adhere the larger image to the background and the smaller sentiment to the larger rectangle.

The card was now ready to assemble. I applied double-sided tape to only the lower half of the scored card and then placed the finished scene panel onto it. I cut another piece of patterned paper at 4-1/8″ x 3″ and adhered it the lower half of the inside card. Then I popped up the sentiment using 3M VHB – 2 sided tape. I added some Wink of Stella – Clear  to the snowman to make him sparkle and Gelly Roll Stardust – Clear and the Wink of Stella – Clear to the large snowflake on the mug. Lastly, I added some Stickles – Diamond to add some texture to the snow.

Card Recipe:

Stamp: Snow Yummy – S182 (High Hopes Rubber Stamps)

Sentiments: Cup of Cocoa – M009 (High Hopes Rubber Stamps)Holiday All Year – H200 (High Hopes Rubber Stamps)

Inks: Memento – Tuxedo Black, Versa Fine – Onyx Black

Embossing Powder: Ranger – Clear Super Fine Detail embossing powder

Paper: Copic Marker X-Press It Blending Card, Hammermill – Premium Colour 100 lb., Stampin’ Up – Snowflake Splendor Designer Series Paper, Hot Buy Craft Smart – Holiday Glitz Glitter Paper 12″ x 12″

Die Cuts: My Creative Time – Rectangle Frame Layers, My Creative Time – Rectangle Frame Dies

Tools: MISTI – Most Incredible Stamping Tool, Cuttlebug, 3M VHB – 2 sided tape, Xyron Creative Station, Wink of Stella – Clear, Stickles – Diamond

Image coloured with Copic Markers:

Snowman: B60, BG000, YR18, YR14, Y08, C9, N8, N5, R30, R27, R24, R22, R20, Colorless Blender, Wink of Stella – Clear

Mug and Hot Cocoa: E23, E25, E27, B37, B14, B12, Wink of Stella – Clear and Gelly Roll Stardust – Clear

Hat and Scarf: C9, C7, C5, R59, R39, R37, R35

Hope you like it and have a great week!

My Cup of Tea


Coffee Loving Cardmakers is currently hosting the 2020 Fall / Winter Coffee Lovers Blog Hop! For my third entry into this hop, I chose the adorable stamp You’re a Squeak Heart  (Kraftin’ Kimmie Stamps) and die cut from My Creative Time – You Deserve A Break (Retired).

The image was coloured with copic markers. I coloured in the image and then fussy cut around it. For the tea cup die, I folded the base cardstock in half and then put the My Creative Time – You Deserve A Break die slightly over the edge. I die cut the cup once again, this time using the paper from Your Next Stamp – The Perfect Blend Designer Paper. I edged around the tea cup with Tim Holtz Distress Ink – Evergreen Bough. Then I glued the background paper on top of the base and also glued on the other tea cup die cuts.

For the little tag, I first stamped the sentiment with Versa Fine – Onyx Black and then embossed it with Ranger – Clear Super Fine Detail embossing powder. This was then heat set with Marvy Uchida – Embossing Heat Tool. I then cut the tags using My Creative Time – Little Gift Tags (Retired) die cuts. Lastly, the sentiment and coloured image were popped up using 3M VHB – 2 sided tape.

Card Recipe:

Stamp and Sentiment: You’re a Squeak Heart (Kraftin’ Kimmie Stamps)

Inks: Memento – Tuxedo Black, Tim Holtz Distress Ink – Evergreen Bough, Versa Fine – Onyx Black

Embossing Powder: Ranger – Clear Super Fine Detail embossing powder

Paper: Copic Marker X-Press It Blending Card, Your Next Stamp – The Perfect Blend (6″ x 6″), Green and White cardstock

Die Cut: My Creative Time – You Deserve A Break (Retired), My Creative Time – Little Gift Tags (Retired)

Tools: MISTI – Most Incredible Stamping Tool, Cuttlebug, 3M VHB – 2 sided tape

Image coloured with Copic Markers:

Mouse: W7, W5, W3, RV14, RV13

Tea Cup and Tea: E35, E34, E33, BG15, BG13, BG11

Hope you like it and have a great week!

Hug in a Mug!


Coffee Loving Cardmakers is currently hosting the 2020 Fall / Winter Coffee Lovers Blog Hop! For my second entry into this hop, I chose the adorable stamp from (My Creative Time) called Cute Mugs – MCT326. 

To create this card, I first used my Cuttlebug and My Creative Time – Bunch of Fun Circle Dies to cut Copic Marker X-Press It Blending Card paper. The image was stamped onto the die-cut with Memento – Tuxedo Black using my MISTI – Most Incredible Stamping Tool to get a nice clean image. I coloured in the image with Copic markers and then stamped the image again on the same paper that I used for the background and fussy cut around the tea-cup piece. I used a black marker to go around the edges and then paper-pieced it into place using some glue. I die cut the sign using Spellbinders – Shapeabilities S4-322 Grommet Tags and also the background circle using some scrap yellow paper. The sentiment was then stamped on using Versa Fine – Onyx Black ink and Ranger – Clear Super Fine Detail Embossing Powder was applied on top. Then, I used Marvy Uchida – Embossing Heat Tool to heat emboss the powder. I also die cut some red hearts with the die-cut that came with the stamp set.

I cut the background pattern from My Mind’s Eye – Lost and Found paper and then used Tim Holtz Distress Ink – Antique Linen to go around the edges. I also used this ink to go around all of my other die cuts.

The card was now ready to assemble. I adhered the background to a base card of 6″ x 6″. Then using 3M VHB – 2 sided tape, I popped up the 2 circles and sign. I added a couple of brads to the sign before adding the tape. I ran the hearts through my Xyron Create a Sticker to make them into stickers and added them around the kitty to complete my card.

Card Recipe:

Stamp: Cute Mugs (My Creative Time)

Inks: Memento – Tuxedo Black, Versa Fine – Onyx Black, Tim Holtz Distress Ink – Antique Linen

Paper: Copic Marker X-Press It Blending Card, Hammermill – Premium Colour 100 lb., My Mind’s Eye – Lost and Found

Die Cuts: My Creative Time – Bunch of Fun Circle Dies

Embossing Powder: Ranger – Clear Super Fine Detail

Tools and Miscellaneous: MISTI – Most Incredible Stamping Tool, Marvy Uchida – Embossing Heat Tool, 3M VHB – 2 sided tape, Xyron Create a Sticker

Image coloured with Copic Markers:

Kitten: C9, C7, C5, C3, 100, R30, R20

Mug and Saucer: E53, E51, E50, Atayou Spica – Gold 11, Paper-Piercing – My Mind’s Eye – Lost and Found

Saucer: BG15, BG11, BG10, BG000

Spoon and Cocoa: C5, C3, C1, E39, E37, E35

Marshmallows and Whipped Cream: C1, C0, Y32, Y23, Y21, Colorless Blender

Hope you like it and have a fantastic week!

Entered into these challenges:

2020 Fall / Winter Coffee Lovers Blog Hop! #fallwinter2020clh

Christmas Joy!


It’s Wednesday, and this week I’m sharing a Christmas card featuring Christmas Joy Snowy – S228 from (High Hopes Rubber Stamps). I love snowmen, winter and Christmas! Growing up in a northern community, we had a lot of snow. It was always so much fun and seeing the snow fall on Christmas day was always wonderful. Where we live now, we don’t get as much and it’s always disappointing when we don’t see snow on the ground for Christmas. It’s ok for the other days, but Christmas is extra special. Hopefully, Christmas Joy Snowy will bring some snow for us this year on our special day. LOL!

To create the card this week, I first used my Cuttlebug and Creative Expressions by Sue Wilson – Festive Collection Peeking Snowflake to create a die cut out of Copic Marker X-Press It Blending Card paper. I stamped the image and then coloured it in with Copic Markers. Once it was all coloured in, I added added some snowflakes to the sky using Gelly Roll Sakura #10 Pen. Clear – Wink of Stella was applied to all of the leaves. Stickles – Diamond was added to create the ground snow effect and I sprinkled some Martha Stewart Crafts – Crystal Fine Glitter on top of the Stickles while it was still wet. The coloured image was set aside to let it dry.

I die cut the larger oval using the same dies out of Crafts – Thick Glitter Craft Paper. I love this paper, but in order to prevent the glitter from getting everywhere, I first sprayed it with some hairspray.

The card was now ready to assemble. I used Recollections – Winter 4.25″ x 5.5″ card for my base. The large oval was adhered directly onto the base using 2-sided tape. The main image was added using 3M VHB – 2 sided tape and some snowflake embellishments were added to complete the card.

Card Recipe:

Stamp: Christmas Joy Snowy – S228 (High Hopes Rubber Stamps)

Inks: Memento – Tuxedo Black

Paper: Copic Marker X-Press It Blending Card, Crafts – Thick Glitter Craft Paper 02-302270, Recollections – Winter 4.25″ x 5.5 (Assorted Box of Cards)

Die Cut: Creative Expressions by Sue Wilson – Festive Collection Peeking Snowflake

Stickles: Diamond

Tools and Miscellaneous: MISTI – Most Incredible Stamping Tool, Marvy Uchida – Embossing Heat Tool, Cuttlebug, Clear – Wink of Stella, 3M VHB – 2 sided tape

Image coloured with Copic Markers:

Snowman: B60, B0, B00, R22, R20, Colorless Blender

Jacket and Hat: B39, B32, B28, B24, B23, B21

Buttons: E15, YR24, Y35, Y08

Mitts and Scarf: BG57, BG53, BG49, BG13, BG11, BG10

Holly and Leaves: G99, YG67, YG17, YG01, G21, R39, R37, Gelly Roll Sakura #5 Pen

Nose: E08, YR18, YR16, YR12

Background: B60, B04, B02, B00, B000, BV20, Stickles – Diamond, Gelly Roll Sakura #10 Pen, Martha Stewart Crafts – Crystal Fine Glitter

Hope you like it and have a fantastic week!

You can find lots of inspiration from the Design Team Divas at the High Hopes blog, and the High Hopes Rubber Stamps Facebook Fan page plus you can also follow us on
Instagram, Twitter and Pinterest.

Hot Cocoa Hugs!


Coffee Loving Cardmakers is currently hosting the 2020 Fall / Winter Coffee Lovers Blog Hop! For my first entry into this hop, I chose the adorable #YNS (Your Next Stamp) called Hot Cocoa Hugs – CYNS491 I couldn’t resist these adorable little mice. Winter is coming and who doesn’t love hot chocolate???

Stamped the image onto Copic Marker X-Press It Blending Card with Memento – Tuxedo Black using my MISTI – Most Incredible Stamping Tool, cut at 5.5″ x 4.25″. The image was coloured with Copic Markers and then I created a mask and put it over top of the coloured image.

I used Tim Holtz Distress Ink – Evergreen Bough, Tim Holtz Distress Ink – Cracked Pistachio and Tim Holtz Distress Inks – Peacock Feathers to create my background and then removed the mask. I used the Bookmark and Tags Die Set (Whimsy Stamps) to die cut the Copic Marker X-Press It Blending Card and then used the Tim Holtz inks to colour it and go around the edges. The sentiment was then stamped on using Versa Fine – Onyx Black ink and Ranger – Clear Super Fine Detail Embossing Powder was applied on top. Then, I used Marvy Uchida – Embossing Heat Tool to heat emboss the powder.

To complete the assembly, I attached the finished image with double-sided tape to my base card of 5.5″ x 4.25″, which was made using Hammermill – Premium Colour 100 lb. paper. Lastly, I added a few mini round gems.

Card Recipe:

Stamp: Hot Cocoa Hugs – CYNS491 (Your Next Stamp)

Inks: Memento – Tuxedo Black, Versa Fine – Onyx Black, Tim Holtz Distress Ink – Evergreen Bough, Tim Holtz Distress Ink – Cracked Pistachio, Tim Holtz Distress Inks – Peacock Feathers

Paper: Copic Marker X-Press It Blending Card, Hammermill – Premium Colour 100 lb.

Die Cut: Bookmark and Tags Die Set (Whimsy Stamps)

Embossing Powder: Ranger – Clear Super Fine Detail

Tools and Miscellaneous: MISTI – Most Incredible Stamping Tool, Marvy Uchida – Embossing Heat Tool, Recollections – Boutique Fleur – Mini Round Gems

Image coloured with Copic Markers:

Mice: W4, W2, W0, R30, R22, R02, R01, Nose and Eyes – Sakura Glaze – Black, Gelly Roll Sakura #5 Pen

Mug: BG57, BG53, BG49

Saucer: BG15, BG11, BG10, BG000

Spoon and Cocoa: C5, C3, C1, E39, E37, E35

Marshmallows and Whipped Cream: C1, C0, Y32, Y23, Y21, Colorless Blender

Hope you like it and have a fantastic week!

Entered into these challenges:

2020 Fall / Winter Coffee Lovers Blog Hop! #fallwinter2020clh

Small Seeds of Gratitude!!


Today I’m sharing  Harvest II Gnome (KLM Digital Designs) image from the November release. This adorable little Gnome comes with 3 different sentiments. One of them, I have used here. The others are “You are the Pumpkin to my pie” and “For the cutest Pumpkin in the patch”. Happy Thanksgiving to all of our American friends from Canada!

I printed out the main image onto Copic Marker X-Press It Blending Card and the sentiment on to Recollections white paper using my HP Printer. I used my Brother Scan and Cut to cut around the image and coloured it in with Copic markers. The sentiment was inked around the edges with Tim Holtz Distress Ink – Carved Pumpkin. I ran the coloured image and the sentiment through my Xyron Creative Station to make them into stickers and then attached both of them to some Recollections black cardstock. I used my small cutter to cut a small border around the sentiment and fussy cut the small border around the image.

The patterned background is from Echo Park – Happy Fall. I cut it to be 5.5″ x 2″ and then inked around the edges with Tim Holtz Distress Ink – Carved Pumpkin. The card was now ready to assemble. I started out with a white base of 5.5″ x 4.25″. I attached the patterned background directly to the base using double-sided tape. Then I glued the image onto the base. The sentiment was popped up  using 3M VHB – 2 sided tape. To finish off the card, I added in some Kraftin’ Kimmie – Pastel Dots.

Card Recipe:

Stamp and Sentiments: Harvest II Gnome (KLM Digital Designs)

Inks: HP Printer Grayscale, Tim Holtz Distress Ink – Carved Pumpkin

Paper: Copic Marker X-Press It Blending Card, Echo Park – Happy Fall (6″ x 6″), Hammermill – Premium Colour 100 lb., Recollections – White, Recollections – Black

Tools: 3M VHB – 2 sided tape, Kraftin’ Kimmie – Pastel Dots, Xyron Creative Station

Image coloured with Copic Markers:

Skin: E000, E00, E04, E11, E21

Beard: W5, W4, W3, W2, W1, W0, W00

Hat: E87, E84, E81, YG95, YG93, YG91, W5, W3, W1, YR24, Y35, Y08

Shirt: E87, E84, E81

Pants: E55, E53, E51

Shoes: E29, E27, E25, E23

Pumpkin: E08, YR18, YR16, YR14, Y08, YG17, YG13, YG01

Hope you like it and have a great week!

You can find more cards to inspire you at KLM Designs, KLM Digital Design Team and KLM Digital Designs on the Facebook Fan page from the rest of our design team.

Wishing You The Best


Today, I’m featuring a Christmas card by Dreamerland Crafts using their stamp set called Wishing You and Your Family – D19069. I decided to make the scene a snowy night, because when we were little, we used to go at dusk to pick up out our new tree. It was always so much fun!


To make this card, I cut some Copic Marker X-Press It Blending Card to the size of 5.5″ x 4.25″. Then using my MISTI and Memento – Tuxedo Black, I stamped the image first onto the paper and then again on to Post-It Note to create a mask. I fussy cut around the mask and placed it over top of the main image. To create my background I used Tim Holtz Distress Ink – Black Soot, Chipped Sapphire, Blueprint Sketch and Dusty Concord inks. Once they were all blended and I was satisfied with the look, I spritzed some water on top and then placed some paper towel over top to pick up some of the droplets.

I removed the mask and proceeded to colour in the main image with Copic markers. I stamped the sentiment from the same stamp set using my MISTI and VersaMark ink. The sentiment was then embossed with Ranger Embossing Powder White – Extra Fine Detail and Marvy Uchida – Embossing Heat Tool was used to heat set the embossing powder.

I was now ready to add the final finishing touches. To do this, I added in the snowflakes and stars using Gelly Roll Sakura #8 Pen and Stickles – Cool Mint to the little lady’s hat and scarf. Gina K Designs – Glitz Glitter Gel was applied with a spatula along the bottom of the card to create some sparkling snow. I set the card aside to let the glitter dry for a few hours.

Once everything was dry, I attached it to a white base card of 5.5″ x 4.25″ using Hammermill – Premium Colour 100 lb. paper with double-sided tape.

Card Recipe:

Stamp and Sentiment:  Wishing You and Your Family – D19069 (Dreamerland Crafts)

Inks: Memento – Tuxedo Black, VersaMark, Tim Holtz Distress Ink – Black Soot, Tim Holtz Distress Ink – Chipped Sapphire, Tim Holtz Distress Ink – Blueprint Sketch, Tim Holtz Distress Inks – Dusty Concord

Paper: Copic Marker X-Press It Blending Card, Hammermill – Premium Colour 100 lb.

Embossing Powder:  Ranger Embossing Powder White – Extra Fine Detail

Tools: MISTI – Most Incredible Stamping Tool, Marvy Uchida – Embossing Heat Tool, Stickles – Cool Mint, Gelly Roll Sakura #8 Pen

Image coloured with Copic Markers:

Face: E21, E11, E04, E00, E000, Eyes – Sakura Glaze – Black, Gelly Roll Sakura #5 Pen

Hair: E47, E44, E43

Jacket, Scarf and Mitts:  BG49, BG18, BG15, Stickles – Cool Mint

Car and Wheels: C10, C6, C8, C3, C1, C0, C00, R59, R39, R37, R35, R17, R14

Bears: E35, E34, E33, E31, E29, E27, E25, E23, Eyes and Noses – Sakura Glaze – Black, Gelly Roll Sakura #5 Pen

Bear’s Hat: R39, R37, R35, Gelly Roll Stardust – Clear

Tree and Star: G99, YG67, YG17, G21, W15, YR24, Y35, Y08

Background Inside Car: B66

Snow: Gina K Designs – Glitz Glitter Gel, Gelly Roll Sakura #8 Pen

Hope you like it and have a great week!

You can find more cards to inspire you at Dreamerland Crafts and Pointer Scrapbooking on the Facebook Fan pages from the rest of our design team.

Buddy’s Present


It’s Wednesday, and this week I’m sharing another Christmas card featuring Buddy’s Gift Block – R161 from (High Hopes Rubber Stamps) with the sentiment Sm. Christmas Script – F051 (High Hopes Rubber Stamps). Buddy and his little birdie friend are all set for Christmas with his gift all wrapped up for you? How soon do you start wrapping presents for Christmas?

To create the card this week, I stamped the main image and then coloured it in with Copic Markers. Once it was all coloured in, I fussy cut around it and used a black marker to go around all of the edges. I used some 2-sided tape and placed it onto some white cardstock. Then I used my cutter  to cut a thin border all around the image. I repeated this process with some red cardstock and edged around all of the sides with Tim Holtz Distress Ink – Barn Door. I added some Stickles – Sea Glass around the inside border, Stickles – Icicle for the hat and pom-pom and some Clear – Wink of Stella to the all of the baubles and set everything aside to dry.

For the sentiment, I cut the the stamp in half so that I could place it on 2 lines. To stamp the sentiment, I used my MISTI, Versa Fine – Onyx Black ink and Ranger – Clear Super Fine Detail embossing powder. The powder was heat set using Marvy Uchida – Embossing Heat Tool.

For the base card I started out with white cardstock folded in half to create a 5.5″ x 4.25″ card. Doodlebug – Milk and Cookies paper was used for the background. I fussy cut along the bottom following the flow of the words. Some red cardstock was glued from the back onto the background paper and then I followed the flow of the previous cut to create a thin border. I repeated this process with some green cardstock. Once all of the 3 layers were complete, I cut the piece to be approximately 5-1/8″ x 3.25″. Tim Holtz Distress Ink – Mowed Lawn was used to go around all of the edges.

To assemble the card, I glued the combined background layers onto the base card.  The main image and frame created earlier were added using 3M VHB – 2 sided tape to complete the card.

Card Recipe:

Stamp: Buddy’s Gift Block – R161 (High Hopes Rubber Stamps)

Sentiment: Sm. Christmas Script- F051 (High Hopes Rubber Stamps)

Inks: Memento – Tuxedo Black, Versa Fine – Onyx Black, Tim Holtz Distress Ink – Mowed Lawn, Tim Holtz Distress Ink – Barn Door

Paper: Copic Marker X-Press It Blending Card, Doodlebug – Milk and Cookies (6″x6″)

Stickles: Icicle, Sea Glass

Embossing Powder: Ranger – Clear Super Fine Detail

Tools and Miscellaneous: MISTI – Most Incredible Stamping Tool, Marvy Uchida – Embossing Heat Tool

Image coloured with Copic Markers:

Bear: E35, E34, E33, E31, E27, E25, E23, R22, R20, Sakura Glaze – Black, Gelly Roll Sakura #5 Pen

Present and Bow: B16, B05, B02, YG17, YG06, YG05, YG03, YG01

Baubles: B16, B05, B02, B00, G46, G29, G28, G24, R59, R39, R37, R35, Pental Sunburst Metalic Med Gel Pen, Atayou Spica – Gold 11, Clear – Wink of Stella

Cardinal: R27, R24, R08, Y17

Hat: R59, R39, R37, R35

Background: R81

Checkered Frame: G29, G28, G24

Hope you like it and have a fantastic week!

You can find lots of inspiration from the Design Team Divas at the High Hopes blog, and the High Hopes Rubber Stamps Facebook Fan page plus you can also follow us on
Instagram, Twitter and Pinterest.

Dear Santa!


Hi Everyone! I’m participating in the 2020 Cat Lovers Blog Hop (#2020CatLoversHop) this year.

This is my third year joining the fun event. For six years, Her Peaceful Garden has been sponsoring The Cat Lover’s Blog Hop and it is a lot of fun.

Here is a third Christmas card that I have created for the hop using Christmas Kitten – GSD617 (Gerda Steiner Designs) for the main image and sentiment. These little kittens are getting into all kinds of trouble. It reminds me so much of when I had my little fur babies. LOL!

To make my card, I started with a base of 5.5″ x 4.25″. I cut some Copic Marker X-Press It Blending Card the same size and stamped on the fun images. Copic markers were used to colour the images in. Once this was done, I stamped the sentiments using Versa Fine – Onyx Black and applied Ranger – Clear Super Fine Detail embossing powder which I heat set with Marvy Uchida – Embossing Heat Tool.  I adhered the completed image to the base using double-sided tape. To finish off the card, I used some Clear – Wink of Stella to add a little bit of sparkle to all of the baubles and Stickles – Diamond for the hats.

THANK YOU so much to Her Peaceful Garden for hosting this event again this year and also a big THANK YOU to Gerda Steiner Designs for being a sponsor this year as well.

Card Recipe:

Stamp and Sentiment:  Christmas Kitten – GSD617 (Gerda Steiner Designs)

Inks: Memento – Tuxedo Black, Versa Fine – Onyx Black, Tim Holtz Distress Inks – Peeled Paint, Tim Holtz Distress Ink – Pine Needles

Paper: Copic Marker X-Press It Blending Card

Embossing Powder: Ranger – Clear Super Fine Detail embossing powder

Tools: MISTI – Most Incredible Stamping Tool, Diamond Stickles, Marvy Uchida – Embossing Heat Tool

Images coloured with Copic Markers:

Kittens: N8, N6, N4, R30, R22, R02, YG09, YG07, YG03, Sakura Glaze – Black for nose and eyes

Hats: BG49, BG18, BG09, BG07, BG05, BG02, R59, R39, R37, R35, C01, C0, Stickles – Diamond

Bobbles: B18, B06, B05, B04, R59, R39, R37, R35, Pental Sunburst Metalic Med Gel Pen, Clear – Wink of Stella

Pine Needles: G09, G07, G05, Tim Holtz Distress Inks – Peeled Paint, Tim Holtz Distress Ink – Pine Needles

Floor and Shadows: E49, E18, E15, E13, E11, C3

Hope you like it and have a fantastic week!