Archive | May 2022

High Tides


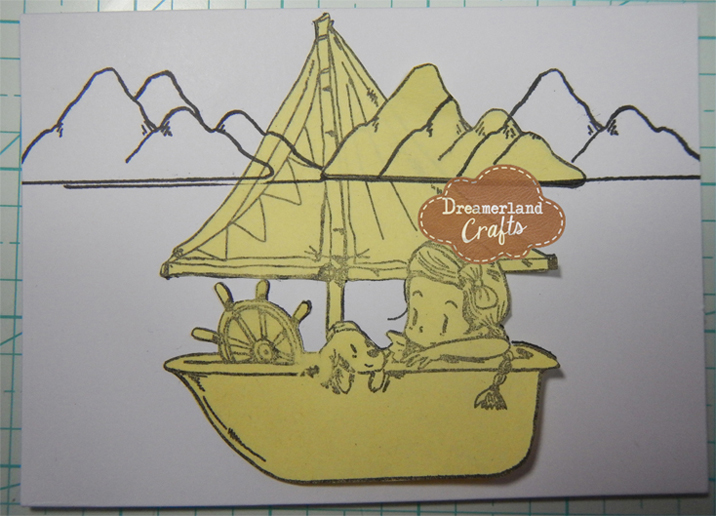
Sharing a card I made today using KLM Digital Design –  Beach Gnome from the new May 2022 release. This image also comes with 2 more sentiments, “Life is better at the beach” and “Enjoy the little things”.

I imported the image and sentiment into Microsoft Word and printed them out onto Copic Marker X-Press It Blending Card. The image was coloured in with Copic markers. I created the pattern on his shirt to make it look a little wild. Using scissors, I fussy cut around the coloured image. I also fussy cut around the sentiment, splitting it into 2 parts. I ran them through a Xyron Create a Sticker and adhered them directly to Recollections – Black cardstock. Once again, I fussy cut around the sentiments. I added U-Line double-sided tape to the backs of the sentiment and image and set them aside.

I created a 5.5″ x 4.25″ card base using Hammermill – Premium Colour 100 lb. cardsstock. I cut another panel to be the same size as the card base. Using Tim Holtz Distress Ink – Squeezed Lemonade ink, a Picket Fence – Blending Brush and Kraftin’ Kimmie – Sunburst stencil, I created the sunny background. I did this by first laying down the yellow background and then putting the stencil over top to make the sun rays a little brighter. Using Krafty Kolours – Sandy Shores ink, I created the sandy shore. For the waves, I thought the paper from Bo Bunny – Down by the Sea Collection was perfect. Using the coloured image as a guide for placement, I cut along the wavy lines with the piece measuring approximately 1.75″ x 4.25″. Using a finger dauber and Tim Holtz Distress Ink – Evergreen Bough, I inked along the top and bottom of the waves to remove the white. Using Tim Holtz Distress Inks – Tumbled Glass and a Picket Fence – Blending Brush, I added a bit of tint to the patterned paper. Using glue, I attached it to the background panel. I added in a small shadow under the sandals with Copic markers.

The card was now ready to assemble. I attached the panel to the base card using double-sided tape. I removed the tape backing from the image and sentiment and popped them both up onto the card. Using a button shank remover, I removed the backs to the Dress It Up Buttons. I applied some glue to the backs of each of them and placed them onto the card to finish it off.

Card Recipe:

Stamp and Sentiment:  Beach Gnome – KLM Digital Designs

Inks: HP Printer Grayscale, Tim Holtz Distress Ink – Squeezed Lemonade, Krafty Kolours – Sandy Shores, Tim Holtz Distress Inks – Tumbled Glass, Tim Holtz Distress Ink – Evergreen Bough

Paper: Copic Marker X-Press It Blending Card, Hammermill – Premium Colour 100 lb., Bo Bunny – Down by the Sea Collection (6″ x 6″ Paper Pad), Recollections – Black

Stencil: Kraftin’ Kimmie – Sunburst

Embellishments: Dress It Up – Ocean View, Dress It Up – Seashells At The Seashore

Miscellaneous: U-Line – 2 sided tape, Gelly Roll Sakura #10 Pen, Gelly Roll Sakura #5 Pen, Xyron Create a Sticker, Picket Fence – Blending Brushes

Image coloured with Copic Markers:

Skin: E21, E11, E04, E00, E000

Beard: E47, E44, E43, E41

Hat and Sandals: B26, B23, B21

Shirt: Y38, Y35, Y15, YR16, Gelly Roll Sakura #10 Pen

Bathing Suit: BG09, BG05, BG02, BG01

Sunglasses: BG09, BG05, BG00, Gelly Roll Sakura #5 Pen

Shadow Under Sandals: E35, E34, E33

Hope you like it and have a great week!

You can find more cards to inspire you at KLM Designs, KLM Digital Design Team and KLM Digital Designs on the Facebook Fan page from the rest of our design team.

Mermaid and Friends!!


Today, I’m sharing a card that I made using Mermaids & Friends Fran’s Clear Stamps & Cutting Dies Stampendous Set – CSD18.

To make this card I used a base of 5.5″ x 4.25″ using Hammermill – Premium Colour 100 lb. cardstock. I cut a piece of coral cardstock to the size of 5-3/8″ x 4-1/8″ and adhered it directly to the base using double-sided tape. I created my own background paper using Crayola chalk, water and American Crafts Vicki Boutin Mixed Media Foundations Paper cut to the size of 5.25″ x 4″. Once the paper was dry, I embossed the whole background with Emboss It – Clear ink and then added Ranger – Clear Super Fine Detail embossing powder. I heat embossed this with my Marvy Uchida – Embossing Heat Tool. I did this same technique with the paper that I used to cut out coral with my Anna Griffin Empress Mini Machine and Elizabeth Craft Designs – Seaweed dies. For the main background, I added some sand to the bottom using Seth Apter – Baked Texture – Dirty Sand and my Ranger HEAT IT Craft Tool. This process takes a little longer, but it allows you to just sprinkle the embossing powder on top and then heat from the bottom first and then on top. I think this gave it a more natural look. Using U-Line double-sided tape, I added the chalk embossed background to the base card.

The images were stamped using my MISTI and Memento – Tuxedo Black ink. I coloured in the images using copic markers. For the pearl, I coloured it in using Cosmic Shimmer Opal Blaze Touch Tip – Turquoise Peach and then embossed it with Ranger – Holographic Embossing Powder and heat set it with Marvy Uchida – Embossing Heat Tool. Clear – Wink of Stella was added over top of the bikini top and the fin to make them glitter. Unfortunately, you can’t see that in this photo. Once the images were coloured, I die cut the turtle and the mermaid using the dies that came with the stamp using my Anna Griffin Empress Mini Machine.

My card was now ready to assemble. I added U-Line double-sided tape to the backs of the 2 images and all of the buttons. I removed the backs from the buttons earlier. I popped each of the characters and added a second layer of tape to the mermaid and then popped it up on the card as well. To finish it off, I added in some bubbles using Your Next Stamp Gumdrops – Crystal Clear And Sparkle Gumdrops. The crown was coloured in with Pental Sunburst Metalic Med Gel Pen – Gold.

Card Recipe:

Stamps: Mermaids & Friends Fran’s Clear Stamps & Cutting Dies Stampendous Set – CSD18.

Inks: Memento – Tuxedo Black, Emboss It – Clear ink

Paper: Copic Marker X-Press It Blending Card, American Crafts Vicki Boutin Mixed Media Foundations Paper 12″X12″ – Smooth White – 140lb, Hammermill – Premium Colour 100 lb.

Die Cuts: Mermaids & Friends Fran’s Clear Stamps & Cutting Dies Stampendous Set – CSD18, Elizabeth Craft Designs – Seaweed (1752)

Embossing Powder: Ranger – Clear Super Fine Detail embossing powder, Ranger – Holographic, Seth Apter – Baked Texture – Dirty Sand

Tools: MISTI – Most Incredible Stamping Tool, Marvy Uchida – Embossing Heat Tool, U-Line double-sided tape, Crayola Chalk, Water, Your Next Stamp Gumdrops – Crystal Clear And Sparkle Gumdrops, Pental Sunburst Metalic Med Gel Pen – Gold, Dress It Up – Ocean’s Alive, Cosmic Shimmer Opal Blaze Touch Tip – Turquoise Peach, Ranger HEAT IT Craft Tool, Clear – Wink of Stella, Anna Griffin Empress Mini Machine

Image coloured with Copic Markers:

Skin: E21, E11, E04, E00, E000, R30, R20

Hair: E15, Y38, Y21, V09, V04, V01

Fintail: V000, BG32, BG10, BG01

Bikini Top: RV66, RV63, RV558

Turtle: E97, YG11, YG07, BG34

Hope you like it and have a great week!

A Little Behind!!


It’s Wednesday, and this week, I made belated birthday card using High Hopes Rubber Stamps Henriettas Backside – Q035 for the image and Sorry I’m – FLL031 for the sentiment. Like Henrietta, I get so busy sometimes, that I forget to send out my birthday cards on time.  This little chickie has now given me an excuse for being late. LOL!

To make my card this week, I began with a card base of AC Cardstock – White cut and scored to be 6″ x 6″. I cut Echo Park Paper Co. – It’s Your Birthday – 6″ x 6″ paper to be the same size as the base and adhered it with double-sided tape. Using my Cuttlebug, I die cut some golden yellow cardstock using My Creative Time -Stitched Squares Inside and Out. I added U-Line double-sided tape to the square and popped it up onto the centre of the card. Using my Cuttlebug again, I die cut Forever In Time – Texture Rouge cardstock with Waffle Flower – Nesting Square dies. I added some U-Line double-sided tape and popped this up into the centre of the last square. Lastly, using my Anna Griffin Empress Mini Machine, I die cut the patterned paper using My Creative Time -Stitched Squares Inside and Out. Once again, I added U-Line double-sided tape and popped up the square into the centre of the previous one.

The image and sentiment were both stamped onto Copic Marker X-Press It Blending Card and the image was coloured in with Copic Markers. I fussy cut around the image and ran it through my Xyron Creative Station to create a sticker. I attached this to Scrapbook.com – Playful Smooth Cardstock and then fussy cut around again leaving a small border. Using my Copic markers E25 ad E23, I added some colour under the feet. With my Empress machine again and Poppystamps – Christmas Quotes die, I die cut the sentiment. Tim Holtz Distress Inks – Wild Honey was used to ink around the edges. I added some U-Line double-sided tape to the back of the image and sentiment and popped them up onto the Jean patterned paper to complete the card.

Card Recipe:

Stamps: Henriettas Backside – Q035 (High Hopes Rubber Stamps)

Sentiment: Sorry I’m – FLL031 (High Hopes Rubber Stamps)

Inks: Memento – Tuxedo Black, Tim Holtz Distress Inks – Wild Honey

Paper: Copic Marker X-Press It Blending Card, AC Cardstock – White, Doodle Bug Designs Inc. – Down on the Farm – 6″ x 6″ paper pad, Echo Park Paper Co. – It’s Your Birthday – 6″ x 6″ paper pad, Forever In Time – Texture Rouge, Scrapbook.com – Playful Smooth Cardstock (4.25″ x 5.5″), Yellow Cardstock

Die Cuts: My Creative Time -Stitched Squares Inside and Out, Waffle Flower – Nesting Square dies, Poppystamps – Christmas Quotes, Xyron Creative Station

Tools: MISTI – Most Incredible Stamping Tool, U-Line double-sided tape, Anna Griffin Empress Mini Machine, Cuttlebug

Image coloured with Copic Markers:

Hen: E97, E47, E37, E09, YR27, YR23, R08

Hope you like it and have a fantastic week!

You can find lots of inspiration from the Design Team Divas at the High Hopes blog, and the High Hopes Rubber Stamps Facebook Fan page plus you can also follow us on
Instagram, Twitter and Pinterest.

Also entered into #Farmquest Challenge Blog #4.  “https://farmquestchallenge.blogspot.com/2022/05/fqcb-theme-4-poultry-and-wire-or-metal.html”.

Born to Be Wild!!


Sharing a card that I made today using KLM Digital Design –  Pre-Colored MotorCycle Gnome from the new May 2022 release.  I remember how refreshing it was when I was younger going for rides on a motorcycle during hot weather!

Using Hammermill – Premium Colour 100 lb. cardstock, I created a base card of 5.5″ x 4.25″. I cut a panel to be the same size out of the same cardstock. The mountains were created using Kraftin’ Kimmie – Krafty Scenery 2 and Tim Holtz Distress Ink – Vintage Photo, Picket Fence – Blending Brush and blocking off the base of the mountains with a long Post-It Note. Once the mountains were in place, I created the clouds using Lawn Fawn Cuts – Cloudy Stencil, Tim Holtz Distress Ink – Salty Ocean and a Picket Fence – Blending Brush. I die cut the road using my Anna Griffin Empress Mini Machine, My Favourite Things – Die-Namics – Open Road MFT-1138 out of Recollections – Black paper. I measured it to the line of the mountains and cut it. Using this as a guide, with Tim Holtz Distress Inks – Mowed Lawn and a Picket Fence – Blending Brush, I created the grass.

Using my Anna Griffin Empress Mini Machine and Stampin’ Cut & Emboss – Pine Wood Dies, I die cut all of the trees using Scrapbook.com – Jewels Smooth Cardstock and Lawn Fawn – Watercolor Wishes Rainbow. I coloured the trunks using Copic marker E27. I applied the bottom trees with glue and then popped up the front trees with Scrapbook Adhesives – 3D Foam Strips. I imported the image into Microsoft Word and printed it out onto Copic Marker X-Press It Blending Card. I fussy cut around the image and added 2 layers of U-Line double-sided tape to it and popped it up onto the road to complete the card.

Card Recipe:

Stamp:  Pre-Colored Motorcycle Gnome – KLM Digital Designs

Sentiment: Art Impressions – Born To Ride Set – 5044

Inks: HP Printer Grayscale, Tim Holtz Distress Ink – Salty Ocean, Tim Holtz Distress Ink – Rustic Wilderness, Tim Holtz Distress Ink – Vintage Photo

Paper: Copic Marker X-Press It Blending Card, Hammermill – Premium Colour 100 lb., Scrapbook.com – Jewels Smooth Cardstock (4.25″ x 5.5″), Scrapbook.com – Jewels Smooth Cardstock (4.25″ x 5.5″), Tim Holtz Distress Inks – Mowed Lawn, Recollections – Black, Lawn Fawn – Watercolor Wishes Rainbow – 6″ x 6″

Dies: Stampin’ Cut & Emboss – Pine Wood Dies, My Favourite Things – Die-Namics – Open Road MFT-1138

Stencil: Lawn Fawn Cuts – Cloudy Stencil, Kraftin’ Kimmie – Krafty Scenery 2

Miscellaneous: U-Line – 2 sided tape, Anna Griffin Empress Mini Machine, Picket Fence – Blending Brushes, Scrapbook Adhesives – 3D Foam Strips

Hope you like it and have a great week!

You can find more cards to inspire you at KLM Designs, KLM Digital Design Team and KLM Digital Designs on the Facebook Fan page from the rest of our design team.

Coffee!!


It’s Wednesday, and this week, I made a card using High Hopes Rubber Stamps Drive Thru – TLF026 for the image and Nothing Begins – FLL021 for the sentiment. I don’t drink coffee, but I know a lot of people who can’t start the day without one! Are you a coffee drinker or a tea drinker like me?

To make my card this week, I began with a card base of Hammermill – Premium Colour 100 lb. cut and scored to be 5.5″ x 4.25″. To create my background, I started with Creative Memories – Hot Fudge paper cut to the same size as the base card. I adhered this directly to the base. From the same paper, I also made several more cuts. 5.5″ x 2-5/8″, 5.5″ x 1-1/16th” and using my Anna Griffin Empress Mini Machine and My Creative Time – Rectangle Frame Layers, I die cut a rectangle the size of 4.75″ x 3.5″. With multiple papers from Your Next Stamp – The Perfect Blend, I cut them to the sizes of 5.5″ x 4-1/8″, 5.5″ x 2.5″ and 5.5″ x 7/8″. I inked around all of the edges of the patterned papers with Tim Holtz Distress Inks – Ground Espresso.

Using double-sided tape, I layered the papers and centered them onto the card in the following order. Coffee beans, Fudge cardstock, coffee stains, Fudge cardstock and lastly the coffee cups. Once again, I inked around all of the outside edges with Tim Holtz Distress Inks – Ground Espresso ink. I added U-Line double-sided tape to the large Fudge cardstock rectangle with an additional smaller layer on the top and bottom and popped it up in the centre of the card.

Using my Anna Griffin Empress Mini Machine and My Creative Time – Rectangle Frame Layers once again, I die cut a rectangle out of Copic Marker X-Press It Blending Card to the size of 4.25″ x 3″. The image and sentiment were both stamped onto Copic Marker X-Press It Blending Card and the image was coloured in with Copic Markers. I added in a lot of extra bricks to the image to create a solid brick wall. Using my Empress machine again and My Creative Time – Little Gift Tags, I die cut the sentiment. Tim Holtz Distress Inks – Ground Espresso was used to ink around the edges. I added some U-Line double-sided tape to the back of it and popped it up onto the coloured image. Lastly to finish off the card, I added a little pop dot from Gina Marie Designs.

Card Recipe:

Stamps: Drive Thru – TLF026 (High Hopes Rubber Stamps)

Sentiment: Nothing Begins – FLL021 (High Hopes Rubber Stamps)

Inks: Memento – Tuxedo Black, Tim Holtz Distress Inks – Ground Espresso

Paper: Copic Marker X-Press It Blending Card, Hammermill – Premium Colour 100 lb., Creative Memories – Hot Fudge (12″ x 12″), Your Next Stamp – The Perfect Blend (6″ x 6″)

Die Cuts: My Creative Time – Rectangle Frame Layers, My Creative Time – Little Gift Tags (Retired)

Tools: MISTI – Most Incredible Stamping Tool, U-Line double-sided tape, Anna Griffin Empress Mini Machine

Image coloured with Copic Markers:

Gnomes: E47, E44, E43, E41, E27, E25, E23, E15, E21, E11, E08, E00, E000, YR18, YR14, B26, B23, B21

Car: R59, R39, R37, R35, C9, C7, C5, C3, C2, C1, B000, Y00, N9, N7, N5

Road: W8, W6, W4

Wall: C2, C1, E97, E19, E08

Window and Signs: T5, T3, T1, T0, Y00, Y000

Hope you like it and have a fantastic week!

You can find lots of inspiration from the Design Team Divas at the High Hopes blog, and the High Hopes Rubber Stamps Facebook Fan page plus you can also follow us on
Instagram, Twitter and Pinterest.

Smooth Sailing Ahead!!


Today, I’m sharing a card that I made using Dreamerland Crafts stamps called Wishing you a smooth sailing ahead – DCS1703. This card could be used to wish someone smooth sailing for cruising, retirement or for a new job position or even if you knew someone who just bought a new boat for fun! The stamp set also comes with 2 more sentiments, “on a Journey to find Happiness” and “Taking a break from my daily routine”.

To make this card I used a base of 5.5″ x 4.25″ using Hammermill – Premium Colour 100 lb. cardstock. Recollections – Black cardstock was die cut to the size of 4.75″ x 3.5″ using Anna Griffin Empress Mini Machine and My Creative Time – Rectangle Frame Layers. Using the same machine and My Creative Time – Rectangle Frame Dies, I die cut Copic Marker X-Press It Blending Card to the size of 4.5″ x 3.75″. The main image was stamped using my MISTI and Memento – Tuxedo Black ink. I stamped the images again onto Post-It Note paper to create a mask and fussy cut around them. After stamping the main image, I placed the masking of the little girl in the boat on top of the inked image as shown below.

I stamped the mountains starting from the left side, while still using my MISTI and Memento – Tuxedo Black ink. The mountain mask was applied over top of them and I stamped another set of mountains so that they looked like they were behind the first set of mountains. I continued to do this going across the image to create a mountain range. Then, I removed all of the masks and coloured in the image using copic markers.  Copic – Opaque White was used to create the crests of the waves and Stampin’ Up – Whisper White Ink and a small #2 round brush were used to create the clouds in the sky. Versamark, my MISTI and Ranger Embossing Powder White – Extra Fine Detail were used to add in the birds from the same stamp set. Marvy Uchida – Embossing Heat Tool was used to heat emboss the powder. I added U-Line double-sided tape to the back of the image and popped it up onto the black rectangle.

Using my MISTI, Versa Fine – Onyx Black ink and Ranger – Clear Super Fine Detail embossing powder, I stamped and embossed the sentiment onto Hammermill – Premium Colour 100 lb. cardstock. Marvy Uchida – Embossing Heat Tool was used to heat emboss this as well. Using Anna Griffin Empress Mini Machine and My Creative Time – Bunch of Fun Circle Dies, I die cut the sentiment with a 1.25″ circle. With a 1.5″ circle punch, I die cut Recollections – Black cardstock. I added U-Line double-side tape to the back of the sentiment and popped it up onto the larger black circle. I added a double layer of the U-Line double-side tape to the right of the black rectangle on each side and popped up the larger black circle to the bottom right of the card. YNS Gumdrops – Ice Ice Baby Sparkly Gumdrops were added to the top left corner of the card to finish it off.

Card Recipe:

Stamps and Sentiment: Wishing you a smooth sailing ahead – DCS17043 – Dreamerland Crafts

Inks: Memento – Tuxedo Black, Versamark, Stampin’ Up – Whisper White Ink, Versa Fine – Onyx Black

Paper: Copic Marker X-Press It Blending Card, Hammermill – Premium Colour 100 lb., Recollections – Black cardstock

Die Cuts: My Creative Time – Rectangle Frame Layers, My Creative Time – Rectangle Frame Dies, My Creative Time – Bunch of Fun Circle Dies, 1.5″ Circle Punch

Embossing Powder: Ranger Embossing Powder White – Extra Fine Detail, Ranger – Clear Super Fine Detail embossing powder

Tools: MISTI – Most Incredible Stamping Tool, Marvy Uchida – Embossing Heat Tool, U-Line double-sided tape, YNS Gumdrops – Ice Ice Baby Sparkly Gumdrops, Anna Griffin Empress Mini Machine

Image coloured with Copic Markers:

Skin: E21, E11, E04, E00, E000, R30, R30, R20

Hair: E47, E44, E43, E41

Blouse and Bow: R83, R81, RV00, RV000

Dog: E35, E33, E31, E30

Bathtub Boat: RV09, RV06, RV04, RV02, E50, E40, E30, E29, E27, E25

Water: BG70, BG53, BG32, BG11, BG10, B93, B91, B52, B41, B06, B04, B02, B01, (Copic – Opaque White)

Sky: B02, B01, B00, B000

Mountains: BV25, BV23, BV20, YG17, YG13, YG03

Hope you like it and have a great week!

You can find more cards to inspire you at Dreamerland Crafts and Pointer Scrapbooking on the Facebook Fan pages from the rest of our design team.

Better Late Than Never!!


Sharing a birthday card I made today using KLM Digital Design –  Stanley The Snail from the new May 2022 release. This image also comes with 2 more sentiments, “You snailed it!” and “Thanks SLOW much!”  Love this sentiment “Better late than never!” as it could be used for so many different occasions.

Using Hammermill – Premium Colour 100 lb. cardstock, I created a base card of 5.5″ x 4.25″. Using Tim Holtz Distress Ink – Salty Ocean, I created the clouds with Lawn Fawn Cuts – Cloudy Stencil directly on the base card. With the dies from Lawn Fawn – Simple Grassy Hillsides and Lawn Fawn – Watercolor Wishes Rainbow paper, I die cut 3 lawn cuts using my Anna Griffin Empress Mini Machine.

I imported the image and sentiment into Microsoft Word and printed them out onto Copic Marker X-Press It Blending Card. The image was coloured in with Copic markers. Using scissors, I fussy cut around the coloured image and inked around the edges with a black marker. I cut the sentiment with my cutter and added U-Line double sided tape to it and popped it up onto the smallest lawn cut.

The card was now ready to assemble. I added U-Line double-sided tape to each layer of grass. I added a second layer of U-Line double sided tape to the middle layer. I used my fussy cut image to determine where the lawn cuts would be positioned and then popped up each layer onto the base. I applied some glue to the back of the image on the bottom only and adhered it to the card between the 2nd and 3rd layer of grass. I felt like the card still needed something, so I added 3 lady bugs from Forever In Time – Ladybug Gems and a butterfly from Doodlebug Design Inc. – Plum Butterflies Braddies to finish off my card.

Card Recipe:

Stamp and Sentiment:  Stanley the Snail – KLM Digital Designs

Inks: HP Printer Grayscale, Tim Holtz Distress Ink – Salty Ocean

Paper: Copic Marker X-Press It Blending Card, Hammermill – Premium Colour 100 lb., Lawn Fawn – Watercolor Wishes Rainbow – 6″ x 6″

Die: Lawn Fawn – Simple Grassy Hillsides

Stencil: Lawn Fawn Cuts – Cloudy Stencil

Miscellaneous: U-Line – 2 sided tape, Anna Griffin Empress Mini Machine, Doodlebug Design Inc. – Plum Butterflies Braddies, Forever In Time – Ladybug Gems

Image coloured with Copic Markers:

Snail: E84, E81, E44, E43, E42, E41, E39, E37, E35, E34, E33, E31, E30, E29, E27, E25, E23, E21, Y38

Hope you like it and have a great week!

You can find more cards to inspire you at KLM Designs, KLM Digital Design Team and KLM Digital Designs on the Facebook Fan page from the rest of our design team.

Love One An-udder!!


It’s Wednesday, and this week, I made an Anniversary card using High Hopes Rubber Stamps Cow Hugs – TT136 for the image and Love An Udder – F205 for the sentiment. Love this adorable combination and thought it would be great for an Inspirational card or an Anniversary card!

To make my card this week, I began with a card base of Hammermill – Premium Colour 100 lb. cardstock, cut and scored to be 5.5″ x 4.25″. Doodle Bug Designs Inc. – Down on the Farm cardstock background paper was cut to the size of 5.5″ x 4.25″ and adhered directly to the base using double-sided tape. Tim Holtz Distress Ink – Black Soot and a finger dauber were used to ink around all of the edgs of the card. Using my Anna Griffin Empress Mini Machine and dies from Whimsy Stamps – Wavy Nested Frame Dies Set, I die cut one pattern out of Recollections – Black cardstock and a smaller cut from Copic Marker X-Press It Blending Card. Using PinkFresh Studio – Slim Stripes dies and my Anna Griffin Empress Mini Machine, I die cut some black stripes using the half-inch die from Recollections – Black cardstock. I added some U-Line double-sided tape to the backs of the 2 black pieces and popped them up onto the patterned background. Using scisssors, I cut off the excess from the black stripe after it was adhered to the base.

I stamped the main image and sentiment onto the Copic Marker X-Press It Blending Card using my MISTI and Memento – Tuxedo Black. The image was coloured in with Copic Markers. I used a Sakura Glaze – Black pen, and Gelly Roll Sakura #8 Pen to create the eyes. After the image was coloured in, I added some U-Line double-sided tape to it and popped it up onto the black die cut. Using my machine again, I die cut the sentiment using Gina K Designs – Sentiment Strips. This was popped up with Scrapbook Adhesives – Black 3D Foam Strips onto the black stripe. To finish off my card, I added 2 little button cows on either side of the sentiment from Dress It Up – In the Barnyard and Dress It Up – Mooove It.

Card Recipe:

Stamps: Cow Hugs – TT136 (High Hopes Rubber Stamps)

Sentiment: Love An Udder – F205 (High Hopes Rubber Stamps)

Inks: Memento – Tuxedo Black, Tim Holtz Distress Ink – Black Soot

Paper: Copic Marker X-Press It Blending Card, Hammermill – Premium Colour 100 lb., Doodle Bug Designs Inc. – Down on the Farm – 6″ x 6″ paper pad, Recollections – Black

Die Cuts: PinkFresh Studio – Slim Stripes, Whimsy Stamps – Wavy Nested Frame Dies Set (WSD382), Gina K Designs – Sentiment Strips

Tools: MISTI – Most Incredible Stamping Tool, U-Line double-sided tape, Anna Griffin Empress Mini Machine, Sakura Glaze – Black Pen, Gelly Roll Sakura #8 Pen, Dress It Up – In the Barnyard and Dress It Up – Mooove It

Image coloured with Copic Markers:

Cows: N9, N7, N5, N0, E42, E41, E40, R30, R02, R01, R00, R000 (Eyes – Sakura Glaze – Black, Gelly Roll Sakura #8 Pen)

Leaves and Grass: G99, YG67, YG17, G21, G07, G05

Flowers: B29, B26, B24, B21, YR16, YR12, E15, Y35, Y11, Y08, Y06, Y04, R46, R14, R08

Bow and Cow Bell: R46, R14, R08, Y38, Y35, Y17, Y15

Sky and Clouds: B60, B01, B00, B000, B0000

Hope you like it and have a fantastic week!

You can find lots of inspiration from the Design Team Divas at the High Hopes blog, and the High Hopes Rubber Stamps Facebook Fan page plus you can also follow us on
Instagram, Twitter and Pinterest.

Birthday Hi!!


It’s Wednesday, and this week, I made a card using High Hopes Rubber Stamps Just Cruisin’ – SLF022 for the image and Just Motorin’ By – G309 for the sentiment. The gnomes are out again and this time their motoring by with a birthday “Hi!” for you.

To make my card this week, I began with a card base of Hammermill – Premium Colour 100 lb. cut and scored to be 5.5″ x 4.25″. To create my background sky, I cut the Echo Parks Paper Co. – Birthday Wishes cardstock to the size of 5.5″ x 1.75″. With Lawn Fawn – Watercolor Wishes Rainbow – 6″ x 6″, I made 3 cuts. 5.5″ x .75″, 5.5″ x 1.25″ and with my Cuttlebug and Card Deco Essentials – Slimline Landscape Borders die, the tree landscape. I ran all of the pieces through my Xyron Creative Station and Xyron Create a Sticker. Using my Cuttlebug again and Recollections – Black cardstock, I die cut the road using My Favourite Things – Die-Namics – Open Road die.

The image and sentiment were both stamped onto Copic Marker X-Press It Blending Card and the image was coloured in with Copic Markers. I fussy cut around the image and the sentiment and then added U-Line double-sided tape to pop them up onto the card later.

The card was now ready for assembly, starting at the bottom of the card, I applied the first piece of grass. I measured the distance of the road and then applied the second piece of green slightly lower than where the road would end. The sky piece was added next and then the tree scape. I used my E25 marker to make the tree trunks brown. I applied double-sided tape to the road piece and adhered it to the base. I popped up the image and the sentiment onto the background. Tim Holtz Distress Ink – Tumbled Glass and a dauber were used to ink around the edges of the sky to complete the card.

Card Recipe:

Stamps: Just Cruisin’ – SLF022 (High Hopes Rubber Stamps)

Sentiment: Just Motorin’ By – G309 (High Hopes Rubber Stamps)

Inks: Memento – Tuxedo Black, Tim Holtz Distress Ink – Tumbled Glass

Paper: Copic Marker X-Press It Blending Card, Hammermill – Premium Colour 100 lb., Lawn Fawn – Watercolor Wishes Rainbow – 6″ x 6″, Echo Parks Paper Co. – Birthday Wishes by Alisha Gordon – 6″ x 6″ Paper Pads, Recollections – Black cardstock

Die Cuts: My Favourite Things – Die-Namics – Open Road MFT-1138, Card Deco Essentials – Slimline Landscape Borders

Tools: MISTI – Most Incredible Stamping Tool, U-Line double-sided tape, Xyron Create a Sticker and Xyron Creative Station

Image coloured with Copic Markers:

Gnomes: E47, E44, E43, E41, E15, E08, E21, E11, E00, E000, YR18, YR14, BG72, BG57, BG49, BG45, BG32, BG11, BG09, BG05, BG02, BG01, Y02, Y00

Car: R59, R39, R37, R35, C9, C7, C5, C4, C3, C2, C1, B000

Hope you like it and have a fantastic week!

You can find lots of inspiration from the Design Team Divas at the High Hopes blog, and the High Hopes Rubber Stamps Facebook Fan page plus you can also follow us on
Instagram, Twitter and Pinterest.

A Flower For You Mom!!


Today, I’m sharing a Mother’s Day card that I made using Dreamerland Crafts stamps called Say Love With Flowers – D162017It’s that time of year when we all get to celebrate our Mother’s special day. A bond between a child and their mother is something so special and rare! Happy Mother’s Day to all of you special ladies out there and especially to my mom whom we all love dearly!

To make this card I used a base of 6″ x 6″ using AC White Cardstock cardstock. Recollections – Matte Gold Foil cardstock was cut to the same size as the base and adhered with double-sided tape. P13 – Hello Spring was cut to 5.75″ x 5.75″ and the edges were inked with Tim Holtz Distress Ink – Saltwater Taffy. This was popped up onto the base card using U-Line double-sided tape. Using my Cuttlebug and PinkFresh Studio Essentials – Blanket Stitched Oval die, I die cut Copic Marker X-Press It Blending Card. The main image was stamped using my MISTI and Memento – Tuxedo Black ink. I coloured in the image using copic markers and created the background. Once the background was completed, I dipped a Q-tip into some Rubbing Alcohol ink and dotted it all over the background. Then using a Ranger – Emboss It Pen Clear, I went around the oval where the pattern was and applied Ranger Super Fine Gold Embossing powder. then heated it with my Marvy Uchida – Embossing Heat Tool. I applied U-Line double-sided tape to the back of the image and popped it up onto the card. For the sentiment, I used the stamps from Die Cutting Essentials Magazine – Issue 75 – Geo Floral Wreath Dies & Stamps. Using my MISTI, Versamark ink and Ranger Embossing Powder White – Extra Fine Detail, I embossed the sentiment onto a scrap piece of green cardstock. I fussy cut around the sentiment and applied U-Line double-side tape to pop it up at the bottom of the card.

Card Recipe:

Stamps: Say Love With Flowers – D16207 – Dreamerland Crafts

Sentiment: Die Cutting Essentials Magazine – Issue 75 – Geo Floral Wreath Dies & Stamps

Inks: Memento – Tuxedo Black, Tim Holtz Distress Ink – Saltwater Taffy, Versamark

Paper: Copic Marker X-Press It Blending Card, Recollections – Matte Gold Foil cardstock, AC White Cardstock cardstock, P13 – Hello Spring (6″ x 6″)

Die Cuts: PinkFresh Studio Essentials – Blanket Stitched Oval

Embossing Powder: Ranger Embossing Powder White – Extra Fine Detail, Ranger Super Fine Gold Embossing powder

Tools: MISTI – Most Incredible Stamping Tool, Marvy Uchida – Embossing Heat Tool, Ranger – Emboss It Pen Clear, U-Line double-sided tape

Image coloured with Copic Markers:

Skin: E21, E11, E04, E00, E000, R30, R30, R20

Hair: E47, E44, E43, E41

Dress: R83, R81, RV00, RV000

Shoes: R83, R81, RV00, W9, W7

Kitty: C7, C5, C3, R30

Flower and Stem: R83, R81, R32, RV00, RV000, Y00, Y000, YG67, YG63, YG23, YG11

Background: R11, Y11, Rubbing Alcohol and Q-Tip

Hope you like it and have a great week!

You can find more cards to inspire you at Dreamerland Crafts and Pointer Scrapbooking on the Facebook Fan pages from the rest of our design team.