Archive | December 2020

Babies Are Sweet Beginnings!!!


It’s Wednesday, and this week I’m sharing a Baby Card featuring Sweet Beginnings – S169 from (High Hopes Rubber Stamps). I love this adorable stamp and I also have a few nieces that are pregnant right now. We are all looking forward to seeing pictures of the new little one’s when they are born. Once Covid19 is over, hopefully, we will be able to travel again and see them in person.

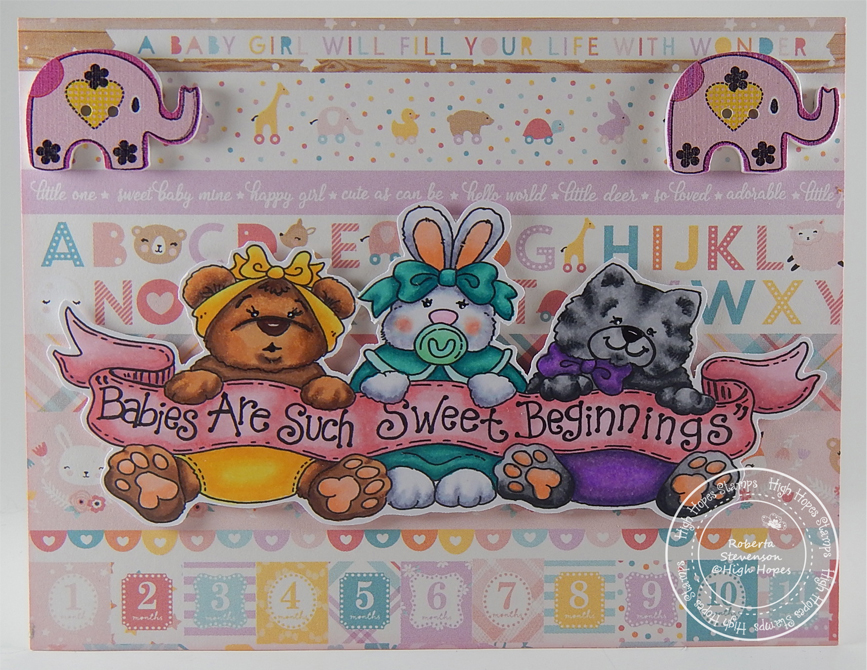
To create the card this week, I stamped the image onto Copic Marker X-Press It Blending Card using my MISTI and Memento – Tuxedo Black ink. I fussy cut around the image and then coloured it in with Copic Markers.

I created a card base made from Hammermill – Premium Colour 100 lb. paper, folded to 5.5″ x 4.25″. For the background paper, I cut a piece the same size as the base from Echo Park – Hello Baby – It’s a Girl. I attached this directly to the base with double-sided tape and then inked around the edges using Tim Holtz Distress Ink – Spun Sugar. I popped up the coloured image using 3M VHB – 2 sided tape. Lastly, I added some little embellishments from Forever In Time – Painted Wood Buttons – Patchwork Elephants to finish off the card.

Card Recipe:

Stamp: Sweet Beginnings – S169 (High Hopes Rubber Stamps)

Inks: Memento – Tuxedo Black, Tim Holtz Distress Ink – Spun Sugar

Paper: Copic Marker X-Press It Blending Card, Hammermill – Premium Colour 100 lb., Echo Park – Hello Baby – It’s a Girl (6″x6″)

Embellishments: Forever In Time – Painted Wood Buttons – Patchwork Elephants – SE083C

Tools and Miscellaneous: MISTI – Most Incredible Stamping Tool, Sakura Glaze – Black, 3M VHB – 2 sided tape

Image coloured with Copic Markers:

Banner: R85, RV13, RV11, RV10

Bear: E29, E25, E23, E21, R30, R02, Y35, Y18, Y13, Sakura Glaze – Black – Eyes and Mouth

Bunny: BV23, BV20, B60, R22, R20, BG49, BG23, BG15, BG10, BG11, YG41, G00, G000, Sakura Glaze – Black – Eyes

Kitten: N8, N5, N3, N1, V17, V15, V04, V01, Sakura Glaze – Black – Eyes and Nose

Hope you like it and have a fantastic week!

You can find lots of inspiration from the Design Team Divas at the High Hopes blog, and the High Hopes Rubber Stamps Facebook Fan page plus you can also follow us on
Instagram, Twitter and Pinterest.

Darcy the Dinosaur!!


Today, I’m sharing Darcy the Dinosaur from KLM Digital Designs December Release. The image comes with 4 different sentiments, “I think you’re dino-mite”, “Happy Anniver-Saury”, “Heard You’re Jurassick” and “Have a Rawrsome Birthday”. I decided to create my own Jurasic scene for Darcy this week and added the sentiment on the inside of the card.

To make the card, I printed out the image onto Copic Marker X-Press It Blending Card using my HP Printer. I coloured in the image with Copic markers and then I fussy cut around the image. A black marker was used to go around all of the edges. Then I put it through my Xyron Creative Station, as I wanted it to lay completely flat on the finished background. The sentiment was printed out and added to the inside of the card. I chose “Have a Rawrsome Birthday”.

For the background scene I cut Copic Marker X-Press It Blending Card to the size of 4.25″ x 5.5″ and drew in my own scene. I also used Kraftin’ Kimmie – Krafty Scenery 3 stencil for the basic outline of the palm tree and leaves. To add some added texture to the grass, I used a piece of old rag with little bumps on it and some Isopropyl Alcohol. Once the background was completed, I added the Dinosaur directly on top of it. I glued the back and then adhered the entire finished piece to my base card cut to 4.25″ x 5.5″.

Card Recipe:

Stamp and Sentiment: Darcy the Dinosaur (KLM Digital Designs)

Inks: HP Printer Grayscale

Paper: Copic Marker X-Press It Blending Card, Hammermill – Premium Colour 100 lb.

Tools: Xyron Creative Station, Kraftin’ Kimmie – Krafty Scenery 3 Stencil

Image coloured with Copic Markers:

Dinosaur: E89, E87, E84, E81, BV29, BV25, BV23, C2, C1, C0

Flowers: V09, V06, V04, Y17, Y08, YG09, YG05

Palm Tree: E43, E42, E41, G28, G07, YG17

Mountains: E55, E49, E47, E44, E35, E34, BV20

Grass: YG17, YG13, YG03, YG01, Piece of rag, Isopropyl Alcohol for added texture

Water: B00, B000

Sky and Clouds: B04, B02, B01, B60, C1, Colorless Blender

Hope you like it and have a great week!

You can find more cards to inspire you at KLM Designs, KLM Digital Design Team and KLM Digital Designs on the Facebook Fan page from the rest of our design team.

Wish You A Merry Christmas


Today, I’m featuring a Christmas card from Dreamerland Crafts new Christmas release called We Wish You A Merry Christmas – D20012. This card features a little kitten helping his friend celebrate the joy of Christmas giving.

To create this card, I first die-cut some Copic Marker X-Press It Blending Card using my Cuttlebug and Creative Expressions – Festive Frames – Snowball. I separated the 2 pieces of the die-cut and using my MISTI and Memento – Tuxedo Black, I stamped the image onto the paper and  coloured it in with Copic markers. I stamped the sentiment using VersaMark ink. The sentiment was then embossed with Ranger Embossing Powder White – Extra Fine Detail and Marvy Uchida – Embossing Heat Tool was used to heat set the embossing powder. Once this was done, I added all of the snowflakes in the sky using a Gelly Roll Sakura #10 Pen and also Gelly Roll Sakura #8 Pen. For the snow on the ground, I used a mixture of Nuvo Glitter Accents – Fresh Snowfall and Stickles – Crystal. This was then set aside for a few hours to dry.

For the frame, I used Cosmic Shimmer Opal Polish – Summer Sky. It was my first time using this polish and I just love how it turned out. Once the snow on the image was dry, I flipped the 2 die-cuts over and attached them back together using some clear tape on the back.

The card was now ready to assemble. For the card base I used The Paper Studio – Primary Base Colours 4.25″ x 5.5″. I added some double-sided tape and some glue to the backing of the finished frame and image and attached it directly to the card base.

Card Recipe:

Stamp and Sentiment:  We Wish You A Merry Christmas – D20012 (Dreamerland Crafts)

Inks: Memento – Tuxedo Black, VersaMark

Paper: Copic Marker X-Press It Blending Card, The Paper Studio – Primary Base Colours 4.25″ x 5.5″

Opal Polish: Cosmic Shimmer – Summer Sky

Glitter \ Snow: Nuvo Glitter Accents – Fresh Snowfall, Stickles – Crystal

Die Cuts: Creative Expressions – Festive Frames – Snowball – CED3146

Tools: MISTI – Most Incredible Stamping Tool, Marvy Uchida – Embossing Heat Tool, Gelly Roll Sakura #8 Pen, 3M VHB – 2 sided tape, Cuttlebug, Gelly Roll Sakura #10 Pen

Image coloured with Copic Markers:

Face: E21, E11, E04, E00, E000, R22, R20, Eyes – Sakura Glaze – Black, Gelly Roll Sakura #5 Pen

Hair: E15, Y38, Y21, YR23

Hat, Cape and Coat:  G29, YG17, YG05, YG03, BV20, C1, C0

Pants: B26, B23, B21

Boots: E53, E51, E50, E29, E27, E25, E23

Present: R14, R13, R11

Bow and Girl’s Scarf: R59, R39, R37, R35

Kitten and Scarf: N10, N8, N6, N4, N3, G29, YG17, YG05, YG03, R32, R20, Eyes – Sakura Glaze – Black, Gelly Roll Sakura #5 Pen

Present: Y17, Y15, Y08, Y04, Y17, Y15, Y13

Stars: Y17, Y15, Y13

Sky: B99, B97, B79, B69, B39, B37, B34, Gelly Roll Sakura #10 Pen, Gelly Roll Sakura #8 Pen

Hope you like it and have a great week!

You can find more cards to inspire you at Dreamerland Crafts and Pointer Scrapbooking on the Facebook Fan pages from the rest of our design team.

Christmas Bells!!


Today, I’m sharing Holiday Bells from KLM Digital Designs November Release. The image comes with 3 different sentiments, “Merry Christmas”, which I’ve used on my card and also, “Season’s Greetings” and “Happy Holidays”.

To make the card, I printed out the image onto Copic Marker X-Press It Blending Card using my HP Printer. I coloured in the image with Copic markers and then I fussy cut around the image. A black marker was used to go around all of the edges. The sentiment was printed out onto Recollections white paper and then fussy cut as well. Then I ran both the image and the sentiment through my Xyron Creative Station to make it easier to lay them down completely flat on the card base. For the card base I used Recollections – Winter 4.25″ x 5.5 (Assorted Box of Cards).

Card Recipe:

Stamp and Sentiment: Holiday Bells (KLM Digital Designs)

Inks: HP Printer Grayscale

Paper: Copic Marker X-Press It Blending Card, Recollections – Winter 4.25″ x 5.5 (Assorted Box of Cards)

Tools: Xyron Creative Station

Image coloured with Copic Markers:

Bells: E15, YR24, Y35, Y28, Y26, Y23, Y21, Y08, W5. W3, W1

Leaves and Berries: R59, R39, R37, R35, G46, G43, G29, YG03, YG01, C3, Gelly Roll Sakura #8 Pen

Ribbon: R29, R27, R24, C3, C2

Hope you like it and have a great week!

Check out KLM Designs for some great savings this month.

Offer good until 12/07/20
25% OFF ALL PHOTOPOLYMER STAMPS
USE COUPON CODE: BLACKFRIDAY

You can find more cards to inspire you at KLM Designs, KLM Digital Design Team and KLM Digital Designs on the Facebook Fan page from the rest of our design team.

Feeling Up To Par!!!


It’s Wednesday, and this week I’m sharing a Get Well Card featuring Golfer Glen – T084 from (High Hopes Rubber Stamps) paired with the sentiment Up To Par – G257 (High Hopes Rubber Stamps). It’s always hard to find Get Well Cards for men, and I thought the pairing of these 2 stamps went so well together.

To create the card this week, I die cut Copic Marker X-Press It Blending Card using my Cuttlebug and My Creative Time – Rectangle Frame Dies. Then, I stamped the image and sentiment using my MISTI and Memento – Tuxedo Black ink. The image was then coloured in with Copic Markers. I stamped the image again onto Post-It Note paper and used it as a mask. Then, I applied the clouds using Tim Holtz Distress Ink – Salty Ocean and cloud stencils I made from Avery Elle – PiercedCloudsDie and Whimsy Stamps – Grass and Cloud Edger Die Set. Then I used some washi tape to mask the main image border and inked around it using Tim Holtz Distress Ink – Salty Ocean.

The card was now ready to assemble, I attached the coloured image to a card base made from Hammermill – Premium Colour 100 lb. paper, folded to 5.5″ x 4.25″.

Card Recipe:

Stamp: Golfer Glen – T084 (High Hopes Rubber Stamps)

Sentiment: Up To Par – G257 (High Hopes Rubber Stamps)

Inks: Memento – Tuxedo Black, Tim Holtz Distress Ink – Salty Ocean

Paper: Copic Marker X-Press It Blending Card, Hammermill – Premium Colour 100 lb.

Die Cuts: My Creative Time – Rectangle Frame Dies, Avery Elle – Custom Steel Dies – Made in the USA – D-05-01 PiercedCloudsDie, Whimsy Stamps – Grass and Cloud Edger Die Set

Tools and Miscellaneous: MISTI – Most Incredible Stamping Tool, Cuttlebug

Image coloured with Copic Markers:

Skin: E21, E11, E04, E00, E000, R22, R21, R20, R01, R00, B23

Hair and Iron: C5, C3, C1

Shirt: Y38, Y35, Y32

Pants: E50, E39, E35, E33

Socks: Y38, Y35, Y32, YR18

Shoes: E53, E50, E49, E47, E39, E37, E37

Bird: B69, B41, B29, B23, YR16

Tee and Grass and Ball: YG61, YG17, YG25, YG03, YR18, YR16, C1

Hope you like it and have a fantastic week!

You can find lots of inspiration from the Design Team Divas at the High Hopes blog, and the High Hopes Rubber Stamps Facebook Fan page plus you can also follow us on
Instagram, Twitter and Pinterest.