Archives

Happy St. Patrick’s Day!!!


Today I am sharing a Happy St. Patrick’s Day card I made using Gerda Steiner StampsSt. Patrick’s Day Cat and Hat Digital Stamp stamp for the image and Lawn Fawn – Celebration Scripty Sentiments for the sentiment. Lawn Fawn – Clover Background Stencils were used to create the background.


To make my cards this week, I began with a card base of Hammermill – Premium Cardstock 110 lb. cardstock, cut and scored to be 5.5″ x 4.25″. I created the background using Lawn Fawn – Clover Background Stencils, and applying Tim Holtz Distress Inks – Lucky Clover for the first layer and then Tim Holtz Distress Ink – Pine Needles for the second layer along with the Lucky Clover ink in spots using an ink blending brush. Tim Holtz Distress Ink – Pine Needles was then applied all around the edges of the card using a finger dauber.

The image was imported into Microsoft Word and then printed out onto Copic Marker X-Press It Blending Card paper using HP Printer Grayscale. With my Cuttlebug, I die cut the image using dies from My Creative Time – Rectangle Frame Die Layers. The image was coloured in with Copic Markers and then Tim Holtz Distress Inks – Mowed Lawn was applied around the edges of the die cut.

The sentiment was stamped directly onto the base card using Versa Fine – Onyx Black ink and MISTI for placement. I embossed the sentiment with Ranger – Clear Super Fine Detail embossing powder and then heat embossed it with a Marvy Uchida – Embossing Heat Tool. U-Line Double-Sided Foam Tape was applied to back of the coloured image and it was popped up onto the centre of the card. Lastly, I added in a few sparkly Gumdrops from Your Next Stamp.

Card Recipe:

Stamp: Gerda Steiner StampsSt. Patrick’s Day Cat and Hat Digital Stamp

Sentiment: Lawn Fawn – Celebration Scripty Sentiments

Inks: HP Printer Grayscale, Versa Fine – Onyx Black, Tim Holtz Distress Inks – Lucky Clover, Tim Holtz Distress Ink – Pine Needles, Tim Holtz Distress Inks – Mowed Lawn

Paper: Copic Marker X-Press It Blending Card, Hammermill – Premium Cardstock 110 lb.

Die Cuts: My Creative TimeRectangle Frame Die Layers – MCT-D274

Stencils: Lawn Fawn – Clover Background Stencils

Embossing Powder: Ranger – Clear Super Fine Detail embossing powder

Miscellaneous: MISTI – Most Incredible Stamping Tool, U-Line Double-Sided Foam Tape, Marvy Uchida – Embossing Heat Tool, Blending Brush, Your Next Stamp – Gumdrops

Image coloured with Copic Markers:

Kitten: R02, R00, C9, C7, C5, C3, Sakura Glaze – Black (Eyes and Nose), PrismaColor Premier Pencil Black (PC935)

Shamrocks: G99, G21, YG67, YG17

Hat: G29, YG25, YG17, YG07, YG03, YG01, C9, C7, C5, C3, E27, Y26, Y15, Y11


Hope you like it and have a fantastic week!

Unicorn Birthday!


Today, I’m sharing a slim-line birthday card using Gerda Steiner DesignsMoody Unicorns (GSD471) for the May Share Your Designs Challenge.


To create the card, I began with a card base of 9.5″ x 7″ using Hammermill – Premium Colour 100 lb. cardstock. I searched my die collection to find the perfect oval and couldn’t find any to fit the images that I had in mind. Since I own a Cricut Explore machine, I thought why not make my own front panel? To do this, I signed into Cricut Design Space to create the slim-line design.

I used the free shapes and selected the square, which I re-porportioned to be 9.5″ x 7″. I imported Scalloped Oval (#M41B9A) from the Baby Steps cartridge. I then duplicated this image several times and used the slice tool to die cut the rectangle in 3 places and the ovals in several places until I was satisfied with the final result. Once I loaded my mat and had selected “Make it”, I chose 2 patterned papers from Craft Smart – Hot Buy – Kawaii Dream. The Unicorns were used for the main panel and the purple pattern was used for the back panel. For the larger scalloped oval,Hot Buy – Recollections – Jewel Tones paper was used and for the smaller scalloped oval, Recollections – Purple Passions was used.

Using my MISTI and Memento – Tuxedo Black ink, I stamped the image from Gerda Steiner DesignsMoody Unicorns (GSD471). The images were coloured in with Copic markers  and then Stickles – Diamond was applied to the manes, tails and cupcake icing. With my MISTI and VersaMark ink various sentiments from the same stamp set were stamped onto Recollections – Purple Passions paper. These were then embossed with Ranger Embossing Powder White – Extra Fine Detail. Marvy Uchida – Embossing Heat Tool was then used to heat emboss the embossing powder. All of the sentiments were then cut using a small slicer device.

To assemble the card, I applied liquid glue to the large patterned purple rectangle and applied it directly to the base card. For the front panel, I first glued on the larger scalloped ovals and then applied the smaller scallops in the same way. The completed piece was then glued on top of the purple patterned paper. Each of the little unicorns and the sentiments were popped up onto the card using U-Line double-sided tape. Lastly, Tim Holtz Distress Ink – Evergreen Bough was applied around the edges of the card with a small finger dauber and Stickles – Diamond was added to the hearts to make them sparkle.

Card Recipe:

Stamp: Gerda Steiner Designs – Moody Unicorns (GSD471)

Inks: Memento – Tuxedo Black, Tim Holtz Distress Ink – Evergreen Bough

Paper: Copic Marker X-Press It Blending Card, Hammermill – Premium Colour 100 lb., Recollections – Purple Passions 8.5″ x 11″, Craft Smart – Hot Buy – Kawaii Dream (12″ x 12″), Hot Buy – Recollections – Jewel Tones (12″ x 12″)

Cricut Explore and Cricut Design Space: Scalloped Oval (#M41B9A) – Baby Steps, Shapes – Rectangle

Embossing Powder: Ranger Embossing Powder White – Extra Fine Detail

Miscellaneous: U-Line double-sided tape, Marvy Uchida – Embossing Heat Tool, MISTI – Most Incredible Stamping Tool, Stickles – Diamond

Image coloured with Copic Markers:

Unicorns:

Tail and Mane: RV14, RV13, BG15, BG13, Y15, Y13, B14, B12, V15, V12

Hooves: C9, C7, C5, C3

Body: C1, C0, C00, Colorless Blender, R02, R00

Eyes: B14, B12, B01

Hope you like it and have a great week!

Entered into: https://gsd-stamps.com/blogs/share-your-designs/play-along-in-our-syd-challenge-may-2023

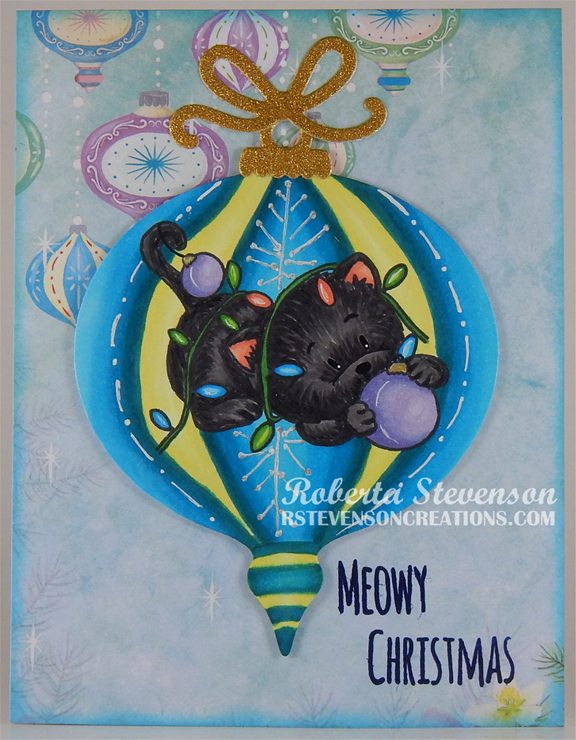
Meowy Christmas!


It’s the last day of the 2022 Cat Lovers Hop and today I’m sharing a Christmas card I made using Gerda Steiner Designs –  Deck The Halls – GSD438. I thought this image was adorable! Have fun hopping everyone!

I created a 5.5″ x 4.25″ card base using Hammermill – Premium Colour 100 lb. cardstock. I cut the background to be the same size using Wild Rose Studio – Winter Bauble Paper and adhered it directly to the base using double-sided tape. Using Tim Holtz Distress Inks – Tumbled Glass and a finger dauber, I inked around all of the edges of the card. With my Cuttlebug and Hero Arts – Infinity Dies – Ornaments, I die cut a large ornament from Copic Marker X-Press It Blending Card cardstock and the ribbon and topper from a scrap piece of gold cardstock.

Using my MISTI and Memento – Tuxedo Black ink, I stamped the image onto the Copic Marker X-Press It Blending Card cardstock and with Versafine – Majestic Blue, I stamped the sentiment onto the base card. I embossed the sentiment with Ranger – Clear Super Fine Detail embossing powder and then heat set it with a Marvy Uchida – Embossing Heat Tool. The image was coloured in with Copic markers and with a Gelly Roll Sakura #8 Pen designs were added to the ornaments and light bulbs. I tried to create the ornament as close to the paper as I could. Once this was completed, using liquid glue, I attached the top piece and the bow to the ornament. U-Line double-sided tape was added to the back of ornament die cut and it was popped up onto the background. With a Gelly Roll Sakura #8 Pen, I added in some string for the bauble.

Card Recipe:

Stamp and Sentiment:  Deck The Halls – GSD438 – Gerda Steiner Designs

Inks: Memento – Tuxedo Black, Versafine – Majestic Blue, Tim Holtz Distress Inks – Tumbled Glass

Die Cuts: Hero Arts – Infinity Dies – Ornaments (D1400)

Paper: Copic Marker X-Press It Blending Card, Hammermill – Premium Colour 100 lb., Wild Rose Studio – Winter Bauble Paper (6″ x 6)

Embossing Powder: Ranger – Clear Super Fine Detail embossing powder

Miscellaneous: U-Line – 2-sided tape, Gelly Roll Sakura #8 Pen, MISTI (Most Incredible Stamping Tool), Marvy Uchida – Embossing Heat Tool,

Image coloured with Copic Markers:

Kitten: T9, T7, T5, T3, R30, R22

Large Ornament: BG09, BG05, BG02, BG01, Y11, Y00, YG00, Gelly Roll Sakura #8 Pen

Baubles: BV11, BV02, BV00, BV000

Lights and Wire Cord: R14, RV42, G07, YG07, YG01, B06, B04, B000

Hope you like it and have a great week!

Also entered into:

https://gsd-stamps.com/blogs/share-your-designs/play-along-in-november-22-challenge


Owl Christmas!!


Sharing a Christmas card I made today using Gerda Steiner DesignsOwl I Want For Christmas. THANK YOU SO MUCH Gerda Steiner for giving me the opportunity to win this super adorable stamp from playing your amazing Advent Calendar this year. This was one of the prizes for door #7. I couldn’t wait to create this card with it.

To make the card, I created the base using Hammermill – Premium Colour 100 lb. to the size of 5.5″ x 4.25″. I cut Creative Memories – Glacier Designer Paper to be the same size as the base and adhered it to the card using double-sided tape. Tim Holtz Distress Ink – Chipped Sapphire was used to ink around all of the edges of the card. The image was imported into Microsoft Word and printed out onto Copic Marker X-Press It Blending Card. Using my Cuttlebug and dies from Creative Expressions Craft Dies by Sue Wilson – Festive Collection – Holly Lattice Frame, I die cut the printed image and also golden background frame using Crafter’s Companion – Luxury Cardstock – Gold paper.

I coloured in the image with Copic markers and also added in the tree trunk. Using a Gelly Roll Sakura #10 Pen, I added snow to the sky, along the branches of the tree and on top of the pine cones. Cosmic Shimmer Fluffy Stuff combined with WOW! Embossing Glitter – White Puff Twinkle were added to the hat and pompom and then heated with a Marvy Uchida – Embossing Heat Tool to make it puff up. U-Line double-sided tape was applied to backs of the image and the gold die cut and both were popped up onto the background. Finally, I added some Stickles – Diamond over top of the snow I created on the tree trunk and pine cones.

For the sentiment, I used a Recollections 1″ circle punch to cut some green cardstock and then using my MISTI, I stamped the sentiment from Penguin Party – Lawn Fawn with VersaFine ink. I added Ranger Embossing Powder White – Extra Fine Detail and heat embossed it with my Marvy Uchida – Embossing Heat Tool. I inked around the edges of the circle with Tim Holtz Distress Ink – Pine Needles. This was popped up with U-Line double-sided tape and I added the embellishment from Recollections – Snowflake Specialty Polyester Glitter. To create the pine cone and pine needles, I used some scraps of brown and green paper and using my Cuttlebug, I die cut the shapes using Sizzix – Tim Holtz – Festive Greens 662425. I used glue to adhere the pieces together and then popped up the completed piece onto the card using U-Line double sided tape.

Card Recipe:

Stamp and sentiment: Owl I Want For Christmas – Gerda Steiner Designs

Stamp and sentiment: Penguin Party – Lawn Fawn

Inks: HP Printer Grayscale, Tim Holtz Distress Ink – Pine Needles, Tim Holtz Distress Ink – Chipped Sapphire

Die Cuts: Sizzix – Tim Holtz – Festive Greens 662425, Creative Expressions Craft Dies by Sue Wilson – Festive Collection – Holly Lattice Frame – CED3125, Recollections 1″ Circle Punch

Paper: Copic Marker X-Press It Blending Card, Hammermill – Premium Colour 100 lb., Creative Memories – Glacier Designer Paper Pack 12 x 12″, Crafter’s Companion – Luxury Cardstock – Gold

Embossing Powder \ Liquid: WOW! Embossing Glitter – White Puff Twinkle, Cosmic Shimmer Fluffy Stuff, Ranger Embossing Powder White – Extra Fine Detail

Miscellaneous: MISTI – Most Incredible Stamping Tool, Marvy Uchida – Embossing Heat Tool, Gelly Roll Sakura #10 Pen, Recollections – Snowflake Specialty Polyester Glitter

Image coloured with Copic Markers:

Owl: E47, E44, E43, YR24, Y38, Y35, Y32, Y23, C9

Hat: R59, R37, R35

Sweater: R59, R37, R35, BG09, BG05, BG02, BG1

Tree, Limb and Pine Cones: E49, E47, E42, E40, E29, E27, E25, E23, G29

Ornaments: R59, R37, R35, R22, BG09, BG05, BG02, BG1, BG000, Y38, Y35, Y32

Sky: B99, B97, B95, B93

Hope you like it and have a great week!

You can find more cards to inspire you at KLM Designs, KLM Digital Design Team and KLM Digital Designs on the Facebook Fan page from the rest of our design team.