Today I’m sharing a miniature Wedding card using Art Impressions – MB Chapel – 5496, MB Template Dies (5317) and MB Envelope Die (5318) that I made for my cousin Trevor and his beautiful bride Caroline’s wedding a week ago. Wishing them both many joyous and prosperous years ahead with lots of happiness and laughter!
All of their decorations for the wedding were in purple, so I made this little card to match, which I inserted into a larger card that I had made for them.
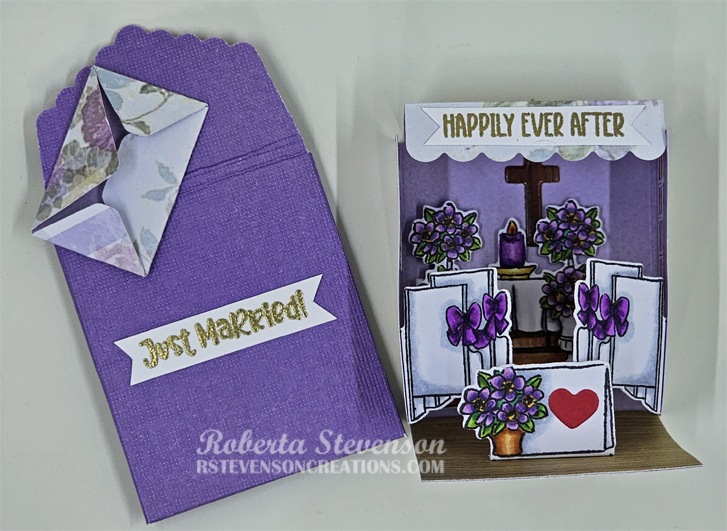
To create the card, I began with the card base using some scrap double-sided paper, Cuttlebug die-cutting machine and the Art Impressions – MB Template Dies (5317). The floor was die cut using Joy Crafts – Artist Trading Card – Wood Texture paper.
With Memento – Tuxedo Black ink and my MISTI, I stamped all of the images and the sentiment onto Copic Marker X-Press It Blending Card. I coloured in all of the images with Copic markers listed below. The windows were stamped onto Forever In Time – Vellum Print Stack Pack paper using VersaMark ink and then applying Ranger Embossing Powder White – Extra Fine Detail. The powder was heat set embossed using a Marvy Uchida – Embossing Heat Tool. This gave them a stained glass look. Using the Cuttlebug again, I die cut all of the inside pop-ups, cross and windows using Art Impressions – MB Chapel dies. Lastly, I die cut the envelopes out of some scrap double-sided paper that I had in my stash using the Art Impressions – MB Envelope Die (5318).
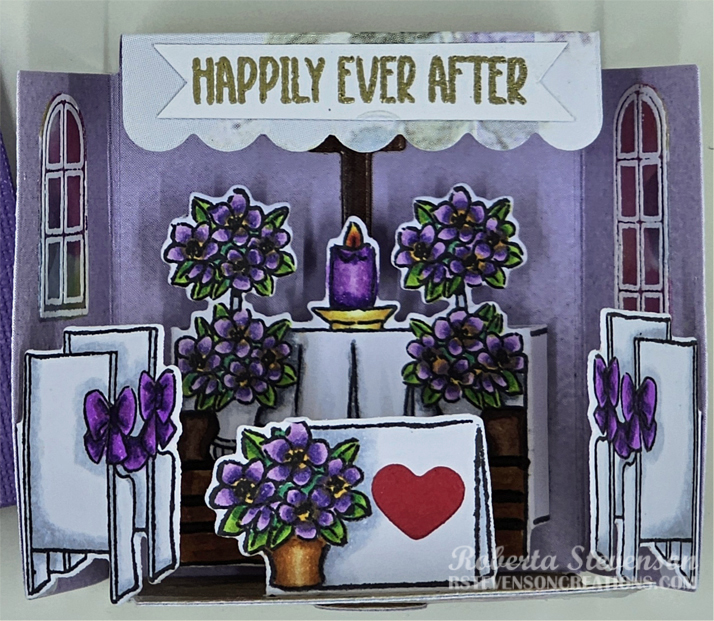
Double-sided tape was applied to do the assembly on the tabs and wall items. They were then all adhered to the base card. Double-sided tape was also applied to the flaps of the larger envelope to complete the assembly. To finish off both the card and the larger envelope, I stamped the sentiments onto some white cardstock with VersaMark ink and applied Ranger Super Fine Gold Embossing powder. This was heat embossed using a Marvy Uchida – Embossing Heat Tool and then cut to size with a cutter and scissors to create the banners. These were both applied to the finished card and envelope using liquid glue as well as the little heart. Then a small message was written on the miniature envelope to the bride and groom.

Card Recipe:
Stamps and Sentiment: Art Impressions – MB Chapel – 5496
Inks: Memento – Tuxedo Black, VersaMark
Paper: Copic Marker X-Press It Blending Card, Hammermill – Premium Colour 100 lb., Forever In Time – Vellum Print Stack Pack (SP280L Technicolor), Scrap patterned paper from stash
Dies: Art Impressions – MB Chapel – 5496, MB Template Dies (5317) and MB Envelope Die (5318)
Miscellaneous: MISTI – Most Incredible Stamping Tool, Cuttlebug, Ranger Embossing Powder White – Extra Fine Detail, Ranger Super Fine Gold Embossing powder, Marvy Uchida – Embossing Heat Tool.
Image coloured with Copic Markers:
Flowers and Leaves: Y35, V17, V15, V12
Flower Pots: E99, E97, Y32, C7, C5, C3, C1
Pews: C3, C2, C1, Colorless Blender
Altar: E29, E25, E23, E21
Steps to Altar: E39, E35, E33, E29
Candle, Bows and Flame: V09, V06, V04, R29, YR04, Y15
Candle Dish: YR23, Y15, Y11, Y00
Hope you like it and have a great week!