Today I’m sharing Summertime Fun (KLM Digital Designs) image from KLM Digital Designs. This little boy is enjoying his day just having a wonderful time not thinking about what is going on around him. He is just living in the moment and having fun blowing bubbles. I remember doing this on many occasions as a child. Do you?
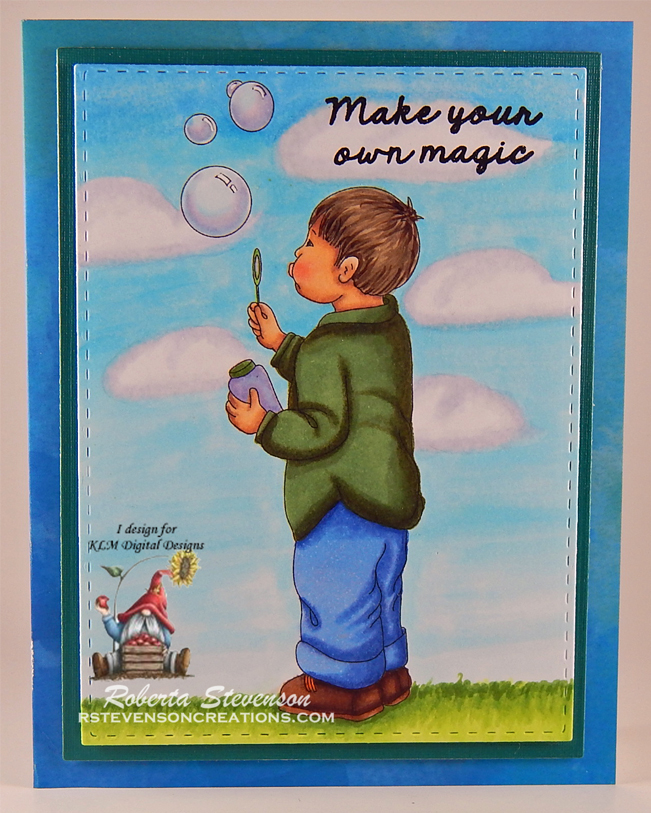
I printed out the main image onto Copic Marker X-Press It Blending Card using my HP Printer. The image was then die cut with my Cuttlebug and My Creative Time – Rectangle Frame Dies Layers and then coloured in with Copic markers. The sentiment was then added using Versa Fine – Onyx Black and embossed with Ranger – Clear Super Fine Detail embossing powder. This was heat embossed using Marvy Uchida – Embossing Heat Tool.
For the main background, Hot Buy – Recollections – Watercolour Solids 5.5″ x 4.25″ was used. My Creative Time – Rectangle Frame Dies were used to die cut Hot Buy – Recollections – Jewel Tones paper. All of the layers were now ready to be assembled. The image and background layer were both popped up with 3M VHB – 2 sided tape.
Card Recipe:
Stamp: Summertime Fun (KLM Digital Designs)
Sentiment: Craftin Desert Divas – Adventure Awaits (Retired Stamp)
Inks: HP Printer Grayscale, Versa Fine – Onyx Black
Paper: Copic Marker X-Press It Blending Card, Hot Buy – Recollections – Jewel Tones, Hot Buy – Recollections – Watercolour Solids Cards & Envelopes
Die Cuts: My Creative Time – Rectangle Frame Dies, My Creative Time – Rectangle Frame Layers
Embosssing Powder: Ranger – Clear Super Fine Detail embossing powder
Tools: 3M VHB – 2 sided tape, Marvy Uchida – Embossing Heat Tool
Image coloured with Copic Markers:
Skin: E000, E00, E04, E11, E21, R22, R20
Hair: E47, E44, E43
Shirt: YG99, YG97, YG63, G21
Pants: B26, B24, B21
Shoes: E29, E27, E25, E23, YR14, YR07
Bubbles: BV00, RV00, B000, B0000, Gelly Roll Sakura #8 Pen
Grass: YG17, YG13, YG03, YG01
Sky and Clouds: B60, B02, B01, B00, B000, B000, C0, Colorless Blender
Hope you like it and have a great week!
You can find more cards to inspire you at KLM Designs, KLM Digital Design Team and KLM Digital Designs on the Facebook Fan page from the rest of our design team.