Archive | April 2022

Hedgies Happy Birthday!!


It’s Wednesday, and this week, I made a birthday card using High Hopes Rubber Stamps Hedgie Stack – TDG027 for the image and Mini Sentiment Set #1 – HLL001 for the sentiment. These little hedgies are excited to wish someone special a very Happy Birthday!

To make my card this week, I began with a card base of Hammermill – Premium Colour 100 lb. cardstock, cut and scored to be 5.5″ x 5.5″. I cut the Crafter’s Companion – Luxury Cardstock – Gold cardstock background paper to the size of 5.5″ x 5.5″ and adhered it directly to the base using double-sided tape. AITOH Origami – Print Chiyogami – Butterflies paper was cut to the size of 5.25″ x 5.25″ and glued on top of the gold paper. Using my Couture Creations – Go Power and Emboss and PinkFresh Essentials: Folk Edge Squares, I die cut another square from Crafter’s Companion – Luxury Cardstock – Gold and Copic Marker X-Press It Blending Card. I popped up the gold die cut onto the floral background using U-Line double-sided tape. I stamped the main image onto the Copic Marker X-Press It Blending Card using my MISTI and Memento – Tuxedo Black.

The image was coloured in with Copic Markers. I used a Gelly Roll Sakura #5 Pen to create some more texture in the fur by just dabbing it everywhere. I’m hoping that it looks like little spikes at the end of their fur. I applied U-Line double-sided tape to the back of the coloured image and popped it up onto the gold die-cut. I stamped the sentiment using my MISTI and Memento – Tuxedo Black ink onto Copic Marker X-Press It Blending Card. Using a 3/4″ punch, I punched out the circle surrounding the sentiment. Then, using my Cuttlebug and My Creative Time – Bunch of Fun Circle Dies, I die cut a slightly larger circle out of a scrap piece of gold paper from Crafter’s Companion – Luxury Cardstock – Gold. I ran the sentiment through my Xyron Create a Sticker and attached it directly to the gold circle. Using some U-Line double-sided tape, I popped it up onto the coloured image. Lastly, to complete my card, I added in some PinkFresh Studio – Essentials Jewel Mix and flowers gems from the Dollar Store.

Card Recipe:

Stamps: Hedgie Stack – TDG027 (High Hopes Rubber Stamps)

Sentiment: Mini Sentiment Set #1 – HLL001 (High Hopes Rubber Stamps)

Inks: Memento – Tuxedo Black

Paper: Copic Marker X-Press It Blending Card, Hammermill – Premium Colour 100 lb., Crafter’s Companion – Luxury Cardstock – Gold, AITOH Origami – Print Chiyogami – Butterflies

Die Cuts: PinkFresh Essentials: Folk Edge Squares, My Creative Time – Bunch of Fun Circle Dies

Tools: MISTI – Most Incredible Stamping Tool, U-Line double-sided tape, Couture Creations – Go Power and Emboss, Gelly Roll Sakura #10 Pen, Gelly Roll Sakura #5 Pen, PinkFresh Studio – Essentials Jewel Mix, Cuttlebug

Image coloured with Copic Markers:

HedgeHogs: T7, T5, T4, T3, E51, E50, R30, R22, R21, R20 (Eyes – Sakura Glaze – Black, Gelly Roll Sakura #10 Pen), Gelly Roll Sakura #5 Pen

Leaves and Grass: G99, YG67, YG17, YG13, G21

Flowers: Y17, RV02, RV10, RV00

Tree and Limbs: E31, E27, E25, E23

Sky: B02, B01, B00, B000, B0000

Hope you like it and have a fantastic week!

Check out more adorable images in the new “Spring Fever Release” at High Hopes Rubber Stamps!

You can find lots of inspiration from the Design Team Divas at the High Hopes blog, and the High Hopes Rubber Stamps Facebook Fan page plus you can also follow us on
Instagram, Twitter and Pinterest.

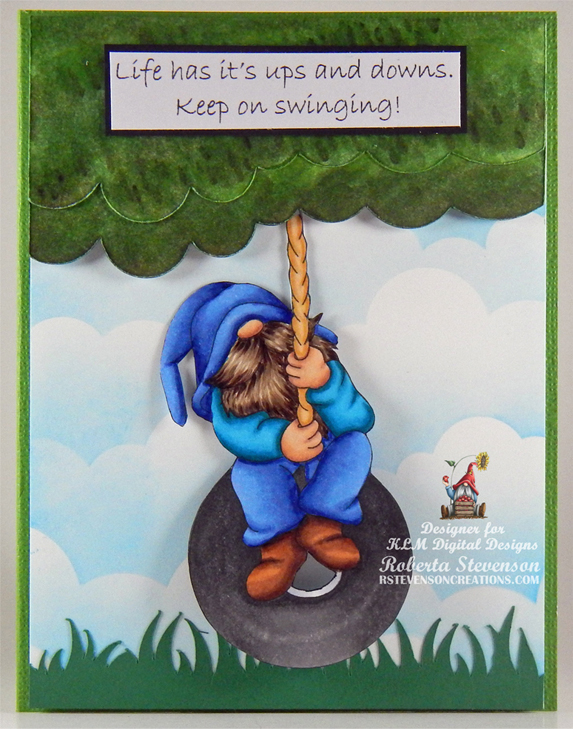
Keep On Swinging!!


Sharing a card I made today using KLM Digital Design –  Tire Swing Gnome from the new April 2022 release. This image also comes with 2 more sentiments, “May your toes touch the sky” and “Why can’t we just swing into Friday?” I think it would be good if we could just swing into Friday and have fun weekends all the time! Don’t you?

Here it is in action.


I used The Paper Studio – Primary Simply Solids (4.25″ x 5.5″) for my base card. I wanted to create an interactive swinging card and I found a video on You Tube from My Favourite Things called “Creating an Interactive Swing Card” by Stephanie on Mar 7, 2019. I didn’t have the dies, so I used the video for inspiration and decided to create my own mechanism and die cuts. Using my Cricut, I took a rectangle and added a bunch of circles and then welded them all together to create the tree. I also created the swing mechanism by joining a circle and thin long rectangle and then welding them together. The grass was also die cut on my Cricut Explore. I die cut the trees and swing mechanism using Copic Marker X-Press It Blending Card and the grass with Recollections – Green cardstock. I coloured in the trees with Copic markers. Using Hammermill – Premium Colour 100 lb. and Tim Holtz Distress Ink – Salty Ocean, I created the clouds with Lawn Fawn Cuts – Cloudy Stencil. Using the mechanism for placement, I die cut a circle into the cloud background.

I imported the image and sentiment into Microsoft Word and printed them out onto Copic Marker X-Press It Blending Card. The image was coloured in with Copic markers. Using scissors, I fussy cut around the coloured image and inked around the edges with a black marker. I cut the sentiment with my cutter and ran it through my Xyron Create a Sticker. I attached it to some Recollections – Black cardstock and cut around it again.

The card was now ready to assemble. I applied a small circle double-side pop-dot to the centre of the hole cut earlier on the cloud paper and attached it to a slightly larger circle at the back of the cloud paper. Using my EK Success Powder tool, I went around all of the sides of the pop-up to remove any stickiness. I applied the mechanism over top of the pop-dot and attached some extra two-sided tape. I applied another die cut circle over top of the raised pop-dot. This allowed the mechanism to now move freely back and forth on the page. Using double-sided tape on the back of the cloud paper, I applied the double-sided tape everywhere except around the mechanism and popped it onto the base card. I ran the grass die cut through my Xyron Create a Sticker and applied it directly to the cloud base. I took the 2 tree die cuts that I had created earlier and coloured and glued them both together. I attached the gnome image to the mechanism with double-sided tape and cut off the extra length not required. I added some double-sided tape behind the trees on both sides and only part way along the top on both sides leaving the area for the swinging mechanism free. This was then popped up onto the cloud background. I applied some U-Line double-sided tape and popped up the sentiment on top of the trees. Lastly, I added a penny to the back of the gnome to give it more momentum when swinging.

Card Recipe:

Stamp and Sentiment:  Tire Swing Gnome – KLM Digital Designs

Inks: HP Printer Grayscale, Tim Holtz Distress Ink – Salty Ocean

Paper: Copic Marker X-Press It Blending Card, The Paper Studio – Primary Simply Solids (4.25″ x 5.5″), Hammermill – Premium Colour 100 lb., Recollections – Green, Recollections – Black cardstock

Dies: Lawn Fawn Cuts – Cloudy Stencil

Miscellaneous: U-Line – 2 sided tape, EK Success Powder Tool, Cricut Explore, Xyron Create a Sticker, penny

Image coloured with Copic Markers:

Skin: E21, E11, E04, E00, E000

Beard: E47, E44, E43, E41

Shirt: BG09, BG05, BG02, BG01

Hat and Jeans: B26, B23, B21

Boots: E27, E25, E23, E21

Tire: T7, T5, T3, C2, C1, C0, Colorless Blender

Rope: Y21, E53, E52, E51

Hope you like it and have a great week!

You can find more cards to inspire you at KLM Designs, KLM Digital Design Team and KLM Digital Designs on the Facebook Fan page from the rest of our design team.

Somebunny Loves You!!


It’s Wednesday, and this week, I made a card using High Hopes Rubber Stamps Bunny Blossoms – TDG024 for the image and Some Bunny – FDG032 for the sentiment. I just love this super adorable little bunny taking time to smell the flowers. Spring is here, but the winter snow keeps playing tricks on us still. LOL! We just had another snow storm the other day. I thought April was supposed to bring Spring showers, not Spring snow!!!

To make my card this week, I began with a card base of AC Cardstock – White, cut and scored to be 6″ x 6″. I cut the Recollections – Matte Gold Foil cardstock background paper to the size of 6″ x 6″ and adhered it directly to the base using double-sided tape. Crafts Designer Paper – 02-3093268 was cut to the size of 5.75″ x 5.75″ and inked around the edges with Tim Holtz Distress Ink – Black Soot. I applied U-Line double-double sided tape and popped the paper onto the gold backing. Using my Couture Creations – Go Power and Emboss and Waffle Flower – Nesting Square dies, I die cut another square from Recollections – Matte Gold Foil cardstock and Copic Marker X-Press It Blending Card. I popped up the gold square onto the bunny background and stamped the main image onto the Copic Marker X-Press It Blending Card using my MISTI and Memento – Tuxedo Black.

The image was coloured in with Copic Markers. I though I’d go out of my comfort zone this week to create this sky with a variety of different colours. I thought it still needed something more so I added in some clouds using a PrimaColor Pencil – White. I also added in some extra fur with PrimaColor Pencil – Beige. Once, I was satisfied with the sky, I added U-Line double-sided tape to the back of it and it too was popped up onto the card. The sentiment was stamped onto Copic Marker X-Press It Blending Card using my MISTI and Memento – Tuxedo Black. I fussy cut around it and then applied it to a small piece of Recollections – Matte Gold Foil cardstock using repositionable tape. I used my Brother Scan and Cut to cut around the image with a slight border. I coloured around the circle stamped image with RV000 and then used a black marker to go all around the edges. I applied U-Line double-sided tape and popped it up onto the gold die-cut. Lastly, 2 layers of the U-Line double-sided tape were applied to the right side only of the sentiment and glue to the left and attached it to the base coloured paper to finish off the card.

Card Recipe:

Stamps: Bunny Blossoms – TDG024 (High Hopes Rubber Stamps)

Sentiment: Some Bunny – FDG032 (High Hopes Rubber Stamps)

Inks: Memento – Tuxedo Black, Tim Holtz Distress Ink – Black Soot

Paper: Copic Marker X-Press It Blending Card, AC Cardstock – White, Recollections – Matte Gold Foil cardstock, Crafts Designer Paper – 02-3093268

Die Cuts: Waffle Flower – Nesting Square dies

Tools: MISTI – Most Incredible Stamping Tool, U-Line double-sided tape, Couture Creations – Go Power and Emboss, Brother Scan and Cut, Gelly Roll Sakura #10 Pen

Image coloured with Copic Markers:

Rabbit: E57, E55, E53, E51, E50, E35, R30, R22, R21, R20 (Eyes – Sakura Glaze – Black, Gelly Roll Sakura #10 Pen), PrimaColor Pencil – Beige (PC997)

Leaves and Grass: G99, YG67, YG17, G21

Flowers: Y17, Y08, RV66, RV63, RV55, RV52, RV00, RV000, R83, R81

Tree and Limbs: E31, E27, E25, E23

Sky: B02, B01, B00, B000, B0000, RV00, R00, R000, Y02, Y00, (Clouds: PrimaColor Pencil – White (PC398))

Hope you like it and have a fantastic week!

Check out more adorable images in the new “Spring Fever Release” at High Hopes Rubber Stamps!

You can find lots of inspiration from the Design Team Divas at the High Hopes blog, and the High Hopes Rubber Stamps Facebook Fan page plus you can also follow us on
Instagram, Twitter and Pinterest.

Hoppy Easter Bunny!!


It’s Wednesday, and this week, I made an Easter card using High Hopes Rubber Stamps Carrot Patch – TDG029 for the image and Hoppy Easter! – E038 for the sentiment. We always looked forward to Easter time every year because we knew we would be colouring all of the Easter eggs with our mom in all different colours. It was always such a fun time!

To make my card this week, I began with a card base of Hammermill – Premium Colour 100 lb., cut and scored to be 5.5″ x 4.25″. I die cut the background papers from Echo Park – Welcome Easter cardstock using My Creative Time – Rectangle Frame Dies and my Cuttlebug. Tim Holtz Distress Ink – Spiced Marmalade was used to ink around all of the edges of both die cuts. I applied U-Line double-double sided tape and popped both papers onto the base card. Using the same set of dies, I die cut Copic Marker X-Press It Blending Card cardstock. I stamped the main image onto this die cut and the sentiment onto Copic Marker X-Press It Blending Card using my MISTI and Memento – Tuxedo Black. The image was coloured in with Copic Markers. I used a black marker to add in more details to the butterflies and also to add a couple of antennas. U-Line double-side tape was applied to the back of the coloured image and it was popped up into the centre of the orange rectangle. Lastly, to finish it off, I added in a few YNS Tropical Paradise Gumdrops.

Card Recipe:

Stamps: Carrot Patch – TDG029 (High Hopes Rubber Stamps)

Sentiment: Hoppy Easter! – E038 (High Hopes Rubber Stamps)

Inks: Memento – Tuxedo Black, Tim Holtz Distress Ink – Spiced Marmalade

Paper: Copic Marker X-Press It Blending Card, Echo Park – Welcome Easter (6″ x 6″), Hammermill – Premium Colour 100 lb.

Die Cuts: My Creative Time – Rectangle Frame Dies

Tools: MISTI – Most Incredible Stamping Tool, U-Line double-sided tape, Cuttlebug, YNS Tropical Paradise Gumdrops

Image coloured with Copic Markers:

Rabbit: B60, C1, C0, R30, R20 (Eyes – Sakura Glaze – Black, Gelly Roll Sakura #8 Pen)

Carrots: E07, YR18, YR16, YR15, TR14, YR12

Leaves: G99, YG67, YG17, G21

Flowers: V12, V06, V04, Y17, Y08

Egg: BG72, BG57, BG32, BG11, RV06, RV04, RV02, Y15, Y08, Y02

Butterflies: YR27, Y38, Y17, Y08, E47

Grass: YG67, YG63, YG45, YG41

Sky: B60, B02, B01, B00, B000, C0

Hope you like it and have a fantastic week!

Check out more adorable images in the new “Spring Fever Release” at High Hopes Rubber Stamps!

You can find lots of inspiration from the Design Team Divas at the High Hopes blog, and the High Hopes Rubber Stamps Facebook Fan page plus you can also follow us on
Instagram, Twitter and Pinterest.
You Are Perfect!!


Sharing a card I made today using KLM Digital Design –  Frog Prince from the new April 2022 release. This image also comes with 2 more sentiments, “Let your tale come true” and “Sometimes you gotta kiss a frog to find a prince”.

I created a 6″ x 6″ card base using AC Cardstock – White. Using my Cuttlebug and Craftin Desert Diva’s – Inside Scalloped Squares die cut, I die cut Momenta – Cardstock. I imported the image and sentiment into Microsoft Word and printed them out onto Copic Marker X-Press It Blending Card. The image was coloured in with Copic markers and then I cut out the whole piece to the size of 4.5″ x 4.5″. I applied liquid glue to the backing of the Scalloped die cut to the stitched border and then placed it over top of my coloured image. U-Line double-sided tape was applied to the backing and it was popped up onto the base card. I added in some gems from “Say it in Crystals” onto the crown and then finished off the card with some dots from Your Next Stamp – Watermelon Party Sparkly Gumdrops.

Card Recipe:

Stamp and Sentiment:  Frog Prince – KLM Digital Designs

Inks: HP Printer Grayscale

Paper: Copic Marker X-Press It Blending Card, Momenta – Cardstock, AC Cardstock – White

Dies: Craftin Desert Diva’s – Inside Scalloped Squares (retired)

Miscellaneous: U-Line – 2 sided tape, Gelly Roll Sakura #10 Pen, Sakura Glaze – Black, Your Next Stamp – Watermelon Party Sparkly Gumdrops

Image coloured with Copic Markers:

Frog: BG99, G19, G17, G14, YG17, YG06, YG03, YG00, YG0000, E81, C1, C0 (Eyes: Sakura Glaze – Black, Gelly Roll Sakura #10 Pen)

Crown: E15, R39, R29, R27, R24, Y35, Y06, YR35, C1, C0

Shadow: B00, Colorless Blender

Hope you like it and have a great week!

You can find more cards to inspire you at KLM Designs, KLM Digital Design Team and KLM Digital Designs on the Facebook Fan page from the rest of our design team.

Ellie & Friends!!


It’s Wednesday, and this week, I made an Easter card using High Hopes Rubber Stamps Ellie & Friends – TDG025 for the image and Happy Easter! – F096 for the sentiment. We are celebrating our new “Spring Fever Release” this month and who couldn’t love this adorable image!

To make my card this week, I began with a card base of AC Cardstock – White, cut and scored to be 6″ x 6″. I cut the flower cardstock from Echo Park – Welcome Easter at 6″ x 1.75″ and Lawn Fawn – Watercolor Wishes Rainbow paper to 6″ x 4.5″. I applied double-side tape and adhered both pieces directly to the base. Tim Holtz Distress Ink – Wilted Violet ink was used to ink around all of the edges of the base card. Using My Creative Time -Stitched Squares Inside and Out and my Cuttlebug, I die cut Momenta – Cardstock and inked around the edges with Tim Holtz Distress Ink – Fossilized Amber. 3M double-sided tape was applied to the back of this and it was popped up onto the base card.

Using PinkFresh Studios – Essentials: Blanket Stitched Square Die Set and my Cuttlebug, I die cut Copic Marker X-Press It Blending Card. I stamped the main image onto this die cut and sentiment onto Copic Marker X-Press It Blending Card using my MISTI and Memento – Tuxedo Black. The image was coloured in with Copic Markers and then U-Line double-side tape was applied to the back of it. This was popped up over top of the yellow square.

I fussy cut around the sentiment and inked around the edges with Tim Holtz Distress Ink – Wilted Violet. I ran it through my Xyron Create a Sticker and applied it to the Momenta – Cardstock and fussy cut around it again. I applied Scrapbook Adhesives – 3D Foam Strips to the back of the sentiment layers and added it to the bottom right of the card. Lastly, I added in 3 DoodleBug Design Inc. – Sprinkles Spring Assortment to complete the card.

Card Recipe:

Stamps: Ellie & Friends – TDG025 (High Hopes Rubber Stamps)

Sentiment: Happy Easter! – F096 (High Hopes Rubber Stamps)

Inks: Memento – Tuxedo Black, Tim Holtz Distress Ink – Wilted Violet, Tim Holtz Distress Ink – Fossilized Amber

Paper: Copic Marker X-Press It Blending Card, Lawn Fawn – Watercolor Wishes Rainbow – 6″ x 6″, Echo Park – Welcome Easter (6″ x 6″), Momenta – Cardstock, AC Cardstock – White

Die Cuts: My Creative Time -Stitched Squares Inside and Out, PinkFresh Studios – Essentials: Blanket Stitched Square Die Set

Tools: MISTI – Most Incredible Stamping Tool, U-Line double-sided tape, 3M double-sided tape, Cuttlebug, Xyron Create a Sticker, DoodleBug Design Inc. – Sprinkles Spring Assortment, Scrapbook Adhesives – 3D Foam Strips

Image coloured with Copic Markers:

Elephant: C5, C3, C2, C1, R30, R20

Chicks: E53, E50, E15, YR31, YR18, YR14, Y21, Y08, Y14, Y08

Flowers, Stems and Leaves: V09, V06, V04, V01, Y17, Y13, G85, G43

Eggs: Y17, Y13, Y04. BG15, BG13, BG11, BG10, V17, V15, V12, B04, B02, B01, RV66, RV55, RV13, RV11, RV10

Sky: B60, B02, B01, B00, B000, C1, Colorless Blender

Grass: G14, YG23, YG11, YG03, YG01

Hope you like it and have a fantastic week!

Check out more adorable images in the new “Spring Fever Release” at High Hopes Rubber Stamps!

You can find lots of inspiration from the Design Team Divas at the High Hopes blog, and the High Hopes Rubber Stamps Facebook Fan page plus you can also follow us on
Instagram, Twitter and Pinterest.

Fido Friend


Sharing a card I made today using KLM Digital Design –  Fido Friend from the new April 2022 release. We took a break for a little while, but now we are back with some wonderful new images. This is a free stamp this month for everyone to enjoy.

I created a 3.75″ x 7.5″ card base using Hammermill – Premium Colour 100 lb. cardstock. I imported the image into Microsoft Word and printed it out onto Copic Marker X-Press It Blending Card. Using my Couture Creations – Go Power and Emboss machine and My Creative Time – Tall Frame Dies, I die cut the image and coloured it in with Copic markers. I applied U-Line double-sided tape and popped it up onto the base card. To finish it off I glued on some Sprinkletz  Embellishments – Top Dog.

Card Recipe:

Stamp and Sentiment:  Fido Friend – KLM Digital Designs

Inks: HP Printer Grayscale

Paper: Copic Marker X-Press It Blending Card, Hammermill – Premium Colour 100 lb.

Die Cuts: My Creative Time – Tall Frame Dies

Miscellaneous: U-Line – 2 sided tape, Gelly Roll Sakura #10 Pen, Sakura Glaze – Black, Sprinkletz  Embellishments – Top Dog (NK146), Couture Creations – Go Power and Emboss

Image coloured with Copic Markers:

Dog: E49, E47, E44, E43, E42, E41, E40, E25, E23, R30, R27, R24, R22, R20, Y35, Gelly Roll Sakura #10 Pen, Sakura Glaze – Black

Lettering: Y38, Y35, Y32, Y26, Y19, Y18, Y17, Y15, Y13

Grass: Y17, Y13, Y03

Hope you like it and have a great week!

You can find more cards to inspire you at KLM Designs, KLM Digital Design Team and KLM Digital Designs on the Facebook Fan page from the rest of our design team.