Archives

Card of the Month – Round 1 – You Did It!


Yippee! I am thrilled to have been asked to enter my card into the Creative Scrapbooker Magazine’s Card of the Month Contest for April! I would love it if you voted for me! Thank you! 🙏🏻 😘💙
Here is the link on Facebook:

https://creativescrapbooker.ca/card-of-the-month-april-2023/?fbclid=IwAR3vXUqlRBglU91NoJldQ6QCgmgcI4C2ORT158UZ-ISyx7rNHNdVTyDo-L0#/bracket/4416181


The original post where I created this card can be found here. https://rstevensoncreations.com/2023/03/10/you-did-it/

Hope you like it and have a great week!

You can find more cards to inspire you at KLM Designs, KLM Digital Design Team and KLM Digital Designs on the Facebook Fan page from the rest of our design team.

You Did It!


Today I’m sharing a graduation card using KLM Digital DesignGraduation Gnome II from the new March release. This image also comes with 2 more sentiments, “Be the change that you want to see in this world” and “And so the adventure begins”. This little gnome is glowing with pride after graduating and accepting his diploma. Congratulations to all of the new graduates out there this year!

Hammermill – Premium Colour 100 lb. cardstock was used to create a 4.25″ x 5.5″ card base. Recollections – Black cardstock was cut to the size of 4″ x 4-5/8″ and Recollections – Patterned paper was cut to the size of 3″ x 4.25″ using My Creative Time – Rectangle Frame Layers and my Cuttlebug. Using a Sharpie – Gold Medium Point – Water Based Paint pen, I inked around all of the edges of both pieces.

The image and sentiment were imported into Microsoft Word and printed out onto Copic Marker X-Press It Blending Card. I coloured in the image and fussy cut around it and the sentiment. Both were adhered onto Recollections Black cardstock and then fussy cut again.

The card was now ready to assemble. I added U-Line double-sided pop-up tape to the backs of the sentiment, image and both rectangular pieces. All pieces were then popped up onto card to complete it.

Card Recipe:

Stamp and Sentiment:  Graduation Gnome II – KLM Digital Designs

Inks: HP Printer Grayscale

Paper: Copic Marker X-Press It Blending Card, Hammermill – Premium Colour 100 lb., Recollections Grad Paper, Recollections Black cardstock

Dies: My Creative Time – Rectangle Frame Layers

Miscellaneous: U-Line double-sided tape, Cuttlebug, Sharpie – Gold Medium Point – Water Based Paint, Xyron Create a Sticker

Image coloured with Copic Markers:

Skin: E21, E11, E04, E00, E000

Beard: E29, E27, E25, E23

Gown and Hat: C10, C8, C6, C5, C4

Boots: 100, C10, C8, C6, C5, C4

Scroll: C1, C0

Ribbon and Tassel: YR23, Y15, Y11, Y00

Glow around image: Y00

Hope you like it and have a great week!

You can find more cards to inspire you at KLM Designs, KLM Digital Design Team and KLM Digital Designs on the Facebook Fan page from the rest of our design team.

Grad Gnome!!


My nephew graduated and I couldn’t resist sharing this adorable little Graduation Gnome With Diploma from KLM Digital Designs that I made for him. The image comes with 3 different sentiments, “Congrats Grad!”, which I’ve used on my card and also, “Congratulations” and “Today is your day!”.

To make the card, I printed out the main image onto Copic Marker X-Press It Blending Card using my HP Printer. I used my Brother Scan and Cut to cut around the image and coloured it in with Copic markers.

I used Hammermill paper to create the base shape of the card 8.5″ x 4.25″. I scored the paper at 4.25″. Then I used a mixture of Tim Holtz inks to create the background. Once I was satisfied with the look, I used Hammerill paper, my Cuttlebug and Your Next Stamp – Confetti Panel Die and popped this die cut up over the coloured background using 3M VHB – 2 sided tape. The sentiment was die cut using MFT – Die-namics Pierced Fishtail Flags, inked around the edges with Tim Holtz Distress Ink – Barn Door and then popped up with 3M VHB – 2 sided tape.

The sentiment was popped up the same way to complete the card.

Card Recipe:

Stamp and Sentiment: Graduation Gnome With Diploma (KLM Digital Designs)

Inks: HP Printer Grayscale, Tim Holtz Distress Ink – Barn Door, Carved Pumpkin, Salty Ocean, Blueprint Sketch, Wild Honey, Festive Berries, Wilted Violet and Lucky Clover

Paper: Copic Marker X-Press It Blending Card, Hammermill – Premium Colour 100 lb.

Die Cut: Your Next Stamp – Confetti Panel Die – YNSD770, MFT – Die-namics Pierced Fishtail Flags

Tools: 3M VHB – 2 sided tape, Cuttlebug

Image coloured with Copic Markers:

Skin: E000, E00, E04, E11, E21

Beard: E49, E47, E44, E42

Hat, Shoes and Gown: C10, C8, C6, T10, T8, Black (100)

Diploma: E41, E40

Tassel: R59, R39, R37, R35

Hope you like it and have a great week!

You can find more cards to inspire you at KLM Designs, KLM Digital Design Team and KLM Digital Designs on the Facebook Fan page from the rest of our design team.

Congrats Grad!!!


It’s Wednesday, and this week I’m sharing a Graduation Card featuring Grad Boy – R114 from (High Hopes Rubber Stamps) for the main image and Lg. Fancy Congrats – J006 (High Hopes Rubber Stamps) for the sentiment. My nephew graduated a while ago, but we just found out about it. So this is a belated graduation card. LOL! You know what they say, better late than never!!


To create the card this week, I stamped the main image and sentiment onto Copic Marker X-Press It Blending Card cut at 5.25″ x 4″ using my MISTI and Memento – Tuxedo Black ink. Then I used just the hat and stamped it at different angles to create my background. The images were coloured in with Copic Markers. I decided to pop one hat up in the air. I stamped it separately, fussy cut the image and then coloured it in and popped it up using 3M VHB – 2 sided tape.

To finish off the card, I used double-sided tape and attached the coloured image onto 5.5″ x 4.25″ cardstock from The Paper Studio – Christmas Box of Cards.

Card Recipe:

Stamp: Grad Boy – R114 (High Hopes Rubber Stamps)

Sentiment: Lg. Fancy Congrats – J006 (High Hopes Rubber Stamps)

Inks: Memento – Tuxedo Black

Paper: Copic Marker X-Press It Blending Card, The Paper Studio – Christmas Box of Cards 2012

Tools and Miscellaneous: MISTI – Most Incredible Stamping Tool, Sakura Glaze – Black, 3M VHB – 2 sided tape

Image coloured with Copic Markers:

Skin and Mouth: E21, E11, E04, E00, E000, R89, R85, R83, R29, Sakura Glaze – Black (Eyes)

Hair: C10, C7, C5

Gown: N10, N6, N5, N4

Hats: 100, N10, N8, N6, R39, R29

Shirt, Tie and Socks: B39, B37, B18, C1, C00

Pants: T5, T3, T2

Shoes: C5, C3, C1, 100

Diploma: B60, C1, Colorless Blender

Hope you like it and have a fantastic week!

You can find lots of inspiration from the Design Team Divas at the High Hopes blog, and the High Hopes Rubber Stamps Facebook Fan page plus you can also follow us on
Instagram, Twitter and Pinterest.

Grad Nurse!!


My niece graduated last year to become a Registered Nurse. We are so proud of her. She has joined several of my cousins in this profession who are also Nurses and Nurse Practitioners. I made her this card to congratulate her using Cute Nurses from The Paper Shelter and Proud Nurse Set – 4899 (Art Impressions)

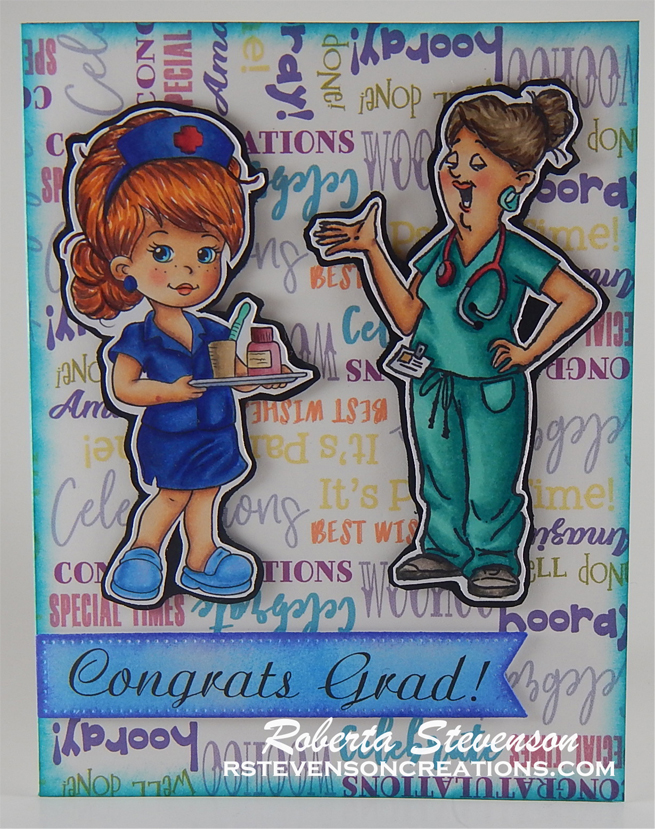
I stamped the image of the nurse on the right and inside of the card onto Copic Marker X-Press It Blending Card using my MISTI and Memento Tuxedo Black Ink. For the nurse on the left, I printed the image out on my printer using High Quality Grayscale.  I coloured in the images with Copic markers and then fussy cut around them. I wanted the images on the front of the card to pop, so I ran them through my Xyron Creative Station and attached them to black cardstock. Then I fussy cut around them again. I stamped the sentiment on the inside of the card using Versa Fine – Onyx Black. This was embossed using Ranger – Clear Super Fine Detail embossing powder and my Marvy Uchida – Embossing Heat Tool. The sentiment on the front was printed on my printer, using digital stamp from Graduation Gnome With Diploma (KLM Digital Designs). Then it was die cut using Die-Namics MFT-489 PCD Fishtail Figs STX.

For the inside of the card, I couldn’t resist using this fun image from Proud Nurse Set – 4899 (Art Impressions), because I know especially today, nurses are working really long hours. My niece said the sentiment and was so true when she received her card. LOL! We have to give all of the front-line workers credit for all of the hard work they are doing during these Covid times.

I used Hammermill paper to create the base shape of the card 5.5″ x 4.25″. I cut the background paper from Polkadoodles – Winnie Celebrations 1 – Top Banana Kit to the same size and inked around the edges using Tim Holtz Distress Inks – Peacock Feathers. For the sentiment on the front, I inked around the edges using Tim Holtz Distress Ink – Blueprint Sketch. I popped up images and sentiment with 3M VHB – 2 sided tape. On the inside of the card, I ran the coloured image through my Xyron Creative Station and attached it.

Card Recipe:

Stamps: Cute Nurses (The Paper Shelter), Proud Nurse Set – 4899 (Art Impressions)

Sentiments: Proud Nurse Set – 4899 (Art Impressions), Graduation Gnome With Diploma (KLM Digital Designs)

Inks: Memento – Tuxedo Black, Versa Fine – Onyx Black, Tim Holtz Distress Ink – Blueprint Sketch, Tim Holtz Distress Inks – Peacock Feathers. HP Printer High Quality Grayscale

Paper: Copic Marker X-Press It Blending Card, Hammermill – Premium Colour 100 lb., Polkadoodles – Winnie Celebrations 1 – Top Banana Kit

Embossing Powder: Ranger – Clear Super Fine Detail embossing powder

Die Cut: Die-Namics MFT-489 PCD Fishtail Figs STX

Tools: 3M VHB – 2 sided tape, Xyron Creative Station, Marvy Uchida – Embossing Heat Tool

Image coloured with Copic Markers:

Skin: E000, E00, E04, E11, E22, R22, R20

Hair: E18, E08, YR18, YR14, E47, E44, E43

Eyes: B05, B02, B01

Hat and Outfits: B29, B28, B26, B24, B23, BG49, BG15, BG13, BG11

Cross on Hat: R39, R37, R35

Shoes: B41, B21, B14, B12

Tray and Items: BG34, BG32, R89, R85, R83, R81, E44, E43, E42, E41, E51, E50, BV20

Table and Chairs: E42, E41, E40, C5, C3, C1

Coffee Mugs and Coffee: B05, B04, B02, E57, E55, E53

Stethoscopes: R39, R37, R25, 100 – Black, C3, C1

Shadow: T3, T2, T1


Hope you like it and have a great week!

KOPS Graduate


Hi There!  I belong to a club called TOPS – Take Off Pounds Sensibly and enjoy it very much! I’ve met some wonderful ladies that all share the same goals and dreams as myself. To become healthier through losing weight and exercising, but also having fun while achieving our goals. One lucky lady was blessed enough to have done just that! She reached her goal and is now called a KOP – Keep Off Pounds Sensibly! It is quite an accomplishment and we all hope that we can join her some day! LOL! It won’t be easy, but we’ll get there!

In honour of her graduation I made her a card which we all signed wishing her well and with encouragement to stay on track.

Here is the front of the card.

I’ve also attached a close-up of the image.

Here is the inside of the card:

All of the digital images are from Polkadoodles – Winnie Celebrations 3 – Top Banana Kit

Background Digital Paper: Polkadoodles – Winnie Celebrations 1 – Top Banana Kit

Digital Sentiment inside card: Polkadoodles – Winnie Celebrations 2 – Top Banana Kit

Die Cut – Spell Binders – Oval Floral – S6-078, PaperCrafter Today – 15 Die Cut Sentiment Set

Glitter Kiss – Blue Teal Kiss on top of frame.

Entered into Polkadoodles challenge: https://digichoosday.blogspot.ca/

She loved her card! Hope you do too!

Graduation Card


Hi There,

Sharing a graduation card that I made using Too Cute By Jessica – Graduation Pals.

Boy-Graduate

I thought this file was so cute! Used Cricut Design Space and Cricut Explore to cut out the pieces. Then ran everything through my Xyron. Used some inks to ink the edges and put the card together on blue Recollections Card Stock. Lost his little nose somehow after I had cut it out! LOL! So, I used the cut out to draw it in with my Zig marker and then drew him a little mouth.

Used pink chalk for the cheeks.

The sentiment is from My Creative Time – Happy Everything Stamp Set. Used Versamark – Onyx black and then Ranger – Clear Super Fine Detail embossing powder for “graduation”.

Used Gelly Roll Sakura #8 Pen for the eyes.

Hope you like it!

Graduation Card for my Niece


My beautiful niece graduated recently and

I wanted to make her a very unique card.

Graduate Front 300 dpi

I created the card front using her university colours.

Wine, white and blue.

For the inside, I saw something similar to this on an SVG Blog Hop and I knew I just had to make it. I missed the original blog hop, but was given a second chance during a second blog hop to purchase a previous blog hop through a donation. Long story short, I LOVED the card that I saw and decided to put my own personal touch to it.

Graduate Inside 300 dpi

With my Cricut Explore I cut out all of the following Cricut images:

Young graduate – Paper Dolls Teen Scene – S-Occssn – #M3F5E7.

Ovals – Phrases – zig zag oval label – #M3A497.

Scroll and sentiment – Wrap It Up – Congratulations – #M43331.

Palm trees – Life is a Beach – PalmTree – #M31ECE.

Sandy bottom – Life is a Beach – Palm Tree – #M33306.

Timon Hula was from the Hakuna Matata Blog hop. I uploaded the .svg file and then used my Cricut Explore to do the cutting.
The long scroll I created in Microsoft Word by inserting the image and then put in my own sentiment.