Archive | August 2021

There’s A Nap For That!!


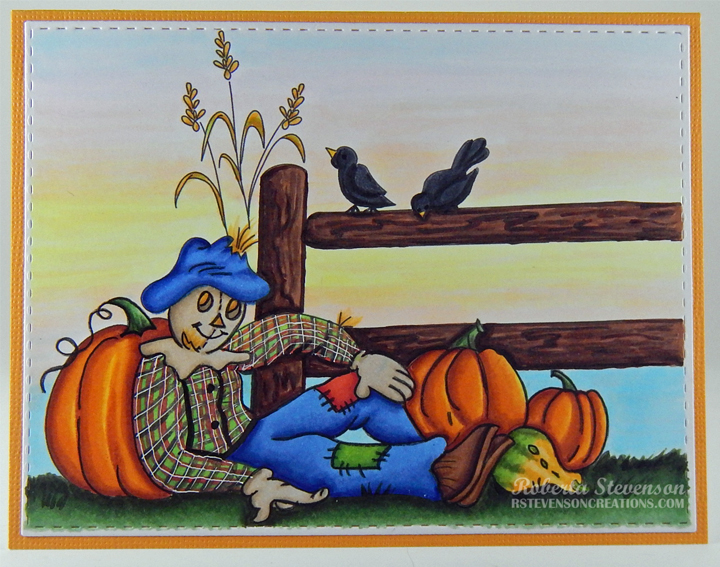
Sharing a birthday card that I made for my husband using Art Impressions – Lazy Boy Set – Ai4159 and Stampin’ Up – Country Club Designer Series Paper for the golf player background. I’ve taken a few pictures over the years of my hubby in this exact position and couldn’t resist this stamp when I saw it. He laughed as soon as he saw the card and said it looked just like him too. LOL!


To make the card, I began with the base of 5″ x 5″ Hammermill – Premium Colour cardstock. Using my MISTI and Memento – Tuxedo Black ink, the image was stamped onto Copic Marker X-Press It Blending Cardstock and coloured in with Copic Markers. I coloured in the backgound picture with Zig Clean Color Real Brush Markers. I stamped the sentiment using Versamark ink and Ranger Embossing Powder White – Extra Fine Detail onto American Crafts – “Holiday” paper. Marvy Uchida – Embossing Heat Tool was used to heat the embossing powder.

The card was now ready for assembly. I cut some light brown cardstock to the size of 5″ x 3.75″ and attached it directly to the base. I cut the background picture to the size of 3-3/8″ x 2-7/8″ and cut some dark brown cardstock to the size of 3-5/8″ x 3″ and used double-sided tape to attach them both together and to the base card. The flooring background with the sentiment was cut to 5″ x 1″ and attached using double-sided tape to the bottom of the card. Lastly, I added 3M double-sided tape to the back of the image after fussy cutting around it and attached it to the card.

Card Recipe:

Stamp and Sentiments: Lazy Boy Set – Ai4159 – Art Impressions

Inks: Memento – Tuxedo Black, Versa Fine – Onyx Black

Paper: Copic Marker X-Press It Blending Card, Hammermill – Premium Colour 100 lb., American Crafts – “Holiday” 6 x 6 in. (15.2 cm x 15.2 cm), Stampin’ Up – Country Club Designer Series Paper (12″ x 12″), Light brown cardstock, Dark brown cardstock

Embossing Powder: Ranger Embossing Powder White – Extra Fine Detail

Miscellaneous: Marvy Uchida – Embossing Heat Tool, 3M double-sided tape, MISTI – Most Incredible Stamping Tool

Image coloured with Copic Markers:

Skin: E21, E11, E00, E000, R30, R20, C1

Hair: E47, E44, E43

Shirt: E93, E18, E09, E08, E07

Shoes: E34, E33, E31, E27, E25, E23

Track Pants: T7, T5, T3, T1

Chair: B29, B28, B24, B23, E27, E25, E23

Remote: C7, C5, C4, C3, C1, Y04, YG03, R24

Chip Bag: B00, B000, B000, Y17, Y15, Y02

Shadow: C2

Image coloured with Zig Clean Color Real Brush Markers:

Sky: 303

Trees and Grass: 066, 053, 049, 048, 047, 045, 044, 041

Water: 037, 036, 032

Pants: 095, 097, 092

Golf Club: 091

Shirt and Hat: 042, 033

Skin: 069, 076, 071

Shoes and Hair: 066

Hope you like it and have a great week!

Woodland Gnome!!


Sharing a card I made today using KLM Digital Designs – Woodland Gnome Girl from the new August release. This little gnome is keeping calm even with little bees flying around. I know if it was me, I’d be running for cover. LOL!


This image also comes with 2 other sentiments, “You gno-me too well” and “Just because”.

To make the card, I first imported the image and sentiment into Microsoft Word and printed them out onto Copic Marker X-Press It Blending Card. Using by Brother Scan and Cut, I cut around the image leaving a small white border. The image was coloured in with Copic markers. For the base card, I used Hammermill – Premium Colour 100 lb. and cut it to be 5.5″ x 4.25″. PhotoPlay – Gnome for the Holidays Thanksgiving paper was cut to the same size as the base and attached using double-sided tape. Lawn Fawn – Watercolor Wishes Rainbow paper was cut to the size of 5.5″ x 2.5″ and glued onto the sunflower paper in the centre. The image was popped up and placed onto the centre of the yellow background paper. Using my Cuttlebug, die cut from Lawn Fawn – Simple Grassy Hillsides and Lawn Fawn – Watercolor Wishes Rainbow paper, I cut the grass. I fussy cut around the printed sentiment and used Copic YGO1 to fill in the background and to go around the fussy cut. I ran this piece through my Xyron Create a Sticker because I wanted the sentiment to lay nice and flat on the grass background. The grass was then centred and popped up on the card. All of the background layers were inked with Tim Holtz Distress Ink – Rustic Wilderness before placing them onto the card. Lastly, to complete the card I added in a few bees from Sprinkletz Embellishments – Bubble Bees.

Card Recipe:

Stamp and sentiment: Woodland Gnome Girl – KLM Digital Designs

Inks: HP Printer Grayscale, Tim Holtz Distress Ink – Rustic Wilderness

Paper: Copic Marker X-Press It Blending Card, Hammermill – Premium Colour 100 lb., PhotoPlay – Gnome for the Holidays Thanksgiving, Lawn Fawn – Watercolor Wishes Rainbow – 6″ x 6″

Die Cut: Lawn Fawn – Simple Grassy Hillsides

Miscellaneous: Xyron Create a Sticker, Cuttlebug, Sprinkletz Embellishments – Bumble Bees (NK137), Brother Scan and Cut

Image coloured with Copic Markers:

Skin: E21, E11, E00, E000

Hair: E47, E45, E43, E42, E41

Dress and Hat: E08, YR18, YR14, YR12

Shoes: E39, E37, E35, E34, E33, E31, E30

Sunflower: YG67, YG23, YG17, Y17, Y15, Y02, E47, E37, E35, E31

Hope you like it and have a great week!

You can find more cards to inspire you at KLM Designs, KLM Digital Design Team and KLM Digital Designs on the Facebook Fan page from the rest of our design team.

Free Broom Rides!!!


It’s Wednesday, and this week, I made a card using Free Broom Rides – TT017 by High Hopes Rubber Stamps for the main image and Wicked – FF052 (High Hopes Rubber Stamps) for the sentiment. Wouldn’t you love to go on a magical broom for a ride? I know I would.

To make my card this week, I began with a card base made from Hammermill – Premium Colour 100 lb. cut and scored to be 5.5″ x 5.5″. I cut the background paper from Echo Park – I Love Halloween paper pad to be the same size as the base and inked around the edges and onto the paper using Tim Holtz Distress Ink – Carved Pumpkin and a Picket Fence – Blending Brush. I applied this directly to the base card using double-sided tape. Using my Cuttlebug and Essentials by Tattered Lace Dies – Easel Slider dies, I die cut Copic Marker X-Press It Blending Card and orange cardstock. Using black cardstock I cut another piece to the size of 5.5″ x 1.25″. I applied this to the base using double-sided tape. I inked around the orange die cut with a Picket Fence – Blending Brush and Tim Holtz Distress Ink – Black Soot. I applied 3M VHB – 2 sided tape to the back of the orange die cut and applied it to the base.

The image and sentiment were then stamped using my MISTI and Memento – Tuxedo Black ink. I coloured in the image with Copic markers. The sentiment was die cut with my Cuttlebug and Whimsy – Quick Strips Die Set dies. I inked around the edges and on top by first using Tim Holtz Distress Ink – Carved Pumpkin with a Picket Fence – Blending Brush and then around the edges again, this time using Tim Holtz Distress Ink – Black Soot. To finish off the card, I applied 3M VHB – 2 sided tape to the back of the image and sentiment and popped them both up.

Card Recipe:

Stamp: Free Broom Rides – TT017 (High Hopes Rubber Stamps)

Sentiment: Wicked – FF052 (High Hopes Rubber Stamps)

Inks: Memento – Tuxedo Black, Tim Holtz Distress Ink – Black Soot, Tim Holtz Distress Ink – Carved Pumpkin

Paper: Copic Marker X-Press It Blending Card, Hammermill – Premium Colour 100 lb., Echo Park – I Love Halloween (6″x6″), Orange cardstock, Black Cardstock

Die Cuts:  Essentials by Tattered Lace Dies – Easel Slider, Whimsy – Quick Strips Die Set

Tools: MISTI – Most Incredible Stamping Tool, 3M VHB – 2 sided tape, Sakura Glaze – Black, Pen Gelly Roll Sakura #5 Pen, Gelly Roll Stardust – Clear, Picket Fence – Blending Brush

Image coloured with Copic Markers:

Skin: E21, E11, E00, E000, R30, R24, R20 (Eyes: Sakura Glaze – Black, Pen Gelly Roll Sakura #5 Pen)

Hair: YG67, YG23, YG17

Dress: BV29, BV25, BV23, V06, V04, V01, Gelly Roll Stardust – Clear

Socks: BV25, BV23, V04, V01, YG23, YG17

Boots, Cat and Hat: BV29, BV25, BV23, R30, R20, V04, V01, YG17, YG13, E15, YR24, Y08 (Eyes: Sakura Glaze – Black, Pen Gelly Roll Sakura #5 Pen)

Sign Post, Pole and Broom Handle: E37, E35, E34, E31

Broom: E08, YR18, YR15, YR12, YR02, E97, C5, C3, C1

Spider: C7, C5, C3 (Eyes: Sakura Glaze – Black)

Grass: G17, G14, G07

Sky: B02, B01, B00, B000, B000

Hope you like it and have a fantastic week!

You can find lots of inspiration from the Design Team Divas at the High Hopes blog, and the High Hopes Rubber Stamps Facebook Fan page plus you can also follow us on
Instagram, Twitter and Pinterest.

Thank-you!!


Sharing a card I made today using KLM Digital Designs – Thank You Gnome from the new August release. I decided since Autumn and our Canadian Thanksgiving is almost upon us and some of the leaves have begun to change, that I would colour in the letters in the Fall colours.

To make the card, I first imported the image into Microsoft Word and printed it out onto Copic Marker X-Press It Blending Card. I die cut the image to the size of 7.25″ x 3.5″ using my Couture Creations – Go Power and Emboss and My Creative Time – Tall Frame Layers.  For the base card, I cut Hammermill – Premium Colour 100 lb. to the size of 7.25″ x 7″ and scored it at 3.5″. After colouring the image, I applied it to the base using double-sided tape.

Card Recipe:

Stamp and sentiment: Thank You Gnome – KLM Digital Designs

Inks: HP Printer Grayscale

Paper: Copic Marker X-Press It Blending Card, Hammermill – Premium Colour 100 lb.

Die Cut: My Creative Time – Tall Frame Layers

Miscellaneous: Couture Creations – Go Power and Emboss

Image coloured with Copic Markers:

Skin: E21, E11, E00, E000

Beard: E29, E27, E25, E23

Hat: E08, E97, E95

Coat: E89, E87, E84, E81

Pants: B26, B23, B21

Boots: E55, E53, E51, E29, E27, E25, E23

T: Y17, Y15, Y13

H: Y38, Y35, Y23

A: R46, R14, R08

N: YR18, YR16, YR15

K: YR27, YR24, YR21

Grass: YG17, YG13, YG11, YG03

Hope you like it and have a great week!

You can find more cards to inspire you at KLM Designs, KLM Digital Design Team and KLM Digital Designs on the Facebook Fan page from the rest of our design team.

Sorry You’re Hurting!!


Sharing a card I made using Clearly Whimsy Stamps – Get Well Dragons – DP1034 for a colleague that had a knee operation recently. I wanted to make a fun card to cheer him up a bit and thought this was the perfect image to make it happen.

To make the card, I stamped the image onto Copic Marker X-Press It Blending Card using Memento – Tuxedo Black ink and my MISTI. I coloured in the image using Copic markers and then fussy cut around it leaving a thin white border. I stamped all of the sentiments onto black cardstock using Versamark ink and Ranger Embossing Powder White – Extra Fine Detail powder. The embossing powders were all heated with Marvy Uchida – Embossing Heat Tool. The smaller sentiments were all die cut using my Cuttlebug and Hero Arts – Infinity Die Ovals. For the background, I used my Cuttlebug and Sizzix Rounded Tags dies to die cut the background paper – Asuka Studio – Sparkly Sky and black cardstock. I die cut the grass using Lawn Fawn – Stitched Hillside Borders and Sizzix Rounded Tags. I inked the top border of the grass with Tim Holtz Distress Inks – Peeled Paint.

The card was now ready to assemble. I started with a base card of 5.5″ x 4.5″ using Hammermill – Premium Colour cardstock. I applied double-sided tape to the back of the black die cut, The patterned paper and the grass cut and applied them all directly to the card. I ran 2 of the “Ouch!” die cuts through my Xyron Create a Sticker and attached them to the top of the card.  Using 3M VHB – 2 sided tape, I popped up the image and 2 other sentiments to finish off the card.

Card Recipe:

Stamp and Sentiments: Get Well Dragons – DP1034 – Clearly Whimsy Stamps

Inks: Memento – Tuxedo Black, Versamark, Tim Holtz Distress Inks – Peeled Paint

Paper: Copic Marker X-Press It Blending Card, Hammermill – Premium Colour 100 lb., Green Cardstock, Black Cardstock, Asuka Studio – Sparkly Sky (6″x6″)

Die Cut: Sizzix Rounded Tags – 8 dies, Lawn Fawn – Stitched Hillside Borders, Hero Arts – Infinity Die Ovals

Embossing Powder: Ranger Embossing Powder White – Extra Fine Detail

Miscellaneous: 3M VHB – 2 sided tape, Marvy Uchida – Embossing Heat Tool, MISTI – Most Incredible Stamping Tool, Xyron Create a Sticker

Image coloured with Copic Markers:

Dragon: YG67, YG63, YG61, YG05, YG03, YG01, YG00, R59, R39, R27, R22, G14, G12, G07, BV04, BV02, BV01, Y38, Y17, Y08

Bandages: E55, E53, E51, E50, C2, C1, C00, Colorless Blender

Crutches: E25, E23, C2, C1

Hope you like it and have a great week!

Frightfully Delightful!!!


It’s Wednesday, and this week, I made a card using Frankie – TT021 by High Hopes Rubber Stamps for the main image and Frightfully Delightful – FF054 (High Hopes Rubber Stamps) for the sentiment. Frankie is all set for Hallowe’en this year with his little pumpkin full of candy. We used to use a pillow case when we were younger to get a lot more goodies when we went Trick or Treating. LOL!

To make my card this week, I began with stamping the image and sentiment onto Copic Marker X-Press It Blending Card using my MISTI and Memento – Tuxedo Black ink. Using my Brother Scan and Cut, I cut around the image leaving a small white border. I coloured in the image and then used Copic C0 to go around all of the edges. I fussy cut around the sentiment and applied Copic Y17 around the edges. I put this through my Xyron Create a Sticker and then applied it to some scrap yellow cardstock. Once again, I fussy cut around the sentiment.

Using my Cricut Explore, I die cut the Haunted House from the Holiday Cakes Cricut Cartridge and the Haunted Tree from the October 31 Cricut Cartridge. I decided to cut the second layer of the haunted house out of Copic Marker X-Press It Blending Card rather than solid cardstock. This gave me the chance to colour in the windows, doors, shutters and moon the way I wanted to in order to make it more spooky with Copic Markers. The moon was coloured in with a mixture of Tim Holtz Distress Ink – Hickory Smoke, Tim Holtz Distress Ink – Fossilized Amber and Picket Fence Studio Blender Brushes. Using glue, I pieced everything together for the Haunted house.

My card was now ready to assemble. I started with a 6″ x 6″ base card made from AC Cardstock – White. I cut the bats background to the same size from Echo Park – I Love Halloween paper pack. I applied this directly to the base with double-sided tape. Using Tim Holtz Distress Ink – Hickory Smoke and a Picket Fence Studio Blender Brush I inked around all of the edges and across the top of the card to darken the sky a little bit. Next, I die cut the grass using my Cuttlebug, Lawn Fawn – Watercolor Wishes Rainbow paper and Lawn Fawn – Simple Stitched Hillside Borders. I applied this directly to the bottom of the card using liquid glue. I applied glue to the haunted tree and haunted house and then applied both of them directly to background. Frankie and the sentiment were both popped up on the card using 3M VHB – 2 sided tape.

Card Recipe:

Stamp: Frankie – TT021 (High Hopes Rubber Stamps)

Sentiment: Frightfully Delightful – FF054 (High Hopes Rubber Stamps)

Inks: Memento – Tuxedo Black, Tim Holtz Distress Ink – Hickory Smoke, Tim Holtz Distress Ink – Fossilized Amber

Paper: Copic Marker X-Press It Blending Card, AC Cardstock – White, Echo Park – I Love Halloween, Lawn Fawn – Watercolor Wishes Rainbow – 6″ x 6″

Die Cut:Lawn Fawn – Simple Stitched Hillside Borders – Lawn Cut

Cricut Die Cuts: – October 31 – Haunted Tree (#M3DCC2), Holiday Cakes – Haunted House – (#M40A62)

Tools: MISTI – Most Incredible Stamping Tool, 3M VHB – 2 sided tape, Sakura Glaze – Black Pen, Gelly Roll Sakura #5 Pen, Brother Scan and Cut, Xyron Create a Sticker and Picket Fence Studio Blender Brushes, Cricut Explore

Image coloured with Copic Markers:

Skin: BV23, BV20, G00, BG93, BG90, R29, R24 (Eyes: Sakura Glaze – Black Pen, Gelly Roll Sakura #5 Pen)

Hair: 100, B39, B32, C9, C7, C5, C3, PrismaColor Premier – Black

Jacket and Pants: V99, V95, V93, V91

Shirt: C9, C7, C5

Shoes: 100, C10, C9, C7, C5, C3

Bat: BV29, BV25, BV23 (Eyes: Sakura Glaze – Black Pen, Gelly Roll Sakura #5 Pen)

Pumpkin: E08, YR18, YR16, YR12, Y15, Y08, C10

Candy: V09, V06, V04, YG17, YG13, YG11

House Background: V17, V15, V09, V06, V04, Y17, Y08, Y04, C3, C2, BV20

Shadow below Frankie: YG17, YG13

Hope you like it and have a fantastic week!

You can find lots of inspiration from the Design Team Divas at the High Hopes blog, and the High Hopes Rubber Stamps Facebook Fan page plus you can also follow us on
Instagram, Twitter and Pinterest.

Scarecrow!!


Sharing a card I made today using KLM Digital Designs – Harvest Scarecrow from the new August release. I don’t think the crows are very scared of this scarecrow just chillaxing on a beautiful autumn day.

To make the card, I first imported the image and sentiment into Microsoft Word and printed it out onto Copic Marker X-Press It Blending Card. I die cut the image and frame using my Cuttlebug and My Creative Time – Rectangle Frame Layers dies. I applied painters tape around all of the edges to keep the slim white border around the image. I coloured in the the image with Copic markers and then attached it to the card base from The Paper Studio – Primary Simply Solids (4.25″ x 5.5″) using double-sided tape.

Card Recipe:

Stamp: Harvest Scarecrow – KLM Digital Designs

Inks: HP Printer Grayscale

Paper: Copic Marker X-Press It Blending Card, The Paper Studio – Primary Simply Solids (4.25″ x 5.5″)

Die Cut: My Creative Time – Rectangle Frame Layers

Miscellaneous:  Cuttlebug, Gelly Roll Sakura #5 Pen, Sakura Glaze – Black

Image coloured with Copic Markers:

Scarecrow Face and Gloves: E43, E42, E41, E40

Jeans and Hat: B26, B23, B21

Patches: R27, R24, R22, YG17, YG11, YG03

Shirt: W9, W7, YG07, YG05, R27, R24, R05, Gelly Roll Sakura #5 Pen

Shoes: E37, E35, E34, E27, E25, E23

Straw and Hay: YR23, YR21, Y35, YG05

Crows: C9, C7, C5 (Eyes: Sakura Glaze – Black)

Pumpkins: Y04, E08, YR18, YR16, YR12

Gourd: YG63, YG03, Y17, Y15, YR31

Grass and Pumpkin Stems: G99, G21, YG67, YG17

Fence: E29, E27, E25, E23

Sky: R000, RV000, YR000, Y00, B000

Hope you like it and have a great week!

You can find more cards to inspire you at KLM Designs, KLM Digital Design Team and KLM Digital Designs on the Facebook Fan page from the rest of our design team.

Pumpkin Buddies!!!


It’s Wednesday, and this week, I made a card using Pumpkin Buddies – TT020 by High Hopes Rubber Stamps for the main image and Happy Halloween Script – F232 (High Hopes Rubber Stamps) for the sentiment. These little Hallowe’en friends look like they’re getting ready to scare unsuspecting little ones this year. LOL!

To make my card this week, I began with die-cutting Copic Marker X-Press It Blending Card with My Creative Time – Rectangle Frame Layers for the main image and Whimsy Stamps – Quick Strips Die Set for the sentiment. The image and sentiment were then stamped using my MISTI and Memento – Tuxedo Black ink onto the die cuts. The image and grass were coloured in with Copic markers. The nose and eyes for the characters were coloured in using Sakura Glaze – Black Pen and Gelly Roll Sakura #8 Pen. I stamped out the image a second time and used my Brother Scan and Cut to cut it out so that I could use it as a mask to put over the coloured image. I also die cut a 1.5″ circle out of Inkadoo Stamping Mask Paper for the moon.

I placed the mask over top of the coloured image and the moon masked circle onto the large rectangle before I inked in the sky using various Tim Holtz inks listed below. I watched a video on YouTube by Glitter Grunge Greetings for inspiration on how to create my night sky. Once the sky was complete, I removed the mask for the moon and used the outside paper that I had cut the moon from to protect the sky while I inked in the texture for it using Picket Fence Studio Blender Brushes, Tim Holtz Ranger Distress Oxide – Fossilized Amber and Tim Holtz Distress Ink – Hickory Smoke. I spritzed the moon and sky with some water. I removed all of the masks at this point and using double-sided tape, I applied the coloured image to my card base using The Paper Studio – Primary Base Colours 4.25″ x 5.5″. Lastly, I applied some Tim Holtz Ranger Distress Oxide – Fossilized Amber to the outside edges of my sentiment and pop it up on the card using 3M VHB – 2 sided tape.

Card Recipe:

Stamp: Pumpkin Buddies – TT020 (High Hopes Rubber Stamps)

Sentiment: Happy Halloween Script – F232 (High Hopes Rubber Stamps)

Inks: Memento – Tuxedo Black, Tim Holtz Ranger Distress Oxide: Fossilized Amber, Wilted Violet, Black Soot, Faded Jeans and Seedless Preserves, Tim Holtz Distress Ink – Stormy Sky, Chipped Sapphire, Tumbled Glass, Hickory Smoke

Paper: Copic Marker X-Press It Blending Card, The Paper Studio – Primary Base Colours 4.25″ x 5.5″

Die Cuts:  My Creative Time – Rectangle Frame Layers, Whimsy Stamps – Quick Strips Die Set – WSD330

Tools: MISTI – Most Incredible Stamping Tool, 3M VHB – 2 sided tape, Sakura Glaze – Black, Pen Gelly Roll Sakura #8 Pen, Brother Scan and Cut, Inkadoo Stamping Mask Paper, Picket Fence Studio Blender Brushes

Image coloured with Copic Markers:

Bat: BV29, BV25, BV23

Pumpkin: E08, YR18, YR16, YR12, Y04, G99, G21, YG67, YG19, Y17, Y15, Y08

Cat: N10, N6, N5, R30, R20, YG06

Dog: E29, E27, E25, E23, E34, E33, E31

Oak Leaves: E13, E07, YR27, YR12

Grass: G99, G21, YG67, YG19

Hope you like it and have a fantastic week!

You can find lots of inspiration from the Design Team Divas at the High Hopes blog, and the High Hopes Rubber Stamps Facebook Fan page plus you can also follow us on
Instagram, Twitter and Pinterest.

Be-Lated Birthday Chicks!!


Sharing a belated birthday card I made for my sister-in-law using Art Impressions – Spring Chicken Set – AiCS40. I really had fun with these cool Chicks! LOL!

Inside of the card.

To make the card, I began with the base of 5.5″ x 4.25″ Hammermill – Premium Colour cardstock. My Creative Time – Rectangle Frame Dies and my Cuttlebug were used to die cut Echo Park Paper Co. – My Favorite Winter paper. I just loved this paper and thought it had the look of barn board for the chicken coop. Double-sided tape was applied to the back of the background paper and it was applied directly to the base card. Tim Holtz Distress Ink – Aged Mahagony was used to ink around all of the edges of the card. Using Lifestyle Crafts Cutting Dies – Nesting Circles dies, I die cut 1 large circle from black cardstock and 1 smaller circle from Doodle Bug Designs Inc. – Down on the Farm paper. I inked around the smaller circle with the same Tim Holtz ink. I applied the 2 circles together using double-sided tape and then added 3M VHB – 2 sided tape to the back of the larger circle and attached it to the background. The speech bubble was die cut with Spellbinders Die D-Lites – Conversation Bubble 4 and my Cuttlebug.

Using my MISTI and Memento – Tuxedo Black ink, the images were stamped onto Copic Marker X-Press It Blending Cardstock and coloured in with Copic Markers. Once everything was coloured, I fussy cut around both images. I popped up the image on the front with 3M VHB – 2 sided tape and ran the second image through my Xyron Creative Station to make a sticker out of it and placed it on the inside of the card. All of the sentiments were stamped with Versa Fine – Onyx Black ink and then embossed with Ranger – Clear Super Fine Detail Embossing Powder. Marvy Uchida – Embossing Heat Too heated the powder. The sentiment bubble was popped up onto the front of the card with 3M VHB – 2 sided tape.

Card Recipe:

Stamp and Sentiments: Spring Chicken Set – AiCS40 – Art Impressions

Inks: Memento – Tuxedo Black, Versa Fine – Onyx Black, Tim Holtz Distress Ink – Aged Mahagony

Paper: Copic Marker X-Press It Blending Card, Hammermill – Premium Colour 100 lb., Doodle Bug Designs Inc. – Down on the Farm – 6″ x 6″ paper pad, Echo Park Paper Co. – My Favorite Winter (6″ x 6″)

Die Cuts: My Creative Time – Rectangle Frame Dies, Spellbinders Die D-Lites – Conversation Bubble 4 (SP-S2138)

Embossing Powder: Ranger – Clear Super Fine Detail

Miscellaneous: 3M VHB – 2 sided tape, Xyron Creative Station, Marvy Uchida – Embossing Heat Tool

Image coloured with Copic Markers:

Chickens: E99, E97, E55, E53, E51, E43, E42, E40, E15, E13, R46, R17, R14, R08, B60, C1, C0, Colorless Blender

Eye Shadow and Glasses: YG17, YG11, B00

Balloon, Cup and Cupcake Wrapper: RV09, RV06, RV04, RV02, RV00

Hat, Flower and Leaves: RV09, RV06, RV02, YG17, YG11, YR30, YR23, Y21, Y17

Cupcake Topping and Candle: Y02, Y00, Y000, RV06, RV04, RV00, Y08, YR12

Dirt: E37, E35, E33, E31

Hope you like it and have a great week!

Merry and Bright!!


Today, I’m sharing a light up Christmas card using Dreamerland Crafts stamps called Lets Decorate Our Home – D18037 and for the sentiment Holiday Sentiments Set 003. It’s never too early to start making Christmas cards and here’s hoping that this card will brightens someone’s day this coming Christmas.

To make this card I used a base card of 5.5″ x 4.25″ using Hammermill – Premium Colour 100 lb. cardstock. For the background paper, I used my Cuttlebug and My Creative Time – Rectangle Frame Dies to die cut American Crafts – “Holiday” paper. The edges were inked with Tim Holtz Distress Inks – Peacock Feathers and then I adhered the background to the base card using double-sided tape. Using my MISTI and Memento – Tuxedo Black ink, I stamped the main image onto Copic Marker X-Press It Blending Card and coloured it in with Copic markers. I added some Stickles – Diamond to the pompom on the hat and fur at the top of the little girl’s boots. For the fluffy snow, I used Cosmic Shimmer Fluffy Stuff and sprinkled on some DecoArt Glamour Dust while it was still wet. Using my Marvy Heat Embossing Tool, I heated up the liquid for it to puff up and look like sparkling snow. I poked holes in the card where I wanted the blue lights to go. I applied some tissue paper over the holes on the back of the image to diffuse the lights. Using Versamark ink and my MISTI, I stamped the sentiment and then applied Ranger Embossing Powder White – Extra Fine Detail. This too was heated with my Marvy Heat Embossing Tool. Lastly, added some snowflakes using a Gelly Roll Sakura #10 Pen. I then set the coloured image aside.

It was now time to set up the bright blue lights for the house using Chibi Lights, copper tape and a battery. I cut out an another rectangle slightly smaller than the coloured image. Placing the coloured image over top of the smaller rectangle, I used a pencil for the placement of the lights on the roof. For the placement of the battery, I used the remote in the girl’s hands as a guide. After mapping out the route for the lights, I place the copper tape down and added 3 blue Chibi Lights to the “+” and “-” paths leading back to the battery. The set up was tested to make sure the lights would come on. Once this was completed, I used 3 layers of 3M VHB – 2 sided tape around the 3 sides of the battery to pop the image up high enough off of the card so that the battery would only light up the lights when someone pressed down on it. To keep the card even all the way around, I added 3 layers of 3M VHB – 2 sided tape to the remainder of the smaller rectangle. The image was then attached to the smaller rectangle. I added some double-sided tape to the back of the smaller rectangle and adhered it directly to the card to finish it off.

Card Recipe:

Stamp: Lets Decorate Our Home – D18037 – Dreamerland Crafts

Sentiment: Holiday Sentiments Set 003 – Dreamerland Crafts

Inks: Memento – Tuxedo Black, Tim Holtz Distress Inks – Peacock Feathers, Versamark

Paper: Copic Marker X-Press It Blending Card, Hammermill – Premium Colour 100 lb., American Crafts – “Holiday” 6″ x 6″ (15.2 x 15.2 cm)

Die Cuts: My Creative Time – Rectangle Frame Dies

Stickles: Diamond

Embossing Powder: Ranger Embossing Powder White – Extra Fine Detail

Tools: MISTI – Most Incredible Stamping Tool, Cuttlebug, Forever in Time – Pop-Dot Tape, Cosmic Shimmer Fluffy Stuff, DecoArt Glamour Dust, Marvy Heat Embossing Tool, Sakura Glaze – Black, Gelly Roll Sakura #10 Pen, Chibi Lights

Image coloured with Copic Markers:

Skin: E21, E11, E04, E00, E000, R30, R20 (Eyes – Sakura Glaze – Black)

Hair: E47, E44, E43

Hat, Scarf and Boots: BG72, BG57, BG32, BG11

Coat: R59, R37, R35

Pants and Boot Soles: E25

Dog: E27, E25, E23 (Eyes and Nose – Sakura Glaze – Black)

Rabbit: E35, E33, E31 (Eyes and Nose – Sakura Glaze – Black)

House: E57, E55, E53, Y06, Y02

Roof: C5, C4, C3, C2, C1

Lights: Y17, Y02, B000

Snow: B60, B000, B0000, Cosmic Shimmer Fluffy Stuff, DecoArt Glamour Dust

Sky: B99, B97, B95

Hope you like it and have a great week!

You can find more cards to inspire you at Dreamerland Crafts and Pointer Scrapbooking on the Facebook Fan pages from the rest of our design team.

Vampire Treat!!!


It’s Wednesday, and this week, I made a card using Vampire Treat – TT022 by High Hopes Rubber Stamps for the main image and Happy Halloween – H232 (High Hopes Rubber Stamps) for the sentiment. Hard to believe Hallowe’en is just around the corner.

To make my card this week, I began with a card base made from Hammermill – Premium Colour 100 lb. cut and scored to be 5.5″ x 4.25″. I die-cut the bat background paper from Echo Park – I Love Halloween paper pad using my Cuttlebug and My Creative Time – Rectangle Frame Dies. The edges were inked with Tim Holtz Ranger Distress Oxide – Black Soot and then this piece was adhered directly to the base card using double-sided tape. The same dies were used to cut the orange cardstock and the edges were inked with Tim Holtz Distress Ink – Carved Pumpkin. Double-sided tape was added to the back of this piece and it was added directly to the bat background paper. Copic Marker X-Press It Blending Card was die cut with My Creative Time – Rectangle Frame Layers and the sentiment shape was die cut with Whimsy Stamps – Quick Strips Die Set. Tim Holtz Ranger Distress Oxide – Fossilized Amber was used to ink around the sentiment shape edges.

The image and sentiment were then stamped using my MISTI and Memento – Tuxedo Black ink. I coloured in the image with copic markers. I stamped out the image a second time and used my Brother Scan and Cut to cut it out so that I could use it as a mask to put over the coloured image. I also die cut a 1″ circle out of Inkadoo Stamping Mask Paper for the moon. I placed both masks onto the coloured image. I tore some masking tape in half vertically to create the grass pattern and then used the reverse to mask the grass while I did the sky. I saw this on a you-tube video and thought it was a cool technique. A mixture of Tim Holtz Ranger Distressed inks listed below were used to create the ground and sky. I removed all of the masks and then for the circle I used the reverse mask to section out just the circle centre and coloured in the moon with my Copic markers. To finish off the card, I applied 3M VHB – 2 sided tape to the back of the image and sentiment and popped them both up on the card.

Card Recipe:

Stamp: Vampire Treat – TT022 (High Hopes Rubber Stamps)

Sentiment: Happy Halloween – H232 (High Hopes Rubber Stamps)

Inks: Memento – Tuxedo Black, Tim Holtz Ranger Distress Oxide: Fossilized Amber, Blueprint Sketch, Wilted Violet, Twisted Citron, Peeled Paint, Black Soot and Seedless Preserves, Tim Holtz Distress Ink – Carved Pumpkin

Paper: Copic Marker X-Press It Blending Card, Hammermill – Premium Colour 100 lb., Echo Park – I Love Halloween (6″x6″), Orange cardstock

Die Cuts:  My Creative Time – Rectangle Frame Dies, My Creative Time – Rectangle Frame Layers, Whimsy Stamps – Quick Strips Die Set – WSD330

Tools: MISTI – Most Incredible Stamping Tool, 3M VHB – 2 sided tape, Sakura Glaze – Black, Pen Gelly Roll Sakura #5 Pen, Brother Scan and Cut, Inkadoo Stamping Mask Paper

Image coloured with Copic Markers:

Skin: E21, E11, E04, E00, E000, R30, R20 (Eyes: Sakura Glaze – Black, Pen Gelly Roll Sakura #5 Pen) (Teeth: Pen Gelly Roll Sakura #5 Pen)

Hair: BV29, BV25, BV23, C1

Cape and Bat Bow-Tie: R59, R29, R27, R24

Coat and Bat: BV29, BV25, BV23

Dracula Bow-Tie: C1, C00, Colorless Blender

Coffin Inside: V09, V06, V04, V01

Coffin: E29, E27, E25, E23

Trick or Treat Bag and Strap: YG17, E08, YR18, YR16, YR12

Shadow Under Coffin: C3, C2

Moon: Y000, Y02, BV20, C0, C00

Hope you like it and have a fantastic week!

You can find lots of inspiration from the Design Team Divas at the High Hopes blog, and the High Hopes Rubber Stamps Facebook Fan page plus you can also follow us on
Instagram, Twitter and Pinterest.

1st Communion!!


Sharing a card I made today using KLM Digital Designs – Communion Cross from the new August release. This image comes with 3 sentiments. I’ve used 1 on my card, but you also have the choice of  “First Communion” and “On Your First Holy Communion”. This would be great image and sentiment to give to either your child or a friend’s child celebrating this blessed sacrament.

To make the card, I first imported the image and sentiment into Microsoft Word and printed it out onto Copic Marker X-Press It Blending Card. I die cut the image and frame using my Cuttlebug and My Creative Time – Rectangle Frame Layers dies. I coloured in the the image with Copic markers and then placed Kraftin’ Kimmie – Starburst stencil over top and taped off the area that I wanted to use. Using Copic Y04, I coloured in the darker rays using the stencil as a guide. The tape was carefully removed from the top and sides of the stencil. The tape was placed back down at the top before removing the tape from the bottom of the stencil. After removing the stencil completely, the tape was placed back down on the 2 sides and bottom where the darker rays ended. Using the darker rays as a guide, I coloured in the lighter rays using Copic Y00 marker. All of the tape was removed at this point which left a nice thin white border around it.

Using the same dies again, I die-cut Crafter’s Companion – Luxury Cardstock – Gold to use for my background.

The card was now ready to assemble. Hammermill – Premium Colour 100 lb. was used to create the card base of 5.5″ x 4.25″. The gold background was added directly to the base using double-sided tape. 3M VHB – 2 sided tape was added to the back of the image to pop it up and it was placed directly over the gold background.

Card Recipe:

Stamp and sentiment: Communion Cross – KLM Digital Designs

Inks: HP Printer Grayscale

Paper: Copic Marker X-Press It Blending Card, Hammermill – Premium Colour 100 lb., Crafter’s Companion – Luxury Cardstock – Gold

Die Cut: My Creative Time – Rectangle Frame Layers

Stencil: Kraftin’ Kimmie – Starburst

Miscellaneous:  3M VHB – 2 sided tape, Cuttlebug

Image coloured with Copic Markers:

Cross: B60, C1, C00, Colorless Blender

Grapes, Vines and Leaves: V09, V06, V04, V01, YG25, YG17, YG03, YG01

Starburst: Y04, Y00

Hope you like it and have a great week!

You can find more cards to inspire you at KLM Designs, KLM Digital Design Team and KLM Digital Designs on the Facebook Fan page from the rest of our design team.

Baking Snowman!!


Sharing a card I made today using KLM Digital Designs – Baking Snowman from the July release. This image comes with 3 sentiments. I’ve used 1 on my card, but you also have the choice of  “Lovin’ from the oven” and “Wishing you a delicious Holiday”. Christmas at our house always had so many wonderful aromas from my mom baking all kinds of Christmas goodies for everyone!

To make the card, I first imported the image and sentiment into Microsoft Word and printed it out onto Copic Marker X-Press It Blending Card. I die the image and frame using my Cuttlebug and Creative Expression Craft Dies by Sue Wilson – Paper Cuts Collection – Christmas Feast dies. I coloured the image in with Copic markers and then added in the snowflakes for the sky with Gelly Roll Sakura #10 Pen. Black PrismaColor Premier Pencil was used to outline parts of the image. Gina K Designs – Glitz Glitter Gel – Iridescent was added below the snowman to create the sparkling snow and the image was set aside to dry.

The frame for the sentiment die was cut twice using Gina Marie Designs – Nested Scalloped Stitched Rectangles. A cutter was used to remove the frame from the one that contained the sentiment. The edges were then inked with Tim Holtz Distress Ink – Barn Door. Viva Decor – Inka-Gold – Yellowgold was applied to the other 2 frames and then once it was dry, a paper towel was used to buff them up and give the gold some shine. The sentiment was then applied directly to the small frame using double-sided tape.

The card was now ready to assemble. Hammermill – Premium Colour 100 lb. was used to create the card base. It was sized at 8-5/8″ x 7¼” and then scored at 3-5/8″. I used my Couture Creations – Go Power and Emboss to die cut Hot Buy Craft Smart – Holiday Glitz Glitter Paper using PinkFresh Studio Essentials – Slim Stitched Rectangle Dies. The dimensions were the same as the base card. Using glue, I applied the large rectangle die-cut directly to the base card. Next, I used the outside frame for the snowman as a guide to where to place the coloured image. I removed the image and applied glue to the back of it and set it back inside the frame. Once the image was glued down to the base, I added glue to the back of the frame and moved it into place around the coloured image to complete the puzzle. 3M VHB – 2 sided tape was added to the back of the frame for the sentiment and it was added directly to the glitter paper. Lastly, to finish off my card, I removed the button parts from the backs of the buttons from Dress It Up – Holiday Collection – Christmas Cookies using my Tim Holtz scissors and pliers.  Mini Glue Dots were applied to the backs of each of the buttons and they were applied directly to the glitter paper.

Card Recipe:

Stamp and sentiment: Baking Snowman – KLM Digital Designs

Inks: HP Printer Grayscale, Tim Holtz Distress Ink – Barn Door

Paper: Copic Marker X-Press It Blending Card, Hammermill – Premium Colour 100 lb., Hot Buy Craft Smart – Holiday Glitz Glitter Paper 12″ x 12″

Die Cut: Creative Expression Craft Dies by Sue Wilson – Paper Cuts Collection – Christmas Feast, Gina Marie Designs – Nested Scalloped Stitched Rectangles, PinkFresh Studio Essentials – Slim Stitched Rectangle Dies

Miscellaneous: Viva Decor – Inka-Gold – Yellowgold, Gina K Designs – Glitz Glitter Gel – Iridescent, Dress It Up – Holiday Collection – Christmas Cookies, Gelly Roll Sakura #10 Pen, 3M VHB – 2 sided tape, Min Glue Dots – 3/16″, Cuttlebug, Couture Creations – Go Power and Emboss

Image coloured with Copic Markers:

Snowman: B60, C1, C00

Apron: G99, G21, YG67, YG17

Hat: BV20, C0, C00

Gingerbread: E35, E33, E31, R35, YG17, Gelly Roll Sakura #10 Pen

Rolling Pin: E43, E42, E40

Sky: B37, B14, B12

Snow: Gina K Designs – Glitz Glitter Gel – Iridescent

Hope you like it and have a great week!

You can find more cards to inspire you at KLM Designs, KLM Digital Design Team and KLM Digital Designs on the Facebook Fan page from the rest of our design team.