Archive | January 2022

How You Doin’??


Sharing a card I made today using KLM Digital Design –  Window Gnome – Boy from the new January 2022 release. This image also comes with 2 more sentiments, “Hang in there” and “Dropping in to say Hi”.

I created a 6″ x 6″ card base using AC Cardstock – White. I applied 6″ x 6″ – 49 and Market Tattered Garden cardstock directly to the base using double-sided tape. I imported the image and sentiment into Microsoft Word and printed them out onto Copic Marker X-Press It Blending Card. The image was coloured in with Copic markers. Using scissors, I fussy cut around the coloured image and sentiment and popped them both up onto the background using U-Line double-sided tape.

Card Recipe:

Stamp and Sentiment:  Window Gnome – Boy – KLM Digital Designs

Inks: HP Printer Grayscale

Paper: Copic Marker X-Press It Blending Card, 49 and Market Tattered Garden – 6 x 6 Collection Pack, AC Cardstock – White

Miscellaneous: U-Line – 2 sided tape, Gelly Roll Sakura #8 Pen

Image coloured with Copic Markers:

Skin: E21, E11, E00, E000

Beard: E47, E44, E43, E41

Hat: R46, R14, R08

Shirt: E89, E87, E84

Wallpaper: G05, YG01, Y04, Gelly Roll Sakura #8 Pen

Window Sill: E74, E71, E70

Hope you like it and have a great week!

You can find more cards to inspire you at KLM Designs, KLM Digital Design Team and KLM Digital Designs on the Facebook Fan page from the rest of our design team.

Lucky Dog!!


Sharing a card I made today using KLM Digital Design –  Fido’s Home from the new January 2022 release. We grew up having dogs in our family. They were all spoiled and loved very much! They may have thought they were the lucky ones, but deep down, I think we were.

I created the base using Hammermill – Premium Colour 100 lb. cardstock to the size of 5.5″ x 4.25″. For the background, I used Kraftin’ Kimmie – Pawprints Stencil, a Picket Fence – Blending Brush and Tim Holtz Distress Ink – Pumice Stone to create the paw prints. For the hearts, I used the same stencil, a small foam brush and Tim Holtz Distress Ink – Barn Door. With my Cuttlebug and My Creative Time – Stitched Squares Inside and Out, I die cut the red square from Forever In Time – Texture Rouge cardstock.

I imported the image and sentiment into Microsoft Word and printed them out onto Copic Marker X-Press It Blending Card. I die cut the image using Waffle Flower – Nesting Square dies and the sentiment with My Creative Time – Stitched Zig Zag Ties. I inked around the edges of the sentiment die cut with Tim Holtz Distress Ink – Barn Door and popped it up onto the base card using U-Line double-sided tape. The image was coloured in with Copic markers and the sky was created with Lawn Fawn – Cloudy Stencil and Tim Holtz Distress Ink – Salty Ocean and a mixture of Copic blue markers. The completed image was popped up onto the base card using U-Line double-sided tape to finish it off.

Card Recipe:

Stamp and Sentiments: Fido’s Home – KLM Digital Designs

Inks: HP Printer Grayscale, Tim Holtz Distress Ink – Barn Door, Tim Holtz Distress Ink – Salty Ocean, Tim Holtz Distress Ink – Pumice Stone

Paper: Copic Marker X-Press It Blending Card, Hammermill – Premium Colour 100 lb., Forever In Time – Texture Rouge

Die Cuts: My Creative Time – Stitched Squares Inside and Out, Waffle Flower – Nesting Square dies, My Creative Time – Stitched Zig Zag Ties

Stencils: Kraftin’ Kimmie – Pawprints Stencil, Lawn Fawn – Cloudy Stencil

Miscellaneous: U-Line – 2 sided tape, Cuttlebug, Picket Fence – Blending Brush

Image coloured with Copic Markers:

Dog: B60, C9, C2, C1, C00, E25, E23, Colorless Blender

Dog House: R46, R14, R08, C9, C7, C5, C2, C1, C0

Grass: YG17, YG13, YG03

Sky: B00, B000, B0000, Tim Holtz Distress Ink – Salty Ocean

Hope you like it and have a great week!

You can find more cards to inspire you at KLM Designs, KLM Digital Design Team and KLM Digital Designs on the Facebook Fan page from the rest of our design team.

Year of the Tiger – 2022!!


Today, I’m sharing the Chinese New Year cards using stamps called Safari Digital Stamp – PickledPotpourriDigi and Cute Tiger – AlexShopsArt. Every year, I enjoy make cards and sending them out to my friends here and overseas hoping to bring them some happiness in bringing in the New Year!

To make this card I first imported the images into Microsoft Word. I sized the tiger for the front of the card and created my sentiment and then added the “Cute Tiger” for the inside of the card. I printed out 8 copies of each onto Copic Marker X-Press It Blending Card. I coloured in all of the images with Copic Markers and then I fussy cut around all of the tiger faces for the front of the card. The inside of the card was die cut using My Creative Time – Rectangle Frame Dies and my Cuttlebug. The letters and numbers were cut using my Cricut Explore and Crafter’s Companion – Luxury Cardstock – Gold cardstock. I ran all of these through my Xyron Create a Sticker and my Xyron Creative Station.

To assemble the card, I used Hot Buy – Reds – Cards and Envelopes (5.5″ x 4.25″) for my base. I placed the words and numbers onto the front of the card and added in the Tiger face in place of the “0”. I applied double-sided tape to the backs of the coloured images die-cut previously for the inside of  the card and adhered it directly to the base.


Altogether, I made 8 individual cards this year.

Card Recipe:

Stamps: Safari Digital Stamp – PickledPotpourriDigi, Cute Tiger – AlexShopsArt

Inks: HP Printer Grayscale

Paper: Copic Marker X-Press It Blending Card, Crafter’s Companion – Luxury Cardstock – Gold, Hot Buy – Reds – Cards and Envelopes (5.5″ x 4.25″)

Die Cuts: Cricket Explore – Text: Rockwell Condensed Bold, Cricut – DonJuan Cartridge, My Creative Time – Rectangle Frame Dies

Tools: Gelly Roll Sakura #5 Pen, Xyron Create a Sticker, Xyron Creative Station

Image coloured with Copic Markers:

Tiger – Front: W9, W5, W3, W1, W00, YR16, YR15, YR12, E71, E15, RV00, R02, R00, G03, YG13, Gelly Roll Sakura #5 Pen, Copic MultiLiner SP 0.5

Tiger – Inside: W9, W3, W2, W1, W00, C1, C00, E71, E15, R89, R59, R39, R22, R20, R02, R00, YR16, YR15, YR12, G07, G03, YG13, YG00, Gelly Roll Sakura #5 Pen, Copic MultiLiner SP 0.5

Hearts: R37, R35

Butterflies: V15, V12, V00

Tiger’s Fur: Prismacolor Premier Pencils: Sienna Brown (PC945), Burnt Ochre (PC943), Orange (PC918)


Hope you like it and have a great week!

You can find more cards to inspire you at Dreamerland Crafts and Pointer Scrapbooking on the Facebook Fan pages from the rest of our design team.

You Got This!!


It’s Wednesday, and this week, I made a card using High Hopes Rubber Stamps Lasso Some Snow – TDG021  for the main image and Don’t Worry – FDG021 for the sentiment. We all need a little bit of encouragement every now and then and this little snowman is here to give us some.

To make my card this week, I began with a card base of Hammermill – Premium Colour 100 lb. cardstock, cut and scored to be 5.5″ x 4.25″.  I used Echo Park Paper Co. – My Favorite Winter cardstock cut to the same size as the base card for the background. I attached this to the base using double-sided tape. Using my Cuttlebug, a mixture of square dies from My Creative Time -Stitched Squares Inside and Out and Waffle Flower – Nesting Square dies, I die cut cardstock from Scrapbook.com Neutrals Smooth Cardstock and also Copic Marker X-Press It Blending Card. I applied double-sided tape to the back of the tan square and applied it directly to the background. U-Line double-sided tape was added to the back of the dark brown square and popped up onto the centre of the tan square.

With my MISTI and Memento – Tuxedo Black ink, I stamped the image onto the Copic Marker X-Press It Blending Card cardstock square and coloured it in with Copic markers. Gelly Roll Sakura #10 Pen was used to create the snow in the sky. Sakura Glaze – Black and Gelly Roll Sakura #5 Pen were used on the eyes of the snowman. I applied U-line douhble-sided tape to the back of the completed image and popped it up onto the centre of the dark brown square.

With my MISTI and Memento – Tuxedo Black ink, I stamped the sentiment onto Recollections – White cardstock and then die cut it out using my Cuttlebug and My Creative Time – Ribbon End Dies. I inked around the edges using Copic – E59 marker to give it a dark brown border. I used my knife to remove the double border from the piece left behind and then traced the shape of the ribbon onto the remaining piece of Scrapbook.com Neutrals Smooth Cardstock. I cut this out with my cutter and scissors. U-Line double-sided tape was applied to both pieces and the completed sentiment was popped up onto the card below the main image to complete the card.

Card Recipe:

Stamp: Lasso Some Snow – TDG021 (High Hopes Rubber Stamps)

Sentiment: Don’t Worry – FDG021 (High Hopes Rubber Stamps)

Inks: Memento – Tuxedo Black

Paper: Copic Marker X-Press It Blending Card, Hammermill – Premium Colour 100 lb., Echo Park Paper Co. – My Favorite Winter (6″ x 6″), Scrapbook.com – Neutrals Smooth Cardstock (5.5″ x 4.25″), Recollections – White cardstock

Die Cuts: My Creative Time -Stitched Squares Inside and Out, Waffle Flower – Nesting Square dies, My Creative Time – Ribbon End Dies

Tools: MISTI – Most Incredible Stamping Tool, U-Line double-sided tape, Gelly Roll Sakura #10 Pen, Gelly Roll Sakura #5 Pen, Sakura Glaze – Black, Cuttlebug

Image coloured with Copic Markers:

Snowman: B60, C9, C7, C5, C00, E49, YR18, YR16, YR12, Colorless Blender (Eyes – Sakura Glaze – Black, Gelly Roll Sakura #5 Pen)

Hats, Mitts and Scarf: B99, B977, B95

Coat: E51, E50, E37, E35, E34, E33, E31

Birds: E59, E37, E35

Fence: E29, E27, E25, E23, E21

Wheel and Rope: E77, E74, E47, E44, E43, Y35, YR31

Sky: B04, B02, B01, B00

Snow: B000, B60, C00, Colorless Blender, Stickles – Diamond

Hope you like it and have a fantastic week!

You can find lots of inspiration from the Design Team Divas at the High Hopes blog, and the High Hopes Rubber Stamps Facebook Fan page plus you can also follow us on
Instagram, Twitter and Pinterest.

Baby Gnome!!


Sharing a card I made today using KLM Digital Design –  Baby Gnome from the new January 2022 release. Congrats to all of the families who received a new blessing into their lives this January and also to all of those future parents-to-be this year too!

I created the base using Hammermill – Premium Colour 100 lb. cardstock. I cut the paper to the size of 5.5″ x 4.25″. For the background, I used the same paper for the front and back. I first cut the Echo Park – Hello Baby – It’s a Girl cardstock to be the same size as the base card. Using my Cuttlebug and Art Impressions – Oval Double Stitched Dies, I cut an oval from the floral patterned side. I inked around the edges of the floral oval with Tim Holtz Distress Ink – Seedless Preserves and for the edges of the oval on the larger piece with the baskets showing, I applied Tim Holtz Distress Ink – Evergreen Bough. I taped the 2 pieces back to together using some Scotch Tape and then using double-sided tape, I applied the full background piece to the base card. I inked around the entire outer edges with the Tim Holtz Distress Ink – Seedless Preserves.

I imported the image into Microsoft Word and printed it out onto Copic Marker X-Press It Blending Card. The image was coloured in with Copic markers and then fussy cut with scissors. U-Line double sided tape was applied to the back of the image and it was popped up onto the card in the centre of the Oval. The sentiments were also brought into Microsoft Word and combined together. I created a rectangular shape and put it behind the type. I added an Aqua colour to fill in the background and then gave it a 4 pt border. Once it was printed out, I just cut around the edges of the rectangle with my cutter and then applied Tim Holtz Distress Ink – Evergreen Bough around the frame. I added some U-Line double sided tape and popped it up onto the bottom of the card. To finish everything off, I added in a few CC Designs – Dragon Dreams Enamel Dots.

Card Recipe:

Stamp and Sentiments: Baby Gnome – KLM Digital Designs

Inks: HP Printer Grayscale, Tim Holtz Distress Ink – Evergreen Bough, Tim Holtz Distress Ink – Seedless Preserves

Paper: Copic Marker X-Press It Blending Card, Hammermill – Premium Colour 100 lb., Echo Park – Hello Baby – It’s a Girl (6″x6″)

Die Cuts: Art Impressions – Oval Double Stitched Dies (5065)

Miscellaneous: U-Line – 2 sided tape, Cuttlebug, CC Designs – Dragon Dreams Enamel Dots

Image coloured with Copic Markers:

Skin: E21, E11, E04, E00, E000, R30, R20

Hat: V15, V12, V01, V000

Blanket and Bow: BG15, BG13, BG11, BG10

Hope you like it and have a great week!

You can find more cards to inspire you at KLM Designs, KLM Digital Design Team and KLM Digital Designs on the Facebook Fan page from the rest of our design team.

Beautiful Day!!


It’s Wednesday, and this week, I made a card using High Hopes Rubber Stamps Winter Kitty – SDG006  for the main image and Beautiful Day – FDG013 for the sentiment. We just had a major snowfall over the last few days and this little kitty is all bundled up and ready to play!

Growing up we had a lot of snow during the winter and couldn’t wait to put on our mitts and snow boots and go out to play. We had huge snow banks in the schoolyard across the street and would toboggan down them or just slide down in our snow suits! LOL! It was sooooo much fun! Sometimes we even made big snow forts in the backyard with tables and chairs made out of ice and snow. We hardly spent anytime indoors and didn’t usually go back into the house until we had to or we were turning blue because it was so cold out, but even then we still wanted to continue playing outdoors. LOL!

To make my card this week, I began with a card base of Hammermill – Premium Colour 100 lb. cardstock, cut and scored to be 5.5″ x 4.25″.  I used Scrapbook.com – Rainbow Smooth Cardstock for the main background paper. It was already the same size as the base, so no cutting had to be done. To get more use out of the same paper, I had cut the oval frame using my Cuttlebug and Hero Arts – Infinity Die Ovals first. Then, I placed the Rainbow cardstock onto the card base using double-sized tape. I die cut the square background using My Creative Time -Stitched Squares Inside and Out and Pebbles – Winter Wonderland paper and the rectangle to the size of 4″ x 4″. The rectangle was cut from from the same paper pack to the size of 1.25″ x 4″. I inked around the edges of both shapes with a sponge dauber and Tim Holtz Distress Ink – Evergreen Bough. Using double-sided tape, I placed both shapes over the pink background and hid where I cut the oval with the square. I cut out a smaller oval using the same Hero Arts – Infinity Die Ovals and Copic Marker X-Press It Blending Card. I also cut out a 1.5″ circle using a circle punch. Lastly, I die cut the scalloped circle using WeR Memory Keepers – Quickutz Nesting Scallops dies and Hot Buy Craft Smart – Holiday Glitz Glitter Paper.

With my MISTI and Memento – Tuxedo Black ink, I stamped the image onto the Copic Marker X-Press It Blending Card cardstock oval and the sentiment onto the circle. I coloured in the image with Copic markers and then added some Ranger – Emboss It Pen Clear to the bottom of the oval and applied WOW! Sparkling Snow Embossing Glitter. I heat embossed this and added more embossing powder several times to create a thicker layer with my Marvy Uchida – Embossing Heat Tool. Then I added some Cosmic Shimmer Fluffy Stuff and heat embossed it as well to puff it up. Gelly Roll Sakura #10 Pen was used to create the snow in the sky. Sakura Glaze – Black and Gelly Roll Sakura #5 Pen were used on the eyes and nose of the cat.

I inked around the edges of the large pink oval and the circle with Tim Holtz Distress Ink – Picked Raspberry. I applied the coloured image directly to the pink oval and the sentiment circle to the scalloped circle using some liquid glue. Both shapes were then popped up onto the card using U-Line double-sided tape. To completed the card and add in some extra sparkle, I applied some YNS Gumdrops – Winter Wonderland to the background patterned paper.

Card Recipe:

Stamp: Winter Kitty – SDG006 (High Hopes Rubber Stamps)

Sentiment: Beautiful Day – FDG013 (High Hopes Rubber Stamps)

Inks: Memento – Tuxedo Black, Tim Holtz Distress Ink – Evergreen Bough, Tim Holtz Distress Ink – Picked Raspberry, Ranger – Emboss It Pen Clear

Paper: Copic Marker X-Press It Blending Card, Hammermill – Premium Colour 100 lb., Scrapbook.com – Rainbow Smooth Cardstock (4.25″ x 5.5″), Pebbles Winter Wonderland 6″ x 6″, Hot Buy Craft Smart – Holiday Glitz Glitter Paper 12″ x 12″

Die Cuts: My Creative Time -Stitched Squares Inside and Out, Hero Arts – Infinity Die Ovals, WeR Memory Keepers – Quickutz Nesting Scallops, 1.5″ Circle Punch

Tools: MISTI – Most Incredible Stamping Tool, U-Line double-sided tape, Gelly Roll Sakura #10 Pen, Gelly Roll Sakura #5 Pen, Sakura Glaze – Black, Cuttlebug, YNS Gumdrops – Winter Wonderland

Image coloured with Copic Markers:

Kitty: N7, N5, N3, R02, R00, RV66, RV63, RV55 (Eyes – Sakura Glaze – Black, Gelly Roll Sakura #5 Pen)

Sky: B05, B04, B02, Gelly Roll Sakura #10 Pen

Snow: WOW! Sparkling Snow Embossing Glitter, Cosmic Shimmer Fluffy Stuff, Marvy Uchida – Embossing Heat Tool

Hope you like it and have a fantastic week!

You can find lots of inspiration from the Design Team Divas at the High Hopes blog, and the High Hopes Rubber Stamps Facebook Fan page plus you can also follow us on
Instagram, Twitter and Pinterest.

Good Times!!


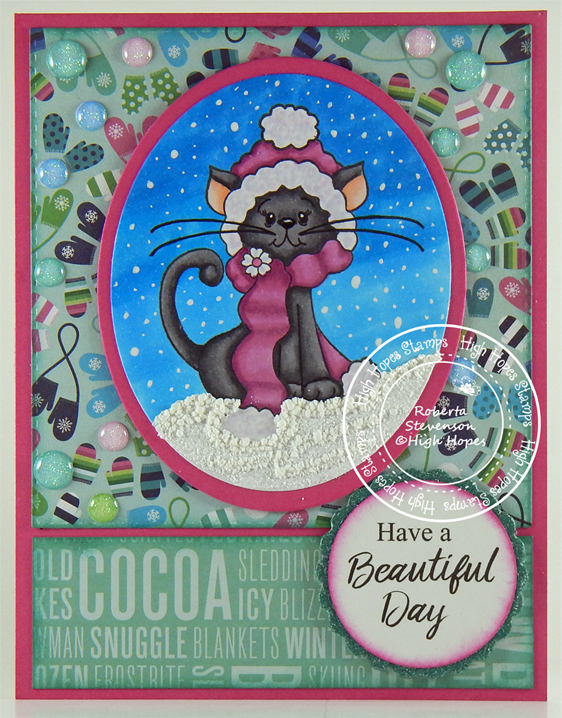
It’s Wednesday, and this week, I made a card using High Hopes Rubber Stamps Bird Song – TDG016  for the main image and Good Times – FDG014 for the sentiment. These little birdie friends know how to whistle a tune. Unfortunately, I myself never mastered how to whistle! I’ve tried over the years, but just can’t seem to do it. LOL!

To make my card this week, I began with a card base of Hammermill – Premium Colour 100 lb. cardstock, cut and scored to be 5.5″ x 4.25″.  I used Scrapbook.com – Brights Smooth Cardstock for the background paper. This paper is great because it’s already cut to size which makes it so easy. I applied it to the base using double-sided tape. Using my Cuttlebug and Your Next Die – Stitched Frame Snowfall Hill die set, I die cut the centre piece from Copic Marker X-Press It Blending Card and the frame from Crafter’s Companion – Luxury Cardstock – Gold.

With my MISTI and Memento – Tuxedo Black ink, I stamped the image onto the Copic Marker X-Press It Blending Card cardstock and the sentiment onto Recollections – White cardstock. I coloured in the image with Copic markers and then added some Stickles – Diamond and Stickles – Waterfall to the parts of the snow to make it sparkly. Gelly Roll Sakura #10 Pen was used to create the snow in the sky. To make the eyes stand out a little more, I used Sakura Glaze – Black and then added a white dot using Gelly Roll Sakura #5 Pen. Once the stickles were dry, I turned the coloured image and frame over and taped them together on the back with some Scotch tape to keep the 2 pieces together. U-line double-sided tape was then applied and I turned it over again and popped it up onto the card. The sentiment was die cut using my Cuttlebug and Essentials by Tattered Lace Dies – Easel Slider. I inked around the edges with Sharpie – Gold Medium Point – Water Based Paint pen, added U-Line double-sided tape to the top half of the sentiment and added it on top of the image. Lastly I added some YNS Gumdrops – White Sugar and Sparkle to complete the card.

Card Recipe:

Stamp: Bird Song – TDG016 (High Hopes Rubber Stamps)

Sentiment: Good Times – FDG014 (High Hopes Rubber Stamps)

Inks: Memento – Tuxedo Black

Paper: Copic Marker X-Press It Blending Card, Hammermill – Premium Colour 100 lb., Scrapbook.com – Brights Smooth Cardstock (4.25″ x 5.5″), Recollections – White, Crafter’s Companion – Luxury Cardstock – Gold

Die Cuts: Your Next Die – Stitched Frame Snowfall Hill, Essentials by Tattered Lace Dies – Easel Slider

Tools: MISTI – Most Incredible Stamping Tool, U-Line double-sided tape, Gelly Roll Sakura #10 Pen, Gelly Roll Sakura #5 Pen, Sakura Glaze – Black, Stickles – Diamond, Stickles – Waterfall, Cuttlebug, YNS Gumdrops – White Sugar and Sparkle

Image coloured with Copic Markers:

Bird1 and Scarf: R59, R39, R37, R35, R29, R27, BG09, BG09, BG05, BG02, BG01, BG000 (Eyes – Sakura Glaze – Black, Gelly Roll Sakura #5 Pen)

Bird2 and Scarf: Y17, Y15, Y13, Y11, Y02, Y00, BG72, BG57, BG49, BG32, BG11, Gelly Roll Sakura #5 Pen

Bird3 and Scarf: R56, R46, R37, R24, R22, C9, C7, C5, G16, G14, YG23, YG03

Beaks and Claws: YR18, YR14, YR12, Y19, Y08

Pine Needles: G29

Sky: B05, B04, B02, B01, Gelly Roll Sakura #10 Pen

Snow: C1, Stickles – Diamond, Stickles – Waterfall

Hope you like it and have a fantastic week!

You can find lots of inspiration from the Design Team Divas at the High Hopes blog, and the High Hopes Rubber Stamps Facebook Fan page plus you can also follow us on
Instagram, Twitter and Pinterest.

Friendship Warms The Heart!!


It’s Wednesday, and this week, I made a card using Friends Snooze – TDG013 by High Hopes Rubber Stamps for the main image and Friendship – FDG023 (High Hopes Rubber Stamps) for the sentiment. Pop on over to High Hopes Rubber Stamps and see all of the wonderful new images as we celebrate our Winter Friends Release!

To make my card this week, I began with a card base of Hammermill – Premium Colour 100 lb. cardstock, cut and scored to be 5.5″ x 4.25″.  I cut the background paper from American Crafts – Jack Frost to be the same size and attached it directly to the base using double-sided tape. Tim Holtz Distress Ink – Chipped Sapphire was used to ink around the outside of the card. Using my Cuttlebug, My Creative Time – Rectangle Frame Layers, My Creative Time – Rectangle Frame Dies, Gina Marie Designs – Nested Scalloped Stitched Rectangles, I die cut the Copic Marker X-Press It Blending Card, Scrapbook.com – Peppermint Smooth Cardstock and Crafter’s Companion – Luxury Cardstock – Ice Blue Pack. Using U-line double-sided tape, I popped up each of the layers onto the card base.

Using my MISTI and Memento – Tuxedo Black ink, I stamped the image onto Copic Marker X-Press It Blending Card cardstock and the sentiment onto Recollections – White cardstock. I coloured in the image with Copic markers and then added some Stickles – Diamond to the parts of the snow to make it sparkly. Gelly Roll Sakura #5 Pen was used to create a starry night sky. I added U-line double-sided tape to the completed image and popped it up onto the card. The sentiment was die cut using my Cuttlebug and Poppystamps – Christmas Quotes. I inked around the edges with Tim Holtz Distress Ink – Chipped Sapphire and glued it onto the top of the image at an angle to complete the card.

Card Recipe:

Stamp: Friends Snooze – TDG013 (High Hopes Rubber Stamps)

Sentiment: Friendship – FDG023 (High Hopes Rubber Stamps)

Inks: Memento – Tuxedo Black, Tim Holtz Distress Ink – Chipped Sapphire

Paper: Copic Marker X-Press It Blending Card, Hammermill – Premium Colour 100 lb., American Crafts – Jack Frost 6 x 6 in., Crafter’s Companion – Luxury Cardstock – Ice Blue Pack, Scrapbook.com – Peppermint Smooth Cardstock – 4.25″ x 5.5″, Recollections – White

Die Cuts: My Creative Time – Rectangle Frame Layers, My Creative Time – Rectangle Frame Dies, Poppystamps – Christmas Quotes, Gina Marie Designs – Nested Scalloped Stitched Rectangles

Tools: MISTI – Most Incredible Stamping Tool, U-Line double-sided tape, Gelly Roll Sakura #10 Pen, Gelly Roll Sakura #5 Pen, Sakura Glaze – Black, Stickles – Diamond, Cuttlebug

Image coloured with Copic Markers:

Bear and Scarf: C9, C7, C5, C4, C3, E27, E25, E23, BG09, BG05, BG02, BG01 (Eyes and Nose – Sakura Glaze – Black)

Bird, Scarf and Hat: R46, R22, R14, R08, YR18, YR15, BG72, BG57, BG32, BG11, Gelly Roll Sakura #5 Pen

Pine Needles: G29

Sky: B99, B97, B95, B93, Gelly Roll Sakura #5 Pen

Snow: B60, B0000, BV20, BG0000, Colorless Blender, Stickles – Diamond

Hope you like it and have a fantastic week!

You can find lots of inspiration from the Design Team Divas at the High Hopes blog, and the High Hopes Rubber Stamps Facebook Fan page plus you can also follow us on
Instagram, Twitter and Pinterest.