Archives

Lighting the Candles!!


Today, I’m sharing a Christmas card that I made using Dreamerland Crafts stamp called Lighting the Candles – D15204. This little angel is helping to light the way to a joyous Christmas for all!

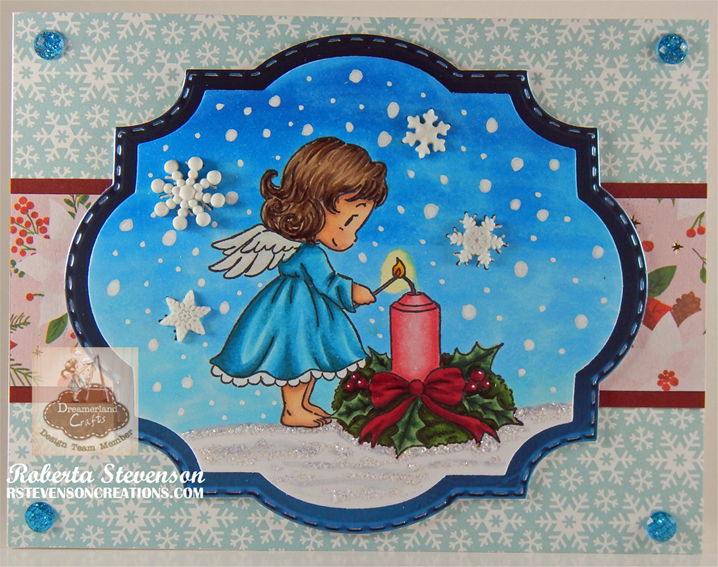
To create this card I began by making a base of 5.5″ x 4.25″ using Hammermill – Premium Colour 100 lb. cardstock. Doodlebug Design Inc. – Winter Wonderland was cut to the same size and applied directly to the base card using double-sided tape. I cut a piece of Recollections – Burgundy to the size of 5.5″ x 2″ and from a scrap piece of patterned paper 5.5″ x 1.75″. Double-sided tape was used to attach the 2 pieces together. These were attached to the base card using double-sided tape.

With my Cuttlebug, I die-cut Crafter’s Companion – Luxury Cardstock – Ice Blue Pack and Copic Marker X-Press It Blending Card cardstock with Creative Expressions by Sue Wilson – Festive Collection – Holly Lattice Frame. U-Line double-sided tape was attached to the larger die-cut and it was popped up onto the centre of the card.

The image was stamped onto the the smaller die-cut using Memento – Tuxedo Black ink, MISTI and Dreamerland Crafts – Lighting the Candles stamp. It was coloured in with Copic markers and Stickles – Star Dust was added to the snow on the ground. For the sky, UNIPosca PC-3M White marker was used for the small snowflakes. Dress It Up – Holiday Collection – Itty Bitty Snowflakes and Dress It Up – Holiday Collection – It’s Cold Outside buttons were placed over top of the images’ snowflakes with liquid glue after I had removed the backing from them. Wink of Stella – Clear was applied to the wings to make them sparkle. I added U-Line double-sided tape to the back of the completed image and popped it up onto the centre of the card.  To complete the card, I placed a PinkFresh Glitter Drops – Lagoon in each corner.

Card Recipe:

Stamp: Lighting the Candles – D15204 – Dreamerland Crafts

Inks: Memento – Tuxedo Black

Paper: Copic Marker X-Press It Blending Card, Hammermill – Premium Colour 100 lb., Crafter’s Companion – Luxury Cardstock – Ice Blue Pack, Doodlebug Design Inc. – Winter Wonderland (6″ x 6″), Recollections – Burgundy

Die Cuts: Creative Expressions by Sue Wilson – Festive Collection – Holly Lattice Frame – CED3125

Tools and Miscellaneous: MISTI – Most Incredible Stamping Tool, U-Line double-sided tape, Cuttlebug, PinkFresh Glitter Drops – Lagoon, Dress It Up – Holiday Colllection – It’s Cold Outside, Dress It Up – Holiday Collection – Itty Bitty Snowflakes, UNIPosca PC-3M White marker, Wink of Stella – Clear

Image coloured with Copic Markers:

Skin: E21, E11, E04, E00, E000, R30, R20

Hair: E47, E44, E43, E42

Dress: BG09, BG05, BG02, BG01

Wings: BG0000, BG000, BV0000, Y00

Wreath: G99, G29, G28, G24, G21, YG67, YG17, R59, R39, R37

Candle: RV14, RV13, RV11, YR12, Y08, R24

Sky: B05, B04, B02, B01

Shadows in Snow: BV20, B0000, Colorless Blender

Hope you like it and have a great week!

You can find more cards to inspire you at Dreamerland Crafts and Pointer Scrapbooking on the Facebook Fan pages from the rest of our design team.

Paw-sitively Good!


It’s day 5 of the 2022 Cat Lovers Hop and today I’m sharing a Christmas card I made using Your Next Stamp –  Meowy Christmas – CYNS681. Having so much fun with this amazing hop and look forward to it every year.

I created a 5.5″ x 4.25″ card base using Hammermill – Premium Colour 100 lb. cardstock. I cut the background to be the same size using My Favourite Things – Pawsome Prints paper and adhered it directly to the base using double-sided tape. Using my Cuttlebug, Creative Expressions – Festive Collection – Bold Snowflake Frame dies and Recollections – Blue Hues Shimmer Cardstock, I cut out the large snowflake and frame. Using some scrap dark blue paper, I die cut the large outline. I tore along the top of a small piece of Recollections – Christmas Inkjet Printable Glitter Paper and then die cut it with the larger cirlce die from the same die set. Using Tim Holtz Distress Ink – Faded Jeans and a finger dauber, the edges were inked all around the base card. With liquid glue, I attached the large snowflake to the background border. I then attached the snow piece that I had cut previously with liquid glue as well. Then, using a Gelly Roll Sakura #10 Pen, I coloured in some snow in the sky.

Using my MISTI and Memento – Tuxedo Black ink, I stamped the image onto Copic Marker X-Press It Blending Card. The image was coloured in with Copic markers and then I fussy cut around it. I added some U-Line double-sided tape to the image and popped it up into centre of the circle. The shadow was added using B52. The sentiments were both stamped onto the dark blue paper with VersaMark ink and then embossed with Ranger Embossing Powder White – Extra Fine Detail. I cut out the larger sentiment with my cutter and the smaller one using my Cuttlebug and Gina K Designs – Sentiment Strips. I attached U-line double sided tape the sentiments and coloured image frame and popped up everything onto the card base.

U-Line double-sided tape was applied to the backs of three Creative Impressions – Brads – Snowflake – Winter with a double layer. They were all popped up onto the card and then YNS Gumdrops – Firefly Magic Sparkly Gumdrops were applied to the centres to finish the card off.

Card Recipe:

Stamp and Sentiment:  Meowy Christmas – CYNS681 – Your Next Stamp

Inks: Memento – Tuxedo Black, VersaMark, Tim Holtz Distress Ink – Faded Jeans

Die Cuts: Creative Expressions – Festive Collection – Bold Snowflake Frame (CED3077), Gina K Designs – Sentiment Strips

Paper: Copic Marker X-Press It Blending Card, Hammermill – Premium Colour 100 lb., My Favourite Things – Pawsome Prints (6″ x 6″), Recollections – Blue Hues Shimmer Cardstock (8.5″ x 11″), Dark Blue paper, Recollections – Christmas Inkjet Printable Glitter Paper – 8.5 x 11″

Embossing Powder: Ranger Embossing Powder White – Extra Fine Detail

Miscellaneous: U-Line – 2-sided tape, YNS Gumdrops – Firefly Magic Sparkly Gumdrops, MISTI (Most Incredible Stamping Tool), Creative Impressions – Brads – Snowflake – Winter, Marvy Uchida – Embossing Heat Tool, Gelly Roll Sakura #10 Pen

Image coloured with Copic Markers:

Cat and Envelope: T9, T7, T5, T4, T3, T1, R21, C1, C0, Colorless Blender

Halo: Y08, Y04

Shadow: B52

Hope you like it and have a great week!

Also entered into https://blog.yournextstamp.com/challenge-191-midnight-comment-for-the-chance-to-win/