Archive | June 2022

Cat & Mouse Party!!


It’s Wednesday, and this week, I made a birthday card using High Hopes Rubber Stamps Cat & Mouse Party – TDG036 for the image and Dot Happy Birthday To You! – F065 for the sentiment. These animals are ready to party, are you?

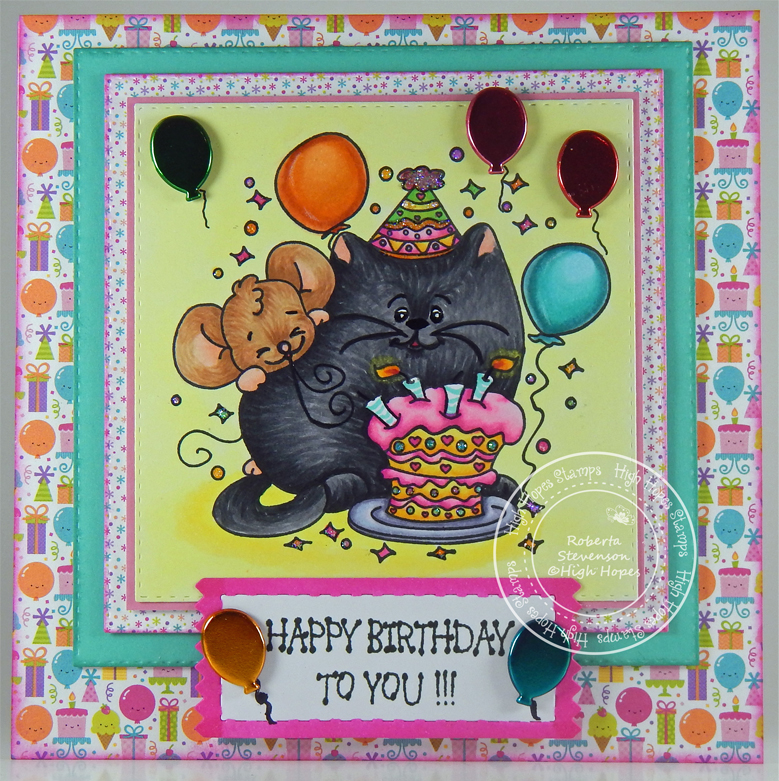
To make my card this week, I began with a card base of AC Cardstock – White paper cut and scored to be 6″ x 6″. Using my Cuttlebug and My Creative Time -Stitched Squares Inside and Out, I die cut 3 squares out of Doodlebug Design Inc. – Fairy Tales, Recollections – Spring Inks paper and Copic Marker X-Press It Blending Card. I also used Doodlebug Design Inc. – Fairy Tales 6″ x 6″ paper for my main background. I applied this directly to the base card using double-sided tape. Tim Holtz Distress Ink – Evergreen Bough and Tim Holtz Distress Ink – Picked Raspberry were both used to go around the edges of the die-cut paper. I applied U-Line double-sided tape to the backs of the aqua coloured square and patterned paper and popped them both up onto the background.

The image and sentiment were both stamped onto Copic Marker X-Press It Blending Card using my MISTI – Most Incredible Stamping Tool and Memento – Tuxedo Black ink. The image was coloured in with Copic Markers. I die cut the sentiment using my Anna Griffin Empress Mini Machine and My Creative Time – Stitched Zig Zag Ties. Copic marker RV06 was used to go around the edges. I attached the coloured image to Recollections – Spring Inks paper using double-sided tape and then cut a slim border around the image. I applied U-Line double-sided tape to the back of this piece and popped it up into the centre of the patterned square. 4 layers of U-Line double-sided tape were attached to the back of the sentiment on the bottom portion and liquid glue was applied to the top. I popped this up onto the card at the bottom. Lastly, to finish the card off, I applied Creative Impressions – Metallic Balloon Brads by adding 2 layers of U-Line double-sided tape. I popped them onto the sentiment and the card and drew in some string for the balloons. Stickles – Star Dust was added to the cake and confetti.

Card Recipe:

Stamps: Cat & Mouse Party – TDG036 (High Hopes Rubber Stamps)

Sentiment: Dot Happy Birthday To You! – F065 (High Hopes Rubber Stamps)

Inks: Memento – Tuxedo Black, Tim Holtz Distress Ink – Evergreen Bough, Tim Holtz Distress Ink – Picked Raspberry

Paper: Copic Marker X-Press It Blending Card, AC Cardstock – White, Doodlebug Design Inc. – Fairy Tales (6″ x 6″), Recollections – Spring Inks (12″ x 12″)

Die Cuts: My Creative Time -Stitched Squares Inside and Out, My Creative Time – Stitched Zig Zag Ties

Tools: MISTI – Most Incredible Stamping Tool, U-Line double-sided tape, Cuttlebug, Anna Griffin Empress Mini Machine, Creative Impressions – Metallic Balloon Brads – Item 90613, Stickles – Star Dust

Image coloured with Copic Markers:

Cat: N9, N7, N6, N5, N4, R46, R30, R20

Mouse: E35, E34, E33, E31, E30, R46, R30, R20, R02, R01, R00

Cake, Hat and Confetti: BG57, BG32, RV06, RV04, RV02, RV00, Y17, Y15, Y11, YR15, YR14, YR12, V04, YG07, YG05, YG03

Balloons: BG72, BG57, BG32, BG11, BG000, YR18, YR16, YR12, YR00

Candles: BG32, R46, YR14, Y08, Y04

Plate: BV25, BV23, BV20, BV0000

Background: Y04, Y02, Y00

Hope you like it and have a fantastic week!

You can find lots of inspiration from the Design Team Divas at the High Hopes blog, and the High Hopes Rubber Stamps Facebook Fan page plus you can also follow us on
Instagram, Twitter and Pinterest.

Birthday Party Girl!!


It’s Wednesday, and this week, I made a birthday card using High Hopes Rubber Stamps Party Girl – TDG034 for the image and Open Happy Birthday – G039 for the sentiment. This little girl loves to dance and celebrate! She is ready for a really nice party to share her birthday with all of her friends.

To make my card this week, I began with a card base of Hammermill – Premium Colour 100 lb. cut and scored to be 5.5″ x 4.25″. I cut out the background to the same size using Bubbly Girls – Party – Yvonne Creations cardstock. This was applied directly to base card with double-sided tape. Tim Holtz Distress Ink – Salvaged Patina was used to ink around all of the edges of the card.

The image and sentiment were both stamped onto Copic Marker X-Press It Blending Card and coloured in with Copic Markers. Using my scissors, I fussy cut around both the image and sentiment. For the sentiment, I used a black marker to go around the edges to hide the white. Using Copic markers, I tried to match the background as best as I could for the coloured image to blend in. I applied U-Line double-sided tape to all of the pieces and popped them up onto the base card. Lastly, to finish it off, I added in 3 gumdrops from YNS Gumdrops – Pretty Peacock Matte Gumdrops.

Card Recipe:

Stamps: Party Girl – TDG034 (High Hopes Rubber Stamps)

Sentiment: Open Happy Birthday – G039 (High Hopes Rubber Stamps)

Inks: Memento – Tuxedo Black, Tim Holtz Distress Ink – Salvaged Patina

Paper: Copic Marker X-Press It Blending Card, Hammermill – Premium Colour 100 lb., Bubbly Girls – Party – Yvonne Creations (6″ x 6″)

Tools: MISTI – Most Incredible Stamping Tool, U-Line double-sided tape, YNS Gumdrops – Pretty Peacock Matte Gumdrops

Image coloured with Copic Markers:

Skin: E21, E11, E04, E00, E000, R30, R22, R21, R20

Hair: E47, E44, E43, E41

Dress, Bows, Socks and Lettering: BG72, BG57, BG32, BG11, RV17, RV14, RV11

Shoes: T10, T9, T7, T5, T3

Balloons: BV13, BV11, BV01, BV0000, G17, G14, G00, YG41

Background: YG0000, RV000, RV0000, G14, BG32, RV17, RV14, YG41

Hope you like it and have a fantastic week!

You can find lots of inspiration from the Design Team Divas at the High Hopes blog, and the High Hopes Rubber Stamps Facebook Fan page plus you can also follow us on
Instagram, Twitter and Pinterest.

Daffodils and Tulips!


Sharing a sympathy card I made today using KLM Digital Design –  Milk Can – Daffodils and Tulips from the new June 2022 release. This image also comes with 2 more sentiments, “Thanks for all you do” and “Kindness changes everything”.

I imported the image and sentiment into Microsoft Word and printed them out onto Copic Marker X-Press It Blending Card. The image was coloured in with Copic markers. I added some Crystal – Stickles to the little dots.  U-Line double-sided tape was added to the back of the image. This was then popped up onto Hammermill – Premium Colour 100 lb. cardsstock cardbase of 5.5″ x 4.25″.

Stamp and Sentiment:  Milk Can – Daffodils and Tulips – KLM Digital Designs

Inks: HP Printer Grayscale

Paper: Copic Marker X-Press It Blending Card, Hammermill – Premium Colour 100 lb.

Dies: My Creative Time – Rectangle Frame Layers

Miscellaneous: U-Line – 2 sided tape, Anna Griffin Empress Mini Machine, Crystal – Stickles

Image coloured with Copic Markers:

Daffodil: Y17, Y15, Y11, YR18, YR16, YR15

Tulips: V17, V15, V12, V09, V06, V04, V01, BV04, BV02, BV01

Leaves: G28, G19, G17, G16, YG67, YG25, YG11

Milk Can: W7, W5, W3, W1, W00

Shadow: E53, E50, E23

Hope you like it and have a great week!

You can find more cards to inspire you at KLM Designs, KLM Digital Design Team and KLM Digital Designs on the Facebook Fan page from the rest of our design team.

Eat Cake!!


It’s Wednesday, and this week, I made a birthday card using High Hopes Rubber Stamps Cupcake Hedgie – TDG035 for the image and Eat Cake – FDG026 for the sentiment. I think the expression on this little hedgie says it all! Birthdays should always be an excuse to eat some cake! LOL!

To make my card this week, I began with a card base of Hammermill – Premium Colour 100 lb. cardstock, cut and scored to be 5.5″ x 4.25″. I adhered Scrapbook.com – Brights Smooth Cardstock which was the same size as the base to the card using double-sided tape. Using my Anna Griffin Empress Mini Machine die cutting machine, I die cut the cake background paper with Your Next Stamp Designer Pad – Birthday Boy and My Creative Time – Rectangle Frame Layers. Tim Holtz Distress Ink – Blueprint Sketch was then inked around all of the edges. I add some U-Line double-sided tape and popped it up onto the base card. Again, using my Empress die cutter, I die cut some golden yellow cardstock using My Creative Time -Stitched Squares Inside and Out. I added some U-Line double sided tape and added it to the patterned background. Waffle Flower – Nesting Square dies were used to die cut the smaller square out of Copic Marker X-Press It Blending Card and My Creative Time – Bunch of Fun Circle Die was used to die cut the circle from some Red cardstock.

The image and sentiment were stamped onto the Copic Marker X-Press It Blending Card. I coloured in the image with Copic Markers. I added Stickles – Star Dust to the cupcake to make the layers sparkle. A 1.5″ Circle punch was used to cut out the sentiment. U-Line double sided tape was added to the backs of the image and sentiment. I popped up the image onto the smaller square and the sentiment onto the red circle. I added another layer of U-Line double sided tape to the right side of the red circle and a little bit of glue to the left side and popped it up over top of the main image. To finish off the card, I added on some YNS Gumdrops – Firefly Magic Sparkly Gumdrops and YNS Gumdrops – Sugar Rush Sparkly Gumdrops.

Card Recipe:

Stamp: Cupcake Hedgie – TDG035 (High Hopes Rubber Stamps)

Sentiment: Eat Cake – FDG026 (High Hopes Rubber Stamps)

Inks: Memento – Tuxedo Black, Tim Holtz Distress Ink – Blueprint Sketch

Paper: Copic Marker X-Press It Blending Card, Hammermill – Premium Colour 100 lb., Your Next Stamp Designer Pad – Birthday Boy (6″ x 6″), Scrapbook.com – Brights Smooth Cardstock (4.25″ x 5.5″)

Die Cuts: My Creative Time -Stitched Squares Inside and Out, My Creative Time – Rectangle Frame Layers, My Creative Time – Bunch of Fun Circle Dies, Waffle Flower – Nesting Square dies

Tools: MISTI – Most Incredible Stamping Tool, U-Line double-sided tape, Anna Griffin Empress Mini Machine, Stickles – Star Dust, YNS Gumdrops – Firefly Magic Sparkly Gumdrops, YNS Gumdrops – Sugar Rush Sparkly Gumdrops

Image coloured with Copic Markers:

Hedgehog: E53, E51, E50, E49, E44, E43, E42, E41, W4, R30, R20, R08, W4

Cupcake Wrapper: B29, B26, B24, B21

Cupcake: Y17, Y15, Y11, R46, R14, R08, G14, YG23, YG11, B26, B24, B21

Cherry: R89, R59, R39, R21

Ground: E34, E33, E3

Check out our new re-release of some fun images for our “Let’s Celebrate Release”!

Hope you like it and have a fantastic week!

You can find lots of inspiration from the Design Team Divas at the High Hopes blog, and the High Hopes Rubber Stamps Facebook Fan page plus you can also follow us on
Instagram, Twitter and Pinterest.

Big Hugs!!


Today, I’m sharing a card using this super adorable image from Dreamerland Crafts stamps called Big Hug – D19025. Great big in person hugs or even virtual hugs are always nice to have or to give to someone or something that you love. Have you hugged someone today?

To make this card I created a base card of 5.5″ x 4.25″ using Hammermill – Premium Colour 100 lb. cardstock. With Tim Holtz Distress Ink – Salty Ocean, a Picket Fence Studio Blender Brush and Lawn Fawn – Cloudy Stencil, I created the clouds. Then, using a combination of Tim Holtz Distress Inks – Mowed Lawn, Tim Holtz Distress Ink – Bundled Sage, a Picket Fence Studio Blender Brush and a mixture of Lawn Fawn – Clippings – Simple Hillside Stencils and Lawn Fawn – Clippings – Slimline Grassy Hillside Stencils, I created the grass. With my Anna Griffin Empress Die-Cutting Mini Machine, Lawn Fawn – Giant Sending Big Hugs was die cut twice using Recollections – Black cardstock. Liquid glue was used to fuse the 2 pieces together. I applied glue to the back of the combined pieces and attached it directly to the base of the card.

Using my MISTI and Memento – Tuxedo Black ink, I stamped the main image onto Copic Marker X-Press It Blending Card and coloured it in with Copic markers. Ranger Inkssentials – Glossy Accents was added to the glasses. The coloured image was fussy cut with scissors leaving a slim white border around it. This was then applied directly to the base card using U-Line – double-sided tape.

Card Recipe:

Stamp: Big Hug – D19025 – Dreamerland Crafts

Inks: Memento – Tuxedo Black, Tim Holtz Distress Ink – Salty Ocean, Tim Holtz Distress Inks – Mowed Lawn, Tim Holtz Distress Ink – Bundled Sage

Paper: Copic Marker X-Press It Blending Card, Hammermill – Premium Colour 100 lb., Recollections – Black cardstock

Die Cuts: Lawn Fawn – Giant Sending Big Hugs

Stencils: Lawn Fawn – Cloudy Stencil, Lawn Fawn – Clippings – Simple Hillside Stencils, Lawn Fawn – Clippings – Slimline Grassy Hillside Stencils

Tools: MISTI – Most Incredible Stamping Tool, Anna Griffin Empress Mini Machine, Picket Fence Studio Blender Brushes, Ranger Inkssentials – Glossy Accents

Image coloured with Copic Markers:

Skin: E21, E11, E04, E00, E000, R30, R20

Hair: E47, E44, E43, E41

Shirt: B16, B12, B05

Tie: V06, V04, V01

Jeans: B26, B23, B21

Shoes: N9, N7, N5, N4

Cat:  N9, N7, N5

Hope you like it and have a great week!

You can find more cards to inspire you at Dreamerland Crafts and Pointer Scrapbooking on the Facebook Fan pages from the rest of our design team.

Chi Chi’s Birthday Party!!


It’s Wednesday, and this week, I made a birthday card using High Hopes Rubber Stamps Chi Chi’s Party – TDG037 for the image and Happy Birthday – FDG027. This is just one of the new re-releases from our “Let’s Celebrate” previously retired stamps at High Hopes Rubber Stamps during the month of June. You should pop on over and take a peek at the other new re-releases too.

To make my card this week, I began with a card base of Hammermill – Premium Colour 100 lb. cardstock, cut and scored to be 5.5″ x 4.25″. I cut Paper Pizazz – Hearts, Coils, Stars designer paper to be the same size as the base and adhered it with double-sided tape. Tim Holtz Distress Ink – Chipped Sapphire was used to ink around all of the edges of the card. Using the Anna Griffin Empress Mini, I die-cut the rectangle using My Creative Time – Rectangle Frame Dies. The image and sentiment were stamped onto Copic Marker X-Press It Blending Card and I coloured in the image and the small balloon on the sentiment with Copic Markers. I added Wink of Stella – Clear to the yellow on the cupcake, hat and ribbons to make them sparkle. U-Line double sided tape was added to the backs of the image and sentiment and they were both popped up onto the patterned base card. Lastly, to finish the card off, I popped a red balloon over top of the balloon on the main image and then an additional 2 balloons for embellishments using Creative Impressions – Metallic Balloon Brads using 2 layers of U-Line double-sided tape.

Card Recipe:

Stamp: Chi Chi’s Party – TDG037 (High Hopes Rubber Stamps)

Sentiment: Happy Birthday – FDG027 (High Hopes Rubber Stamps)

Inks: Memento – Tuxedo Black, Tim Holtz Distress Ink – Chipped Sapphire

Paper: Copic Marker X-Press It Blending Card, Hammermill – Premium Colour 100 lb., Paper Pizazz – Hearts, Coils, Stars

Die Cuts: My Creative Time – Rectangle Frame Dies

Tools: MISTI – Most Incredible Stamping Tool, U-Line double-sided tape, Anna Griffin Empress Mini Machine, Creative Impressions – Metallic Balloon Brads – Item 90613, Wink of Stella – Clear

Image coloured with Copic Markers:

Chi Chi and Bear: E49, E47, E37, E35, E34, E33, E31, E30, R30, R20, R08

Presents: BG72, BG57, BG32, BG11, R46, R24, R08, YR23, Y15, Y11, Y00

Hat: R46, R24, R08, BG57, BG32

Cupcake: BG57, BG32, Y35, Y15, Y06, R08

Balloon: R46, R24, R08

Background: B39, B37, BG09, BG05, BG02, BG01, YG13, Y35, Y15, Y06, R46, R24, R08

Hope you like it and have a fantastic week!

You can find lots of inspiration from the Design Team Divas at the High Hopes blog, and the High Hopes Rubber Stamps Facebook Fan page plus you can also follow us on
Instagram, Twitter and Pinterest.

Love and Cake!


Sharing a birthday card I made today using KLM Digital Design –  Chef Gnome – Cake from the new June 2022 release. This image also comes with 2 more sentiments, “If we are what we eat, well, I’m pretty sweet!” and “If the cake fits, eat it!”. My mom always made our birthdays very special by creating special cake designs every year for each of our birthdays growing up. As a child, I never liked cake, but my mom used to wrap some change into tin foil and hide it in the cake. When all of my friends left, I would take a knife and cut through the cake to get all of the change out to put into my piggy bank. LOL! Unfortunately for me, I developed a sweet tooth when I got older and met my husband who has a really big sweet tooth. Only difference is he manages to keep the weight off. LOL!

I imported the image and sentiment into Microsoft Word and printed them out onto Copic Marker X-Press It Blending Card. The image was coloured in with Copic markers. I added some Wink of Stella – Clear to the icing and then I fussy cut around the coloured image. Using my Anna Griffin Empress Mini Machine and Die-Namics MFT-489 PCD Fishtail Figs STX dies, I die cut the sentiment and also some Aqua cardstock.

The 5.5″ x 4.25″ card base was created using Hammermill – Premium Colour 100 lb. cardsstock. I cut the patterned paper from Echo Parks Paper Co. – Birthday Wishes to the size of 5.5″ x 3.5″ and attached it to the centre of the base using double-sided tape. Two .5″ strips were cut from Yellow Cardstock and then put through my Xyron with one strip attached at the top and one strip on the bottom of the card. The Aqua die cut was added to the right side using double-sided tape. Tim Holtz Distress Ink – Mustard Seed was used to ink around all of the edges of the card. I applied U-Line double-sided tape to the image and the sentiment and popped them both up onto the background. YNS Gumdrops – Celebration Sparkly Gumdrops were added to the top and bottom strips. Lastly, to finish off my card, I ran Art Impresisons – 5335 – Kitchen Mini Dies through the Anna Griffin Empress Mini die cutting machine using Crafter’s Companion Luxury Cardstock – Silver. I ran the 2 pieces through my Xyron Create a Sticker and attached them both to the sentiment tag.

Card Recipe:

Stamp and Sentiment:  Chef Gnome – Cake – KLM Digital Designs

Inks: HP Printer Grayscale, Tim Holtz Distress Ink – Mustard Seed

Paper: Copic Marker X-Press It Blending Card, Hammermill – Premium Colour 100 lb., Echo Parks Paper Co. – Birthday Wishes by Alisha Gordon – 6″ x 6″ Paper Pads, Crafter’s Companion Luxury Cardstock – Silver – 8.5 x 11″, Aqua and Yellow cardstock

Dies: Art Impresisons – 5335 – Kitchen Mini Dies, Die-Namics MFT-489 PCD Fishtail Figs STX

Miscellaneous: U-Line – 2 sided tape, YNS Gumdrops – Celebration Sparkly Gumdrops, Wink of Stella – Clear, Anna Griffin Empress Mini Machine, Xyron Create a Sticker

Image coloured with Copic Markers:

Skin: E21, E11, E00, E000

Beard: E47, E44, E43, E41

Hat and Chef’s Outfit: BV20, C1, C00, Colorless Blender

Shoes: E29, E27, E25, E23, E21

Cake, Icing and Tray: E29, E27, E25, E23, Y19, Y17, Y13, C5, C3, C1

Hope you like it and have a great week!

You can find more cards to inspire you at KLM Designs, KLM Digital Design Team and KLM Digital Designs on the Facebook Fan page from the rest of our design team.

Thank You!!


It’s Wednesday, and this week, I made a Thank You card using High Hopes Rubber Stamps Gladiolas – TDG038 for the image. We are super excited to re-release 9 previously retired images today. This is the first image of many more to come!

It’s spring and my husband is busy in his garden, planting some beautiful flowers. Every year, he asks me what colours I would like to have in the garden and then he puts together a gorgeous display. Thank goodness he is taking care of them, because a green thumb is certainly something I was not blessed with. LOL!

To make my card this week, I began with a card base of Hammermill – Premium Colour 100 lb. cardstock, cut and scored to be 5.5″ x 4.25″. I cut Crafter’s Consortium – The Essential Craft Papers – Ink Drops – Ocean to be the same size as the base and adhered it with double-sided tape. I cut 2 .5″ strips of Recollections – Matte Gold Foil cardstock and adhered a piece on each side of the card using glue. I die cut the words “Thank You” using the same Matte Gold foil cardstock, PaperCrafter Today – 15 Die Cut Sentiment Set and my Anna Griffin Empress Mini Machine. I ran the words through my Xyron Create a Sticker and set them to the side.

The image was stamped onto Copic Marker X-Press It Blending Card and coloured in with Copic Markers. I fussy cut around the image and added some U-Line double-sided tape to the back of it. The images was then popped up onto card. I added the words “Thank You” that I had turned into stickers earlier to complete the card.

Card Recipe:

Stamp: Gladiolas – TDG038 (High Hopes Rubber Stamps)

Inks: Memento – Tuxedo Black

Paper: Copic Marker X-Press It Blending Card, Hammermill – Premium Colour 100 lb., Recollections – Matte Gold Foil cardstock, Crafter’s Consortium – The Essential Craft Papers – Ink Drops – Ocean (6″ x 6″)

Die Cuts: PaperCrafter Today – 15 Die Cut Sentiment Set

Tools: MISTI – Most Incredible Stamping Tool, U-Line double-sided tape, Anna Griffin Empress Mini Machine

Image coloured with Copic Markers:

Flower: B79, B66, B63, Y35, YR12

Leaves and Stem: G28, YG67, YG25, YG11

Hope you like it and have a fantastic week!

You can find lots of inspiration from the Design Team Divas at the High Hopes blog, and the High Hopes Rubber Stamps Facebook Fan page plus you can also follow us on
Instagram, Twitter and Pinterest.

Also entered into #Farmquest Challenge Blog #4.  “https://farmquestchallenge.blogspot.com/2022/05/fqcb-theme-4-poultry-and-wire-or-metal.html”.