Archive | June 2021

Smell The Flowers!!!


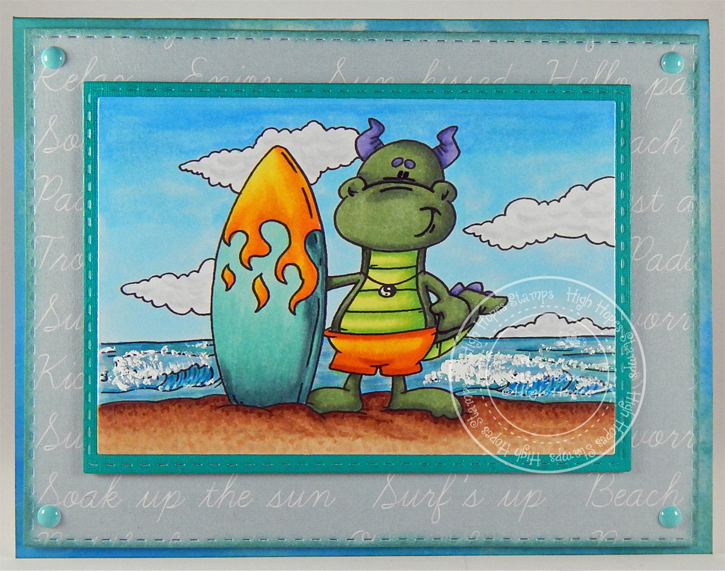
It’s Wednesday, and this week, I made a card using Tink Picking Posies – T027 by High Hopes Rubber Stamps for the main image and Smell The Flowers – G189 (High Hopes Rubber Stamps) for the sentiment. Most of the flowers are now in full bloom. It’s so wonderful to see all of the beautiful colours and smell the wonderful aromas of the flowers in our garden. So happy that my husband has such a green thumb and loves gardening!

To make my card this week, I stamped my image and sentiment using my MISTI and Memento – Tuxedo Black ink onto Copic Marker X-Press It Blending Cardstock. I stamped the image a second time onto plain copy paper and fussy cut around it to create a mask. My Creative Time – Rectangle Frame Dies and My Creative Time – Rectangle Frame Layers were used to cut out the sentiment and background layer. I coloured in the image using Copic markers and then put my mask over top of the coloured image. Using stencils that I had created earlier with Avery Elle – Pierced Clouds Dies (D-05-01), I inked in the clouds using Tim Holtz Distress Ink – Salty Ocean. Once this was done, I removed the mask.

To assemble my card, I started with a base using Hot Buy – Cards and Envelopes (5.5″ x 4.25″). I ran the coloured image through my Xyron Create a Sticker and applied it to the black cardstock. 3M VHB – 2 sided tape, was applied to the back of the black frame and then it was attached directly to the base.

Card Recipe:

Stamp: Tink Picking Posies – T027 (High Hopes Rubber Stamps)

Sentiment: Smell The Flowers – G189 (High Hopes Rubber Stamps)

Inks: Memento – Tuxedo Black, Tim Holtz Distress Ink – Salty Ocean

Paper: Copic Marker X-Press It Blending Card, Black Cardstock, Plain Copy Paper (Mask)

Die Cuts: My Creative Time – Rectangle Frame Dies, My Creative Time – Rectangle Frame Layers, Avery Elle – Pierced Clouds Die (D-05-01)

Tools Miscellaneous: MISTI – Most Incredible Stamping Tool, Xyron Create a Sticker, Cuttlebug

Image coloured with Copic Markers:

Skunk: 100, C9, C7, C5, R30, R20, Colorless Blender, (Eyes and Nose – Sakura Glaze – Black)

Flowers: RV09, RV06, Y17, Y15, Y11, Y08, V04, V01

Leaves: G28, G24, G21

Grass: YG17, YG13, YG03, YG01

Sky: B00 to fill in white spots

Hope you like it and have a fantastic week!

You can find lots of inspiration from the Design Team Divas at the High Hopes blog, and the High Hopes Rubber Stamps Facebook Fan page plus you can also follow us on
Instagram, Twitter and Pinterest.

Just a Note!!


Sharing a card I made today using KLM Digital Designs – Birdhouse #1 from the new June release for the image and sentiment. This image also comes with 2 other sentiments: “Welcome To The Neighbourhood” and “Thinking of You”.

To make the card, I first imported the image and the sentiment into Microsoft Word. I printed out the image and sentiment onto Copic Marker X-Press It Blending Card and a second copy of the image onto copy paper using my HP Printer. I coloured in the image with Copic markers and then fussy cut around the image on the copy paper to create a mask using my Brother Scan and Cut.

The rectangles were die cut using My Creative Time – Rectangle Frame Dies and My Creative Time – Rectangle Frame Layers. I fussy cut around the sentiment and inked around the yellow rectangle and sentiment with Tim Holtz Distress Ink – Fossilized Amber. I placed the mask over the coloured image and added in my clouds using some stencils that I created previously using Avery Elle – Pierced Clouds Die (D-05-01) and Tim Holtz Distress Ink – Salty Ocean. Tim Holtz Distress Ink – Mowed Lawn was added for the base background of the lawn.

To assemble the card, I began with a base card of The Paper Studio – Primary Simply Solids (4.25″ x 5.5″). I ran all of the elements through my Xyron Creative Station to create stickers out of them and so that they would lay completely flat when assembled. I added all of the layers directly to the base card. To finish it off, I added some CC Designs – Dragon Dreams Enamel Dots.

Card Recipe:

Stamp and Sentiment: Birdhouse #1 – KLM Digital Designs

Inks: HP Printer Grayscale, Tim Holtz Distress Ink – Salty Ocean, Tim Holtz Distress Ink – Mowed Lawn, Tim Holtz Distress Ink – Fossilized Amber

Paper: Copic Marker X-Press It Blending Card, The Paper Studio – Primary Simply Solids (4.25″ x 5.5″)

Dies: Avery Elle – Pierced Clouds Die (D-05-01)

Miscellaneous: Xyron Creative Station, CC Designs – Dragon Dreams Enamel Dots, Cuttlebug

Image coloured with Copic Markers:

Birdhouse: V09, V06, V04, Y17, Y15, Y11, E39, E35, E33

Flower and Leaves: YG17, YG03, YG01, V04, V01, Y15

Planter and Dirt: E59, E57, E55, E53, E25, E23, E21, C7, C5, C3, C1

Pole: E39, E37, E35

Grass: YG17, YG13, YG11

 Hope you like it and have a great week!

You can find more cards to inspire you at KLM Designs, KLM Digital Design Team and KLM Digital Designs on the Facebook Fan page from the rest of our design team.

Tea Time!!


Sharing a card I made today using KLM Digital Designs – Rose Teapot from the new June release for the image and sentiment. I have always loved tea and never liked coffee. I have a huge cupboard full of Herbal Teas and love how wonderful it tastes especially with a spoonful of natural unpasteurized honey. Spending time with my grandmother and having a cup of tea with her was always special and I still cherish those moments even though she left us for a better place a long time ago.

To make the card, I first imported the image and the sentiment into Microsoft Word. I created the green background behind the sentiment by creating a rectangle shape and moving it to the back behind it. Then I coloured the rectangle green using a custom colour of R233, G242 and B227 combined and printed out the image onto Copic Marker X-Press It Blending Card and the sentiment onto copy paper using my HP Printer. I coloured in the image with Copic markers and then fussy cut around it leaving a thin white border. I fussy cut around the sentiment as well and applied glue behind it and then attached it to the little sign. Then I attached the sign to some pink cardstock and fussy cut around the sign again. The background papers were all from P13 – The Four Seasons – Spring.

I cut the green patterned paper to the size of 5.75″ x 2.75″ and approximately 6″ x 3/16″ and inked around the edges with Tim Holtz Distress Ink – Bundled Sage. The pink solid patterned paper is 6″ x 3″ and the large patterned background is 6″ x 6″. The pinks were inked around the edges with Tim Holtz Distress Ink – Spun Sugar.

To assemble the card, I began with a base card of 6″ x 6″ using AC White Cardstock. Using double-side tape, I attached the large background directly to the base. Next I applied the larger pink rectangle to the main background using double-sided tape. The 2 green layers were also added using double-sided tape. For the sentiment and the image, 3M VHB – 2 sided tape was added to the backs of each and then attached to the card. To finish it off, I added some sequins using Craftin Desert Diva’s – Sherbert.

Card Recipe:

Stamp and Sentiment: Rose Teapot – KLM Digital Designs

Inks: HP Printer Grayscale, Tim Holtz Distress Ink – Bundled Sage, Tim Holtz Distress Ink – Spun Sugar

Paper: Copic Marker X-Press It Blending Card, P13 – The Four Seasons – Spring 6″ x 6″, P13 – The Four Seasons – Spring 12″ x 12″, Pink Cardstock

Miscellaneous: 3M VHB – 2 sided tape, Craftin Desert Diva’s – Sherbert Sequins

Image coloured with Copic Markers:

Teapot: RV66, RV63, RV55,RV52, RV00, RV000

Flower and Leaves: YG7, YG13, YG11, YG03, YG01, RV66, RV63, RV55, RV52

Hope you like it and have a great week!

You can find more cards to inspire you at KLM Designs, KLM Digital Design Team and KLM Digital Designs on the Facebook Fan page from the rest of our design team.

Happy Birthday MVP!!!


It’s Wednesday, and this week, I made a masculine card using Touchdown Trevor – R027 by High Hopes Rubber Stamps for the main image and Happy Birthday MVP – G174 (High Hopes Rubber Stamps) for the sentiment. Both of my brothers were All Stars when they played Football in High-School a long time ago. Sports were always a big part of our lives growing up and for a lot of our family, they still are!!!

To make my card this week, the image and sentiment were both stamped using my MISTI and Memento – Tuxedo Black ink. I used my Brother Scan and Cut to die cut the image and then I coloured it in with Copic markers. For the background, I used my Cricut Explore to die cut the football and goal post using Hammermill – Premium Colour 100 lb. paper with an image from 3 Birds – Life’s a A Party. Using pre-cut stencils for clouds, I used Tim Holtz Distress Ink – Salty Ocean and a Picket Fence – Blending Brush to create them. I added in the grass with a Picket Fence – Blending Brush, finger dauber and Tim Holtz Distress Ink – Mowed Lawn. Black, brown and yellow cardstock were added behind the cut-out. The sentiment was cut with my cutter and the corners were snipped off with scissors. To give it an edge, I went around the cut sentiment with Copic marker – E23.

To assemble the card, I used The Paper Studio – Primary Simply Solids (4.25″ x 5.5″) for the base. 2-sided tape was applied to the back of the coloured background image and it was attached directly to the base. 3M VHB – 2 sided tape was attached to the back of the coloured image and back of sentiment and applied to the top of the card.

Card Recipe:

Stamp: Touchdown Trevor – R027 (High Hopes Rubber Stamps)

Sentiment: Happy Birthday MVP – G174 (High Hopes Rubber Stamps)

Inks: Memento – Tuxedo Black, Tim Holtz Distress Ink – Salty Ocean and Tim Holtz Distress Ink – Mowed Lawn

Paper: Copic Marker X-Press It Blending Card, Hammermill – Premium Colour 100 lb., The Paper Studio – Primary Simply Solids (4.25″ x 5.5″), Yellow Cardstock, Black Cardstock, Brown Cardstock

Cricut Die Cuts: 3 Birds – Life’s a A Party

Stencil: Avery Elle – Custom Steel Dies – Made in the USA – D-05-01 PiercedCloudsDie , Whimsy Stamps – Grass and Cloud Edger Die Set (Used both to create stencils)

Tools: MISTI – Most Incredible Stamping Tool, Picket Fence – Blending Brush, 3M VHB – 2 sided tape, Brother Scan and Cut, Cricut Explore

Image coloured with Copic Markers:

Skin: E21, E11, E04, E00, E000, R30, R20

Hair: E47, E44, E43, E40

Browns: E29, E27, E25, E23

Gold: E15, Y35, Y108, YR24

Pants: C1, C0, C00, Colorless Blender

Hope you like it and have a fantastic week!

You can find lots of inspiration from the Design Team Divas at the High Hopes blog, and the High Hopes Rubber Stamps Facebook Fan page plus you can also follow us on
Instagram, Twitter and Pinterest.

Living to be 110!!


Just loved the sentiment and the happy go lucky image called 5279 – Be Happy Laugh Lines by Art Impressions. I used to belong to a weight club called TOPS until Covid hit and thought this would be a fun card to make for one of my former Tops Pals.

Using My Creative Time – Rectangle Frame Layers, I die cut Copic Marker X-Press It Blending Card. The image and sentiment were stamped onto the paper using my MISTI and Memento Tuxedo Black Ink and Versa Fine – Onyx Black ink. The image was coloured with Copic markers and I heat embossed the sentiment with Ranger – Clear Super Fine Detail embossing powder and Marvy Uchida – Embossing Heat Tool. The image was then mounted onto Hot Buy – Cards and Envelopes (5.5″ x 4.25″) cardstock.

Card Recipe:

Stamps and Sentiment: 5279 – Be Happy Laugh Lines (Art Impressions)

Inks: Memento – Tuxedo Black, Versa Fine – Onyx Black

Paper: Copic Marker X-Press It Blending Card, Hot Buy – Cards and Envelopes (5.5″ x 4.25″)

Embossing Powder: Ranger – Clear Super Fine Detail embossing powder

Die Cut: My Creative Time – Rectangle Frame Layers

Tools: Marvy Uchida – Embossing Heat Tool

Image coloured with Copic Markers:

Skin: E000, E00, E11, E22, R27, R24, R22, R20

Hair: C7, C5, V3

Dress: BV13, BV04, BV02, BV01

Apron and Slippers: V09, V06, V04, C2, C1, C0, Colorless Blender

Shadow: B41, B21, B14, B12

Hope you like it and have a great week!

Surfin’ Dudley!


It’s Wednesday, and this week, I used High Hopes Stamps’ image Surf Scene Dudley – S244. I’ve seen surfers in action while travelling the world, but have never gone on one myself. Who knows, maybe someday???? Dudley, sure looks happy sporting his vacation pose. LOL!

Using my MISTI and Memento – Tuxedo Black ink, I stamped the image onto Copic Marker X-Press It Blending Card. I coloured in the image with Copic markers and used Copic – Opaque White to create the splash on the waves. My Creative Time – Rectangle Frame Dies and My Creative Time – Rectangle Frame Layers were both used to die cut the coloured image and background papers. The edges were inked around with Tim Holtz Distress Ink – Evergreen Bough. The image was then attached to the Aqua background using double-sided tape.

To assemble the card, I began with a base card of Hot Buy – Cards and Envelopes (5.5″ x 4.25″). I popped up the 2 backgrounds with 3M VHB – 2 sided tape and attached them both to the base card. Lastly, I added some pop-dots from CC Designs – Dragon Dreams Enamel to finish it off.

Card Recipe:

Stamp: Surf Scene Dudley – S244 (High Hopes Rubber Stamps)

Inks: Memento – Tuxedo Black, Tim Holtz Distress Ink – Evergreen Bough

Paper: Copic Marker X-Press It Blending Card, DCWV – Coastal – 12″ x 12″, Hot Buy – Recollections – Jewel Tones, Hot Buy – Cards and Envelopes (5.5″ x 4.25″)

Die Cuts: My Creative Time – Rectangle Frame Dies, My Creative Time – Rectangle Frame Layers

Tools: MISTI – Most Incredible Stamping Tool, Cuttlebug, 3M VHB – 2 sided tape, CC Designs – Dragon Dreams Enamel Dots

Images coloured with Copic Markers:

Dragon: G94, G82, G46, YG07, YG03, YG00, BV04, BV02, BV01 (Eyes – Sakura Glaze – Black)

Bathing Suit: YR18, YR16, Y08

Surf Board: BG72, BG57, BG32, BG11, YR16, YR14, Y08, Y04

Water: BG70, BG32, BG11, B93, B91, B52, B41, B06, B04, B02, B01, (Copic – Opaque White)

Sky: B02, B01, B00, B000

Sand: E37, E35, E33, E31

Clouds: BG70, C1, C00, Colorless Blender

Hope you like it and have a fantastic week!

You can find lots of inspiration from the Design Team Divas at the High Hopes blog, and the High Hopes Rubber Stamps Facebook Fan page plus you can also follow us on
Instagram, Twitter and Pinterest.

Rabbits Story Time!!


Sharing a card I made today using KLM Digital Designs – Reading Gnome with Rabbits from the new June release. I think this image is such a peaceful scene. These little rabbits are really interested in the story about their cousin Peter Rabbit. We have a little family of wild rabbits that have adopted our backyard yard. I wonder if they’d sit close to me while I read to them. LOL!

To make the card, I first imported the image into Microsoft Word and printed it out onto Copic Marker X-Press It Blending Card and copy paper using my HP Printer. Using my Cuttlebug, My Creative Time – Rectangle Frame Dies and My Creative Time – Rectangle Frame Layers, I die cut black cardstock and the image. I coloured in the image with Copic markers and I created the cloud background using Tim Holtz Distress Ink: Salty Ocean, Broken China, Tumbled Glass with a mixture of cloud stencils I created using Avery Elle – PiercedCloudsDie. I had used my Brother Scan and Cut to create the mask to put over the image while I created the clouds.

To assemble the card, I used Hot Buy – Cards and Envelopes cardstock (5.5″ x 4.25″) for the base. Using double-sided tape, I attached the coloured image and black layer to the base card.

Card Recipe:

Stamp: Reading Gnome with Rabbits – KLM Digital Designs

Inks: HP Printer Grayscale, Tim Holtz Distress Ink – Salty Ocean, Tim Holtz Distress Inks – Broken China, Tim Holtz Distress Inks – Tumbled Glass

Paper: Copic Marker X-Press It Blending Card, Hot Buy – Cards and Envelopes (5.5″ x 4.25″), Black cardstock

Die Cuts Stencils: Avery Elle – Pierced Clouds Die (D-05-01), My Creative Time – Rectangle Frame Dies, My Creative Time – Rectangle Frame Layers

Miscellaneous: Picket Fence – Blending Brush

Image coloured with Copic Markers:

Skin: E21, E11, E04, E00, E000

Beard: W5, W4, W3, W2, W1, W00

Shirt: E89, E87, E84

Jeans: B26, B23, B21

Boots: E27, E25, E23, E21, C3, C2, C1, C0

Book and Hat: BG72, BG57, BG32, BG11, YR30, Y000

Rabbits: W3, W2, W1, W0, W00, R30, R20

Egg Box: E57, E55, E53, E51

Grass: YG17, YG13, YG03, YG01

Hope you like it and have a great week!

You can find more cards to inspire you at KLM Designs, KLM Digital Design Team and KLM Digital Designs on the Facebook Fan page from the rest of our design team.

Card of the Month – Round 3!!


Hi everyone, so excited!!! Just found out that I made it into Round 3 of Creative Scrapbooker Card of the Month and I just wanted to ask for your help again ( if you like ). Please vote for my KLM Digital Designs card at CreativeScrapbooker.ca. Round 3 of the June cards has just started and you can vote until the 19th of June. Here is the link to vote: https://creativescrapbooker.ca/card-of-the-month-june-2021. This is my card 🙂 Thanks for all of your support so far and I hope to survive until next round!

Live Life!!


It’s Wednesday, and this week, I’m sharing a card I made from the High Hopes Rubber Stamps “Mix It Up Release”  using Sports Car 1 – SS048 for the main image and Live Life – GG037 for the sentiment! It would be great to win a lottery and drive something similar to this awesome car! Then, I could rent a race track and speed around it. That would be sooooo much fun! LOL!

To make my card this week, I stamped the image and sentiment using my MISTI and Memento – Tuxedo Black ink onto Copic Marker X-Press It Blending Card. I coloured in the image with Copic markers and then fussy cut around it and set it aside. A piece of Copic Marker X-Press It Blending Card was cut to the size of 5.5″ x 4.25″ for me to create my background. The background was also coloured in with Copic markers. Next, I die cut the background using my Cuttelbug and My Creative Time – Rectangle Frame Layers. The sentiment was die cut with Waffle Flower – Nesting Square dies and for the outer square, My Creative Time -Stitched Squares Inside and Out die was used. Tim Holtz Distress Ink – Chipped Sapphire was used to ink around the edges of both squares.

To assemble the card, 3M VHB – 2 sided tape was attached to the backs of the car image, sentiment and larger blue square. The background coloured image was adhered directly to the base card of The Paper Studio – Primary Simply Solids (4.25″ x 5.5″). The car and the sentiment were than attached onto the main background.

Card Recipe:

Stamp: Sports Car 1 – SS048 (High Hopes Rubber Stamps)

Sentiment: Live Life – GG037 (High Hopes Rubber Stamps)

Inks: Memento – Tuxedo Black, Tim Holtz Distress Ink – Chipped Sapphire

Die Cuts: My Creative Time – Rectangle Frame Layers, Waffle Flower – Nesting Square dies, My Creative Time -Stitched Squares Inside and Out

Paper: Copic Marker X-Press It Blending Card, The Paper Studio – Primary Simply Solids (4.25″ x 5.5″), Blue cardstock

Tools: MISTI – Most Incredible Stamping Tool, 3M VHB – 2 sided tape

Image coloured with Copic Markers:

Sports Car: B39, B37, B14, B12, B000, C10, C8, C6, C5, C3, C1, C0

Mountains: BV23, BV20, C7, C5, C3, C1, B000

Sky and Fence: B00, B000, B000, Colorless Blender

Roadway: E74, E71, E70, BV23, BV20, W2, W0, C7, C5, C3, C1, C0, C00, B00, Rubbing Alcohol, Q-Tip

Check out some other fun new returning stamps from the Mix It Up Release here:
Mix It Up Release – High Hopes Rubber Stamps (highhopesstamps.com)

Hope you like it and have a fantastic week!

You can find lots of inspiration from the Design Team Divas at the High Hopes blog, and the High Hopes Rubber Stamps Facebook Fan page plus you can also follow us on
Instagram, Twitter and Pinterest.

Card of the Month – Round 2!!


Hi everyone, so excited!!! Just found out that I made it into Round 2 of Creative Scrapbooker Card of the Month and I just wanted to ask for your help again ( if you like ). Please vote for my KLM Digital Designs card at CreativeScrapbooker.ca. Round 2 of the June cards has just started and you can vote until the 13th of June. Here is the link to vote: https://creativescrapbooker.ca/card-of-the-month-june-2021. This is my card 🙂 Thanks ..hope to survive until next round!

Seas The Day!!


Sharing a card I made today using KLM Digital Designs – Boating Gnome from the new June release. This stamp comes with 2 other sentiments, “It’s a boat time” and “You float my boat”. There’s nothing like getting up early in the morning and rowing a boat along a shore seeing the wildlife when you go camping. It’s so peaceful and serene.

To make the card, I first imported the image into Microsoft Word and printed it out onto Copic Marker X-Press It Blending Card and copy paper using my HP Printer. Using my Cuttlebug, My Creative Time – Rectangle Frame Dies and My Creative Time – Rectangle Frame Layers, I die cut red, blue cardstock and the image. I coloured in the image with Copic markers and I created the cloud background using Tim Holtz Distress Ink: Salty Ocean, Broken China, Tumbled Glass with a mixture of cloud stencils I created using Avery Elle – PiercedCloudsDie. I had used my Brother Scan and Cut to create the mask to put over the image while I created the clouds.

To assemble the card, I used Hot Buy – Cards and Envelopes cardstock (5.5″ x 4.25″) for the base. I attached the coloured image to the blue layer using double-sided tape. 3M VHB – 2 sided tape was applied to backs of the red and blue rectangles and attached directly to the base.

Card Recipe:

Stamp: Boating Gnome – KLM Digital Designs

Inks: HP Printer Grayscale, Tim Holtz Distress Ink – Salty Ocean, Tim Holtz Distress Inks – Broken China, Tim Holtz Distress Inks – Tumbled Glass

Paper: Copic Marker X-Press It Blending Card, Hot Buy – Cards and Envelopes (5.5″ x 4.25″), Red cardstock, Blue cardstock

Die Cuts Stencils: Avery Elle – Pierced Clouds Die (D-05-01), My Creative Time – Rectangle Frame Dies, My Creative Time – Rectangle Frame Layers

Miscellaneous: 3M VHB – 2 sided tape, Cuttlebug, Brother Scan and Cut, Picket Fence – Blending Brush

Image coloured with Copic Markers:

Skin: E21, E11, E00, E000

Beard: E47, E44, E43, E42

Hat and Glasses: R29, R27, R24, R22, C5

Bathing Suit: B79, B69, B66

Boat and Oar: E39, E37, E35, E34, E33, E31, E30, E29, E27, E25, E23, E21, WR27, R24, R17

Water: BG70, B93, B91, B52, B41, B06, B02, B01, B000

Hope you like it and have a great week!

You can find more cards to inspire you at KLM Designs, KLM Digital Design Team and KLM Digital Designs on the Facebook Fan page from the rest of our design team.

Card of the Month – Round 1!!


Hi everyone, just wanted to ask for your help ( if you like )..Please vote for my KLM Digital Designs card at CreativeScrapbooker.ca. Round 1 of the June cards has just started and you can vote until the 7th of June. Here is the link to vote: https://creativescrapbooker.ca/card-of-the-month-june21 This is my card 🙂 Thanks ..hope to survive until next round !

Fairy Garden!!


It’s Wednesday, and this week, I’m sharing a card I made from the High Hopes Rubber Stamps “Mix It Up Release”  using Fairy Garden – TT141 for the main image and Leave Room – LL015 for the sentiment! I love movies and reading books about Fantasy! It’s always so much fun to get lost in the moment, just like these little fairies are enjoying their little magical garden!

To make my card this week, I started out with a base card using AC Cardstock – White at the size of 6″ x 6″. I thought this paper by Graphic45 – Unique Papercrafting – Fairie Dust Collection – Moonlit Blooms went so well with the sentiment and the garden, so I die-cut it using my Couture Creations – Go Power and Emboss and Creative Expression Craft Dies by Sue Wilson – Noble Dies – Double Pierced Squares – Set B. I used double-sided tape and attached it directly to the base.

The image and sentiment were both stamped using my MISTI and Memento – Tuxedo Black ink. I coloured in the image with Copic markers and then fussy cut around it and the sentiment. I ran both pieces through my Xyron Creative Station to make them into stickers and so that they would lie completely flat when I attached them to some pieces of Recollections – Black cardstock. Once again, I fussy cut around the coloured image and sentiment. 3M VHB – 2 sided tape was attached to the backs of the image and sentiment and were applied directly to the background of the card to finish it off.

Card Recipe:

Stamp: Fairy Garden – TT141 (High Hopes Rubber Stamps)

Sentiment: Leave Room – LL015 (High Hopes Rubber Stamps)

Inks: Memento – Tuxedo Black

Die Cuts: Creative Expression Craft Dies by Sue Wilson – Noble Dies – Double Pierced Squares – Set B

Paper: Copic Marker X-Press It Blending Card, Graphic45 – Unique Papercrafting – Fairie Dust Collection – Moonlit Blooms, AC Cardstock – White, Recollections – Black cardstock

Tools: MISTI – Most Incredible Stamping Tool, 3M VHB – 2 sided tape, Couture Creations – Go Power and Emboss, Xyron Creative Station

Image coloured with Copic Markers:

Tree House: E49, E27, E25, E23, E21, W5, W3, W0, BG72, BG57, BG32, BG11, BG01, Y04, Y02, C5, C3, C1

Walkway: E47, E44, E43, E42, E40

Greenery: YG67, YG63, YG17, YG13, YG11, YG03, YG01, G17, G14, G07

Flowers: V12, V09, V06, V01, YR30, YR20, YR16, YR14, E15, Y17, Y08, Y06, GB02, BG01, BG0000

Bench and Bridge: BG72, BG57, BG32, BG11, C5, C3, C1, E27, E23, E21

Bird Bath: C5, C3, C1,

Water: B93, B91, B52, B41, B06, B04, B02, B01, B000

Check out some other fun new returning stamps from the Mix It Up Release here:
Mix It Up Release – High Hopes Rubber Stamps (highhopesstamps.com)

Hope you like it and have a fantastic week!

You can find lots of inspiration from the Design Team Divas at the High Hopes blog, and the High Hopes Rubber Stamps Facebook Fan page plus you can also follow us on
Instagram, Twitter and Pinterest.