Sharing a birthday card I made using Whimsy Stamps Wonkey Donkey – DP1053 for the images and sentiments for my younger brother’s birthday card this year. I just couldn’t resist these fun characters when I saw them!
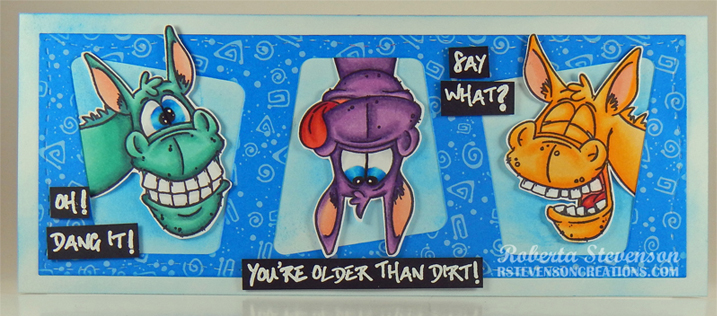
To make my card, I began with a card base of Hammermill – Premium Colour 100 lb. cardstock, cut and scored to be 8.5″ x 3.5″. For the background, I used Tim Holtz Distress Ink – Salty Ocean and a Picket Fence – Blending Brush. Using my Couture Creations – Go Power and Emboss and Whimsy Stamps – Slimline Marquee Die (WSD347), I die cut the blue patterned paper. I stamped the images onto Copic Marker X-Press It Blending Card cardstock with my MISTI and Memento – Tuxedo Black ink. I coloured them all in with Copic markers and then fussy cut around all of them. Using my MISTI and Versamark, I stamped the sentiments onto Recollections – Black cardstock. They were then embossed using my Marvy Uchida – Embossing Heat Tool and Ranger Embossing Powder White – Extra Fine Detail. I used some liquid glue to place the donkeys behind the die-cut cardstock and then applied liquid glue over the rest of the back of the die cut and adhered it directly to the base. U-Line double-sided tape was applied to the remainder of the donkeys to pop them up on the card out of the windows. Lastly, I added some U-Line double-side tape to the backs of each of the sentiments and popped them up onto the card to finish it off.
Card Recipe:
Stamp and Sentiment: Wonkey Donkey – DP1053 (Whimsy Stamps)
Inks: Memento – Tuxedo Black, Tim Holtz Distress Ink – Salty Ocean, Versamark
Paper: Copic Marker X-Press It Blending Card, Hammermill – Premium Colour 100 lb., Recollections – Black cardstock
Dies: Whimsy Stamps – Slimline Marquee Die (WSD347)
Embossing Powder: Ranger Embossing Powder White – Extra Fine Detail
Tools: MISTI – Most Incredible Stamping Tool, U-Line double-sided tape, Marvy Uchida – Embossing Heat Tool, Gelly Roll Sakura #10 Pen, Picket Fence – Blending Brush, Couture Creations – Go Power and Emboss
Image coloured with Copic Markers:
Donkey1: BG72, BG57, BG32, BG11, R30, R20, B06, B02, B01, W9, C1, C0, Gelly Roll Sakura #10 Pen
Donkey2: V17, V15, V12, R46, R30, R22, R20, R14, R08, B06, B02, B01, W9, Gelly Roll Sakura #10 Pen
Donkey3: Y38, Y35, Y32, R46, R30, R22, R20, R14, R08, B06, B02, B01, W9, C1, C0, Gelly Roll Sakura #10 Pen
Hope you like it and have a great week!