Archive | December 2019

Penguins Visit Santa


Sharing a card that I made using Penguins Visit (Di’s Digi Stamps). I just thought this stamp was so adorable and loved the little scene.

Stamp: Penguins Visit (Di’s Digi Stamps)

Sentiment: New Christmas Seals (Kraftin Kimmie Stamps)

Inks: Memento – Tuxedo Black, Versamark, Tim Holtz Distress Ink – Evergreen Bough

Paper: Copic Marker X-Press It Blending Card, Hot Buy Craft Smart – Holiday Glitz Glitter Paper 12″ x 12″, Hot Buy Craft Smart – Cute and Cozy Christmas 12″ x 12″, Recollections – Christmas Plaids – 6″ x 6″ (15.2 cm x 15.2 cm), Lawn Fawn – Snowy Day Remix – 6″ x 6″ (15.2 cm x 15.2 cm)Lawn Fawn – Snowy Day Remix – 6″ x 6″ (15.2 cm x 15.2 cm)

Die Cuts: My Creative Time -Stitched Squares Inside and Out, Sizzix Tim Holtz Alterations Snowflakes, Amy Design – Dies – Keep It Cool – Cool Square Frame

Embossing Powder: Ranger Embossing Powder White – Extra Fine Detail

Image Coloured with Copic Markers

Skin:  E21, E11, E04, E00, E000

Beard, Trim, Pompoms: W1, W0, Colorless Blender

Santa’s Coat, Pants and Hat: R39, R29, R27, R24, Stickles – Diamond

Santa’s Bag and Mittens: G82, G29, G28

Boots: W9, W5, W2

Penguins: W9, W5, W2, YR14, Y17, Y15, E43, E41, Colorless Blender

Penguin Hat: BG49, BG45, BG32, Glitter Glue – Aqua

Presents and Bows: BG49, BG45, BG32, BG07, BG05, BG02, E15, Y19, Y17, Y15, R59, R37, R35

Igloo: BV20, C0, Colorless Blender, Wink of Stella – Clear

Sky: B39, B37, B34, Gelly Roll Sakura #10 Pen

Snow: Stickles – Diamond

Hope you like it!

Merry Christmas and Happy New Year Everyone!

Our Friendship is Magic!


Welcome High Hopes Rubber Stamps Fans!

It’s Wednesday, and for my last High Hopes card for the year, I’m sharing a couple of good friends just relaxing and taking it easy! Sometimes it is nice to just chill out a bit! LOL! The stamp for the main image is called South Pole Pals R147 (High Hopes Rubber Stamps).

To make my card, I decided to keep it simple. I cut out the frame using Amy Design – Dies – Keep It Cool – Cool Square Frame and Copic Marker X-Press It Blending Card. Next, I stamped the image using my MISTI into the centre of the die cut. I coloured this in with the Copic markers listed below. For the outside of the die cut, I used Tim Holtz Distress Inks – Broken China and sponged on the ink using a dauber.

To create the background for the main image, I re-stamped the main image onto Inkadoo Stamping Mask Paper and fussy cut it out. Then I placed the mask over my coloured image. Next I used a mixture of Tim Holtz Distress Oxide inks, Faded Jeans, Wilted Violet and Festive Berries to create the sky. I have never tried this before, and just love the way it turned out.

For the snow, I stamped the bottom of the image with VersaMark ink and then added WOW! Embossing Glitter – White Puff Twinkle. I heated up the embossing powder with my heat gun and then added some Stickles – Diamond along the top of the snow.

Next I assembled the card onto 5.5″ x 5.5″ white AC Cardstock. I cut out a piece of 5.5″ x 5.5″ Hot Buy Craft Smart – Holiday Glitz Glitter Paper and mounted it with 2 sided tape onto the base. Then I added glue to the back of the frame and centre previously cut and coloured with Zig 2 Way Glue and mounted it onto top of the card.

Lastly, I added the sentiment Magic Friendship F234 (High Hopes Rubber Stamps) and popped it up with 3M VHB – 2 sided tape to finish up the card.

Card Recipe:

Stamp:  South Pole Pals R147 (High Hopes Rubber Stamps)

Sentiment: Magic Friendship F234 (High Hopes Rubber Stamps)

Inks: Memento – Tuxedo Black, Tim Holtz Distress Oxide Festive Berries, Tim Holtz Distress Oxide Faded Jeans, Tim Holtz Distress Oxide Wilted Violet, Tim Holtz Distress Inks – Broken China, Versamark

Paper: Copic Marker X-Press It Blending Card, Hot Buy Craft Smart – Holiday Glitz Glitter Paper 12″ x 12″

Die Cut: Amy Design – Dies – Keep It Cool – Cool Square Frame

Tools: MISTI – Most Incredible Stamping Tool, Cuttlebug, 3M VHB – 2 sided tape, Inkadoo Stamping Mask Paper

Embossing Powder: WOW! Embossing Glitter – White Puff Twinkle

Image coloured with Copic Markers:

Penguin: W9, W7, W5, E15, YR14, Y17, Y15, Y11, E45, E43, E41, Colorless Blender

Polar Bear: W9, W2, W1, W0, R30, R20, Colorless Blender

Hope you like it and have a fantastic week!

You can find lots of inspiration from the Design Team Divas at the High Hopes blog, and the High Hopes Rubber Stamps Facebook Fan page plus you can also follow us on
Instagram, Twitter and Pinterest.


Walking in a Winter Wonderland


Welcome Back Dreamerland Craft Fans!

Today, I’m sharing a card with you that I made using DCS19089 – Mix and Match Clear Stamp  (Dreamerland Crafts Clear Stamps) for the main image and sentiment and 2018 Christmas Trees & Houses – M18312 (Dreamerland Crafts Clear Stamps) for the trees in the background! I thought this little bear was just so adorable, so I thought I would make him pulling his little forest friend on a little walk through the forest!

I used the centre die cut from Creative Expressions by Sue Wilson – Festive Collection – Pointsettia Mini Background – CED3049 to cut out the area I wanted to stamp my image on. I used Copic Marker X-Press It Blending Card, Memento – Tuxedo Black ink and my MISTI to get a nice clean image. The first step was to stamp the bear, sled and bunny. Next I used Inkadoo Stamping Mask Paper and stamped the 3 images again. Next, I added the masked images over top of the images that were previously stamped on the base image.

The second step was to stamp in the trees. I wanted to give the impression that some trees were further back, so I inked the tree stamp with Memento – Bamboo Leaves and stamped once and then immediately again using the same stamp. I performed this several times across the background. Once all of the trees were in place, I removed the masking and was ready to colour in my images.

Before adding snow to the sky, I stamped on the sentiment using VersaMark ink and Ranger Embossing Powder White – Extra Fine Detail. Then I added in the snow flakes using Gelly Roll Sakura #8 Pen.

The colours used for each character and the trees are listed below. The final step for the main image was to add in some sparkle on the trees and snow on the ground. For the glitter on the trees I used Quickie Glue and DecoArt Glamour Dust. For the snow below the trees, sled and bear, I used VersaMark ink and WOW! Embossing Glitter – White Puff Twinkle and touches of Stickles – Diamond.

Lastly, I die cut the background frame using Recollections – Christmas Inkjet Printable Glitter Paper and Creative Expressions by Sue Wilson – Festive Collection – Pointsettia Mini Background. I added glue to the back of the die cut and mounted it on top of Crafts Sparkling Stickers – 02-3068629. Then I popped up the main image in the centre using 3M VHB – 2 sided tape.

Card Recipe:

Stamps: 2018 Christmas Trees & Houses – M18312 (Dreamerland Crafts Clear Stamps), DCS19089 – Mix and Match Clear Stamp (Dreamerland Crafts Clear Stamps)

Sentiments: DCS19089 – Mix and Match Clear Stamp (Dreamerland Crafts Clear Stamps)

Inks: Memento – Tuxedo Black, Memento – Bamboo Leaves, Memento – Rich Cocoa, VersaMark ink

Embossing Powder: Ranger Embossing Powder White – Extra Fine Detail, WOW! Embossing Glitter – White Puff Twinkle

Paper: Copic Marker X-Press It Blending Card, Crafts Sparkling Stickers – 02-3068629, Recollections – Christmas Inkjet Printable Glitter Paper – 8.5 x 11″

Die Cuts: Creative Expressions by Sue Wilson – Festive Collection – Pointsettia Mini Background – CED3049,

Tools: MISTI – Most Incredible Stamping Tool, Cuttlebug, 3M VHB – 2 sided tape, Inkadoo Stamping Mask Paper, Stickles – Diamond

Image coloured with Copic Markers:

Bear: E57, E55, E53, E39, E37, E35, E34, R59, R37, R35, Sakura Glaze – Black (Nose and Eyes), Gelly Roll Sakura #5 Pen

Bunny: E57, E55, E53, E51, R20, R00, Sakura Glaze – Black (Eyes), Gelly Roll Sakura #5 Pen

Sleigh: R59, R37, R35, C3, C2, C1, E39, E37, E35

Trees: BG96, YG67, YG17, G21, G20, G00, G0000

Background Sky: B99, B97, B95, B93, B91


Hope you like it and have a great week!

You can find more cards to inspire you at Dreamerland Crafts on the Facebook Fan page from the rest of our design team.

Nordic Night Snowy Delight!


Welcome High Hopes Rubber Stamps Fans!

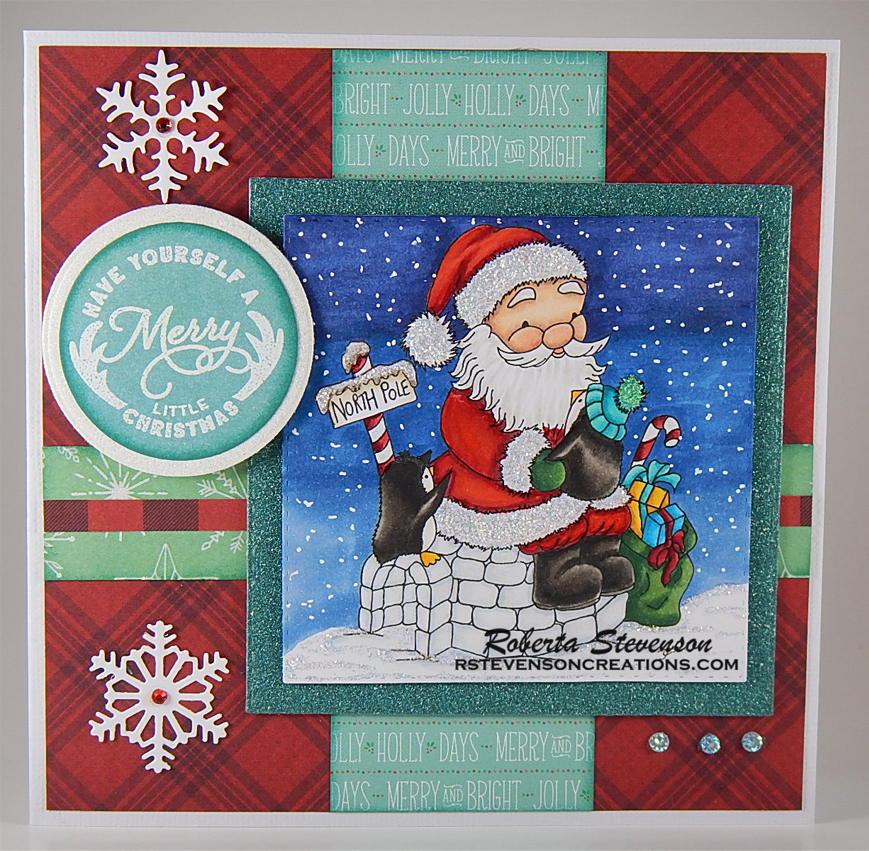
It’s Wednesday, and today I’m sharing a card that I made using the image Nordic Snowman with Bird (TLF010) (High Hopes Rubber Stamps) from our latest Christmas release. I just love the serenity of this image.  I grew up in Northern Canada and have always loved snow. It’s always so beautiful watching it come down from the sky. Not so much fun when you have to shovel it or drive through a snow storm, but other than that, it is quite beautiful! LOL! Did you grow up where there was a lot of snow too?

To make my card, I first stamped the image using Memento – Tuxedo Black ink onto Copic Marker X-Press It Blending Card. Then I ran the stamped image through my Cuttlebug and die cut it with Craftin Desert Diva’s Fancy Frames.

I decided to colour in the sky first with various blue Copic markers. After I coloured in the sky, I added in the falling snow using Gelly Roll Sakura #10 Pen.

I thought the sweater looked Scandinavian, so I decided to colour it similar to some Scandinavian  sweaters that I’ve seen in the past. I used Sakura Glaze – Black pen to pop up the eyes and smile on the snowman and lastly added some Stickles – Diamond for the pom-poms on the hat and along the top of the snow on the sweater. I also coloured over top of the black snowflakes with Gelly Roll Sakura #10 Pen and Gelly Roll Sakura #5 Pen on the sweater and hat.

For the snow at the bottom of the snowman, I used the same die-cut, Craftin Desert Diva’s Fancy Frames, to cut out the base using Recollections – Christmas Inkjet Printable Glitter Paper. I then ran this same paper through my Cuttlebug again, this time using the die cut from Lawn Fawn – Stitched Hillside Borders. Next I popped it up on the image using 3M VHB – 2 sided tape.

I die-cut some patterned paper using Your Next Stamp – Stitched Rectangle Die Set (YNSD214) that I had in my stash and then popped up the coloured snowman image onto it using 3M VHB – 2 sided tape.

For the sentiment I used Winter Delight (G114) (High Hopes Rubber Stamps). I stamped the sentiment and then die-cut it out using Craftin Desert Diva’s – Tag Essentials Dies. Then I went around the border of the die-cut with Gelly Roll Stardust – Clear pen and drew in some small snowflakes.

I then die-cut some snowflakes using Poppy – Simple Snowflakes (Style 1931) from Recollections – Christmas Inkjet Printable Glitter Paper. Once the snowflakes were all cut out, I ran them through my small Xyron to make them into stickers.

To assemble the card, I started with a base of 6″ x 6″ white AC cardstock. Next I mounted American Crafts – Wonderland Collection paper for my background. I chose this particular pattern as I thought it matched the image so well. I attached the mounted snowman directly to the background paper using 2-sided tape. I popped up my sentiment using 3M VHB – 2 sided tape. Added my snowflakes and then finished off the card by adding in little gems in the centre of each snowflake and 1 on the sentiment.

Card Recipe:

Stamp:  Nordic Snowman with Bird (TLF010) (High Hopes Rubber Stamps)

Sentiment:  Winter Delight (G114) (High Hopes Rubber Stamps)

Inks: Memento – Tuxedo Black

Paper: Copic Marker X-Press It Blending Card, Recollections – Christmas Inkjet Printable Glitter Paper – 8.5 x 11″, AC Cardstock – White,

Die Cuts: Poppy – Simple Snowflakes (Style 1931), Craftin Desert Diva’s – Tag Essentials Dies, Craftin Desert Diva’s Fancy Frames, Lawn Fawn – Stitched Hillside Borders, American Crafts – Wonderland Collection – 6 x 6″ (15.2 x 15.2 cm) paper pack

Tools: MISTI – Most Incredible Stamping Tool, Cuttlebug, 3M VHB – 2 sided tape, Gelly Roll Stardust – Clear pen, Xyron, Forever in Time – Round Gemstone Stickers, Rhinestone Selection – Dress Up Sheet – Red, Stickles – Diamond,

Image coloured with Copic Markers:

Night Sky: B99, B97, B37, B34, B32, B29, B24, B21, Gelly Roll Sakura #10 Pen

Moose: E27, E25, E23, E35, E33

Snowman: E27, E25, E23, YR18, YR16, YR14, YR12, Y15, BV20, C0, Colorless Blender,

Sweater and Hat: R59, R37, R35, C4, C3, C2, E41, E40, Gelly Roll Sakura #10 Pen, Gelly Roll Sakura #5 Pen, Stickles – Diamond

Scarf: YG67, YG17, G21, R59, R37, R35

Cardinal: R59, R37, R35, Y17, Gelly Roll Sakura #5 Pen

Tree \ Holly Leaves: G99, YG67, YG17, G21, R59, R35

Hope you like it and have a fantastic week!

You can find lots of inspiration from the Design Team Divas at the High Hopes blog, and the High Hopes Rubber Stamps Facebook Fan page plus you can also follow us on
Instagram, Twitter and Pinterest.


Happiness is Reading!


Hi There! Today I’m sharing a card that I made for a very special friend who loves reading and is also an author of several books. When I saw this stamp by Kraftin’ Kimmie, I knew it was the perfect stamp to make her card with.

I tried to colour the image to be the same as my friend’s favourite chair and her special little kitty too! For the main image and sentiment I used Happiness is Reading – Kraftin’ Kimmie Stamps.

My friend doesn’t have wallpaper, but she LOVES purple, so I that is why I coloured her dress and the wall in shades of purple too. LOL!

She loved her card and I hope that you do to!

Card Recipe:

Stamp and Sentiment: Happiness is Reading – Kraftin’ Kimmie Stamps

Inks: Memento – Tuxedo Black, Versa Fine – Onyx Black, Tim Holtz Distress Inks – Peacock Feathers

Paper: Copic Marker X-Press It Blending Card, Purple and Aqua Cardstock

Die Cuts: Your Next Stamp – Stitched Rectangle Die Set (YNSD214), Craftin Desert Diva’s Fancy Frames (Retired), My Creative Time – Scalloped Stitched Oval Dies

Embossing Powder: Ranger – Clear Super Fine Detail embossing powder

Image coloured with Copic Markers:

Hair: E57, E55, E53

Skin: E000, E00, E04, E11, E21, R22, R20

Dress: V09, V06, V04, BV13, BV11

Jeans: B39, B28, B24

Cat: YR18, Y38, Y17, Y15, Y08, R01

Chair and Rug: Y15, Y13, Y08, Y02

Pillow, Book and Large Rug: BG78, BG18, BG13, BG11

Polar Bears Visit Santa


Hi There! Sharing a Christmas card that I made using Polar Bears Visit (Di’s Digital Stamps). I just thought this image was so adorable and helps to celebrate the magic of Christmas!

To make this card I printed the image onto Copic Marker X-Press It Blending Cardstock using Grayscale. Using grayscale prevents the image from smudging when you go to colour it. I coloured in the image with various Copic markers which are listed below and then added in the snow on the bottom of the sleigh with DecoArt Snow-Tex. I love the texture of the snow with this product. After completing everything, I mounted the image onto the background papers using 3M VHB – 2 sided tape.

Card Recipe:

Stamp: Polar Bears Visit (Di’s Digital Stamps)

Paper: Copic Marker X-Press It Blending Card, Heidi Swapp – HS01073 – 6 x 6 in, Green cardstock

Embellishment: Jot – Pop-up Stickers

Image coloured with Copic markers

Santa Suit: R39, R29, R27, R24

Mitts and Belt: W10, W8, W6

Sleigh: E35, Y38, Y35, Y21, R37, C5, C3, C1, E35, Y38, Y35, Y31

Bears: E17, E15, E13, E11

Present: G28, YG63, G21, Wink of Stella – Clear

Bow: E35, Y38, Y35, Y31

Sky: B01, B00, B000, Gelly Roll Sakura #8 Pen

Hat and Santa’s Coat Trim: Star Dust Stickles

Snow: DecoArt Snow-Tex

Hope you all have a magical Christmas this year!

Happy Retirement Bros!


Sharing some cards that I made for my 2 brothers who both retired recently.

My older brother was a Fireman for many years and worked his way up to being a Captain. My younger brother worked for the Ontario Provincial Police Force (OPP) in various roles and became a Sergeant.  My brother in the OPP worked with forensics and we used to ask him how much of what we saw in TV shows was actually real. He thought it was amazing at how fast they could solve a crime and wishes it was that easy! LOL!

I am very happy for them both, but jealous at the same time. LOL!

I decided to make them both very simple cards and to do them both the same only changing the colours to match their professions. The red is for the fireman and the blue is for the police officer.

To make the cards I used various Tim Holtz inks to create my own background on a 5.25″ x 4.25″ background using the sentiment from Your Next Stamp –  Photo Booth Thumbs UP – CYNS709. Next I coloured in both of the images with Copic markers the same and then coloured in one background in various reds and the other in blues.

Next I used my Cuttlebug to die cut  Photo Booth Polaroid die (YNSD735) – (Your Next Stamp) and then embossed the sentiment using the same stamp set as above. I then attached the image to the die cut and popped it up with some 3M VHB – 2 sided tape.

On the inside of the card, I used Your Next Stamp – Cool Tees – CYNS714 for the image and sentiment. Again I coloured up both images to represent their professions. Showing the inside of the 2 cards below.

Unfortunately, I still have to work for a little while longer! LOL! But, someday, my day for retirement will also come.

Congratulations to my 2 brothers, you both worked hard, sometime with long periods away from your families and and now you both deserve some time to enjoy life. Have fun!

Card Recipe:

Stamps and Sentiments: Photo Booth Thumbs UP – CYNS709 (Your Next Stamp), Cool Tees – CYNS714 (Your Next Stamp)

Die Cut: Photo Booth Polaroid die (YNSD735) (Your Next Stamp)

Inks: Memento – Tuxedo Black, Tim Holtz – Barn Door, Tim Holtz – Fired Brick, Tim Holtz Distress Ink – Aged Mahagony, Tim Holtz Distress Inks – Festive Berries, Tim Holtz Distress Ink – Blueprint Sketch, Tim Holtz Distress Ink – Chipped Sapphire, Tim Holtz Distress Ink – Faded Jeans, TIm Holtz Distress Ink – Salty Ocean, Versamark

Paper: Copic Marker X-Press It Blending Card, White cardstock

Embossing Powder: Ranger Embossing Powder White – Extra Fine Detail

Miscellaneous Tools: MISTI – Most Incredible Stamping Tool, Cuttlebug, 3M VHB – 2 sided tape

Copic Markers for Colouring in images:

Cat: W9, W7, W5

Dog: E18, E17, E15, E13

Policeman background: B29, B28, B24

Fireman background: R59, R37, R35

Both of my brothers loved their cards and I hope that you do too!

Mudzie Goes Skating!


Welcome High Hopes Rubber Stamps Fans!

It’s Wednesday and this week I’m back to share a card that I made using Skating Mudzie – R064 (High Hopes Rubber Stamps) with Frozen Skating Pond – S074 (High Hopes Rubber Stamps) for my background and then finished off with the sentiment Sparkle In Ice – H156 (High Hopes Rubber Stamps).

This card brought back memories of skating on the Ottawa Canal when I was younger whenever we went to visit our grandparents and my mom’s side of the family. We would skate for hours, enjoying Beaver Tails along the way (Beaver Tails are a fried dough pastry, stretched to look a beaver’s tail with added yummy toppings of your choice. They are sooooooo good! LOL!)

I grew up in Northern Ontario and we couldn’t wait to get home from school to lace up our skates and go across the street to the rink to skate. Like Starbuck’s, we had rink on practically every corner and the rinks were always full of children playing hockey or rink games. Our parents would have to fight with us to go inside. We would go in for supper and then be right back out on the ice again.

To make this card, I first coloured the ice with a mixture of blue Copic colours. Then I covered the whole area with Ranger Inkssentials – Glossy Accents and let it sit overnight to dry. The next day, I finished colouring in the trees, leaving the snow drifts white. I also coloured in the sky and then used various sizes of Gelly Roll Sakura Pens to create the snow.

Lastly, I completed the background snow using some BV20, C0 and Colorless Blender and then to add some sparkle, I spread glue randomly over the snowy areas and tree tops and added glitter.

I coloured in the moose and fussy cut around him and then popped him up as well as the background onto the card. I thought it would be fun to do his socks in the traditional “Roots” fashion. I also used the Gelly Roll pen to create some movement on the ice below the moose.

For the sentiment, I wanted it to have some sparkle like the snow. To do this, I inked the sentiment on white paper and then used some Sookwang double-sided tape to cover it. I peeled off the tape and then sprinkled Crystal Glitter Ritz – Warm Highlight – Transparent Ultra Fine Glitter and burnished it with my finger. (Rubbing it until it was smooth). I added some double-sided pop-up tape and added it to my card to finish it off.

Lastly, I added some green ribbon and some pop-dots for the last finishing touches.

Card Recipe:

Stamps: Skating Mudzie – R064 (High Hopes Rubber Stamps), Frozen Skating Pond – S074 (High Hopes Rubber Stamps)

Sentiment: Sparkle In Ice H156 (High Hopes Rubber Stamps)

Inks: Memento – Tuxedo Black, Tim Holtz Distress Ink – Forest Moss

Paper: Copic Marker X-Press It Blending Card, American Crafts – Merry and Bright 6 x 6″ pad, American Crafts – Holiday – 6 x 6″ (15.2 x 15.2 cm) paper pack

Die Cut: My Creative Time -Stitched Squares Inside and Out

Tools \ Miscellaneous: MISTI – Most Incredible Stamping Tool, Cuttlebug, 3M VHB – 2 sided tape, Crystal Glitter Ritz – Warm Highlight, Jot Stickers: Pop-Up, Crafts Ribbon – 02-0201044

Image coloured with Copic Markers:

Moose: E37, E35, E33, E31, R22

Antlers: E25, E23, E21

Skates: W9, W7, W5, C3, C1, C0, Wink of Stella – Clear

Sweater: R59, R37, R35

Socks: C4, C3, R37

Trees: G99, G21, YG67, YG17

Ice: B01, B00, B000, B0000, Ranger Inkssentials – Glossy Accents

Sky: B99, B39, B37, B34, B32, Gelly Roll Sakura #10 Pen, Gelly Roll Sakura #5 Pen

Snow: BV20, C0, Colourless Blender, Recollections Extra Fine Glitter – Snow

Hope you like it and have a fantastic week!

You can find lots of inspiration from the Design Team Divas at the High Hopes blog, and the High Hopes Rubber Stamps Facebook Fan page plus you can also follow us on
Instagram, Twitter and Pinterest.


Off To Seek New Adventures!


Sharing a card that I made for my manager who left to follow his dreams. I’m sure he will do very well in his new position and we all wish him very well. He was a great manager and he will be missed by all of us.

To make this card I used the stamp set called Out of this World (Kraftin’ Kimmie).

Here is the inside of the card.

Card Recipe:

Stamp and Sentiments: Out of this World – Kraftin Kimmie

Paper: Copic Marker X-Press It Blending Card, ModaScrap – Love Your to the Moon – 6″ x 6″

Inks: Memento – Tuxedo Black, Tim Holtz Distress Ink – Chipped Sapphire, Versa Fine – Onyx Black

Miscellaneous Tools: MISTI – Most Incredible Stamping Tool, Cuttlebug, 3M VHB – 2 sided tape

Images Coloured with Copic Markers:

Aliens: G05, YG21, YG17, YG13, V09, V06, V04, C5, C3, C1, R27, R24, R22, R20, B04, B00, B000

Moon: C5, C3, C1, BV20, BV000

He loved it and I hope you do too!