Archives

Happy St. Patrick’s Day!!!


Today I am sharing a Happy St. Patrick’s Day card I made using Gerda Steiner StampsSt. Patrick’s Day Cat and Hat Digital Stamp stamp for the image and Lawn Fawn – Celebration Scripty Sentiments for the sentiment. Lawn Fawn – Clover Background Stencils were used to create the background.


To make my cards this week, I began with a card base of Hammermill – Premium Cardstock 110 lb. cardstock, cut and scored to be 5.5″ x 4.25″. I created the background using Lawn Fawn – Clover Background Stencils, and applying Tim Holtz Distress Inks – Lucky Clover for the first layer and then Tim Holtz Distress Ink – Pine Needles for the second layer along with the Lucky Clover ink in spots using an ink blending brush. Tim Holtz Distress Ink – Pine Needles was then applied all around the edges of the card using a finger dauber.

The image was imported into Microsoft Word and then printed out onto Copic Marker X-Press It Blending Card paper using HP Printer Grayscale. With my Cuttlebug, I die cut the image using dies from My Creative Time – Rectangle Frame Die Layers. The image was coloured in with Copic Markers and then Tim Holtz Distress Inks – Mowed Lawn was applied around the edges of the die cut.

The sentiment was stamped directly onto the base card using Versa Fine – Onyx Black ink and MISTI for placement. I embossed the sentiment with Ranger – Clear Super Fine Detail embossing powder and then heat embossed it with a Marvy Uchida – Embossing Heat Tool. U-Line Double-Sided Foam Tape was applied to back of the coloured image and it was popped up onto the centre of the card. Lastly, I added in a few sparkly Gumdrops from Your Next Stamp.

Card Recipe:

Stamp: Gerda Steiner StampsSt. Patrick’s Day Cat and Hat Digital Stamp

Sentiment: Lawn Fawn – Celebration Scripty Sentiments

Inks: HP Printer Grayscale, Versa Fine – Onyx Black, Tim Holtz Distress Inks – Lucky Clover, Tim Holtz Distress Ink – Pine Needles, Tim Holtz Distress Inks – Mowed Lawn

Paper: Copic Marker X-Press It Blending Card, Hammermill – Premium Cardstock 110 lb.

Die Cuts: My Creative TimeRectangle Frame Die Layers – MCT-D274

Stencils: Lawn Fawn – Clover Background Stencils

Embossing Powder: Ranger – Clear Super Fine Detail embossing powder

Miscellaneous: MISTI – Most Incredible Stamping Tool, U-Line Double-Sided Foam Tape, Marvy Uchida – Embossing Heat Tool, Blending Brush, Your Next Stamp – Gumdrops

Image coloured with Copic Markers:

Kitten: R02, R00, C9, C7, C5, C3, Sakura Glaze – Black (Eyes and Nose), PrismaColor Premier Pencil Black (PC935)

Shamrocks: G99, G21, YG67, YG17

Hat: G29, YG25, YG17, YG07, YG03, YG01, C9, C7, C5, C3, E27, Y26, Y15, Y11


Hope you like it and have a fantastic week!

Sweet Note of Thanks!


Today I’m sharing a Thank-you card using Your Next StampMusic Bunny – CYNS262. I was on a cruise last year and we met some wonderful couples that sat at the tables next to ours and we exchanged information. Unknown to us until the final evening, the couple that sat directly beside us was Steven Gilliland and his wonderful wife Diane. Steven happens to be a very well known acclaimed author and public speaker. My husband and I were so happy when Steven sent us a few of his books, “Making a Difference” and a “Cherry On Top”. Steven had personally autographed them to us as well. What a kind and awesome gesture and it was very much appreciated. We are currently reading his books and just love them. As a thank you for their kind generosity, I sent them this card from my husband and I.

To create the card, I began with a card base of 5.5″ x 5.5″ using Hammermill – Premium Colour 100 lb. cardstock. I cut Recollections – Matte Gold Foil cardstock to be the same size as the base card and applied double-sided tape to it. This was adhered directly to the base card. Next, I cut a piece of Hammermill – Premium Colour 100 lb. cardstock to the size of 5.25″ x 5.25″. I sprayed some water onto the paper and then using Kraftin’ Kimmie – Musical Melodies stencil I placed it on top of the paper and ran it through my Cricut Die Cutting machine to emboss the paper. Once the paper was dry, I placed the stencil over top of the paper again and this time, using Tim Holtz Distress Ink – Black Soot and a blending brush, I coloured in the musical notes. I also inked around the edges with the same ink and a mini dauber.

Using my Cuttlebug and PinkFresh Studio – Essentials – Blanket Stitched Square 4″ dies, I die cut Copic Marker X-Press It Blending Card. The main image was stamped onto this die cut using Memento – Tuxedo Black ink and my MISTI. I coloured in the image and created my own background. Once this was completed, I put the image back into my MISTI and stamped the sentiment using Versa Fine – Onyx Black ink. Ranger – Clear Super Fine Detail embossing powder was applied over top of the ink and then heat embossed with a Marvy Uchida – Embossing Heat Tool. The little notes were added with Versa Fine – Onyx Black ink and a miniature stamping block. I just chose several notes and stamped them randomly around the image. I felt like the image was still missing something, so I decided to take my Copic black marker (100) and using the lines from the die cut as a guide, coloured in every second stripe. I thought this made it look like a piano keyboard. Lastly, My Creative Time – Stitched Squares Inside and Out 4.5″ were used to die cut Recollections – Matte Gold Foil cardstock.

The card was now ready to assemble. I added U-Line Double-Sided Foam tape to the back of the music square, gold square and image. Each of them were popped onto each other and centred onto the base card.

Card Recipe:

Stamp: You’re Next StampMusic Bunny – CYNS262

Inks: Memento – Tuxedo Black, Tim Holtz Distress Ink – Black Soot, Versa Fine – Onyx Black

Paper: Copic Marker X-Press It Blending Card, Hammermill – Premium Colour 100 lb., Recollections – Matte Gold Foil cardstock

Dies: PinkFresh Studio – Essentials – Blanket Stitched Square, My Creative Time – Stitched Squares Inside and Out

Stencil: Kraftin’ Kimmie – Musical Melodies

Embossing Poweder: Ranger – Clear Super Fine Detail

Miscellaneous: U-Line Double-Sided Foam Tape, Marvy Uchida – Embossing Heat Tool, MISTI – Most Incredible Stamping Tool, Sakura Glaze – Black pen

Image coloured with Copic Markers:

Bunny: C3, C1, C0, C00, R30, R02, R00, Colorless Blender

Mice: W7, W5, W3, R30, R02, R00

Ribbon: R59, R37, R35

Flower: B29, B26, B23, Y17, Y11

Piano: W9, W7, W5, C9

Piano Chair: W9, W7, W5, R59, R37, R35

Floor: E49, E34, E29, E27, E25, E23

Wall: BG32, BG11, BG10

Border: 100

Hope you like it and have a great week!

Birthday Ssschmirth-day!


Today, I’m sharing a fun birthday card using Whimsy StampsMe-Wow Cat Birthday that I made for my father-in-laws 80th Birthday. He’s wasn’t too keen on turning 80 so I thought I would make this fun card for him! He loved it and I hope that you do too!

To create the card, I began with a card base of 5.5″ x 5.5″ using Hammermill – Premium Colour 100 lb. cardstock. Echo Park Paper Co. – Happy Birthday Boy paper was cut to the same size as the base and adhered with double-sided tape. Using my Cuttlebug and My Creative Time – Stitched Squares Inside and Out, I die cut a 3.5″ x 3.5″ square out of Copic Marker X-Press It Blending Card and a 4″ x 4″ square out of Recollections – Black cardstock.

Using my MISTI and Memento – Tuxedo Black ink, I stamped the image from Whimsy StampsMe-Wow Cat Birthday. The image was coloured in with Copic markers and then I stamped the image again onto a Post-It note and fussy cut around the balloon and upper half of the kitty to use it as a mask. I placed it over top of the coloured image and created the party background using Tim Holtz Distress Ink – Salty Ocean, Tim Holtz Distress Ink – Squeezed Lemonade and Tim Holtz Distress Ink – Wilted Violet which I applied using Blending Brushes. After the first layers were added, I used the same colours,  but this time I used Hero Arts – Party Confetti Stencil (Crop & Create Exclusive) to create the streamers. I removed the mask and put the image into my MISTI once again and this time, I stamped the sentiment from the same stamp set using Versa Fine – Onyx Black ink and then heat embossed it using Ranger – Clear Super Fine Detail embossing powder and Marvy Uchida – Embossing Heat Tool. Lastly, U-Line double-sided tape was applied to the back of the image and the black square. These were then popped up onto the centre of the card.

Card Recipe:

Stamp: Whimsy StampsMe-Wow Cat Birthday – C1386

Inks: Memento – Tuxedo Black, Versa Fine – Onyx Black, Tim Holtz Distress Ink – Salty Ocean, Tim Holtz Distress Ink – Squeezed Lemonade and Tim Holtz Distress Ink – Wilted Violet

Paper: Copic Marker X-Press It Blending Card, Hammermill – Premium Colour 100 lb., Recollections – Black cardstock, Echo Park Paper Co. – Happy Birthday Boy 6″ x 6″

Dies: My Creative Time – Stitched Squares Inside and Out

Stencil: Hero Arts – Party Confetti Stencil (Crop & Create Exclusive)

Embossing Poweder: Ranger – Clear Super Fine Detail

Miscellaneous: U-Line double-sided tape, Marvy Uchida – Embossing Heat Tool, MISTI – Most Incredible Stamping Tool, Blending Brushes

Image coloured with Copic Markers:

Cat: C10, C8, C7, C6, C5, C4, R22, R02, 100, YG09, YG07, YG05

Hat: BG15, BG11, BG10, BG09, BG05, BG02, BG01

Balloon: BG09, BG05, BG02, BG01, BG0000

Lawn: YG25, YG23, YG21, YG03, YG01

Hope you like it and have a great week!

Sweet Note of Thanks!


Today I’m sharing a Thank-you card using Your Next StampMusic Bunny – CYNS262. I was recently on a cruise and we met some new wonderful couples that sat at the tables next to ours and we exchanged information. Unknown to us until the final evening, the couple that sat directly beside us was Steven Gilliland and his wonderful wife Diane. Steven happens to be a very well known acclaimed author and public speaker. My husband and I were so happy when Steven sent us a few of his books, “Making a Difference” and a “Cherry On Top”. Steven had personally autographed them to us as well. What a kind and awesome gesture and it was very much appreciated. We are currently reading his books and just love them. As a thank you for their kind generosity, I sent them this card from my husband and I.

To create the card, I began with a card base of 5.5″ x 5.5″ using Hammermill – Premium Colour 100 lb. cardstock. I cut Recollections – Matte Gold Foil cardstock to be the same size as the base card and applied double-sided tape to it. This was adhered directly to the base card. Next, I cut a piece of Hammermill – Premium Colour 100 lb. cardstock to the size of 5.25″ x 5.25″. I sprayed some water onto the paper and then using Kraftin’ Kimmie – Musical Melodies stencil I placed it on top of the paper and ran it through my Cricut Die Cutting machine to emboss the paper. Once the paper was dry, I placed the stencil over top of the paper again and this time, using Tim Holtz Distress Ink – Black Soot and a blending brush, I coloured in the musical notes. I also inked around the edges with the same ink and a mini dauber.

Using my Cuttlebug and PinkFresh Studio – Essentials – Blanket Stitched Square 4″ dies, I die cut Copic Marker X-Press It Blending Card. The main image was stamped onto this die cut using Memento – Tuxedo Black ink and my MISTI. I coloured in the image and created my own background. Once this was completed, I put the image back into my MISTI and stamped the sentiment using Versa Fine – Onyx Black ink. Ranger – Clear Super Fine Detail embossing powder was applied over top of the ink and then heat embossed with a Marvy Uchida – Embossing Heat Tool. The little notes were added with Versa Fine – Onyx Black ink and a miniature stamping block. I just chose several notes and stamped them randomly around the image. I felt like the image was still missing something, so I decided to take my Copic black marker (100) and using the lines from the die cut as a guide, coloured in every second stripe. I thought this made it look like a piano keyboard. Lastly, My Creative Time – Stitched Squares Inside and Out 4.5″ were used to die cut Recollections – Matte Gold Foil cardstock.

The card was now ready to assemble. I added U-Line double-sided pop-up tape to the back of the music square, gold square and image. Each of them were popped onto each other and centred onto the base card.

Card Recipe:

Stamp: You’re Next StampMusic Bunny – CYNS262

Inks: Memento – Tuxedo Black, Tim Holtz Distress Ink – Black Soot, Versa Fine – Onyx Black

Paper: Copic Marker X-Press It Blending Card, Hammermill – Premium Colour 100 lb., Recollections – Matte Gold Foil cardstock

Dies: PinkFresh Studio – Essentials – Blanket Stitched Square, My Creative Time – Stitched Squares Inside and Out

Stencil: Kraftin’ Kimmie – Musical Melodies

Embossing Poweder: Ranger – Clear Super Fine Detail

Miscellaneous: U-Line double-sided tape, Marvy Uchida – Embossing Heat Tool, MISTI – Most Incredible Stamping Tool, Sakura Glaze – Black pen

Image coloured with Copic Markers:

Rabbit: C3, C2, C1, C0, C00, R30, R02

Mice: W3, W2, W1, R30, R02, (Eyes and Nose – Sakura Glaze – Black pen)

Ribbon: R59, R37, R35

Flower: B29, B26, B23, Y17, Y11

Piano: W9, W7, W5, C9

Piano Chair: W9, W7, W5, R59, R37, R35

Floor: E49, E34, E29, E27, E25, E23

Wall: BG32, BG11, BG10

Border: 100

Hope you like it and have a great week!

Do Not Stop!


Today I’m sharing an inspirational card using KLM Digital DesignSlow Ride Gnome from the new February release. This image also comes with 2 more sentiments, “Travel at your own pace” and “Life is a journey, not a race”.  It was hard for me to pick which sentiment to use as I loved them all. They are all so true to life.

Hammermill – Premium Colour 100 lb. cardstock was used to create a 5.5″ x 4.25″ card base. I had found Crafts Designer Paper – 02-3080678 at Dollarama and thought this paper was perfect for this card. It was cut to the same size as the base card and adhered with double-sided tape.

The image and sentiment were imported into Microsoft Word and printed out onto Copic Marker X-Press It Blending Card. With my Cuttlebug, I die cut the image using My Creative Time – Bunch of Fun Circle 3.25″ Dies. The larger circle was die cut using Recollections – Blue Ombre Cardstock and Lifestyle Crafts Cutting Dies – Nesting 3.5″ Circle. I trimmed down the sentiment to be 2.25″ x 1.5″. Using what was left on a blending brush that I used for blues, I lightly went over the paper to give it a light blue hue. Tim Holtz Distress Ink – Salvaged Patina was then inked around the 3 edges.

The image was coloured in with Copic Markers listed below. I printed out another copy of the image onto plain paper and fussy cut around the top portion. I applied some Washi Tape to the back of it to create a hinge and to mask the image. Using a blender brush, Tim Holtz Distress Ink – Salty Ocean and Lawn Fawn Cuts – Cloudy Stencil, I created the clouds in the sky.

For the assembly of the card, I added double-sided tape to the back of the sentiment and adhered it directly to the card. U-Line double-sided tape was added to the backs of the larger and smaller circle and both were popped up onto each other and the card. Lastly, to finish off everything, I added in some YNS Gumdrops – Tropical Paradise.

Card Recipe:

Stamp and Sentiment:  Slow Ride Gnome – KLM Digital Designs

Inks: HP Printer Grayscale, Tim Holtz Distress Ink – Salty Ocean, Tim Holtz Distress Ink – Salvaged Patina

Paper: Copic Marker X-Press It Blending Card, Hammermill – Premium Colour 100 lb., Crafts Designer Paper – 02-3080678, Recollections – Blue Ombre Cardstock

Dies: My Creative Time – Bunch of Fun Circle Dies, Lifestyle Crafts Cutting Dies – Nesting Circles

Stencils: Lawn Fawn Cuts – Cloudy Stencil

Miscellaneous: U-Line double-sided tape, Cuttlebug, Blending Brush, YNS Gumdrops – Tropical Paradise

Image coloured with Copic Markers:

Skin: E21, E11, E04, E00, E000

Beard: E08, YR18, YR16, YR12

Jeans: B26, B23, B21

Shoes: C9, C7, C5, C1

Shirt: B69, B63, C3, R46

Hat: BG09, BG05, BG02, BG01

Turtle: E47, E44, E43, E42, E40, BG99, BG96, BG93, BG90, G07, YG07, Y35, C1, C00, 100

Sand: E37, E35, E33, E31

Flower and Stem: G14, YG23, YG11, E33, Y38, Y35, Y32

Hope you like it and have a great week!

You can find more cards to inspire you at KLM Designs, KLM Digital Design Team and KLM Digital Designs on the Facebook Fan page from the rest of our design team.

Fido – Love You


It’s Wednesday, and today I’m sharing a card I made using KLM Digital Design –  Fido – Love You from the new January 2023 release. Our pets always give us unconditional love and they make the best companions to talk to, play with and just cuddle with with when we need a big hug!

To make my card this week, I started with a 7.25″ x 3.5″ card base using Hammermill – Premium Colour 100 lb. cardstock. Recollections – Burgundy was cut to the size of 7.25″ x 3.5″ and adhered directly to the card. Using my Cuttlebug and My Creative Time – Tall Paw Frame Dies, I die cut Martha Stewart Crafts – Enchanted Woodland paper and the little bone using scraps of brown and black cardstock. Tim Holtz Distress Inks – Festive Berries and a blending brush were used to ink around the edges of the large die cut. This was popped up onto the base using U-Line Double-Sided tape.

The image and sentiment were imported into Microsoft Word and printed out onto Copic Marker X-Press It Blending Card. The paper was cut to be 5-5/8″ x 2-5/8″ and everything was coloured in. U-Line Double-Sided tape was added to this and it was popped up onto the die cut. I ran the bone die cuts through my Xyron Create a Sticker and attached them to the card to finish it off.

Card Recipe:

Stamp and Sentiment:  Fido – Love You – KLM Digital Designs

Inks: HP Printer Grayscale, Tim Holtz Distress Inks – Festive Berries

Paper: Copic Marker X-Press It Blending Card, Hammermill – Premium Colour 100 lb., Martha Stewart Crafts – Enchanted Woodland 12″ x 12″, Recollections – Burgundy

Die Cuts: My Creative Time – Tall Paw Frame Dies

Miscellaneous: 2 sided tape, Cuttlebug, Xyron Create a Sticker, U-Line Double-Sided tape

Image coloured with Copic Markers:

Letters: R46, R14, R08

Dog: E55, E53, E51, E50, E49, E47, E29, E27, E25, E23, R30, R29, R02, R00

Sky and Clouds: BG70, C1, B02, B01, B00, B000, Colorless Blender

Grass: YG23, YG09, YG05, YG03, YG01

Hope you like it and have a great week!

You can find more cards to inspire you at KLM Designs, KLM Digital Design Team and KLM Digital Designs on the Facebook Fan page from the rest of our design team.

Make Lemonade!


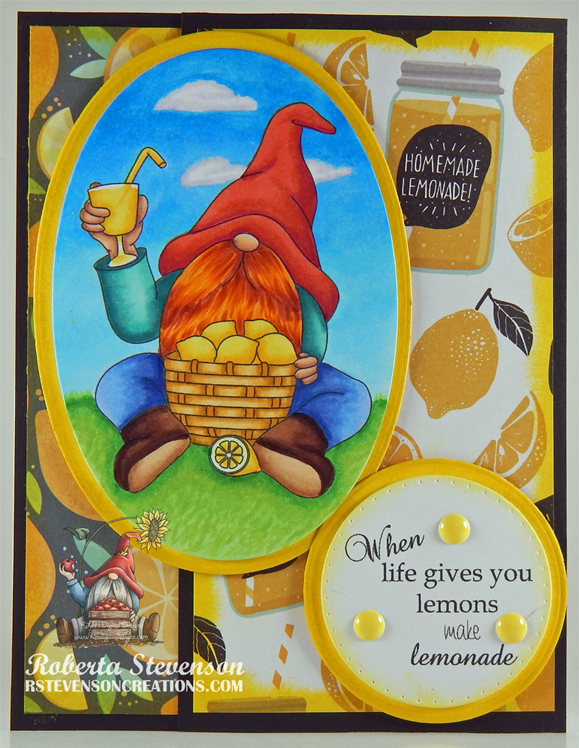
Today I’m sharing an inspirational card using KLM Digital DesignLemon Gnome from the new January release. This image also comes with 2 more sentiments, “I could just Squeeze you!” and “Squeeze the day”.  I’ve always loved lemons and they are good for so many different things, baking, tea and they are high in Vitamin C, just to name a few.

Hammermill – Premium Colour 100 lb. cardstock was used to create a 5.5″ x 4.25″ card base. I had found Crafts Designer Paper – 02-3093268 at Dollarama and thought this paper was perfect for this card. I chose 2 patterns from this paper pack and cut the darker pattern to the size of 5.25″ x 2.25″ and the other piece to the size of 5.25″ x 2.75″. Two rectangles were cut out of Recollections – Black cardstock to the size of 5.5″ x 2.75″ and 5.5″ x 3″. With yellow cardstock and my Cuttlebug, I die cut the large oval using Waffle Flower – Additional Oval dies and the larger circle with Lifestyle Crafts Cutting Dies – Nesting Circles. All of the edges for the patterned pieces and the yellow die cuts were inked with Tim Holtz Distress Ink – Mustard Seed.

The image and sentiment were imported into Microsoft Word and printed out onto Copic Marker X-Press It Blending Card. With my Cuttlebug, I die cut the large oval using Waffle Flower – Additional Oval dies and the smaller circle with My Creative Time – Bunch of Fun Circle Dies. Tim Holtz Distress Ink – Squeezed Lemonade was applied to the outer edges of the smaller circle. The image was coloured in with Copic markers.

For the assembly of the card, I applied the 2 patterned pieces together with the black cardstock using double sided tape. I placed the colourful piece down first onto the base card and then the second piece was applied over top of that one. Both were adhered with double-sided tape. The image and the sentiment were both popped up onto the larger oval and larger circle using U-Line Double-Sided tape. I applied U-Line Double-Sided tape to the backs of these combined pieces and then popped them both up onto the card. Finally, I added in some YNS Gumdrops – Tropical Paradise around the sentiment to complete the card.

Card Recipe:

Stamp and Sentiment:  Lemon Gnome – KLM Digital Designs

Inks: HP Printer Grayscale, Tim Holtz Distress Ink – Mustard Seed, Tim Holtz Distress Ink – Squeezed Lemonade

Paper: Copic Marker X-Press It Blending Card, Hammermill – Premium Colour 100 lb., Recollections – Black cardstock, Crafts Designer Paper – 02-3093268 (6″ x 6″), Yellow Cardstock

Dies: My Creative Time – Bunch of Fun Circle Dies, Waffle Flower – Additional Oval dies, Lifestyle Crafts Cutting Dies – Nesting Circles

Miscellaneous: U-Line double-sided tape, Cuttlebug, YNS Gumdrops – Tropical Paradise

Image coloured with Copic Markers:

Skin: E21, E11, E04, E00, E000

Beard: E08, YR18, YR16, YR12

Jeans: B26, B23, B21

Shoes: EEE, E31, E30. E29, E27, E25, E23

Shirt: BG72, BG54, BG32, BG11

Hat: R46, R14, R08

Lemons, Straw and Lemonade: Y17, Y15, Y13, Y11, Y000

Basket: YR24, YR23, YR21, Y32

Sky: B04, B02, B01, B00

Clouds: B60, C1, Colorless Blender

Grass: G14, YG23, YG13, YG11

Hope you like it and have a great week!

You can find more cards to inspire you at KLM Designs, KLM Digital Design Team and KLM Digital Designs on the Facebook Fan page from the rest of our design team.

Couples Cruise!


It’s Wednesday, and this week, I made a card using High Hopes Rubber Stamps Couples Cruise – S135 for the image and Wonderful Adventure – H164 for the sentiment. Cruising is starting up again and I can’t wait to go! Seeing this image reminded me of all of the fun times we’ve had and of all of the fun times to come.

To make my card this week, I began with a card base of AC Cardstock – White, cut and scored to be 6″ x 6″. Forever In Time – Textura Sky was cut to the size of 5-7/8″ x 5-7/8″ and was adhered to the base using double-sided tape. Craft Consortium – Clare Therese Ocean Tale was cut to the size of 5.75″ x 5.75″ and was popped up onto the base using U-Line double-sided tape. Using Forever In Time – Textura Sky cardstock and My Creative Time – Rectangle Frame Layers, the larger frame was die cut using the Cuttlebug. Copic Marker X-Press It Blending Card and My Creative Time – Rectangle Frame Dies were used to die cut Copic Marker X-Press It Blending Card cardstock using the Cuttlebug as well. Lastly, the little clouds were die cut using Lawn Fawn Cuts – Centre Picture Window Card dies, a scrap of Copic Marker X-Press It Blending Card and my Cuttlebug.

I stamped the image onto the Copic Marker X-Press It Blending Card using Memento – Tuxedo Black ink and my MISTI. Once the image and little clouds were coloured, I added in the little eyes using a Sakura Glaze – Black pen to make them stand out more. The nails in the ark were coloured in with a Pental Sunburst Metalic Med Gel Pen – Silver. A few white caps were created using a General’s Charcoal White 558 Pencil in the water.

The sentiment was also stamped using my MISTI onto Copic Marker X-Press It Blending Card cardstock and then fussy cut into 3 separate pieces. I ran this through my Xyron Create a Sticker and adhered it to Recollections – Black cardstock. Once again, I cut around the sentiment, leaving a slim border. U-Line double-sided tape was applied to the back of each of the sentiment pieces, image and blue rectangle and they were all popped up onto the card. For embellishments, I added in three YNS Gumdrops – Firefly Magic Sparkly Gumdrops and some blue and white twine using American Crafts Premium Ribbon.

Card Recipe:

Stamps: Couples Cruise – S135 (High Hopes Rubber Stamps)

Sentiment: Wonderful Adventure – H164 (High Hopes Rubber Stamps)

Inks: Memento – Tuxedo Black

Die Cuts: Lawn Fawn Cuts – Centre Picture Window Card, My Creative Time – Rectangle Frame Layers, My Creative Time – Rectangle Frame Dies

Paper: Copic Marker X-Press It Blending Card, AC Cardstock – White, Craft Consortium – Clare Therese Ocean Tale (6″ x 6″), Forever In Time – Textura Sky (6″ x 6″)

Embellishments: YNS Gumdrops – Firefly Magic Sparkly Gumdrops, American Crafts Premium Ribbon

Tools: MISTI – Most Incredible Stamping Tool, U-Line double-sided tape, Cuttlebug, Xyron Create a Sticker, Sakura Glaze – Black, Pental Sunburst Metalic Med Gel Pen – Silver

Image coloured with Copic Markers:

Ark: E49, E30, E27, E25, E23, Pental Sunburst Metalic Med Gel Pen – Silver

Giraffes: YR31, YR000, E97, E95, E79, E77, E55, E15, R02, R00, W5, Y38

Elephants: C5, C3, C2, C1, R02, R00

Monkeys: E59, E37, E35, E33, E31, E30, G05, G00, YG23

Sky: B02, B01, B00, B000

Water: BG34, BG32, BG11, BG02, BG01, B52, B24, B12, B05, General’s Charcoal White 558 Pencil

Clouds:  C1, C00, Colorless Blender

Hope you like it and have a fantastic week!

Check out more adorable images at High Hopes Rubber Stamps!

You can find lots of inspiration from the Design Team Divas at the High Hopes blog, and the High Hopes Rubber Stamps Facebook Fan page plus you can also follow us on
Instagram, Twitter and Pinterest.

Not Tadpoles Anymore!!


Sharing a card I made today using KLM Digital Design –  Frogotful Frog from the new September 2022 release. This image also comes with 3 more sentiments, “Have I Toad you lately that I love you?”, “Sorry, I Frogot!” and “Toadily Happy”. As we get older, we need to keep a sense of humour about aging! I couldn’t resist the sentiment that came with this adorable image, as it is so true. LOL!


The image and sentiment were imported into Microsoft Word and printed out onto Copic Marker X-Press It Blending Card. I drew a big rock onto the same paper and then coloured both images in and fussy cut around them.

Hammermill – Premium Colour 100 lb. cardstock was used to create a 5″ x 5″ card base. Stampin’ UP! – Lily Impressions Designer Series Paper was cut to be the same size and applied to the base using double-sided tape. Bo Bunny – Willow & Sage was cut to the size of 5″ x 1.5″ and then inked around all of the edges with Tim Holtz Distress Ink – Saltwater Taffy. This was applied to the base background with double-sided tape as well. Once again, Tim Holtz Distress Ink – Saltwater Taffy and a finger dauber were used to ink around all of the edges of the card.

U-Line double-sided tape was applied to the back of the rock and the frog. A double layer of the tape was added to the top half of the frog and then both images were popped up onto the card base. The sentiment was put through my Xyron Create a Sticker and then fussy cut. The pieces were adhered to Recollections – Black cardstock. I fussy cut around the sentiment pieces again and applied U-Line double-sided tape to them and popped them up onto the lower half of the card. Using Anna Griffin Empress Mini die-cutting Machine, Lawn Fawn – Stitched Pond Frame and some small scraps of paper, the cat-tails were created. The pieces were put through the Xyron Create a Sticker and adhered to the card behind the rock.

Lastly, to finish off the card, some embellishments were added using Doodlebug Design Inc. – Sprinkles Spring Assortment pop dots and the little frog from Dress It UP – Wild and Wacky.

Card Recipe:

Stamp and Sentiment:  Frogotful Frog – KLM Digital Designs

Inks: HP Printer Grayscale, Tim Holtz Distress Ink – Saltwater Taffy

Paper: Copic Marker X-Press It Blending Card, Hammermill – Premium Colour 100 lb., Bo Bunny – Willow & Sage (6″ x 8″), Stampin’ UP! – Lily Impressions Designer Series Paper (12″ x 12″), Recollections – Black cardstock

Dies: Lawn Fawn – Stitched Pond Frame (LF2068)

Miscellaneous: U-Line – 2 sided tape, Gelly Roll Sakura #10 Pen, Doodlebug Design Inc. – Sprinkles Spring Assortment, Dress It UP – Wild and Wacky, Xyron Create a Sticker, Anna Griffin Empress Mini Machine

Image coloured with Copic Markers:

Frog: BG99, G19, G17, G14, YG17, YG06, YG03, YG00, E81, C1, C0, T9 (Eyes: G19, G16, YG03, Y38, C1, C00, Gelly Roll Sakura #10 Pen)

Rock: W8, W6, W4, W3

Hope you like it and have a great week!

You can find more cards to inspire you at KLM Designs, KLM Digital Design Team and KLM Digital Designs on the Facebook Fan page from the rest of our design team.

Boo Pals!!


It’s Wednesday, and this week, I made a Hallowe’en card using High Hopes Rubber Stamps Boo Pals – SS007 for the image and Boo-tiful Day – E233 for the sentiment. Hallowe’en is now only a few months away! Wow! Where has this year gone? Time seems to be flying by so fast!

To make my card this week, I began with a card base of Hammermill – Premium Colour 100 lb. cardstock, cut and scored to be 5.5″ x 4.25″. I cut the background paper from Recollections – Black cardstock to be the same size as the base card and attached it using double-sided tape. Using My Creative Time – Rectangle Frame Layers and my Anna Griffin Empress Mini Machine, I die cut Doodlebug – Pumpkin Party cardstock. I just love these little ghosts. With a finger dauber and Tim Holtz Distress Ink – Villainous Potion, I inked around all of the edges of the die cut. U-Line double-side tape was applied to the back of this piece and I popped it up onto the base card. Using the same cutting machine, I die cut Copic Marker X-Press It Blending Card cardstock using Nestabilities Dies – Deckled Rectangles – Large.

I stamped the main image onto the Copic Marker X-Press It Blending Card die cut using my MISTI and Memento – Tuxedo Black ink and coloured it in. I created my own moon shape using a 2″ circle mask that I had created earlier with a Fiskars hand punch. The eyes and nose for the cat and ghost were added in using a Sakura Glaze – Black pen. I ran the coloured image through my Xyron Creative Station and attached it to Recollections – Black cardstock. I didn’t have a larger die of the same shape, so I put the piece that I had adhered together into my Brother Scan ‘N Cut and created a .08″ border around it. This created the small black border to make the image pop. The sentiment was stamped onto a scrap piece of Copic Marker X-Press It Blending Card cardstock using my MISTI and Memento – Tuxedo Black ink and then it was die cut using my cutting machine and Poppystamps – Christmas Quotes. Tim Holtz Distress Ink – Wilted Violet and a finger dauber were used to go around the die cut.

The card was now ready to assemble. I added U-Line double-sided tape to the back of the frame and sentiment and popped them both up onto the card to finish it off.

Card Recipe:

Stamps: Boo Pals – SS007 (High Hopes Rubber Stamps)

Sentiment: Boo-tiful Day – E233 (High Hopes Rubber Stamps)

Inks: Memento – Tuxedo Black, Tim Holtz Distress Ink – Wilted Violet, Tim Holtz Distress Ink – Villainous Potion

Paper: Copic Marker X-Press It Blending Card, Hammermill – Premium Colour 100 lb., Doodlebug – Pumpkin Party (12″ x 12″), Recollections – Black cardstock

Die Cuts: My Creative Time – Rectangle Frame Layers, Spellbinders Nestabilities Dies – Deckled Rectangles Large (S4-202), Poppystamps – Christmas Quotes

Tools: MISTI – Most Incredible Stamping Tool, U-Line double-sided tape, Anna Griffin Empress Mini Machine, Sakura Glaze – Black, Brother Scan ‘N Cut, Xyron Creative Station

Image coloured with Copic Markers:

Black Cat: C8, C6, C4, C3, R30, R22, (Eyes and Nose – Sakura Glaze – Black)

Ghost: BV20, C0, Colorless Blender, (Eyes and Nose – Sakura Glaze – Black)

Tombstone: W5, W3, W1, W0, 100

Grass: G99, G94, G21, YG97, YG17

Sky: BV29, BV25, BV23. BV20

Moon: BV23, BV20, C1, C0, C00, Y00, Colorless Blender

Hope you like it and have a spooktacular week!

You can find lots of inspiration from the Design Team Divas at the High Hopes blog, and the High Hopes Rubber Stamps Facebook Fan page plus you can also follow us on
Instagram, Twitter and Pinterest.

Kitty In Training!!


It’s Wednesday, and this week, I made a Hallowe’en card using High Hopes Rubber Stamps Kitty In Training – TT052 for the image and Happy Halloween Script – F232 for the sentiment. Hallowe’en is one of our favourite times of year and my husband likes to go all out decorating our front yard. I always have fun finding new animated toys to add to our decorations and love seeing the little trick or treaters faces light up when they come to our house.

To make my card this week, I began with a card base of Hammermill – Premium Colour 100 lb., cut and scored to be 5.5″ x 4.25″. I die cut the background paper from Pebbles – Boo! cardstock to be the same size and attached it to the base using double-sided tape. Using My Creative Time – Rectangle Frame Layers and my Anna Griffin Empress Mini Machine, I die cut Scrapbook.com – Brights Smooth Cardstock for the larger frame. Using the same machine, I die cut Copic Marker X-Press It Blending Card cardstock using My Creative Time – Rectangle Frame Dies. The thin stripes were die cut using Scrapbook.com – Rainbow Smooth Cardstock and PinkFresh Studio – Slim Stripes dies. Lastly, I cut a black strip using Recollections – Black cardstock to the size of 4.25″ x 1-3/8″.

I stamped the main image onto the Copic Marker X-Press It Blending Card die cut using my MISTI and Memento – Tuxedo Black ink and coloured it in. The sentiment was stamped onto a scrap piece of orange paper cardstock using my MISTI and Memento – Tuxedo Black and then it was die cut using my cutting machine and Gina K Designs – Sentiment Strips.

The card was now ready to assemble. I ran the thin strips through my Xyron Create a Sticker and adhered them to the black strip leaving small spaces in between them to be the same as the witch’s socks. I ran this whole piece through my Xyron Create a Sticker again so that it would lay completely flat when I adhered it to the base card. I added U-Line double-sided tape to the backs of the rectangles and sentiment and popped up all of the layers onto the card. Tim Holtz Distress Ink – Black Soot was used to ink around all of the edges of the card and Stickles – Diamond was added to the small dots at the top of the card above the stripe lines. Gelly Roll Sparkle Pen was added to the sky to create some sparkly stars.

Card Recipe:

Stamps: Kitty In Training – TT052 (High Hopes Rubber Stamps)

Sentiment: Happy Halloween Script – F232 (High Hopes Rubber Stamps)

Inks: Memento – Tuxedo Black, Tim Holtz Distress Ink – Black Soot

Paper: Copic Marker X-Press It Blending Card, Hammermill – Premium Colour 100 lb., Pebbles – Boo! (6×6 in / 15.2×15.2 cm), Scrapbook.com – Brights Smooth Cardstock (4.25″ x 5.5″), Scrapbook.com – Rainbow Smooth Cardstock (4.25″ x 5.5″), Recollections – Black cardstock

Die Cuts: My Creative Time – Rectangle Frame Layers, My Creative Time – Rectangle Frame Dies, Gina K Designs – Sentiment Strips, PinkFresh Studio – Slim Stripes

Tools: MISTI – Most Incredible Stamping Tool, U-Line double-sided tape, Anna Griffin Empress Mini Machine, Xyron Create a Sticker, Stickles – Diamond, Gelly Roll Sparkle Pen

Image coloured with Copic Markers:

Blacks: N10, N9, N7, N6, N5, N4, N3

Skin: E21, E11, E04, E00, E000, R30, R20

Hair and Stripes on Socks and Hat: G19, G14, RV66, RV55, RV53, Y19, B63, Y38, Y18

Pumpkins: E07, YR18, YR16, YR15, YR12, YR08

Tree Stump: E79, E27, E25, E23, E21

Broomstick: E35, E34, E33, C5, C3, C00, Y35, Y32, Y19, YR31

Leaves and Grass: G99, G94, G21, YG97, YG17, YG63

Sky: BV29, BV25, BV23. BV20, Gelly Roll Sparkle Pen

Hope you like it and have a fantastic week!

Check out more adorable images in the new “Spring Fever Release” at High Hopes Rubber Stamps!

You can find lots of inspiration from the Design Team Divas at the High Hopes blog, and the High Hopes Rubber Stamps Facebook Fan page plus you can also follow us on
Instagram, Twitter and Pinterest.

Sparkle & Cheer!!


It’s Wednesday, and this week, I made a Christmas slim-line card using High Hopes Rubber Stamps Christmas Gofer – TDG003 for the image and Sparkle & Cheer – LDG001 for the sentiment. This little gofer is all set to start decorating his tree for Christmas. With all of this heat right now, snow is sounding pretty good to cool off a bit. LOL!

To make my card this week, I began with a card base of Hammermill – Premium Colour 100 lb. cardstock, cut and scored to be 4″ x 8″. I cut the background to be the same size using Creative Memories – Glacier paper and adhered it to the base card using double-sided tape. I die cut Recollections – White Cardstock and Signature Collection by Sara Davies – Glittering Snowflakes cardstock using my Anna Griffin Empress Mini Machine and My Favourite Things – Die-namics – Elegant Rectangle Stax dies. I stamped the sentiment onto the white cardstock using Memento – Tuxedo Black ink and my MISTI. Using my die cutting machine again and Waffle Flower – Nesting Square dies, I die cut Copic Marker X-Press It Blending Card. I stamped the image onto it using Memento – Tuxedo Black ink and my MISTI.

The image was coloured in with Copic markers and then I added snow to the sky using a Gelly Roll Sakura #10 Pen. For the hat trim and pop-pom, I added Cosmic Shimmer Fluffy Stuff and heated it with my Marvy Uchida – Embossing Heat Tool to puff up the liquid. I put a little bit of Stickles – Diamond onto my finger and dabbed it across the trim and pom-pom to give them an extra bit of sparkle. Lastly, I added some Stickles – Diamond to the snow. When the Stickles was all dry, I adhered the image to Signature Collection by Sara Davies – Glittering Snowflakes cardstock with double-sided tape and some glue. Using my cutter, I cut a slim border around the image. I ran the sentiment through my Xyron Creative Station and adhered it to the larger die cut. U-line double-sided tape was added behind the 2 pieces and they were both popped up onto the card. Lastly, to finish the card off, I added a few YNS Gumdrops – White Sugar and Sparkle to both sides of the sentiment.

Card Recipe:

Stamp: Christmas Gofer – TDG003 (High Hopes Rubber Stamps)

Sentiment: Sparkle & Cheer – LDG001 (High Hopes Rubber Stamps)

Inks: Memento – Tuxedo Black

Paper: Copic Marker X-Press It Blending Card, Hammermill – Premium Colour 100 lb., Creative Memories – Glacier Paper Pack 12″ x 12″, Signature Collection by Sara Davies – Glittering Snowflakes, Recollections – White Cardstock

Die Cuts: My Favourite Things – Die-namics – Elegant Rectangle Stax – MFT-1268, Waffle Flower – Nesting Square dies

Tools: MISTI – Most Incredible Stamping Tool, Anna Griffin Empress Mini Machine, U-Line double-sided tape, Cosmic Shimmer Fluffy Stuff, Marvy Uchida – Embossing Heat Tool, Gelly Roll Sakura #10 Pen, Stickles – Diamond, YNS Gumdrops – White Sugar and Sparkle, Xyron Creative Station

Image coloured with Copic Markers:

Gofer: E49, E47, E27, E25, E23, E21, R30, R20

Hat and Scarf: BG09, BG05, BG02, BG01, C2, C1, C00, Cosmic Shimmer Fluffy Stuff, Stickles – Diamond

Baubles: R59, R37, R35, YG17, YG09, YG07, YG05, C3, C2, C0

Snow: B60, B00, Stickles – Diamond

Sky: B99, B97, B95, B93, B91

Hope you like it and have a fantastic week!

You can find lots of inspiration from the Design Team Divas at the High Hopes blog, and the High Hopes Rubber Stamps Facebook Fan page plus you can also follow us on
Instagram, Twitter and Pinterest.

I Smell Birthday Cake!!


Sharing a card I made today using KLM Digital Design –  Ribbiting Frog from the new July 2022 release. This image also comes with 2 more sentiments, “Sometimes you have to kiss a frog to find a Prince!” and “I find you Ribbiting“.

I imported the image and sentiment into Microsoft Word and printed them out onto Copic Marker X-Press It Blending Card. Using my Cuttlebug and My Creative Time – Rectangle Frame Layers, I die cut the image frame and then coloured in the image with Copic markers. I created a 5.5″ x 4.25″ card base using Hammermill – Premium Colour 100 lb. cardstock. U-Line double-sided tape was applied to the back pf the coloured image and it was popped up onto the base card. I added a piece of cake, YNS Gumdrops – Retro and YNS Gumdrops – Tropical Paradise as embellishments to complete the card.

Card Recipe:

Stamp and Sentiment:  Ribbiting Frog – KLM Digital Designs

Inks: HP Printer Grayscale

Paper: Copic Marker X-Press It Blending Card, Hammermill – Premium Colour 100 lb.

Dies: My Creative Time – Rectangle Frame Layers

Miscellaneous: U-Line – 2 sided tape, Gelly Roll Sakura #10 Pen, YNS Gumdrops – Retro, YNS Gumdrops – Tropical Paradise

Image coloured with Copic Markers:

Frog: BG99, G19, G17, G14, YG67, YG17, YG06, YG03, YG00, YG0000, E81, C1, C0, T9 (Eyes: Gelly Roll Sakura #10 Pen)

Shadow: B000, B0000

Hope you like it and have a great week!

You can find more cards to inspire you at KLM Designs, KLM Digital Design Team and KLM Digital Designs on the Facebook Fan page from the rest of our design team.

Santa…I Tried!!


It’s Wednesday, and this week, I made a Christmas card using High Hopes Rubber Stamps Reindeer Games – S108 for the image and Santa…I Tried – FLL001 for the sentiment. It’s never too early to start making Christmas cards and I couldn’t resist this super fun image and sentiment paired together. It just makes me laugh and I hope it makes you laugh too! I don’t think the reindeer worked very hard, I think he just wanted Santa to pull the sleigh while he relaxed. LOL!

To make my card this week, I began with a card base of Hammermill – Premium Colour 100 lb. cardstock, cut and scored to be 5.5″ x 4.25″. I cut the background to be the same size using Stampin UP! – ‘Tis The Season paper and adhered it to the base card using double-sided tape. Using Tim Holtz Distress Ink – Rustic Wilderness and a finger dauber, I inked around all of the edges of the card. Using my Cuttlebug and My Creative Time – Rectangle Frame Dies, I die cut Forever In Time – Texture Rouge paper. I added some U-Line double-sided tape to it and popped it up on top of the patterned paper. Using Copic Marker X-Press It Blending Card, my Cuttlebug and My Creative Time – Rectangle Frame Layers, I die cut Copic Marker X-Press It Blending Card cardstock.

The image was stamped with Memento – Tuxedo Black ink onto the die cut using my MISTI – Most Incredible Stamping Tool. I coloured in the image and background with Copic Markers. I added in the puffy Santa trim and pop-pom using Cosmic Shimmer Fluffy Stuff. This was then heated with my Marvy Uchida – Embossing Heat Tool to puff up the liquid. For the blue tints in the snow, I first coloured them in with Copic Marker – B60 and then using a Ranger – Emboss It Pen Clear and Stampendous – Frozen Ice Tinsel Embossing Powder, I heat embossed the snow drifts. I stamped the sentiment using my MISTI, Versamark and Ranger Embossing Powder White – Extra Fine Detail. This again was heated with my heating tool. Then, I added in the snow in the sky with a Gelly Roll Sakura #10 Pen. Lastly, I added Stickles – Diamond to add some more sparkle to the snow on the ground and Stickles – Holly all around the frame of the coloured image. I set this all aside to dry for a few hours and then applied U-Line double-sided tape to the back of the coloured image and popped it up onto the red rectangle. To finish off the card, I added in 3 pop-dots from YNS Gumdrops – Milk and Cookies – Matte.

Card Recipe:

Stamp: Reindeer Games – S108 (High Hopes Rubber Stamps)

Sentiment: Santa…I Tried! – FFL001 (High Hopes Rubber Stamps)

Inks: Memento – Tuxedo Black, Tim Holtz Distress Ink – Rustic Wilderness, Versamark

Paper: Copic Marker X-Press It Blending Card, Hammermill – Premium Colour 100 lb., Stampin UP! – ‘Tis The Season (6″x6″), Forever In Time – Texture Rouge

Die Cuts: My Creative Time – Rectangle Frame Dies, My Creative Time – Rectangle Frame Layers

Embossing Powders: Stampendous – Frozen Ice Tinsel Embossing Powder, Ranger Embossing Powder White – Extra Fine Detail.

Tools: MISTI – Most Incredible Stamping Tool, Cuttlebug, U-Line double-sided tape, Cosmic Shimmer Fluffy Stuff, Marvy Uchida – Embossing Heat Tool, Ranger – Emboss It Pen Clear, Gelly Roll Sakura #10 Pen, Stickles – Diamond, Stickles – Holly, YNS Gumdrops – Milk and Cookies – Matte

Image coloured with Copic Markers:

Skin: E21, E11, E00, E000, R30, R20, Eyes (Sakura Glaze – Black)

Hair and Beard: C3, C1, C0, Colorless Blender

Clothing: R59, R37, R35

Sleigh: R59, R37, R35, C5, C3, C1, E27, E25, E23

Mitts and Scarf: G29, G28, G24

Reindeer: E53, E51, E50, 37, E35, E34, E33, R30, R20

Hoofs and Boots: T9, T7, T5

Rope: Y19, Y17, Y15

Sky: B99, B79, B69, B29, B26, B24

Hope you like it and have a fantastic week!

You can find lots of inspiration from the Design Team Divas at the High Hopes blog, and the High Hopes Rubber Stamps Facebook Fan page plus you can also follow us on
Instagram, Twitter and Pinterest.

Better at the Beach!!!


Sharing a card I made today using KLM Digital Design –  Beach Gnome – Girl from the new June 2022 release. This image also comes with 2 more sentiments, “Good times & tan lines” and “Girls just wanna have sun”.

I imported the image and sentiment into Microsoft Word and printed them out onto Copic Marker X-Press It Blending Card and the image again onto regular copy paper. Using My Creative Time – Rectangle Frame Dies and my Cuttlebug, I die cut the image. The image was coloured in with Copic markers. I fussy cut around the image printed out of regular copy paper to create a mask and applied it over top of the coloured image using repositionable tape. Using several Picket Fence – Blending Brushes and multiple Tim Holtz Distress Inks and Krafty Kolours – Sandy Shores, I created the sand, water and clouds using Lawn Fawn – Ocean Waves Stencils, Lawn Fawn – Clippings – Slimline Hillside Stencils and Lawn Fawn Cuts – Cloudy Stencil.

I created a 5.5″ x 4.25″ card base using Hammermill – Premium Colour 100 lb. cardsstock. U-Line – 2 sided tape was added to the back of the image and it was popped up onto the base card. To finish the card off, I added in a few seashells using 2 layers of U-Line – 2 sided tape.

Card Recipe:

Stamp and Sentiment:  Beach Gnome – Girl – KLM Digital Designs

Inks: HP Printer Grayscale, Krafty Kolours – Sandy Shores, Tim Holtz Distress Ink – Salty Ocean, Mermaid Lagoon, Salvaged Patina, Peacock Feathers, Broken China

Paper: Copic Marker X-Press It Blending Card, Hammermill – Premium Colour 100 lb.

Die Cut: My Creative Time – Rectangle Frame Dies

Stencils: Lawn Fawn – Ocean Waves Stencils, Lawn Fawn – Clippings – Slimline Hillside Stencils and Lawn Fawn Cuts – Cloudy Stencil

Miscellaneous: U-Line – 2 sided tape, Picket Fence – Blending Brushes

Image coloured with Copic Markers:

Skin: E21, E11, E04, E00, E000

Hair: E47, E44, E43, E41

Clothing, Hat and Sandals: RV09, RV06, RV04, RV02, B79, B69, B66

Towel, Flower, Pail: V12, V09, V06, V04

Hope you like it and have a great week!

You can find more cards to inspire you at KLM Designs, KLM Digital Design Team and KLM Digital Designs on the Facebook Fan page from the rest of our design team.

Eat Cake!!


It’s Wednesday, and this week, I made a birthday card using High Hopes Rubber Stamps Cupcake Hedgie – TDG035 for the image and Eat Cake – FDG026 for the sentiment. I think the expression on this little hedgie says it all! Birthdays should always be an excuse to eat some cake! LOL!

To make my card this week, I began with a card base of Hammermill – Premium Colour 100 lb. cardstock, cut and scored to be 5.5″ x 4.25″. I adhered Scrapbook.com – Brights Smooth Cardstock which was the same size as the base to the card using double-sided tape. Using my Anna Griffin Empress Mini Machine die cutting machine, I die cut the cake background paper with Your Next Stamp Designer Pad – Birthday Boy and My Creative Time – Rectangle Frame Layers. Tim Holtz Distress Ink – Blueprint Sketch was then inked around all of the edges. I add some U-Line double-sided tape and popped it up onto the base card. Again, using my Empress die cutter, I die cut some golden yellow cardstock using My Creative Time -Stitched Squares Inside and Out. I added some U-Line double sided tape and added it to the patterned background. Waffle Flower – Nesting Square dies were used to die cut the smaller square out of Copic Marker X-Press It Blending Card and My Creative Time – Bunch of Fun Circle Die was used to die cut the circle from some Red cardstock.

The image and sentiment were stamped onto the Copic Marker X-Press It Blending Card. I coloured in the image with Copic Markers. I added Stickles – Star Dust to the cupcake to make the layers sparkle. A 1.5″ Circle punch was used to cut out the sentiment. U-Line double sided tape was added to the backs of the image and sentiment. I popped up the image onto the smaller square and the sentiment onto the red circle. I added another layer of U-Line double sided tape to the right side of the red circle and a little bit of glue to the left side and popped it up over top of the main image. To finish off the card, I added on some YNS Gumdrops – Firefly Magic Sparkly Gumdrops and YNS Gumdrops – Sugar Rush Sparkly Gumdrops.

Card Recipe:

Stamp: Cupcake Hedgie – TDG035 (High Hopes Rubber Stamps)

Sentiment: Eat Cake – FDG026 (High Hopes Rubber Stamps)

Inks: Memento – Tuxedo Black, Tim Holtz Distress Ink – Blueprint Sketch

Paper: Copic Marker X-Press It Blending Card, Hammermill – Premium Colour 100 lb., Your Next Stamp Designer Pad – Birthday Boy (6″ x 6″), Scrapbook.com – Brights Smooth Cardstock (4.25″ x 5.5″)

Die Cuts: My Creative Time -Stitched Squares Inside and Out, My Creative Time – Rectangle Frame Layers, My Creative Time – Bunch of Fun Circle Dies, Waffle Flower – Nesting Square dies

Tools: MISTI – Most Incredible Stamping Tool, U-Line double-sided tape, Anna Griffin Empress Mini Machine, Stickles – Star Dust, YNS Gumdrops – Firefly Magic Sparkly Gumdrops, YNS Gumdrops – Sugar Rush Sparkly Gumdrops

Image coloured with Copic Markers:

Hedgehog: E53, E51, E50, E49, E44, E43, E42, E41, W4, R30, R20, R08, W4

Cupcake Wrapper: B29, B26, B24, B21

Cupcake: Y17, Y15, Y11, R46, R14, R08, G14, YG23, YG11, B26, B24, B21

Cherry: R89, R59, R39, R21

Ground: E34, E33, E3

Check out our new re-release of some fun images for our “Let’s Celebrate Release”!

Hope you like it and have a fantastic week!

You can find lots of inspiration from the Design Team Divas at the High Hopes blog, and the High Hopes Rubber Stamps Facebook Fan page plus you can also follow us on
Instagram, Twitter and Pinterest.

Chi Chi’s Birthday Party!!


It’s Wednesday, and this week, I made a birthday card using High Hopes Rubber Stamps Chi Chi’s Party – TDG037 for the image and Happy Birthday – FDG027. This is just one of the new re-releases from our “Let’s Celebrate” previously retired stamps at High Hopes Rubber Stamps during the month of June. You should pop on over and take a peek at the other new re-releases too.

To make my card this week, I began with a card base of Hammermill – Premium Colour 100 lb. cardstock, cut and scored to be 5.5″ x 4.25″. I cut Paper Pizazz – Hearts, Coils, Stars designer paper to be the same size as the base and adhered it with double-sided tape. Tim Holtz Distress Ink – Chipped Sapphire was used to ink around all of the edges of the card. Using the Anna Griffin Empress Mini, I die-cut the rectangle using My Creative Time – Rectangle Frame Dies. The image and sentiment were stamped onto Copic Marker X-Press It Blending Card and I coloured in the image and the small balloon on the sentiment with Copic Markers. I added Wink of Stella – Clear to the yellow on the cupcake, hat and ribbons to make them sparkle. U-Line double sided tape was added to the backs of the image and sentiment and they were both popped up onto the patterned base card. Lastly, to finish the card off, I popped a red balloon over top of the balloon on the main image and then an additional 2 balloons for embellishments using Creative Impressions – Metallic Balloon Brads using 2 layers of U-Line double-sided tape.

Card Recipe:

Stamp: Chi Chi’s Party – TDG037 (High Hopes Rubber Stamps)

Sentiment: Happy Birthday – FDG027 (High Hopes Rubber Stamps)

Inks: Memento – Tuxedo Black, Tim Holtz Distress Ink – Chipped Sapphire

Paper: Copic Marker X-Press It Blending Card, Hammermill – Premium Colour 100 lb., Paper Pizazz – Hearts, Coils, Stars

Die Cuts: My Creative Time – Rectangle Frame Dies

Tools: MISTI – Most Incredible Stamping Tool, U-Line double-sided tape, Anna Griffin Empress Mini Machine, Creative Impressions – Metallic Balloon Brads – Item 90613, Wink of Stella – Clear

Image coloured with Copic Markers:

Chi Chi and Bear: E49, E47, E37, E35, E34, E33, E31, E30, R30, R20, R08

Presents: BG72, BG57, BG32, BG11, R46, R24, R08, YR23, Y15, Y11, Y00

Hat: R46, R24, R08, BG57, BG32

Cupcake: BG57, BG32, Y35, Y15, Y06, R08

Balloon: R46, R24, R08

Background: B39, B37, BG09, BG05, BG02, BG01, YG13, Y35, Y15, Y06, R46, R24, R08

Hope you like it and have a fantastic week!

You can find lots of inspiration from the Design Team Divas at the High Hopes blog, and the High Hopes Rubber Stamps Facebook Fan page plus you can also follow us on
Instagram, Twitter and Pinterest.

A Little Behind!!


It’s Wednesday, and this week, I made belated birthday card using High Hopes Rubber Stamps Henriettas Backside – Q035 for the image and Sorry I’m – FLL031 for the sentiment. Like Henrietta, I get so busy sometimes, that I forget to send out my birthday cards on time.  This little chickie has now given me an excuse for being late. LOL!

To make my card this week, I began with a card base of AC Cardstock – White cut and scored to be 6″ x 6″. I cut Echo Park Paper Co. – It’s Your Birthday – 6″ x 6″ paper to be the same size as the base and adhered it with double-sided tape. Using my Cuttlebug, I die cut some golden yellow cardstock using My Creative Time -Stitched Squares Inside and Out. I added U-Line double-sided tape to the square and popped it up onto the centre of the card. Using my Cuttlebug again, I die cut Forever In Time – Texture Rouge cardstock with Waffle Flower – Nesting Square dies. I added some U-Line double-sided tape and popped this up into the centre of the last square. Lastly, using my Anna Griffin Empress Mini Machine, I die cut the patterned paper using My Creative Time -Stitched Squares Inside and Out. Once again, I added U-Line double-sided tape and popped up the square into the centre of the previous one.

The image and sentiment were both stamped onto Copic Marker X-Press It Blending Card and the image was coloured in with Copic Markers. I fussy cut around the image and ran it through my Xyron Creative Station to create a sticker. I attached this to Scrapbook.com – Playful Smooth Cardstock and then fussy cut around again leaving a small border. Using my Copic markers E25 ad E23, I added some colour under the feet. With my Empress machine again and Poppystamps – Christmas Quotes die, I die cut the sentiment. Tim Holtz Distress Inks – Wild Honey was used to ink around the edges. I added some U-Line double-sided tape to the back of the image and sentiment and popped them up onto the Jean patterned paper to complete the card.

Card Recipe:

Stamps: Henriettas Backside – Q035 (High Hopes Rubber Stamps)

Sentiment: Sorry I’m – FLL031 (High Hopes Rubber Stamps)

Inks: Memento – Tuxedo Black, Tim Holtz Distress Inks – Wild Honey

Paper: Copic Marker X-Press It Blending Card, AC Cardstock – White, Doodle Bug Designs Inc. – Down on the Farm – 6″ x 6″ paper pad, Echo Park Paper Co. – It’s Your Birthday – 6″ x 6″ paper pad, Forever In Time – Texture Rouge, Scrapbook.com – Playful Smooth Cardstock (4.25″ x 5.5″), Yellow Cardstock

Die Cuts: My Creative Time -Stitched Squares Inside and Out, Waffle Flower – Nesting Square dies, Poppystamps – Christmas Quotes, Xyron Creative Station

Tools: MISTI – Most Incredible Stamping Tool, U-Line double-sided tape, Anna Griffin Empress Mini Machine, Cuttlebug

Image coloured with Copic Markers:

Hen: E97, E47, E37, E09, YR27, YR23, R08

Hope you like it and have a fantastic week!

You can find lots of inspiration from the Design Team Divas at the High Hopes blog, and the High Hopes Rubber Stamps Facebook Fan page plus you can also follow us on
Instagram, Twitter and Pinterest.

Also entered into #Farmquest Challenge Blog #4.  “https://farmquestchallenge.blogspot.com/2022/05/fqcb-theme-4-poultry-and-wire-or-metal.html”.

Coffee!!


It’s Wednesday, and this week, I made a card using High Hopes Rubber Stamps Drive Thru – TLF026 for the image and Nothing Begins – FLL021 for the sentiment. I don’t drink coffee, but I know a lot of people who can’t start the day without one! Are you a coffee drinker or a tea drinker like me?

To make my card this week, I began with a card base of Hammermill – Premium Colour 100 lb. cut and scored to be 5.5″ x 4.25″. To create my background, I started with Creative Memories – Hot Fudge paper cut to the same size as the base card. I adhered this directly to the base. From the same paper, I also made several more cuts. 5.5″ x 2-5/8″, 5.5″ x 1-1/16th” and using my Anna Griffin Empress Mini Machine and My Creative Time – Rectangle Frame Layers, I die cut a rectangle the size of 4.75″ x 3.5″. With multiple papers from Your Next Stamp – The Perfect Blend, I cut them to the sizes of 5.5″ x 4-1/8″, 5.5″ x 2.5″ and 5.5″ x 7/8″. I inked around all of the edges of the patterned papers with Tim Holtz Distress Inks – Ground Espresso.

Using double-sided tape, I layered the papers and centered them onto the card in the following order. Coffee beans, Fudge cardstock, coffee stains, Fudge cardstock and lastly the coffee cups. Once again, I inked around all of the outside edges with Tim Holtz Distress Inks – Ground Espresso ink. I added U-Line double-sided tape to the large Fudge cardstock rectangle with an additional smaller layer on the top and bottom and popped it up in the centre of the card.

Using my Anna Griffin Empress Mini Machine and My Creative Time – Rectangle Frame Layers once again, I die cut a rectangle out of Copic Marker X-Press It Blending Card to the size of 4.25″ x 3″. The image and sentiment were both stamped onto Copic Marker X-Press It Blending Card and the image was coloured in with Copic Markers. I added in a lot of extra bricks to the image to create a solid brick wall. Using my Empress machine again and My Creative Time – Little Gift Tags, I die cut the sentiment. Tim Holtz Distress Inks – Ground Espresso was used to ink around the edges. I added some U-Line double-sided tape to the back of it and popped it up onto the coloured image. Lastly to finish off the card, I added a little pop dot from Gina Marie Designs.

Card Recipe:

Stamps: Drive Thru – TLF026 (High Hopes Rubber Stamps)

Sentiment: Nothing Begins – FLL021 (High Hopes Rubber Stamps)

Inks: Memento – Tuxedo Black, Tim Holtz Distress Inks – Ground Espresso

Paper: Copic Marker X-Press It Blending Card, Hammermill – Premium Colour 100 lb., Creative Memories – Hot Fudge (12″ x 12″), Your Next Stamp – The Perfect Blend (6″ x 6″)

Die Cuts: My Creative Time – Rectangle Frame Layers, My Creative Time – Little Gift Tags (Retired)

Tools: MISTI – Most Incredible Stamping Tool, U-Line double-sided tape, Anna Griffin Empress Mini Machine

Image coloured with Copic Markers:

Gnomes: E47, E44, E43, E41, E27, E25, E23, E15, E21, E11, E08, E00, E000, YR18, YR14, B26, B23, B21

Car: R59, R39, R37, R35, C9, C7, C5, C3, C2, C1, B000, Y00, N9, N7, N5

Road: W8, W6, W4

Wall: C2, C1, E97, E19, E08

Window and Signs: T5, T3, T1, T0, Y00, Y000

Hope you like it and have a fantastic week!
You can find lots of inspiration from the Design Team Divas at the High Hopes blog, and the High Hopes Rubber Stamps Facebook Fan page plus you can also follow us on
Instagram, Twitter and Pinterest.

Hedgies Happy Birthday!!


It’s Wednesday, and this week, I made a birthday card using High Hopes Rubber Stamps Hedgie Stack – TDG027 for the image and Mini Sentiment Set #1 – HLL001 for the sentiment. These little hedgies are excited to wish someone special a very Happy Birthday!

To make my card this week, I began with a card base of Hammermill – Premium Colour 100 lb. cardstock, cut and scored to be 5.5″ x 5.5″. I cut the Crafter’s Companion – Luxury Cardstock – Gold cardstock background paper to the size of 5.5″ x 5.5″ and adhered it directly to the base using double-sided tape. AITOH Origami – Print Chiyogami – Butterflies paper was cut to the size of 5.25″ x 5.25″ and glued on top of the gold paper. Using my Couture Creations – Go Power and Emboss and PinkFresh Essentials: Folk Edge Squares, I die cut another square from Crafter’s Companion – Luxury Cardstock – Gold and Copic Marker X-Press It Blending Card. I popped up the gold die cut onto the floral background using U-Line double-sided tape. I stamped the main image onto the Copic Marker X-Press It Blending Card using my MISTI and Memento – Tuxedo Black.

The image was coloured in with Copic Markers. I used a Gelly Roll Sakura #5 Pen to create some more texture in the fur by just dabbing it everywhere. I’m hoping that it looks like little spikes at the end of their fur. I applied U-Line double-sided tape to the back of the coloured image and popped it up onto the gold die-cut. I stamped the sentiment using my MISTI and Memento – Tuxedo Black ink onto Copic Marker X-Press It Blending Card. Using a 3/4″ punch, I punched out the circle surrounding the sentiment. Then, using my Cuttlebug and My Creative Time – Bunch of Fun Circle Dies, I die cut a slightly larger circle out of a scrap piece of gold paper from Crafter’s Companion – Luxury Cardstock – Gold. I ran the sentiment through my Xyron Create a Sticker and attached it directly to the gold circle. Using some U-Line double-sided tape, I popped it up onto the coloured image. Lastly, to complete my card, I added in some PinkFresh Studio – Essentials Jewel Mix and flowers gems from the Dollar Store.

Card Recipe:

Stamps: Hedgie Stack – TDG027 (High Hopes Rubber Stamps)

Sentiment: Mini Sentiment Set #1 – HLL001 (High Hopes Rubber Stamps)

Inks: Memento – Tuxedo Black

Paper: Copic Marker X-Press It Blending Card, Hammermill – Premium Colour 100 lb., Crafter’s Companion – Luxury Cardstock – Gold, AITOH Origami – Print Chiyogami – Butterflies

Die Cuts: PinkFresh Essentials: Folk Edge Squares, My Creative Time – Bunch of Fun Circle Dies

Tools: MISTI – Most Incredible Stamping Tool, U-Line double-sided tape, Couture Creations – Go Power and Emboss, Gelly Roll Sakura #10 Pen, Gelly Roll Sakura #5 Pen, PinkFresh Studio – Essentials Jewel Mix, Cuttlebug

Image coloured with Copic Markers:

HedgeHogs: T7, T5, T4, T3, E51, E50, R30, R22, R21, R20 (Eyes – Sakura Glaze – Black, Gelly Roll Sakura #10 Pen), Gelly Roll Sakura #5 Pen

Leaves and Grass: G99, YG67, YG17, YG13, G21

Flowers: Y17, RV02, RV10, RV00

Tree and Limbs: E31, E27, E25, E23

Sky: B02, B01, B00, B000, B0000

Hope you like it and have a fantastic week!

Check out more adorable images in the new “Spring Fever Release” at High Hopes Rubber Stamps!

You can find lots of inspiration from the Design Team Divas at the High Hopes blog, and the High Hopes Rubber Stamps Facebook Fan page plus you can also follow us on
Instagram, Twitter and Pinterest.