Archive | September 2022

Couples Cruise!


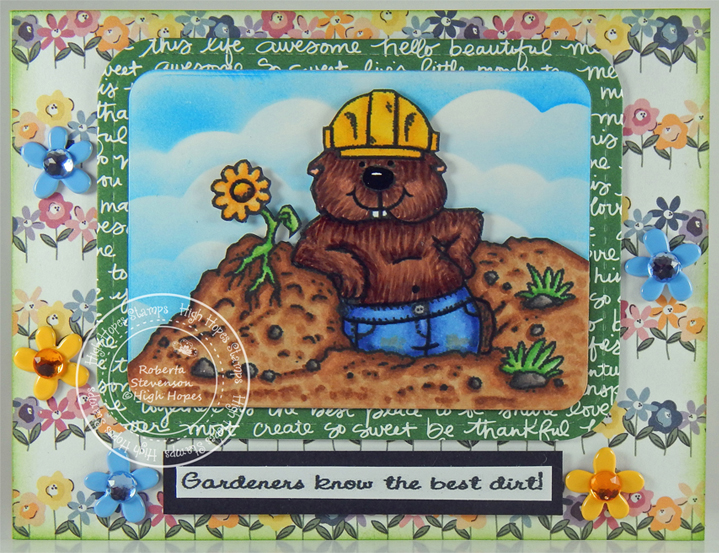
It’s Wednesday, and this week, I made a card using High Hopes Rubber Stamps Couples Cruise – S135 for the image and Wonderful Adventure – H164 for the sentiment. Cruising is starting up again and I can’t wait to go! Seeing this image reminded me of all of the fun times we’ve had and of all of the fun times to come.

To make my card this week, I began with a card base of AC Cardstock – White, cut and scored to be 6″ x 6″. Forever In Time – Textura Sky was cut to the size of 5-7/8″ x 5-7/8″ and was adhered to the base using double-sided tape. Craft Consortium – Clare Therese Ocean Tale was cut to the size of 5.75″ x 5.75″ and was popped up onto the base using U-Line double-sided tape. Using Forever In Time – Textura Sky cardstock and My Creative Time – Rectangle Frame Layers, the larger frame was die cut using the Cuttlebug. Copic Marker X-Press It Blending Card and My Creative Time – Rectangle Frame Dies were used to die cut Copic Marker X-Press It Blending Card cardstock using the Cuttlebug as well. Lastly, the little clouds were die cut using Lawn Fawn Cuts – Centre Picture Window Card dies, a scrap of Copic Marker X-Press It Blending Card and my Cuttlebug.

I stamped the image onto the Copic Marker X-Press It Blending Card using Memento – Tuxedo Black ink and my MISTI. Once the image and little clouds were coloured, I added in the little eyes using a Sakura Glaze – Black pen to make them stand out more. The nails in the ark were coloured in with a Pental Sunburst Metalic Med Gel Pen – Silver. A few white caps were created using a General’s Charcoal White 558 Pencil in the water.

The sentiment was also stamped using my MISTI onto Copic Marker X-Press It Blending Card cardstock and then fussy cut into 3 separate pieces. I ran this through my Xyron Create a Sticker and adhered it to Recollections – Black cardstock. Once again, I cut around the sentiment, leaving a slim border. U-Line double-sided tape was applied to the back of each of the sentiment pieces, image and blue rectangle and they were all popped up onto the card. For embellishments, I added in three YNS Gumdrops – Firefly Magic Sparkly Gumdrops and some blue and white twine using American Crafts Premium Ribbon.

Card Recipe:

Stamps: Couples Cruise – S135 (High Hopes Rubber Stamps)

Sentiment: Wonderful Adventure – H164 (High Hopes Rubber Stamps)

Inks: Memento – Tuxedo Black

Die Cuts: Lawn Fawn Cuts – Centre Picture Window Card, My Creative Time – Rectangle Frame Layers, My Creative Time – Rectangle Frame Dies

Paper: Copic Marker X-Press It Blending Card, AC Cardstock – White, Craft Consortium – Clare Therese Ocean Tale (6″ x 6″), Forever In Time – Textura Sky (6″ x 6″)

Embellishments: YNS Gumdrops – Firefly Magic Sparkly Gumdrops, American Crafts Premium Ribbon

Tools: MISTI – Most Incredible Stamping Tool, U-Line double-sided tape, Cuttlebug, Xyron Create a Sticker, Sakura Glaze – Black, Pental Sunburst Metalic Med Gel Pen – Silver

Image coloured with Copic Markers:

Ark: E49, E30, E27, E25, E23, Pental Sunburst Metalic Med Gel Pen – Silver

Giraffes: YR31, YR000, E97, E95, E79, E77, E55, E15, R02, R00, W5, Y38

Elephants: C5, C3, C2, C1, R02, R00

Monkeys: E59, E37, E35, E33, E31, E30, G05, G00, YG23

Sky: B02, B01, B00, B000

Water: BG34, BG32, BG11, BG02, BG01, B52, B24, B12, B05, General’s Charcoal White 558 Pencil

Clouds:  C1, C00, Colorless Blender

Hope you like it and have a fantastic week!

Check out more adorable images at High Hopes Rubber Stamps!

You can find lots of inspiration from the Design Team Divas at the High Hopes blog, and the High Hopes Rubber Stamps Facebook Fan page plus you can also follow us on
Instagram, Twitter and Pinterest.

Not Tadpoles Anymore!!


Sharing a card I made today using KLM Digital Design –  Frogotful Frog from the new September 2022 release. This image also comes with 3 more sentiments, “Have I Toad you lately that I love you?”, “Sorry, I Frogot!” and “Toadily Happy”. As we get older, we need to keep a sense of humour about aging! I couldn’t resist the sentiment that came with this adorable image, as it is so true. LOL!


The image and sentiment were imported into Microsoft Word and printed out onto Copic Marker X-Press It Blending Card. I drew a big rock onto the same paper and then coloured both images in and fussy cut around them.

Hammermill – Premium Colour 100 lb. cardstock was used to create a 5″ x 5″ card base. Stampin’ UP! – Lily Impressions Designer Series Paper was cut to be the same size and applied to the base using double-sided tape. Bo Bunny – Willow & Sage was cut to the size of 5″ x 1.5″ and then inked around all of the edges with Tim Holtz Distress Ink – Saltwater Taffy. This was applied to the base background with double-sided tape as well. Once again, Tim Holtz Distress Ink – Saltwater Taffy and a finger dauber were used to ink around all of the edges of the card.

U-Line double-sided tape was applied to the back of the rock and the frog. A double layer of the tape was added to the top half of the frog and then both images were popped up onto the card base. The sentiment was put through my Xyron Create a Sticker and then fussy cut. The pieces were adhered to Recollections – Black cardstock. I fussy cut around the sentiment pieces again and applied U-Line double-sided tape to them and popped them up onto the lower half of the card. Using Anna Griffin Empress Mini die-cutting Machine, Lawn Fawn – Stitched Pond Frame and some small scraps of paper, the cat-tails were created. The pieces were put through the Xyron Create a Sticker and adhered to the card behind the rock.

Lastly, to finish off the card, some embellishments were added using Doodlebug Design Inc. – Sprinkles Spring Assortment pop dots and the little frog from Dress It UP – Wild and Wacky.

Card Recipe:

Stamp and Sentiment:  Frogotful Frog – KLM Digital Designs

Inks: HP Printer Grayscale, Tim Holtz Distress Ink – Saltwater Taffy

Paper: Copic Marker X-Press It Blending Card, Hammermill – Premium Colour 100 lb., Bo Bunny – Willow & Sage (6″ x 8″), Stampin’ UP! – Lily Impressions Designer Series Paper (12″ x 12″), Recollections – Black cardstock

Dies: Lawn Fawn – Stitched Pond Frame (LF2068)

Miscellaneous: U-Line – 2 sided tape, Gelly Roll Sakura #10 Pen, Doodlebug Design Inc. – Sprinkles Spring Assortment, Dress It UP – Wild and Wacky, Xyron Create a Sticker, Anna Griffin Empress Mini Machine

Image coloured with Copic Markers:

Frog: BG99, G19, G17, G14, YG17, YG06, YG03, YG00, E81, C1, C0, T9 (Eyes: G19, G16, YG03, Y38, C1, C00, Gelly Roll Sakura #10 Pen)

Rock: W8, W6, W4, W3

Hope you like it and have a great week!

You can find more cards to inspire you at KLM Designs, KLM Digital Design Team and KLM Digital Designs on the Facebook Fan page from the rest of our design team.

The Best Dirt!


It’s Wednesday, and this week, I made a card using High Hopes Rubber Stamps Gordon Groundhog – R123 for the image and The Best Dirt – F221 for the sentiment. My husband loves gardening and this makes me think of him! LOL! We have a few little squirrels that like to raid his garden, eat the tomatoes and dig up the potatoes. Luckily, my husband is good natured and says he can’t get mad at them for what comes natural. We call our back yard the Stevenson’s oasis for wild animals. We have bunnies, squirrels, racoons, possums and a mole that seem to like our vegetables and sometimes we’ve even caught them sleeping up on the furniture under the Gazebo. My husband has now installed a backyard web cam so that we can now capture some of what goes on at night while we are sleeping.

To make my card this week, I began with a card base of Hammermill – Premium Colour 100 lb., cut and scored to be 5.5″ x 4.25″. Echo Park – New Day Beautiful Blooms Paper was cut to be the same size as the base and applied using double-sided tape. Tim Holtz Distress Ink – Mowed Lawn and a finger dauber were used to ink around all of the edges of the card. Anna Griffin Empress Mini Cutting Machine and My Favourite Things Die-Namics – Single Stitch Line Rounded Rectangle Frames were used to die cut Stampin’ UP! – Regals Designer Series Paper, Copic Marker X-Press It Blending Card and Hammermill – Premium Colour 100 lb. cardstock.

The clouds in the sky were created using the inner part of the die-cut from the Hammermill – Premium Colour 100 lb. cardstock and a mid-size Gina K Designs Blender Brush, Tim Holtz Distress Ink – Salty Ocean and stencils that I created using Avery Elle – Pierced Clouds Die. Once this was done, I used regular tape to piece the outer die cut from the Stampin’ UP! – Regals Designer Series Paper and the clouds piece together from the back side. I stamped the image onto the inner frame of the Copic Marker X-Press It Blending Card using Memento – Tuxedo Black ink and my MISTI. Once the image was coloured, it was fussy cut around the top part of the image. I applied U-Line double-sided tape to the image and background pieces that I had joined together and popped them both up onto the card.

The sentiment was also stamped using my MISTI onto the same cardstock and then cut with a small cutting device. I ran this through my Xyron Create a Sticker and adhered it to Recollections – Black cardstock. Once again, I cut around the sentiment, leaving a slim border. U-Line double-sided tape was applied to the back of this and it was popped up onto the card. Lastly, to finish it off, I added some Doodlebug Design Inc. Braddies with Glue Dots – Mini.

Card Recipe:

Stamps: Gordon Groundhog – R123 (High Hopes Rubber Stamps)

Sentiment: The Best Dirt – F221 (High Hopes Rubber Stamps)

Inks: Memento – Tuxedo Black, Tim Holtz Distress Ink – Mowed Lawn, Tim Holtz Distress Ink – Salty Ocean

Die Cuts: My Favourite Things Die-Namics – Single Stitch Line Rounded Rectangle Frames, Avery Elle – Pierced Clouds Die (D-05-01)

Paper: Copic Marker X-Press It Blending Card, Hammermill – Premium Colour 100 lb., Stampin’ UP! – Regals Designer Series Paper Stack (12″ x 12″), Echo Park – New Day Beautiful Blooms (12″ x 12″), Recollections – Black

Embellishments: Doodlebug Design Inc. Braddies – Bubble Blue Blossoms and Tangerine Blossoms

Tools: MISTI – Most Incredible Stamping Tool, U-Line double-sided tape, Anna Griffin Empress Mini Machine, Glue Dots – Mini, Xyron Create a Sticker, Sakura Glaze – Black

Image coloured with Copic Markers:

Groundhog: E29, E27, E25, E23, (Nose and Eyes – Sakura Glaze – Black)

Jeans: B26, B23, B21, E31

Hard Hat: Y17, Y15, Y08

Dirt, Stones, Stem and Grasses: E37, E35, E33, E31, W7, W5, W3, YG23, YG17, YG11, YG09

Flower: E15, Y38, Y35, Y32, Y17, Y08

Hope you like it and have a fantastic week!

Check out more adorable images at High Hopes Rubber Stamps!

You can find lots of inspiration from the Design Team Divas at the High Hopes blog, and the High Hopes Rubber Stamps Facebook Fan page plus you can also follow us on
Instagram, Twitter and Pinterest.

Gnome Stack


Sharing a slimline CAS card I made today using KLM Digital Design –  Gnome Stack from the new September 2022 release. This image comes with 2 other sentiments as well, “Thanks for your support” and “I love Hanging with my Gnomies”. This image could be used for Thank You cards, Birthday cards or even Inspirational cards.

To make my card this week, I started with a 8″ x 3.5″ card base using Hammermill – Premium Colour 100 lb. cardstock. The image and sentiment were imported into Microsoft Word and printed out onto Copic Marker X-Press It Blending Card. I cut the paper to be the same size as the base and coloured in the image. I applied double-sided tape and adhered the coloured image to the base card.

Card Recipe:

Stamp and Sentiment:  Gnome Stack – KLM Digital Designs

Inks: HP Printer Grayscale

Paper: Copic Marker X-Press It Blending Card, Hammermill – Premium Colour 100 lb.

Miscellaneous: 2 sided tape

Image coloured with Copic Markers:

Skin: E21, E11, E04, E00, E000

Beard 1: E47, E44, E43, E41

Beard 2: YR68, YR31, YR18, Y38

Beard 3: E37, E35, E34, E33, E31

Jeans: B26, B23, B21

Boots: C9, C8,C7, C6, C4, C2, 100

Shirts 1 and 3: BG72, BG57, BG32, BG11

Shirt 2: V17, V15, V12

Hats: R59, R39, R37

Ground: E47, E44, E43

Hope you like it and have a great week!

You can find more cards to inspire you at KLM Designs, KLM Digital Design Team and KLM Digital Designs on the Facebook Fan page from the rest of our design team.

You’re O-Fish-Ally Awesome!


It’s Wednesday, and this week, I made a card using High Hopes Rubber Stamps Finnigan – P117 for the image and O-fish-ally – FLL019 for the sentiment. We have a lot of family and friends that love to fish and when I saw this image and sentiment, I could resist pairing them together.

To make my card this week, I began with a card base of Hammermill – Premium Colour 100 lb., cut and scored to be 5.5″ x 4.25″. Stampin’ UP! – Whale of a Time Designer Series Paper was cut to be the same size as the base and applied using double-sided tape. Using paper from the same pack, I fussy cut around the school of fish and applied it to the base card using a mixture of double-sided tape and glue. The excess was then trimmed off on the bottom and left side of the card. Tim Holtz Distress Ink – Evergreen Bough was applied around all of the outer edges of the card using a finger dauber. Using my Anna Griffin Empress Mini Machine and PinkFresh Studio Essentials – Blanket Stitched Circle, I die cut Copic Marker X-Press It Blending Card cardstock. Then, using my MISTI and Memento – Tuxedo Black ink, I stamped the image onto the die-cut piece. The sentiment was also stamped using my MISTI onto the same cardstock and then die cut using Gina K Designs – Sentiment Strips. Lastly, I combined the dies from PinkFresh Studio Essentials – Blanket Stitched Circle and Lifestyle Crafts Cutting Dies – Nesting Circles to create a frame using the paper from Stampin’ UP! – Whale of a Time Designer Series Paper and Anna Griffin Empress Mini Machine.

The image was coloured in with Copic markers listed below. I coloured in the fish first, then the water. Some sand was added to the bottom of the bowl using a Ranger – Emboss It Pen Clear and Seth Apter – Dirty Sand Embossing Powder. This was heat set with a Marvy Uchida – Embossing Heat Tool. I wanted the back part of the sand to appear lighter, so I just dabbed the pen in spots to add in the Embossing Powder after I had coloured it. Lastly, I applied Ranger Inkssentials – Glossy Accents to the inside of the bowl and puddles of water. This was set aside to dry.

Once the Glossy Accents was dry the card was ready to assemble.  I applied some glue to the circle frame I had created earlier and applied it over top of the coloured image circle. U-Line double-sided tape was applied to the back of the image and sentiment and they were both popped up onto the background designer papers. I thought these adorable buttons from Buttons Galore & More – Fun in the Sun Collection were perfect for this card. The button backings were removed from the backs of the fish buttons and U-Line double-sided tape was applied to them. I popped up the 3 fish on the card to finish it off.

Card Recipe:

Stamps: Finnigan – P117 (High Hopes Rubber Stamps)

Sentiment: O-fish-ally – FLL019 (High Hopes Rubber Stamps)

Inks: Memento – Tuxedo Black, Tim Holtz Distress Ink – Evergreen Bough

Die Cuts: PinkFresh Studio Essentials – Blanket Stitched Circle, Gina K Designs – Sentiment Strips, Lifestyle Crafts Cutting Dies – Nesting Circles

Embossing Powder: Seth Apter – Dirty Sand

Paper: Copic Marker X-Press It Blending Card, Hammermill – Premium Colour 100 lb., Stampin’ UP! – Whale of a Time Designer Series Paper (6″ x 6″)

Embellishments: Buttons Galore & More – Fun in the Sun Collection

Tools: MISTI – Most Incredible Stamping Tool, U-Line double-sided tape, Ranger – Emboss It Pen Clear, Marvy Uchida – Embossing Heat Tool, Ranger Inkssentials – Glossy Accents, Anna Griffin Empress Mini Machine

Image coloured with Copic Markers:

Fish: YR68, YR31, YR18, Y38, R89, R59, R39, R29, R24

Fish Bowl, Water, Sand and Water Droplets: B04, B02, B01, B00, E44, E43, E42, E41, C3, C2, C1, C00, Seth Apter – Dirty Sand

Background: BG72, BG57, BG32, BG11, E37, E35, E33, E31

Hope you like it and have a fantastic week!

Check out more adorable images at High Hopes Rubber Stamps!

You can find lots of inspiration from the Design Team Divas at the High Hopes blog, and the High Hopes Rubber Stamps Facebook Fan page plus you can also follow us on
Instagram, Twitter and Pinterest.

A Good Guy


Sharing a CAS card I made today using KLM Digital Design –  Fido and Friend Male from the new September 2022 release. This image comes with 2 other sentiments as well, “Thank You for being a wonder friend” and “Every snack you bake, Every meal you bake, Every bit you take, I’ll be watching you”. I think this last sentiment is so true for our furry friends. LOL! I chose the sentiment I used on this card because I know I found my 4 leaf lucky clover and he became my wonderful, kind, caring and loving husband.

To make my card this week, I started with a 5.5″ x 4.25″ card base using Hammermill – Premium Colour 100 lb. cardstock. The image and sentiment were imported into Microsoft Word and printed out onto Copic Marker X-Press It Blending Card. The image and sentiment were cut to be the same size as the base and the image was coloured in. This was then applied to the base card using double-sided tape. Hot Buy Craft Smart – Holiday Glitz Glitter Paper was die cut using my Cuttlebug and Lawn Fawn Cuts – Lucky Clovers. I ran this die cut through my Xyron Create a Sticker and attached it to the card to finish it off.

Card Recipe:

Stamp and Sentiment:  Fido and Friend Male – KLM Digital Designs

Inks: HP Printer Grayscale

Paper: Copic Marker X-Press It Blending Card, Hammermill – Premium Colour 100 lb., Hot Buy Craft Smart – Holiday Glitz Glitter Paper 12″ x 12″

Die Cuts: Lawn Fawn Cuts – Lucky Clovers

Miscellaneous: 2 sided tape, Cuttlebug, Xyron Create a Sticker, Pental Sunburst Metalic Med Gel Pen – Silver

Image coloured with Copic Markers:

Skin: E21, E11, E04, E00, E000

Beard: E47, E44, E43, E41

Overalls and Hat: B26, B23, B21, (Buttons – Pental Sunburst Metalic Med Gel Pen – Silver)

Shirt: E87, E84, E81

Boots: E49, E43, E42, E41, E39, E37, E35, E34, E33, E31

Dog: E55, E53, E51, E50, E49, E47, E29, E27, E25, E23, R30, R29, R24, R20

Ground: E47, E44, E43

Hope you like it and have a great week!

You can find more cards to inspire you at KLM Designs, KLM Digital Design Team and KLM Digital Designs on the Facebook Fan page from the rest of our design team.

Book Worm!!


It’s Wednesday, and this week, I couldn’t resist making this very easy bookmark using High Hopes Rubber Stamps Book Worm – P100 for the image. My husband I both love to read and with this adorable image, it is quick to create multiple bookmarks quickly. They would also be a great gift for the readers in your life too!

To make my bookmark this week, I stamped the main image onto Copic Marker X-Press It Blending Card cardstock using my MISTI and Memento – Tuxedo Black ink. I coloured in the image and I wanted the eyes to stand out. I added in a small line with a Pigma Micron #5 – Black pen and then added some colour to the eyes. To finish the eyes,  I added a little dot of white using a Gelly Roll Sakura #8 Pen. The image was then fussy cut with a small white border all around it. Crafts – Designer Paper – 02-3093268 was die cut using Die-Namics MFT-489 PCD Fishtail Figs STX and my Anna Griffin Empress Mini Machine. I punched a hole using We R Memory Keepers Crop-A-Dile Eyelet and Snap Punch at the top of the bookmark. We R Memory Keepers Embellishment Makers Basic Tools-Tassel Loom was used to create the tassel along with 3 yards of twine and then 2 6″ pieces of twine.  I wanted the image to lay flat on the bookmark, so I ran it through my Xyron Create a Sticker and then applied it to the die cut. I tied a knot in the twine to join the tassel to the book mark and then added some Ranger Inkssentials – Glossy Accents to the glass lenses to finish it off.

Card Recipe:

Stamp: Book Worm – P100 (High Hopes Rubber Stamps)

Ink: Memento – Tuxedo Black

Paper: Copic Marker X-Press It Blending Card, Hammermill – Premium Colour 100 lb., Crafts – Designer Paper – 02-3093268 (6″ x 6″)

Die Cuts: Die-Namics MFT-489 PCD Fishtail Figs STX

Tools: MISTI – Most Incredible Stamping Tool, Xyron Create a Sticker, Gelly Roll Sakura #8 Pen, Ranger Inkssentials – Glossy Accents, Pigma Micron #5 – Black, Anna Griffin Empress Mini Machine, We R Memory Keepers Crop-A-Dile Eyelet and Snap Punch, We R Memory Keepers Embellishment Makers Basic Tools-Tassel Loom

Image coloured with Copic Markers:

Worm: YG23, YG11, YG09, R20, R30

Eyes: C1, C0, E25, E23, Y17, W9, Gelly Roll Sakura #8 Pen, Pigma Micron #5 – Black

Glasses and Bow Tie: BV29, BV25, BV23, Ranger Inkssentials – Glossy Accents for the lenses

Book: BV25, BV23, V000

Hope you like it and have a fantastic week!

Check out more adorable images at High Hopes Rubber Stamps!

You can find lots of inspiration from the Design Team Divas at the High Hopes blog, and the High Hopes Rubber Stamps Facebook Fan page plus you can also follow us on
Instagram, Twitter and Pinterest.

Dance With Me!!


Today, I’m sharing a card that I made using Dreamerland Crafts stamps called Just Dance With Me – DCS17037. Sometimes just dancing with our partners or friends can bring such joy to us. No matter where you may be, just hear the music and dance no like no one is watching!

To create this card I began by making a base of 5.5″ x 4.25″ using Hammermill – Premium Colour 100 lb. cardstock. The sky was created using Lawn Fawn Cuts – Cloudy Stencil, a  blender brush and Tim Holtz Distress Inks – Salty Ocean and Broken China. To create the grass, I first cut 2 pieces of DCWV – Pocket Blossom designer paper to the sizes of 5.5″ x 2.5″ and 5.5″ x 1-5/8″.  Lawn Fawn – Grassy Hillside Borders die cuts and my Anna Griffin Empress Mini Cutting Machine were used to die cut the 2 pieces. Using a blender brush and Tim Holtz Distress Ink – Rustic Wilderness, I inked over top of the blades of grass and then around the other 3 edges.

The main image was stamped using my MISTI and Memento – Tuxedo Black ink onto Copic Marker X-Press It Blending Card. I coloured in the image and then fussy cut around it leaving a slim white border. U-Line double-sided tape was added to the back of the image. I then placed the image onto the card before removing the tape backing to see where to place the sentiment. Using my MISTI again and Versa Fine – Onyx Black ink, I applied the sentiment onto the base card. Ranger – Clear Super Fine Detail embossing powder was then applied to it and it was heat embossed with Marvy Uchida – Embossing Heat Tool.

The final pieces of the card were now ready to assemble. I peeled off the tape backings from the large die-cut and added some liquid glue to allow me to move it into the correct position over top of the grass I had placed down earlier onto the base card. After popping up the top grass cut, I then repeated the same process and popped up the image in between the blades of grass. Finally, I added in some butterflies from the same stamp set using Tim Holtz Distress Ink – Wilted Violet. I had made them lighter by first stamping off of the page and then onto the card.

Card Recipe:

Stamps: Just Dance With Me – DSC17037 – Dreamerland Crafts

Inks: Memento – Tuxedo Black, Tim Holtz Distress Ink – Rustic Wilderness, Wilted Violet, Salty Ocean and Broken China, Versa Fine – Onyx Black

Paper: Copic Marker X-Press It Blending Card, Hammermill – Premium Colour 100 lb., DCWV – Pocket Blossom – 12″X12″ (30.5cmx30.5cm)

Die Cuts: Lawn Fawn – Grassy Hillside Borders

Stencil: Lawn Fawn Cuts – Cloudy Stencil

Embossing Powder: Ranger – Clear Super Fine Detail embossing powder

Tools: MISTI – Most Incredible Stamping Tool, Marvy Uchida – Embossing Heat Tool, U-Line double-sided tape, Anna Griffin Empress Mini Machine, Gelly Roll Sakura #10 Pen

Image coloured with Copic Markers:

Skin: E21, E11, E04, E00, E000, R30, R30, R20

Hair: E47, E44, E43, E41

Dress: V06, V04, V01, V0000, Gelly Roll Sakura #10 Pen

Shirt: BG72, BG57, BG32, BG11

Jeans: B26, B23, B21

Hope you like it and have a great week!

You can find more cards to inspire you at Dreamerland Crafts and Pointer Scrapbooking on the Facebook Fan pages from the rest of our design team.

Picked Just For You!


Sharing a card I made today using KLM Digital Design –  Milk Can – Sunflowers from the August 2022 release. This image comes with 2 other sentiments as well, “YOU ARE MY sunshine” and “SHINE LIKE A sunflower”.


I created a 5.5″ x 4.25″ card base using Hammermill – Premium Colour 100 lb. cardstock. I imported the image and sentiment into Microsoft Word and printed them out onto Copic Marker X-Press It Blending Card.  Using my Anna Griffin Empress Mini Machine and Gina Marie Designs – Loopy Rectangle Die Set, I die cut the printed image and sentiment.

The image was coloured in with Copic markers. U-Line double-sided tape was applied to the back of the die cut and it was popped up onto the base card. YNS Gumdrops – Happy Harvest were added to complete the card.

Card Recipe:

Stamp and Sentiment:  Milk Can – Sunflowers – KLM Digital Designs

Inks: HP Printer Grayscale

Paper: Copic Marker X-Press It Blending Card, Hammermill – Premium Colour 100 lb.

Die Cuts: Gina Marie Designs – Loopy Rectangle Die Set

Miscellaneous: U-Line – 2 sided tape, YNS Gumdrops – Happy Harvest, Anna Griffin Empress Mini Machine

Image coloured with Copic Markers:

Milk Can: C9, C7, C5, C3, C1, C00

Sunflower: E29, E27, E25, E23, E21, E09, Y38, Y35, YR24

Little Flowers: Y17, Y15, Y08

Leaves: G99, G21, YG67, YG17

Shadow: BG01, BG000, BG0000, Colorless Blender

Hope you like it and have a great week!

You can find more cards to inspire you at KLM Designs, KLM Digital Design Team and KLM Digital Designs on the Facebook Fan page from the rest of our design team.