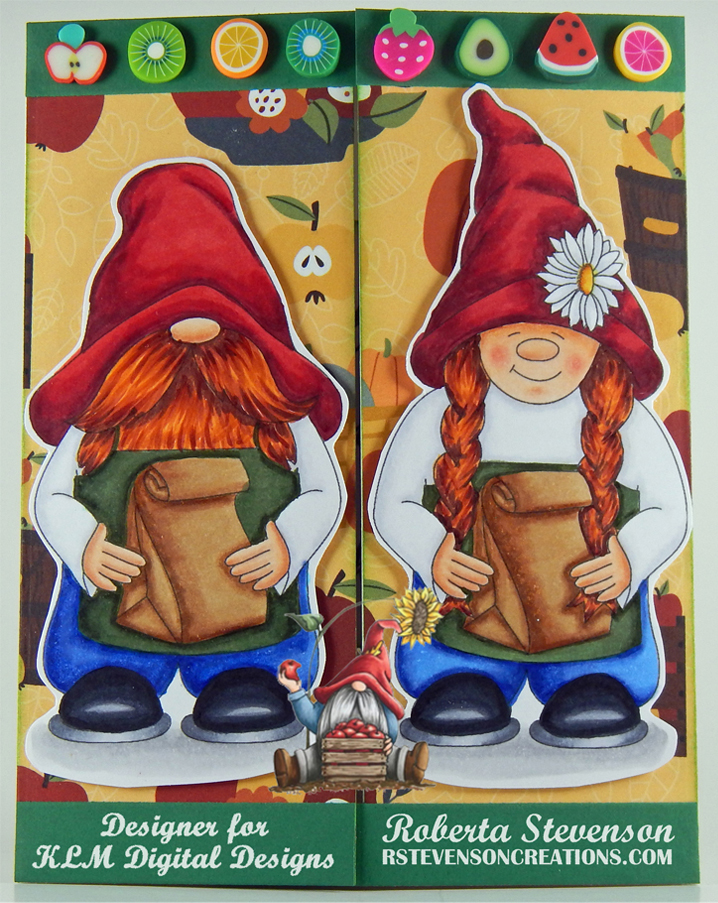
Tag Archive | Tim Holtz Distress Inks – Peeled Paint

Have A Hoppy Day!!


Sharing a birthday card that I made today using KLM Digital Design –  Hang In There Frog from the new November 2022 release. This image also comes with 2 more sentiments, “Take a leap of faith” and “Hang in there”.

The image and sentiment were imported into Microsoft Word and printed out onto Copic Marker X-Press It Blending Card. I coloured the image in and then fussy cut around it. Using a black marker, I inked around the image.

Hammermill – Premium Colour 100 lb. cardstock was used to create a 5″ x 4.25″ card base. Using multiple Tim Holtz Distress Inks and a blender brush, I created the background sky directly on the card base. The leafy border was die cut using Copic Marker X-Press It Blending Card, a Cuttlebug and Lawn Fawn – Tropical Leaves Backdrop dies. With multiple Tim Holtz inks and a blender brush I inked over the die cut and some extra leaves from the same die set. Then with Copic markers, I made some of the leaves a little darker to give the background some contrast.

Scrapbook Adhesives – 3D Foam Strips were attached to the back of the large die cut. I applied some glue to the ends of the vine for the frog and attached them to the leaves. Once the glue was dry, I added more Scrapbook Adhesives – 3D Foam Strips to the back of the coloured image. Both pieces were now attached to the base card. I applied some glue to the individual leaves and applied them directly to the base card underneath the die cut. Lastly, I die cut the sentiment using a Cuttlebug and Poppystamps – Christmas Quotes die. I inked around the edges of the die cut with a black marker and then glued it to the tops of the leaves to finish off the card.

Card Recipe:

Stamp and Sentiment:  Hang In There Frog – KLM Digital Designs

Inks: HP Printer Grayscale, Tim Holtz Distress Inks – Saltwater Taffy, Squeezed Lemonade, Tumbled Glass, Salty Ocean, Forest Moss, Rustic Wilderness, Mowed Lawn and Peeled Paint

Paper: Copic Marker X-Press It Blending Card, Hammermill – Premium Colour 100 lb.

Dies: Lawn Fawn – Tropical Leaves Backdrop, Poppystamps – Christmas Quotes

Miscellaneous: Scrapbook Adhesives – 3D Foam Strips, Blender Brushes

Image coloured with Copic Markers:

Frog: YG17, YG06, YG03, YG00, E81, C1, C0, Black (Eyes: G19, G16, YG03, Y38, C1, C00, Gelly Roll Sakura #5 Pen)

Leaves: G19, G16, G03

Vine: G99, YG67, YG63, YG61

Hope you like it and have a great week!

You can find more cards to inspire you at KLM Designs, KLM Digital Design Team and KLM Digital Designs on the Facebook Fan page from the rest of our design team.

Spring is in the Air!!


It’s Wednesday, and this week, I made a card using High Hopes Rubber Stamps Turtle Stack – TLF035 for the image and Spring Is In The Air – FDG036 for the sentiment. Really loving the New Spring Release called “This and That” at High Hopes Rubber Stamps! This image could also be used for birthday’s too.

To make my card this week, I began with a card base of Hammermill – Premium Colour 100 lb. cardstock, cut and scored to be 5.5″ x 4.25″. I attached Scrapbook.com – Playful Smooth Cardstock to the base using double-sided tape. Using W R Memory Keepers – Crop-A-Dile Corner Chomper – I cut the corners using the 1/4″. Using my Cuttlebug and Hero Arts – Infinity Dies – Rounded Rectangle, I die cut the following papers: Scrapbook.com – Jewels Smooth Cardstock, Your Next Stamp – Happy Spring cardstock and Copic Marker X-Press It Blending Card. I inked around the edges of the base card with Tim Holtz Distress Ink – Fossilized Amber and around the floral background with Tim Holtz Distress Inks – Peeled Paint. I applied U-Line double-sided tape onto the floral background and solid green background and popped up both onto the base card. I stamped the image onto the small rectangle that I had cut out of the Copic Marker X-Press It Blending Card using my MISTI and Memento – Tuxedo Black. The sentiment was also stamped with the same ink and then fussy cut. I inked around the sentiment with Tim Holtz Distress Inks – Peeled Paint and set it aside for later. The image was coloured in with Copic Markers. I applied multiple layers of U-Line double-sided tape to the back of the sentiment and applied one layer to the back of the main image and popped them both up on the card. Lastly, I added some pop-dots to complete the card.

Card Recipe:

Stamps: Turtle Stack – TLF035 (High Hopes Rubber Stamps)

Sentiment: Spring Is In The Air – FDG036 (High Hopes Rubber Stamps)

Inks: Memento – Tuxedo Black, Tim Holtz Distress Ink – Fossilized Amber, Tim Holtz Distress Inks – Peeled Paint

Paper: Copic Marker X-Press It Blending Card, Hammermill – Premium Colour 100 lb., Scrapbook.com – Playful Smooth Cardstock (4.25″ x 5.5″), Scrapbook.com – Jewels Smooth Cardstock (4.25″ x 5.5″), Your Next Stamp – Happy Spring (6″x6″)

Die Cuts: Hero Arts – Infinity Dies – Rounded Rectangle (DI465)

Tools: MISTI – Most Incredible Stamping Tool, U-Line double-sided tape, Cuttlebug, W R Memory Keepers – Crop-A-Dile Corner Chomper

Image coloured with Copic Markers:

Turtles: YG67, YG17, YG08, YG03, YG01, E87, E84, E44, E43, E42, E15, Y35, Y08, YR24, G99, G94, G21, G07, G03,  C1

Sky: B02, B01, B00, B000

Grass: Y13, Y03, Y01

Hope you like it and have a fantastic week!

You can find lots of inspiration from the Design Team Divas at the High Hopes blog, and the High Hopes Rubber Stamps Facebook Fan page plus you can also follow us on
Instagram, Twitter and Pinterest.

Toad-ally In Love!!


It’s Wednesday, and this week, I made a card using High Hopes Rubber Stamps Toad-ally In Love – M127  for the image and sentiment. I toad-ally love this sweet image because it can be used for both Valentine’s Day, an Anniversary or just to let someone know that you love them.

To make my card this week, I began with a card base of Hammermill – Premium Colour 100 lb. cardstock, cut and scored to be 5″ x 5″. I used Picket Fence – Blending Brushes, Tim Holtz Distress Ink: Mowed Lawn, Crushed Olive, Peeled Paint, Festive Berries, Fired Brick and Barn Door and Lawn Fawn – Lots of Hearts Background Stencils to create my card background. Using Lawn Fawn – Valentine’s Hearts Border and my Cuttlebug, I die cut some Craft Smith – Hot Buy – Green and Forever In Time – Texture Rouge cardstock and adhered the 2 pieces together with some glue. I did this twice and then glued the 2 finished pieces to the base card. With my MISTI and Memento – Tuxedo Black ink, I stamped the image onto the Copic Marker X-Press It Blending Card cardstock. I then die cut it using Sizzix Framelets by Stephanie Barnard – 562676 – Hearts Dotted. The image was coloured in and popped up onto the background using U-line douhble-sided tape. I applied some glue onto the backs of 3 of the pre-cut hearts and placed them onto the base background to complete the card.

Card Recipe:

Stamp and Sentiment: Toad-ally In Love – M127 (High Hopes Rubber Stamps)

Inks: Memento – Tuxedo Black, Tim Holtz Distress Ink: Mowed Lawn, Crushed Olive, Peeled Paint, Festive Berries, Fired Brick and Barn Door

Paper: Copic Marker X-Press It Blending Card, Hammermill – Premium Colour 100 lb., Craft Smith – Hot Buy – Green, Forever In Time – Texture Rouge

Die Cuts: Sizzix Framelets by Stephanie Barnard – 562676 – Hearts Dotted, Lawn Fawn – Valentine’s Hearts Border

Stencils: Lawn Fawn – Lots of Hearts Background Stencils

Tools: MISTI – Most Incredible Stamping Tool, U-Line double-sided tape, Cuttlebug

Image coloured with Copic Markers:

Toad: YG17, YG06, YG03, YG00, E81, R30, BG99, E84, E81Colorless Blender (Eyes – Sakura Glaze – Black, Gelly Roll Sakura #5 Pen)

Hearts: R46, R14, R08, YG17, YG06, YG03

Big Heart Background: R27, R24, R22, R21, R20, (C3, C2, E23 – Shadow under Toad)


Hope you like it and have a fantastic week!

You can find lots of inspiration from the Design Team Divas at the High Hopes blog, and the High Hopes Rubber Stamps Facebook Fan page plus you can also follow us on
Instagram, Twitter and Pinterest.

Grocery Gnomes!!


Sharing a card I made today using KLM Digital Design –  Grocery Gnome – Boy and Grocery Gnome – Girl from the new December release. I love these images as they are great for creating a card for our unspoken heroes who serve us everyday at the grocery stores.

I created the base using Hammermill – Premium Colour 100 lb. cardstock. I cut the paper to the size of 5.5″ x 8.5″. Then I scored each side at 2-1/8″ each and folded them towards the centre. I die cut Photo-Play Autumn Greetings – Fruit Baskets paper using my Cuttlebug and My Creative Time – Rectangle Frame Dies. This die cuts the paper to exactly 5.5″ x 4.25″. I then cut this piece into 2 using my cutter to create 2 equal pieces of 2-1/8″. Tim Holtz Distress Inks – Peeled Paint was used to ink around the edges of the 2 pieces. I applied these directly to the 2 front panels using liquid glue. I wanted to be able to keep the fronts closed, so I used my Cuttlebug and Pink Fresh Dies – Slim Stripes to die cut some green cardstock. I applied 1 longer piece to the left side at the top, 1 long piece to the bottom on the right side using liquid glue. Then I added a stripe on the remaining sides top and bottom with liquid glue to the length of 2-1/8″. On the inside of the card, I applied some 1/8″ tape to a small piece of the green stripes, cut at .5″ x .5″. This allows the longer flaps to slide into them to keep the card closed.

I imported the images and sentiment into Microsoft Word and printed them out onto Copic Marker X-Press It Blending Card. The images were coloured in with Copic markers and then fussy cut with scissors. U-Line double sided tape was applied to the backs of the images and they were popped up onto the card. Finally to finish it off, I applied small embellishments from Dress My Craft – Fruit Salad Slices with liquid glue across the top of the card.

The sentiment was die cut using My Creative Time – Rectangle Frame Dies and my Cuttlebug. Tim Holtz Distress Inks – Peeled Paint was used to ink around the edges and double-sided tape was used to adhere it to the inside of the card.

Card Recipe:

Stamp and Sentiment: Grocery Gnome – Boy – KLM Digital Designs, Grocery Gnome – Girl – KLM Digital Designs

Inks: HP Printer Grayscale, Tim Holtz Distress Inks – Peeled Paint

Paper: Copic Marker X-Press It Blending Card, Hammermill – Premium Colour 100 lb., Photo-Play Autumn Greetings – Fruit Baskets (12″ x 12″), Green Cardstock

Die Cuts: My Creative Time – Rectangle Frame Dies, Pink Fresh Dies – Slim Stripes

Miscellaneous: U-Line – 2 sided tape, Dress My Craft – Fruit Salad Slices, Cuttlebug

Image coloured with Copic Markers:

Skin: E21, E11, E04, E00, E000, R30, R20

Hair: E18, E08, YR18, YR14

Hats: R59, R39, R37, R35

Shirts B60, C1, C00, Colorless Blender

Pants: B26, B23, B21

Shoes: C9, C7, C5, C3, C1

Aprons: G99, G94, G85

Bags: E35, E34, E31

Hope you like it and have a great week!

You can find more cards to inspire you at KLM Designs, KLM Digital Design Team and KLM Digital Designs on the Facebook Fan page from the rest of our design team.

Santa Candy Cane


Today, I’m featuring this adorable Santa image from Conie Fong Art called Holiday Gnomes Bundle By Conie Fong.

For the base card, I used Hammermill – Premium Colour 100 lb. cardstock and cut it and scored it to be 5.5″ x 5.5″. For the background, I cut Craft Smith – Peppermint Twist paper to the same size as the base card and inked around the edges with Tim Holtz Distress Inks – Candied Apple. I adhered this to the base card with double-sided tape. AC – Green cardstock was die cut with my Cuttlebug and Essentials by Tattered Lace Dies – Easel Slider dies. Tim Holtz Distress Inks – Peeled Paint was used to ink around all of the edges and it was popped up onto the base card using U-Line double-sided tape.

The image using HP High Quality Grayscale was printed onto Copic Marker X-Press It Blending Card and die cut using my Cuttlebug and Essentials by Tattered Lace Dies – Easel Slider dies. The image was coloured in with Copic markers and Cosmic Shimmer Fluffy Stuff and WOW! Sparkling Snow Embossing Glitter were added to the brim of the hat and pompom. Ranger – Emboss It Pen Clear was added in parts at the bottom for snow and WOW! Sparkling Snow Embossing Glitter was applied. The hat, pompom and snow were all then heat embossed using my Marvy Uchida – Embossing Heat Tool. Stickles – Crystal was also added to the snow to add a little more sparkle. Lastly, using a Gelly Roll Sakura #10 Pen, I added snow to the background sky. The finished image was popped up onto the green cardstock using U-Line double-sided tape and Kraftin’ Kimmie – Christmas Dots were added to complete the card.

Card Recipe:

Stamp: Holiday Gnomes Bundle by Conie Fong

Inks: HP High Quality Grayscale, Tim Holtz Distress Inks – Candied Apple, Tim Holtz Distress Inks – Peeled Paint

Paper: Copic Marker X-Press It Blending Card, Hammermill – Premium Colour 100 lb., Craft Smith – Peppermint Twist 6×6 in., American Crafts – Green Cardstock

Die Cuts: Essentials by Tattered Lace Dies – Easel Slider

Miscellaneous: U-Line double-sided tape, Stickles – Crystal, Gelly Roll Sakura #10 Pen, Cosmic Shimmer Fluffy Stuff, Marvy Uchida – Embossing Heat Tool

Image coloured with Copic Markers:

Skin: E21, E11, E00, E000, R30, R20

Beard: C2, C1, C0, BV20

Hat and Clothing: R59, R37, R35, WOW! Embossing Glitter – White Puff Twinkle, Cosmic Shimmer Fluffy Stuff, Ranger – Emboss It Pen Clear

Shoes: C9, C7, C5, C3

Candy Cane: C1, C0, C00, Colorless Blender, Spectrum Noir Sparkles – Red Berry, Spectrum Noir Sparkles – Clear

Bow: G14, G07, YG23, YG11

Sky: C7, B99, B97, B95

Snow: B60, C1, Stickles – Diamond, Cosmic Shimmer Fluffy Stuff, WOW! Sparkling Snow Embossing Glitter, Ranger – Emboss It Pen Clear

Hope you like it and have a great week!


Viking Gnome!!


Sharing a card I made today using KLM Digital Designs –  Viking Gnome from the new October release. This image also comes with 2 more sayings: “Today is all about you” and “Happy Anniversary”. This card would also be great for a birthday card too!

To make the card, I first imported the image and sentiment into Microsoft Word and printed them out onto Copic Marker X-Press It Blending Card. My Creative Time – Rectangle Frame Dies were used to die cut the image. The image was coloured in with Copic markers.  The base was created with Hammermill – Premium Colour 100 lb. cardstock cut and folded to the size of 5.5″ x 4.25″. I attached the background pattern from Doodlebug Design Inc. – Dragon Tails to the base and then inked around the edges of the image and card. Double-sided tape was used to pop-up the finished image to the base card using U-Line double-sided tape.

Card Recipe:

Stamp and Sentiment:  Viking Gnome – KLM Digital Designs

Inks: HP Printer Grayscale, Tim Holtz Distress Inks – Peeled Paint

Paper: Copic Marker X-Press It Blending Card, Hammermill – Premium Colour 100 lb., Doodlebug Design Inc. – Dragon Tails (6″ x 6″)

Die Cuts: My Creative Time – Rectangle Frame Dies

Miscellaneous: U-Line – 2 sided tape

Image coloured with Copic Markers:

Skin: E21, E11, E00, E000

Beard and Hair: E18, E08, YR18, YR14

Helmet: C5, C3, C2, C1, E53, E51, E50

Clothing: E89, E87, E84

Boots: C9, C7, C5, C0

Axe: C5, C4, C3, C2, C1, E49, E27, E25, E23

Sheild: C5, C3, C1, YG67, YG23, YG17, YG11, G99, G21, G14

Fur: E37, E35, E33

Shadow: C2, C1, C0

Hope you like it and have a great week!

You can find more cards to inspire you at KLM Designs, KLM Digital Design Team and KLM Digital Designs on the Facebook Fan page from the rest of our design team.

Sorry You’re Hurting!!


Sharing a card I made using Clearly Whimsy Stamps – Get Well Dragons – DP1034 for a colleague that had a knee operation recently. I wanted to make a fun card to cheer him up a bit and thought this was the perfect image to make it happen.

To make the card, I stamped the image onto Copic Marker X-Press It Blending Card using Memento – Tuxedo Black ink and my MISTI. I coloured in the image using Copic markers and then fussy cut around it leaving a thin white border. I stamped all of the sentiments onto black cardstock using Versamark ink and Ranger Embossing Powder White – Extra Fine Detail powder. The embossing powders were all heated with Marvy Uchida – Embossing Heat Tool. The smaller sentiments were all die cut using my Cuttlebug and Hero Arts – Infinity Die Ovals. For the background, I used my Cuttlebug and Sizzix Rounded Tags dies to die cut the background paper – Asuka Studio – Sparkly Sky and black cardstock. I die cut the grass using Lawn Fawn – Stitched Hillside Borders and Sizzix Rounded Tags. I inked the top border of the grass with Tim Holtz Distress Inks – Peeled Paint.

The card was now ready to assemble. I started with a base card of 5.5″ x 4.5″ using Hammermill – Premium Colour cardstock. I applied double-sided tape to the back of the black die cut, The patterned paper and the grass cut and applied them all directly to the card. I ran 2 of the “Ouch!” die cuts through my Xyron Create a Sticker and attached them to the top of the card.  Using 3M VHB – 2 sided tape, I popped up the image and 2 other sentiments to finish off the card.

Card Recipe:

Stamp and Sentiments: Get Well Dragons – DP1034 – Clearly Whimsy Stamps

Inks: Memento – Tuxedo Black, Versamark, Tim Holtz Distress Inks – Peeled Paint

Paper: Copic Marker X-Press It Blending Card, Hammermill – Premium Colour 100 lb., Green Cardstock, Black Cardstock, Asuka Studio – Sparkly Sky (6″x6″)

Die Cut: Sizzix Rounded Tags – 8 dies, Lawn Fawn – Stitched Hillside Borders, Hero Arts – Infinity Die Ovals

Embossing Powder: Ranger Embossing Powder White – Extra Fine Detail

Miscellaneous: 3M VHB – 2 sided tape, Marvy Uchida – Embossing Heat Tool, MISTI – Most Incredible Stamping Tool, Xyron Create a Sticker

Image coloured with Copic Markers:

Dragon: YG67, YG63, YG61, YG05, YG03, YG01, YG00, R59, R39, R27, R22, G14, G12, G07, BV04, BV02, BV01, Y38, Y17, Y08

Bandages: E55, E53, E51, E50, C2, C1, C00, Colorless Blender

Crutches: E25, E23, C2, C1

Hope you like it and have a great week!

Think Snow!!!


It’s Wednesday, and this week, I made a card using Snowman Stumble – TT014 by High Hopes Rubber Stamps for the main image and Think Snow 2 – FF047 (High Hopes Rubber Stamps) for the sentiment. I grew up skating at the outdoor rink directly across the street from my house. We couldn’t wait to get home from school and throw on our skates. The rinks were always full of children from the neighbourhood. We would either play rink games or hockey. I think there was a rink every couple of blocks. As soon as we’d finish eating, we were back on the ice again. Our parents were always yelling at us to come inside at the end of the day. How times have changed. LOL!

To make my card this week, I began with a card base made from Hammermill – Premium Colour 100 lb. cut and scored to be 5.5″ x 4.25″. My Cuttlebug and My Creative Time – Rectangle Frame Dies were used to die cut Hot Buy Craft Smart – Holiday Glitz Glitter Paper to be the same size as the base card. With a Picket Fence – Blending Brush and a mixture of Tim Holtz Distress Ink – Blueprint Sketch and Tim Holtz Distress Ink – Salty Ocean, I created the background sky. I applied this directly to the glitter background paper. Once this was done, I applied this directly to the base using double-sided tape. Next, Nellie’s Choice – Nature Scene Dies – NSD001 – Mountains were used to die cut the tree scenery using Momenta – Cardstock and using a small dauber I added in some darker touches of green using Tim Holtz Distress Inks – Peeled Paint. The pond was die cut using Whimsy Stamps – Wavy Nested Frame Dies Set and Copic Marker X-Press It Blending Card. I inked the image and sentiment using my MISTI and Memento – Tuxedo Black. Lastly, I die cut the sentiment using Joy Crafts – Labels and Tags and inked around the edges with my Picket Fence – Blending Brush and the ink that was still on it from doing the sky.

I coloured in the image with Copic markers and added in some highlights on the skate blades with Pental Sunburst Metalic Med Gel Pen. I inked the image a second time onto the Hot Buy Craft Smart – Holiday Glitz Glitter Paper for the snowman body and fussy cut around it. Once it was coloured in with Copics, I ran it through my Xyron Create a Sticker and attached it to the base stamped image.

The card was now ready to assemble. Part of the pond was cut off at the top before it was attached it to the sparkly background using glue and double-sided tape. Next, I added some 3M VHB – 2 sided tape to the back of the trees and applied it over top of where the sky ended and the pond met. To create the snow around the pond and in between the trees, pond and snow, I used Cosmic Shimmer Fluffy Stuff and added some DecoArt Glamour Dust while it was still wet. Marvy Uchida – Embossing Heat Tool was used to heat the liquid and make it puff up to look like fluffy snow. I added some Stickles – Diamond to the pompom. Using a Gelly Roll Sakura #10 Pen and Sharpie Water Based Paint – White – Extra Fine Point pen, I created the snow in the sky. Lastly, to finish off the card, I added 3M VHB – 2 sided tape to the sentiment and applied it to the card.

Card Recipe:

Stamp: Snowman Stumble – TT014 (High Hopes Rubber Stamps)

Sentiment: Think Snow 2 – FF047 (High Hopes Rubber Stamps)

Inks: Memento – Tuxedo Black, Tim Holtz Distress Ink – Blueprint Sketch, Tim Holtz Distress Ink – Salty Ocean, Tim Holtz Distress Inks – Peeled Paint

Paper: Copic Marker X-Press It Blending Card, Hammermill – Premium Colour 100 lb., Momenta – Cardstock, Hot Buy Craft Smart – Holiday Glitz Glitter Paper 12″ x 12″

Die Cuts: My Creative Time – Rectangle Frame Dies, Nellie’s Choice – Nature Scene Dies – NSD001 – Mountains, Whimsy Stamps – Wavy Nested Frame Dies Set (WSD382), Joy Crafts – Labels and Tags

Stickles: Diamond

Tools: MISTI – Most Incredible Stamping Tool, 3M VHB – 2 sided tape, Gelly Roll Sakura #10 Pen, Sharpie Water Based Paint – White – Extra Fine Point, DecoArt Glamour Dust, Cosmic Shimmer Fluffy Stuff, Marvy Uchida – Embossing Heat Tool, Cuttlebug, Picket Fence – Blending Brush, Pental Sunburst Metalic Med Gel Pen, Xyron Create a Sticker

Image coloured with Copic Markers:

Snowman: B60, R30, R20, YR21, YR16, YR15, Colorless Blender

Hat: BG72, BG57, BG32, BG11, Gelly Roll Sakura #10 Pen

Mitts and Skates: C3, C2, C1, C00, BG09, BG05, BG02, BG01

Ice: B00, B000, B000

Hope you like it and have a fantastic week!

You can find lots of inspiration from the Design Team Divas at the High Hopes blog, and the High Hopes Rubber Stamps Facebook Fan page plus you can also follow us on
Instagram, Twitter and Pinterest.

Hearts Warm!!!


It’s Wednesday, and this week, I made a card using Toasting Marshmallows – T026 by High Hopes Rubber Stamps for the main image and Hearts Warm – G063 (High Hopes Rubber Stamps) for the sentiment. This image brings back so many memories of going camping and sitting around the campfire roasting marshmallows. I gave my image coloured marshmallows, because growing up they were always my favourite! LOL!

To make my card this week, I started with a base of 6″ x 6″ using Recollections – Black cardstock. I taped Echo Park – Star Stencil on top of the cardstock and applied several Cosmic Shimmer – Opal Blaze Polishes using a spatula to create the nice starry background. I wanted my scene to look like the friends were in the woods, so I die cut some trees of various sizes using Nellie’s Choice – Nature Scene Dies – NSD001 – Mountains and Momenta – Cardstock. Once I die cut the trees, I added some Tim Holtz Distress Ink – Forest Moss and Tim Holtz Distress Inks – Peeled Paint to add some more colour to them. Then, I ran the trees through my Xyron Create a Sticker to make it easier to apply them later. I felt the scene also needed a moon, so I die cut one using Nellie’s Choice – Nature Scene Dies – NSD002 – Sky and then coloured it in and added 3M VHB – 2 sided tape to the back of it and set everything aside.

I stamped my image and sentiment using my MISTI and Memento – Tuxedo Black ink onto Copic Marker X-Press It Blending Cardstock. I fussy cut around the top part of the image and then used a ruler to know where to cut the remainder of the bottom piece with my cutter. I coloured in the image using Copic markers and then used a black marker to go around all of the fussy cut part of the image and Copic marker – YG67 was used to go around the edges of the grassy area. For the sentiment, I used My Creative Time – Rectangle Frame Dies and My Creative Time – Rectangle Frame Layers to cut out the sentiment and background layer. I ran the sentiment through my Xyron Create a Sticker and applied it directly to the outer frame.

My card was now ready to assemble. I first adhered my starry background to a card base of AC – White cardstock sized at 6″ x 6″ using double-sided tape. Then, I used my coloured image to help me with the placement of where the trees would go. Since, I had already made stickers out of my trees, this was a fairly easy process. Once I was satisfied with their positioning, I applied 3M VHB – 2 sided tape, to the back of the coloured image and sentiment frame and attached them directly to the base card. Lastly, I attached the moon to complete the scene.

Card Recipe:

Stamp: Toasting Marshmallows – T026 (High Hopes Rubber Stamps)

Sentiment: Hearts Warm – G063 (High Hopes Rubber Stamps)

Inks: Memento – Tuxedo Black, Tim Holtz Distress Inks – Peeled Paint, Tim Holtz Distress Ink – Forest Moss

Paper: Copic Marker X-Press It Blending Card, Recollections – Black Cardstock, AC Cardstock – White, Momenta – Cardstock

Die Cuts: Nellie’s Choice – Nature Scene Dies – NSD001 – Mountains, Nellie’s Choice – Nature Scene Dies – NSD002 – Sky, My Creative Time – Rectangle Frame Dies, My Creative Time – Rectangle Frame Layers

Stencil: Echo Park – Star Stencil (6″ x 6″)

Cosmic Shimmer: Opal Blaze Polish – Sapphire Grape, Sunset Orange, Pink Blueberry, Turquoise Peach

Tools Miscellaneous: MISTI – Most Incredible Stamping Tool, Xyron Create a Sticker, Cuttlebug, Spatula

Image coloured with Copic Markers:

Beaver: E99, E97, E11, E07, (Eyes – Sakura Glaze – Black)

Moose: E53, E51, E50, E35, E34, E33, E31, R30, R20, Colorless Blender, (Eyes – Sakura Glaze – Black)

Bear: E53, E51, E50, E47, E44, E43, E42, (Eyes and Nose – Sakura Glaze – Black)

Skunk: C10, T6, T4, C1, C00, R30, R20, Colorless Blender, (Eyes and Nose – Sakura Glaze – Black)

Logs: E29, E27, E25, E23, E21

Marshmallows: YR00, R30, G20, Y11

Fire and Glow: YR09, YR04, Y08, Y02, Y00

Grass: YG67, YG63, YG45, YG17, YG13, YG03, YG01

Moon: BV20, C1, C00, Y000, Colorless Blender

Hope you like it and have a fantastic week!

You can find lots of inspiration from the Design Team Divas at the High Hopes blog, and the High Hopes Rubber Stamps Facebook Fan page plus you can also follow us on
Instagram, Twitter and Pinterest.

Anniversary Gnomes!!


Sharing a card I made today combining the image from KLM Digital Designs April Release called Bride Gnome and image and sentiment from Groom Gnome. These images could be used separately or together and come with multiple sentiments.

To make the card, I first imported the image into Microsoft Word and printed it out onto Copic Marker X-Press It Blending Card using my HP Printer. I coloured in the image with Copic markers. Then I printed them out again on regular copy paper and used my Brother Scan and Cut  to cut around them. I used these as masks over top of the coloured images. Using multiple Tim Holtz inks listed below, I created the sky with a stencil I had created from Avery Elle – Pierced Clouds Die and grass stencil I created from Lawn Fawn – Grassy Hillside Borders.

For the base card, Recollections – Christmas Cards and envelopes paper was used at the size of 5.5″ x 4.25″. I die cut the finished coloured image with Your Next Stamp – Stitched Rectangle Die Set (YNSD214) and glued it to the base.

Card Recipe:

Stamp: Bride Gnome – KLM Digital Designs, Groom Gnome – KLM Digital Designs

Sentiment: Groom Gnome – KLM Digital Designs

Inks: HP Printer Grayscale, Tim Holtz Distress Ink: Peeled Paint, Mowed Lawn, Crushed Olive, Salty Ocean, Broken China, Tumbled Glass

Paper: Copic Marker X-Press It Blending Card, Recollections – Christmas Cards and Envelopes – 5″ x 6.5″

Die Cuts: Avery Elle – Pierced Clouds Die (D-05-01), Lawn Fawn – Grassy Hillside Borders, Your Next Stamp – Stitched Rectangle Die Set (YNSD214)

Image coloured with Copic Markers:

Skin: E21, E11, E04, E00, E000, R30, R20

Beard: E49, E47, E44, E42

Hat and Tuxedo: C9, C7, C5, C3, C2

Shirt Sleeves: C00, Colorless Blender

Shoes: 100, C10, C8, C6, C5

Hair: E18, E08, YR18, YR14

Dress and Shoes : B60, C00, Colorless Blender

Flowers, Leaves, Vest and Ribbon: BV04, BV02, BV01, BV00, Y17, Y04, YG17, YG13, YG03, Gelly Roll Sakura #10 Pen

Hope you like it and have a great week!

Take advantage of this special at KLM Digital Designs!

MOTHER’S DAY SALE 20% OFF EVERYTHING UNTIL MAY 10TH
CODE:MOTHERSDAY21

You can find more cards to inspire you at KLM Designs, KLM Digital Design Team and KLM Digital Designs on the Facebook Fan page from the rest of our design team.

Just a Note To Say!!


Today, I’m sharing an inspirational card that I made using Dreamerland Crafts stamps called Farm 01 – D20017 and Just A Note To Say – DCS17038 for the main images and Mix and Match Clear Stamps – DCS19093 for the sentiment.

Above is a close-up of the card. Below is the card opened.

To make this card I used a base card of 11″ x 4.25″ using Hammermill – Premium Colour 100 lb. cardstock. I scored it at 2.75″ and 5.5″ to create an easel card. I stamped the fence, horses, pig and girl onto Inkadoo Stamping Mask Paper and fussy cut around them. Then I placed them onto Copic Marker X-Press It Blending Card cut at 5.5″ x 4.25″ for placement.

I removed the fence and using my MISTI and Memento – Tuxedo Black ink, I stamped the girl. I placed the girl mask over top of the stamped girl image and then stamped the fence, chicks, pig and farm house and fields. I stamped a horse and then placed the horse mask over it and stamped a second horse. Next, I removed the masks from the scene. I coloured all of the images and background in with Copic markers. I added double sided tape to the bottom portion of the easel card and attached the coloured image.

My Creative Time – Rectangle Frame Dies were used create the base background and Gina Marie Designs – Petite Looped Lace Rectangle dies were used to create the base for the sentiment. I stamped the sentiment using my MISTI and Versa Fine – Onyx Black ink. I added Ranger – Clear Super Fine Detail embossing powder and then heat embossed the powder with Marvy Uchida – Embossing Heat Tool. Tim Holtz Distress Ink – Peeled Paint ink was used to ink around the edges of both die cuts.

To complete the card, the large rectangle was added directly to the card using double-sided tape and 2 layers of 3M VHB – 2 sided tape were added to the back of the sentiment die cut and attached to the base card background.

Card Recipe:

Stamps: Farm 01 – D20017 (Dreamerland Crafts); Just A Note To Say – DCS17038 (Dreamerland Crafts)

Sentiment: Mix and Match Clear Stamps – DCS19093 (Dreamerland Crafts)

Inks: Memento – Tuxedo Black, Versa Fine – Onyx Black, Tim Holtz Distress Inks – Peeled Paint

Embossing Powder: Ranger – Clear Super Fine Detail embossing powder

Paper: Copic Marker X-Press It Blending Card, Hammermill – Premium Colour 100 lb., Momenta – Cardstock

Die Cut: Gina Marie Designs – Petite Looped Lace Rectangle, My Creative Time – Rectangle Frame Dies

Tools: MISTI – Most Incredible Stamping Tool, Cuttlebug, Marvy Uchida – Embossing Heat Tool, 3M VHB – 2 sided tape, Inkadoo Stamping Mask Paper

Image coloured with Copic Markers:

Skin: E000, E00, E04, E11, E21, R22, R20

Hair:  E47, E44, E43

Blouse and Scarf: V28, BV13, BV11, BV04, BV01, BV00, BV0000, Gelly Roll Sakura #8 Pen

Pants: B26, B23, B21

Boots: E27, E25, E23, E21

Feather and Paper: C7, C1, C0, C00

Horses: E59, E49, E37, E35, E33, E31, C7, C5

Pig: R20, R000, E93, E47

Chicken and Chicks: Y04, Y02, Y00, C2, C1, C00, YR12, R17

Barn and Silo: R39, R37, R35, Y08, Y04, C7, C5, C1, C0

Fence: E59, E27, E25, E23, E21

Grass: YG17, YG13, YG03, YG01

Sky: B02, B01, B00, B000, B0000, Colorless Blender

Ground: E37, E35, E33, E31

Hope you like it and have a great week!

You can find more cards to inspire you at Dreamerland Crafts and Pointer Scrapbooking on the Facebook Fan pages from the rest of our design team.

He Is Risen!


It’s Wednesday, and this week, I made an Easter Card using  He Lives! – R057 (High Hopes Rubber Stamps) for the main image and He Is Risen! – H137 (High Hopes Rubber Stamps) for the sentiment. I really love the serenity of this image. Here’s hoping that we will get to spend Easter with our loved ones this year.

To make my card this week, I used AC Cardstock for my base folded at 6″ x 6″. For the main background, I used this beautiful paper from Heartfelt Creations – Flowering Dogwood Collections cut to the same size as the base and attached it using double-sided tape. Tim Holtz Distress Inks – Peeled Paint was used to ink around all of the edges. My Creative Time – Scalloped Stitched Oval Dies was used to cut all of the ovals and My Creative Time – Rectangle Frame Die Layers was used to cut the small rectangle. Tim Holtz Distress Ink – Fossilized Amber was used to ink around the large scalloped oval and Tim Holtz Distress Inks – Dusty Concord was used to ink around the larger oval and small rectangle. I used 2 types of purple ribbon and ran both pieces through my Xyron Create a Sticker to make it easier to attach them to each other and then onto the card. I used some double-sided tape and glue to adhere the larger oval to the base. 3M VHB – 2 sided tape was used to add the larger oval.

I stamped the image and sentiment using Memento – Tuxedo Black and my MISTI onto Copic Marker X-Press It Blending Card. I coloured in the image using Copic markers. For the sentiment, I found the white was too bright, so I coloured over it with a soft purple Copic marker – V01. I added 3M VHB – 2 sided tape to the back of the coloured image and placed it on top of the larger oval. For the sentiment, I doubled up on the 3M VHB – 2 sided tape before attaching it to the card.

Card Recipe:

Stamp:  He Lives! – R057 (High Hopes Rubber Stamps)

Sentiment Background: He Is Risen – H137 (High Hopes Rubber Stamps)

Inks: Memento – Tuxedo Black, Tim Holtz Distress Ink – Fossilized Amber, Tim Holtz Distress Inks – Dusty Concord, Tim Holtz Distress Inks – Peeled Paint

Paper: Copic Marker X-Press It Blending Card, Heartfelt Creations – Flowering Dogwood Collections – 12″ x 12″ Paper Pad – HCDP1-275, AC White Cardstock, Yellow Cardstock, Purple Cardstock

Die Cuts: My Creative Time – Rectangle Frame Die Layers – MCT-D274, My Creative Time – Scalloped Stitched Oval Dies

Tools: MISTI – Most Incredible Stamping Tool, Cuttlebug, 3M VHB – 2 sided tape, Xyron Create a Sticker

Images coloured with Copic Markers:

Cross: E59, E39, E35, E33, E31

Sash: BV08, V17, V15, V09, V04

Flower and Leaves: YG17, YG03, YG01, Y02, C0

Lamb: B60, C3, C1, C0, R30, Colorless Blender

Grass: YG13, YG11, YG03, YG01

Sky: Y02, Y06, Y08

Hope you like it and have a fantastic week!

You can find lots of inspiration from the Design Team Divas at the High Hopes blog, and the High Hopes Rubber Stamps Facebook Fan page plus you can also follow us on
Instagram, Twitter and Pinterest.

Ella the Elephant!!


Today, I’m sharing a card using this adorable image from KLM Digital Designs new February release called Ella The Elephant. The image comes with 3 different sentiments. Like so many others, I’ve been missing my family and friends a lot due to Covid lockdowns, so I chose the “Miss You” sentiment for my card. Hopefully, times will get better this year and we’ll be able to see our distant families and friends again.

To make the card, I printed out the main image onto Copic Marker X-Press It Blending Card using my HP Printer. I used my Brother Scan and Cut to cut around the image and coloured it in with Copic markers.

I used AC White Cardstock for the base card size of 6″ x 6″ and ScrapBerry’s Tropics paper for the background. I ran the image through my Xyron Creative Station because I wanted it to lay flat on the background. I used my Cuttlebug to die cut the grass using Lawn Fawn – Grassy Hillside Borders and green cardstock. Then I edged around it using Tim Holtz Distress Inks – Peeled Paint. I applied double-sided tape to the back of the grass and applied it directly to the base, then I positioned the elephant in front and behind the grass.

Card Recipe:

Stamp and Sentiment: Ella The Elephant (KLM Digital Designs)

Inks: HP Printer Grayscale, HP Printer Black, Tim Holtz Distress Inks – Peeled Paint

Paper: Copic Marker X-Press It Blending Card, AC White Cardstock, ScrapBerry’s Tropics – 6×6 Paper Collection, Lime Green cardstock

Die Cut: Lawn Fawn – Grassy Hillside Borders

Tools: Cuttlebug, Xyron Creative Station

Image coloured with Copic Markers:

Elephant: W3, W2, W1, W0, R22, R20, B04, B02, B00, C1

Ribbon and Flower: RV14, RV13, RV10, Y17, Y08

Leaves and Stem: YG67, YG65, YG61, G07

Hope you like it and have a great week!

You can find more cards to inspire you at KLM Designs, KLM Digital Design Team and KLM Digital Designs on the Facebook Fan page from the rest of our design team.

Dear Santa!


Hi Everyone! I’m participating in the 2020 Cat Lovers Blog Hop (#2020CatLoversHop) this year.

This is my third year joining the fun event. For six years, Her Peaceful Garden has been sponsoring The Cat Lover’s Blog Hop and it is a lot of fun.

Here is a third Christmas card that I have created for the hop using Christmas Kitten – GSD617 (Gerda Steiner Designs) for the main image and sentiment. These little kittens are getting into all kinds of trouble. It reminds me so much of when I had my little fur babies. LOL!

To make my card, I started with a base of 5.5″ x 4.25″. I cut some Copic Marker X-Press It Blending Card the same size and stamped on the fun images. Copic markers were used to colour the images in. Once this was done, I stamped the sentiments using Versa Fine – Onyx Black and applied Ranger – Clear Super Fine Detail embossing powder which I heat set with Marvy Uchida – Embossing Heat Tool.  I adhered the completed image to the base using double-sided tape. To finish off the card, I used some Clear – Wink of Stella to add a little bit of sparkle to all of the baubles and Stickles – Diamond for the hats.

THANK YOU so much to Her Peaceful Garden for hosting this event again this year and also a big THANK YOU to Gerda Steiner Designs for being a sponsor this year as well.

Card Recipe:

Stamp and Sentiment:  Christmas Kitten – GSD617 (Gerda Steiner Designs)

Inks: Memento – Tuxedo Black, Versa Fine – Onyx Black, Tim Holtz Distress Inks – Peeled Paint, Tim Holtz Distress Ink – Pine Needles

Paper: Copic Marker X-Press It Blending Card

Embossing Powder: Ranger – Clear Super Fine Detail embossing powder

Tools: MISTI – Most Incredible Stamping Tool, Diamond Stickles, Marvy Uchida – Embossing Heat Tool

Images coloured with Copic Markers:

Kittens: N8, N6, N4, R30, R22, R02, YG09, YG07, YG03, Sakura Glaze – Black for nose and eyes

Hats: BG49, BG18, BG09, BG07, BG05, BG02, R59, R39, R37, R35, C01, C0, Stickles – Diamond

Bobbles: B18, B06, B05, B04, R59, R39, R37, R35, Pental Sunburst Metalic Med Gel Pen, Clear – Wink of Stella

Pine Needles: G09, G07, G05, Tim Holtz Distress Inks – Peeled Paint, Tim Holtz Distress Ink – Pine Needles

Floor and Shadows: E49, E18, E15, E13, E11, C3

Hope you like it and have a fantastic week!

Have A Beary Special Day!


Welcome Back Dreamerland Craft Fans!

Today, I’m sharing a birthday card that I made with Dreamerland Crafts stamp called With My Love – D19024. This little bear is on his way to wish someone a “Beary Good Birthday”!


To make this card I used a base card of 4.25″ x 5.5″. I stamped the image onto Copic Marker X-Press It Blending Card using Memento – Tuxedo Black ink and my MISTI. I coloured in the image and background with Copic markers and then used my Brother Scan and Cut to cut around it.

I cut out at rectangle 4.25″ x 5.5″ from Hammermill – Premium Colour 100 lb. paper and then I used various dies and Tim Holtz inks to create the background. I have listed them below. I had die cut templates using the dies which makes it really easy to create the backgrounds.

I stamped the sentiment from Jaded Blossom – Forest Friends using Versa Fine – Onyx Black ink and my MISTI onto some Turquoise Cardstock. I used Ranger – Clear Super Fine Detail embossing powder and then heat embossed the powder with Marvy Uchida – Embossing Heat Tool. Next, I edged around the background sentiment outer edges with Tim Holtz Distress Ink – Peacock Feathers. I went around the main image outline with Copic Markers – B000 and YG03. Then, I popped up the image with 3M VHB – 2 sided tape and added in some balloons which I die-cut using Your Next Stamp – Mini Balloon Trio Die Set and drew little strings from them.

Card Recipe:

Stamp:  With My Love – D19024 (Dreamerland Crafts)

Sentiment: Jaded Blossom – Forest Friends

Inks: Memento – Tuxedo Black, Versa Fine – Onyx Black, Tim Holtz Distress Ink – Mermaid Lagoon, Tim Holtz Distress Ink – Mowed Lawn, Tim Holtz Distress Inks – Peeled Paint, Tim Holtz Distress Ink – Crushed Olive, Tim Holtz Distress Inks – Peacock Feathers

Embossing Powder: Ranger – Clear Super Fine Detail embossing powder

Paper: Copic Marker X-Press It Blending Card, Crafts – Sparkling Stickers – 02-3068629, Hammermill – Premium Colour 100 lb.

Die Cuts: Your Next Stamp – Mini Balloon Trio Die Set (YNSD241), Avery Elle – Custom Steel Dies – Made in the USA – D-05-01 PiercedCloudsDie, Lawn Fawn – Grassy Hillside Borders

Tools: MISTI – Most Incredible Stamping Tool, Cuttlebug, Marvy Uchida – Embossing Heat Tool, 3M VHB – 2 sided tape

Image coloured with Copic Markers:

Bear: E33, E31, E30, E29, E27, E25, E23, R22, R20

Balloon: R59, R37, R35, R24

Hope you like it and have a great week!

You can find more cards to inspire you at Dreamerland Crafts and Pointer Scrapbooking on the Facebook Fan pages from the rest of our design team.

Hang in There!


It’s Wednesday, and this week, I thought I’d make an inspirational card to share with you using Raggedy Ann-ouncement – R044 (High Hopes Rubber Stamps) for the main image and Hang In There – D278 (High Hopes Rubber Stamps) for the sentiment.

To make my card this week, I started off with a card base of 5.5″ x 4.25″.  I created the background on Hammermill – Premium Colour cardstock using various stencils, Picket Fence Studio Blender Brushes and Tim Holtz inks which I have listed below. I thought the sun rays reflected a ray of hope for everyone and I hope that we will all be seeing better days soon. Once the background was finished, I used 2 sided tape and mounted it onto the base card.

I stamped the image  and sentiment onto Copic Marker X-Press It Blending Card and coloured in the main image with Copic markers. I ran the coloured image through my Brother Scan and Cut to create a slim border around it and then went around the edges with Y06 – Yellow and YG25 – Celadon Green to make it blend into the background. Lastly, I popped up the image using 3M VHB – 2 sided tape and created a small shadow below Raggedy Ann.

Card Recipe:

Stamp:  Raggedy Ann-ouncement – R044  (High Hopes Rubber Stamps)

Sentiment: Hang In There – D278 (High Hopes Rubber Stamps)

Inks: Memento – Tuxedo Black, Tim Holtz Distress Ink – Squeezed Lemonade, Tim Holtz Distress Ink – Mustard Seed, Tim Holtz Distress Ink – Mowed Lawn, Tim Holtz Distress Ink – Crushed Olive, Tim Holtz Distress Inks – Peeled Paint

Paper: Copic Marker X-Press It Blending Card, Hammermill – Premium Colour 100 lb.

Stencil: Kraftin’ Kimmie – Starburst, Lawn Fawn – Lawn Cut dies (Made into Stencil), Kraftin’ Kimmie – Krafty Scenery 2

Tools: MISTI – Most Incredible Stamping Tool, 3M VHB – 2 sided tape, Picket Fence Studio Blender Brushes

Image coloured with Copic Markers:

Skin: E21, E11, E04, E00, E000, R22, R20

Hair: R35, R17, R14, R08

Dress: R59, R37, R35

Patch: B52, B41, B12

Apron and Socks: C-2, C-1, C-0

Shoes: C10, C8, C5, C3

Sign: E37, E35, E33, E31, E30

Shadow below feet: YG25, YG06, YG03

Hope you like it and have a fantastic week!

You can find lots of inspiration from the Design Team Divas at the High Hopes blog, and the High Hopes Rubber Stamps Facebook Fan page plus you can also follow us on
Instagram, Twitter and Pinterest.


Happy Father’s Day Gnomes


KLM Digital Designs released some brand new stamps this month, and today I’m sharing Dad and Kid Gnomes (KLM Digital Designs)!  This new stamp contains adorable images of a dad, his children and 3 loving sentiments for your father. This stamp allows you to create your card to represent all of your siblings with your dad or just 1 if it is a special card.

For this card, I decided to create a card from a son to his dad.

To put the card together, I printed out the main image onto Copic Marker X-Press It Blending Card and the sentiment onto Hammermill Premium Colour paper.

I die cut the Hammermill paper with Your Next Stamp – Stitched Rectangle Die Set. Then using stencils that I made with Avery Elle – PiercedCloudsDie, I created the sky using Tim Holtz Distress Ink – Salty Ocean. For the grassy hillsides, I created stencils using Lawn Fawn – Stitched Hillside Borders and Lawn Fawn – Simple Stitched Hillside Borders – Lawn Cuts. Then I used Tim Holtz Distress Inks – Bundled Sage, Mowed Lawn, Crushed Olive and Peeled Paint to create the colour variations of the hills.

I coloured in the main image with copics and then fussy cut around them. Then I used a black marker to go around all of the edges. I attached the background to some AC White cardstock cut at 5.5″ x 4.25″. Then to finish off the card, I popped up the 2 coloured images with 3M VHB – 2 sided tape and placed them onto the background.

Card Recipe:

Stamp and Sentiment: Dad and Kid Gnomes (KLM Digital Designs)

Inks: HP Printer Greyscale

Paper: Copic Marker X-Press It Blending Card, Hammermill – Premium Colour 100 lb., AC White Cardstock

Die Cuts: Your Next Stamp – Stitched Rectangle Die Set (YNSD214), Avery Elle – Custom Steel Dies – Made in the USA – D-05-01 PiercedCloudsDie, Lawn Fawn – Stitched Hillside Borders, Lawn Fawn – Simple Stitched Hillside Borders – Lawn Cuts

Background Inks:

Sky:Tim Holtz Distress Ink – Salty Ocean

Grass: Tim Holtz Distress Ink – Bundled Sage, Tim Holtz Distress Ink – Mowed Lawn, Tim Holtz Distress Ink – Crushed Olive, Tim Holtz Distress Inks – Peeled Paint

Tools: 3M VHB – 2 sided tape, Cuttlebug

Image coloured with Copic Markers:

Skin: E000, E00, E04, E11, E21, R22, R20

Hair: E47, E44, E43

Beard: W5, W4, W3, W1, W0, W00

Pants and Hat – Dad: E89, E87, E84

Coat – Dad: YG95, YG93, YG91

Boots: C10, C8, C5, C3

Cane: E29, E25, E23

Overalls – Boy: B26, B23, B21. E15, Y28, Y26, Y19

Shirt – Boy: YG95, YG93, YG91

Hat and Socks – Boy: E89, E87, E84

Hope you like it and have a great week!

You can find more cards to inspire you at KLM Designs, KLM Digital Design Team and KLM Digital Designs on the Facebook Fan page from the rest of our design team.

Herd It Was Your Birthday!!!


KLM Digital Designs has just released some brand new stamps this month, and today I’m sharing Woman Farmer Gnome (KLM Digital Designs)! She’s taking some time out from her chores on this beautiful sunny day to wish you a Happy Birthday.

For this card, I printed out the image with my HP Printer onto Copic Marker X-Press It Blending Card using Greyscale. Then I coloured it in with Copic markers and fussy cut around it. I used a  black marker to go around all of the image to hide the white paper from where I fussy cut it. I couldn’t cut out the portion between the girl and the shovel, so I used my copics to match the background that I created with the Tim Holtz inks.

For the background, I used Your Next Stamp – Stitched Rectangle Die Set die and my Cuttlebug to cut Strathmore Bristol Paper (100 lb. – 270 g/m2). Next I created some stencils from Avery Elle – Pierced Clouds Die and Lawn Fawn – Stitched Hillside Borders. I used these stencils to create the cloudy background and the fields behind the farm girl using Tim Holtz Distress Inks.

I had a small scrap strip of patterned paper from Doodle Bug Designs Inc. – Down on the Farm and thought it would go perfectly with this card. I applied this to a 5.5″ x 4.25″ card base from AC Cardstock – Autumn collection. I printed out the sentiment and fussy cut it to split it up and attached it on top of the base background. I then popped up the colored image using 3M VHB – 2 sided tape onto the background that I created earlier. Then I popped up the entire background onto the base card. I added in a few Party Time dots from Kraftin’ Kimmie Dots and inked around the entire card with Tim Holtz Distress Inks – Peeled Paint to finish it off.

Card Recipe:

Stamp and Sentiment: Woman Farmer Gnome (KLM Digital Designs)

Inks: HP Printer Greyscale, Tim Holtz Distress Ink – Salty Ocean, Tim Holtz Distress Ink – Crushed Olive, Tim Holtz Distress Ink – Mowed Lawn, Tim Holtz Distress Inks – Peeled Paint

Paper: Copic Marker X-Press It Blending Card, Doodle Bug Designs Inc. – Down on the Farm – 6″ x 6″ paper pad, AC Cardstock – Autumn, Strathmore Bristol Paper (100 lb. – 270 g/m2)

Die Cuts: Your Next Stamp – Stitched Rectangle Die Set (YNSD214), Avery Elle – Custom Steel Dies – Made in the USA – D-05-01 Pierced Clouds Die, Lawn Fawn – Stitched Hillside Borders

Tools and Miscellaneous: Cuttlebug, 3M VHB – 2 sided tape, Kraftin’ Kimmie Party Time Dots, Xyron Create a Sticker

Image coloured with Copic Markers:

Skin: E000, E00, E04, E11, E21, R22, R20

Hair: E18, E08, YR18, YR14

Pants: B26, B23, B21

Shirt: YG95, YG93, YG91

Hoe: C5, C3, C1, E39, E35, E31

Boots and Hat: E29, E27, E25, E23

Background: YG61, YG03, YG01, B000, Tim Holtz Distress Ink – Salty Ocean, Tim Holtz Distress Ink – Crushed Olive, Tim Holtz Distress Ink – Mowed Lawn, Tim Holtz Distress Inks – Peeled Paint

Hope you like it and have a great week!

You can find more cards to inspire you at KLM Designs, KLM Digital Design Team and KLM Digital Designs on the Facebook Fan page from the rest of our design team.

Happy Easter to my Gnomies!


Today, I’m sharing a card that I made using Bunny Painter Gnome and Sentiments Digital Stamp (KLM Digital Designs)! This little Easter Gnome has all of his eggs painted up to give out for Easter. Do you still paint your eggs for Easter too?

To make the card, I printed out the image and sentiment with my HP printer using High Quality Grayscale onto Copic Marker X-Press It Blending Card. I coloured in the image and then fussy cut around it and the sentiment.

For the background, I cut out a piece of Strathmore Bristol paper 5.5″ x 4.25″.  Then with a stencil that I made using Avery Elle – Custom Steel Dies – Pierced Clouds Die, I created the sky using Tim Holtz Distress Ink – Salty Ocean. For the grass, I used a mixture of Tim Holtz Distress Ink Greens – Mowed Lawn, Peeled Paint, and Twisted Citron. Then I used some water and 1/4 round Sable brush and #1 Fine Liner to create the grass.

I used my Xyrons to create a sticker out of the coloured image and sentiment and then mounted the finished image onto a white card base of 5.5″ x 4.25″ using double-sided tape.

Card Recipe:

Stamp and Sentiment: Bunny Painter Gnome and Sentiments Digital Stamp (KLM Digital Designs)

Inks: HP Printer – Greyscale, Tim Holtz Distress Ink – Salty Ocean, Tim Holtz Distress Ink – Mowed Lawn, Tim Holtz Distress Inks – Peeled Paint, Tim Holtz Distress Ink – Twisted Citron

Paper: Copic Marker X-Press It Blending Card, Strathmore Bristol Paper

Die Cuts: Avery Elle – Custom Steel Dies – Made in the USA – D-05-01 PiercedCloudsDie

Tools: Xyron Create a Sticker, Xyron Creative Station

Image coloured with Copic Markers:

Skin: E21, E11, E04, E00, E000

Beard and Mustache: W5, W4, W3, W1, W0

Hat: YG45, YG41, G21

Pants: B26, B23, B21

Boots: E37, E35, E34, E33, W3, W2, W1, BG49, BG45, BG34

Paintbrush: E53, E51, E50, E37, E34, E33, C4, C2, C1, BG49, BG45, BG34

Eggs: B02, B01, B00, BG49, BG45, BG34, Y13, Y08, Y04, R83, R81, RV02

Background: B70, B01, B00, B000, B000, C0, Colorless Blender

Hope you like it and have a great week! Happy Easter Everybody!

You can find more cards to inspire you at KLM DesignsKLM Digital Design Team and KLM Digital Designs on the Facebook Fan page from the rest of our design team.

Wishing You the Sweetest Things!


Welcome Back Dreamerland Craft Fans!

Today, I’m sharing Dreamerland Craft Stamps Coordinating Die & Clear Stamp Package (D172906) for Character Stamp D172006 Love The Music From My Guitar and Love The Music From My Guitar – D172006! This little boy loves his guitar and all of the animals love his music.

To make his card, I stamped all of the images using my MISTI, Memento – Tuxedo Black ink and Copic Marker X-Press It Blending Card. I coloured in all of the images using Copic markers and then used my Cuttlebug and all of the die cuts from Coordinating Die & Clear Stamp Package (D172906) for Character Stamp D172006 Love The Music From My Guitar (Dreamerland Crafts Clear Stamps). I also die cut the sentiment at the same time and stamped it with Versa Fine – Onyx Black and then heat embossed it using Marvy Uchida – Embossing Heat Tool and Ranger – Clear Super Fine Detail embossing powder..

I was now ready to do the background. To achieve this I cut several die cuts using Monte Mart A4 Watercolour Book paper, Lawn Cuts – Simple Stitched Hillside Borders – Lawn Fawn and Your Next Stamp – Stitched Rectangle Die Set (YNSD214).

For the sky I used several Tim Holtz Blue inks in various shades listed below using a stencil that I had created from Avery Elle – Custom Steel Dies – Made in the USA – D-05-01 PiercedCloudsDie. For the grass I used various shades of Tim Holtz green inks – (see below).

I ran all of the die cuts and the back 2 layers of grass through Xyron Creative Station. Then I set them all aside.

I was now ready to assemble my card. I layered the first 2 die cuts onto the main die cut and then popped up the bottom grass cut with 3M VHB – 2 sided tape. I then added on the characters that I made stickers out of for easy assembly. I popped up the upper half of the little dog with 3M VHB – 2 sided tape. Once the scene was completed I mounted it onto 5.25″ x 4.25″ white cardstock.

Card Recipe:

Stamps and Sentiment: Coordinating Die & Clear Stamp Package (D172906) for Character Stamp D172006 Love The Music From My Guitar (Dreamerland Crafts Clear Stamps), Love The Music From My Guitar – D172006 (Dreamerland Crafts)

Inks: Memento – Tuxedo Black, Versa Fine – Onyx Black

Clouds: Tim Holtz Distress Ink – Blueprint Sketch, Tim Holtz Distress Ink – Salty Ocean, Tim Holtz Distress Inks – Broken China

Grass: Tim Holtz Distress Ink – Mowed Lawn, Tim Holtz Distress Ink – Bundled Sage, Tim Holtz Distress Ink – Twisted Citron, Tim Holtz Distress Inks – Peeled Paint

Embossing Powder: Ranger – Clear Super Fine Detail embossing powder

Paper: Copic Marker X-Press It Blending Card, Mont Mart A4 Watercolour Book paper – Acid Free – 190 GSM, Recollections – White Cardstock

Die Cuts:  Your Next Stamp – Stitched Rectangle Die Set (YNSD214), Coordinating Die & Clear Stamp Package (D172906) for Character Stamp D172006 Love The Music From My Guitar (Dreamerland Crafts Clear Stamps), Avery Elle – Custom Steel Dies – Made in the USA – D-05-01 PiercedCloudsDie

Tools: MISTI – Most Incredible Stamping Tool, Cuttlebug, 3M VHB – 2 sided tape, Marvy Uchida – Embossing Heat Tool

Image coloured with Copic Markers:

Skin: E000, E00, E04, E11, E21, R22, R20

Hair: E47, E44, E43

Shirt: BG49, BG45, BG34

Pants: B26, B23, B21

Guitar: E99, E97, E93, E51, E35, E33, E31, YR27

Bird: B04, B02, B00, Y38

Dog: E35, E34, E33, E31

Rabbit: C7, C5, C3, R30, R02

Cat: W9, W7, W5

Pig: E93,E04, R20, R00, R000, E44, E04

Background: B04, B02, B00

Hope you like it and have a great week!

You can find more cards to inspire you at Dreamerland Crafts on the Facebook Fan page from the rest of our design team.