Archive | January 2021

Thundering Rogue


Yo Ho Maties, today I’m sharing a Pirate card that I made using The Thundering Rogue – T053 (High Hopes Rubber Stamps) for the main image and Yo Ho – H179 (High Hopes Rubber Stamps) for the sentiment. This image is perfect for a little boy’s card.

To make my CAS card today, I used AC White cardstock cut at 12″ x 6″ and then scored at 6″ to create a base of 6″ x 6″. Using double-sided tape I attached the background using Scrapberry’s – The Pirate’s Treasure paper. I thought it went perfectly with this image.

I stamped both the image and sentiment using my Misti and Memento – Tuxedo Black ink onto Copic Marker X-Press It Blending Card. I coloured in the images using Copic Markers. Then I fussy cut around the main images and coloured in the interior with Copic markers B97, B95 and BG11 to match the colours of the background. Using My Creative Time – Ribbon End Dies and my Cuttlebug, I die cut the sentiment and then inked around the edges with Tim Holtz Distress Ink – Faded Jeans. I added some Copic Opaque White to the tops of the ocean waves to give it that frothy texture.

To complete my card, I used 3M VHB – 2 sided tape and popped up both the image and sentiment to complete the card.

Card Recipe:

Stamp:  The Thundering Rogue – T053 (High Hopes Rubber Stamps)

Sentiment Background: Yo Ho – H179 (High Hopes Rubber Stamps)

Inks: Memento – Tuxedo Black, Tim Holtz Distress Ink – Faded Jeans

Paper: Copic Marker X-Press It Blending Card, Scrapberry’s – The Pirate’s Treasure (6×6 Paper Collection), AC White Cardstock

Die Cuts: My Creative Time – Ribbon End Dies

Tools: MISTI – Most Incredible Stamping Tool, Cuttlebug, 3M VHB – 2 sided tape

Images coloured with Copic Markers:

Ship and Masts: E25, E23, E21, E18, E15, E13, E11, Y19, Y17, Y08

Sails: C9, C7, C5, C3, R39, R37, R35, E41, E40, Colorless Blender

Waves: BG05, B16, B12, Copic Opaque White

Sky: B97, B95, BG11

Hope you like it and have a fantastic week!

You can find lots of inspiration from the Design Team Divas at the High Hopes blog, and the High Hopes Rubber Stamps Facebook Fan page plus you can also follow us on
Instagram, Twitter and Pinterest.

Happiness


Hi Everyone! It’s the new year and it’s never too early to start making your Christmas cards. Today, I’m featuring a Christmas card from Dreamerland Crafts new Christmas release called Happiness Is Time Spent With A Good Friend – D20009.

To create this card, I first stamped my images using my MISTI and Memento – Tuxedo Black ink.  The images were coloured in with Copic markers. Then I fussy cut around them and went around the edges with a black marker and set them aside.

Next, I worked on the background. I cut Hammermill – Premium Colour 100 lb. to the size of 4.25″ x 5.5″. I created the sky using the Tim Holtz inks listed below and then added in some snow using Stamperi – Glamour Paste – Sparkling White and sprinkling on some Martha Stewart Crafts – Crystal Fine Glitter while it was still wet. I then set this aside to dry. Once the paste was dry, I stamped the sentiment using VersaMark ink. The sentiment was embossed with Ranger Embossing Powder White – Extra Fine Detail and Marvy Uchida – Embossing Heat Tool was used to heat set the embossing powder.

The bench was die cut using Joy Crafts – Floral Flourishes – 6002/0191, my Cutttlebug and Tim Holtz – Idea-ology – Christmas paper. Shadows were added in using T5 Copic Marker. I created a base card using Hammermill – Premium Colour 100 lb. to the size of 4.25″ x 5.5″. I added double-sided tape to the coloured background and adhered it directly to the base. Using double-sided tape, I added the bench to the background. I popped up the images on the bench using 3M VHB – 2 sided tape. The snow and stars were added in using a combination of Gelly Roll Sakura #8 Pen and Gelly Roll Sakura #10 Pen. Sequins was added from some mixed sparkles I had.

To finish off the card, I added in some Cosmic Shimmer – Fluffy Puff around the bottom of each of the legs of the bench and also onto the trim of the girl’s cape, kitten’s cape and pompom. Lastly, I added some Stickles – Diamond onto the snow and the girl’s cape for added texture.

Card Recipe:

Stamp and Sentiment:  Happiness Is Time Spent With A Good Friend – D20009 (Dreamerland Crafts)

Inks: Memento – Tuxedo Black, VersaMark, Tim Holtz Distress Ink: Black Soot, Blueprint Sketch, Chipped Sapphire, Salty Ocean, Salty Ocean

Paper: Copic Marker X-Press It Blending Card, Hammermill – Premium Colour 100 lb., Tim Holtz – Idea-ology – Christmas

Glitter \ Snow: Stamperi – Glamour Paste – Sparkling White, Stickles – Diamond, Cosmic Shimmer – Fluffy Puff

Die Cuts: Joy Crafts – Floral Flourishes – 6002/0191

Tools: MISTI – Most Incredible Stamping Tool, Marvy Uchida – Embossing Heat Tool, Gelly Roll Sakura #8 Pen, Gelly Roll Sakura #10 Pen, 3M VHB – 2 sided tape, Cuttlebug

Image coloured with Copic Markers:

Face: E21, E11, E04, E00, E000, R22, R20, Eyes – Sakura Glaze – Black, Gelly Roll Sakura #8 Pen

Hair: E47, E44, E43

Cape and Dresses:  BG72, BG57, BG34, BG11

Pants: T7, T5, T4, T3

Boots: E55, E50, E29, E27, E25, E23

Kitty: T7, T5, T3, R20, Sakura Glaze – Black, Gelly Roll Sakura #8 Pen

Hat and Antlers: C2, R39, R37, R35

Sky: Gelly Roll Sakura #10 Pen, Gelly Roll Sakura #8 Pen,

Hope you like it and have a great week!

You can find more cards to inspire you at Dreamerland Crafts and Pointer Scrapbooking on the Facebook Fan pages from the rest of our design team.

C’mon Baby Light My Fire!


It’s Wednesday, and this week, I used Walker Walter – TLF013 (High Hopes Rubber Stamps) and Walker Winnie – TLF012 (High Hopes Rubber Stamps) for the main images and Light My Fire – F154 (High Hopes Rubber Stamps) for the sentiment. I thought I would create a Senior’s Valentine’s card with these fun images. This could also be used for an Anniversary card too. After all, you’re never too old to be in love!!!

To make my card this week, I used Hammermill – Premium Colour 100 lb. for my base at 4.25″ x 5.5″. I taped down the card onto a glass mat and then used the stencils Flames – Honey Bee Stamps to create the background using various Tim Holtz Distress inks which I have listed below.

I stamped both the images and sentiment using my Misti and Memento – Tuxedo Black ink onto Copic Marker X-Press It Blending Card. I coloured in the images using Copic Markers. Then I fussy cut around both images and in between the walkers. The sentiment was also fussy cut and I cut into 2 pieces to fit my design better. I added 2-sided tape to the back of my sentiments and then attached them to a small piece of Martha Stewart Crafts – Enchanted Woodland paper. Ran this through my Xyron Create a Sticker and then fussy cut around the sentiment again. I found the white too bright when I added it to the card, so I used Copic Y11 to give it some colour.

For the main images, once coloured, I ran both of them through my Xyron Creative Station and adhered them directly to the base. I used my Cuttlebug to cut some hearts out of Martha Stewart Crafts – Enchanted Woodland paper using Sizzix Framelets – Hearts Dotted die. Then I ran them through my Xyron Create a Sticker to change them into stickers and placed them directly onto the base. For the few spots on the images that I didn’t fussy cut, I used Copic markers YR23, YR16 and YR15 to fill in the white spaces.

Card Recipe:

Stamp:  Walker Walter – TLF013 (High Hopes Rubber Stamps), Walker Winnie – TLF012 (High Hopes Rubber Stamps)

Sentiment Background: Light My Fire – F154 (High Hopes Rubber Stamps)

Inks: Memento – Tuxedo Black, Tim Holtz Distress Ink – Fossilized Amber, Tim Holtz Distress Ink – Barn Door, Tim Holtz Distress Ink – Fired Brick, Tim Holtz Distress Ink – Wild Honey, Tim Holtz Distress Ink – Carved Pumpkin

Paper: Copic Marker X-Press It Blending Card, Martha Stewart Crafts – Enchanted Woodland 12″ x 12″, Hammermill – Premium Colour 100 lb.

Die Cuts: Sizzix Framelets by Stephanie Barnard – 562676 – Hearts Dotted

Stencil: Flames – Honey Bee Stamps

Tools: MISTI – Most Incredible Stamping Tool, Cuttlebug, 3M VHB – 2 sided tape, Xyron Creative Station, Xyron Create a Sticker

Images coloured with Copic Markers:

Skin: E21, E11, E04, E00, E000, R22, R20

Hair: C5, C3, C1, Gelly Roll Sakura #8 Pen

Shirt, Dress, Earring, Lady’s Shoes, Horn: BG72, BG57, BG32, BG11, C3, C1

Pants: B26, B24, B21

Man’s Shoes: E27, E25, E23, E21, C3, C1

Blouse, Flowers and Socks: RV19, RV17, RV14, RV11, RV10, G09, G07, Y17, Y08

Tennis Balls: YG05, YG03, YG01

Walkers, Horns, Wheels and Grips: C9, C7, C5, C3, C1

Hope you like it and have a fantastic week!

You can find lots of inspiration from the Design Team Divas at the High Hopes blog, and the High Hopes Rubber Stamps Facebook Fan page plus you can also follow us on
Instagram, Twitter and Pinterest.

Grad Gnome!!


My nephew graduated and I couldn’t resist sharing this adorable little Graduation Gnome With Diploma from KLM Digital Designs that I made for him. The image comes with 3 different sentiments, “Congrats Grad!”, which I’ve used on my card and also, “Congratulations” and “Today is your day!”.

To make the card, I printed out the main image onto Copic Marker X-Press It Blending Card using my HP Printer. I used my Brother Scan and Cut to cut around the image and coloured it in with Copic markers.

I used Hammermill paper to create the base shape of the card 8.5″ x 4.25″. I scored the paper at 4.25″. Then I used a mixture of Tim Holtz inks to create the background. Once I was satisfied with the look, I used Hammerill paper, my Cuttlebug and Your Next Stamp – Confetti Panel Die and popped this die cut up over the coloured background using 3M VHB – 2 sided tape. The sentiment was die cut using MFT – Die-namics Pierced Fishtail Flags, inked around the edges with Tim Holtz Distress Ink – Barn Door and then popped up with 3M VHB – 2 sided tape.

The sentiment was popped up the same way to complete the card.

Card Recipe:

Stamp and Sentiment: Graduation Gnome With Diploma (KLM Digital Designs)

Inks: HP Printer Grayscale, Tim Holtz Distress Ink – Barn Door, Carved Pumpkin, Salty Ocean, Blueprint Sketch, Wild Honey, Festive Berries, Wilted Violet and Lucky Clover

Paper: Copic Marker X-Press It Blending Card, Hammermill – Premium Colour 100 lb.

Die Cut: Your Next Stamp – Confetti Panel Die – YNSD770, MFT – Die-namics Pierced Fishtail Flags

Tools: 3M VHB – 2 sided tape, Cuttlebug

Image coloured with Copic Markers:

Skin: E000, E00, E04, E11, E21

Beard: E49, E47, E44, E42

Hat, Shoes and Gown: C10, C8, C6, T10, T8, Black (100)

Diploma: E41, E40

Tassel: R59, R39, R37, R35

Hope you like it and have a great week!

You can find more cards to inspire you at KLM Designs, KLM Digital Design Team and KLM Digital Designs on the Facebook Fan page from the rest of our design team.

Hoppy Valentine’s Day


It’s Wednesday, and this week I’m sharing a Valentine’s Card featuring Bunny Love – S054 from (High Hopes Rubber Stamps) for the main image and Hoppy Valentines – F092 (High Hopes Rubber Stamps) for the sentiment. Love this adorable image and it can be used for so many different occasions, Valentine’s, which I’ve used here, Easter or even for an Anniversary card.

To create the card this week, I stamped the main image and sentiment onto Copic Marker X-Press It Blending Card using Memento – Tuxedo Black ink and my MISTI. I coloured in the main image with Copic Markers. Then I fussy cut around it. The sentiment was die cut using Whimsy Stamps – Quick Strips Die Set – WSD330.

To create the base I began with AC Cardstock – Christmas (6″ x 6″). Then I die cut K&Company – Kelly Panacci – KP Valentine – 30-599338 paper using My Creative Time -Stitched Squares Inside and Out. For the smaller heart, I used K&Company – Kelly Panacci – KP Valentine – 30-599345 paper and Sizzix Framelets by Stephanie Barnard – 562676 – Hearts Dotted dies. I also used the same dies to cut the larger heart using Recollections – Christmas Noel paper. I inked around all of the cut images with Tim Holtz Distress Ink – Aged Mahagony and also Tim Holtz Distress Ink – Barn Door.

To assemble the card, the large square was attached directly to the base using double side tape. All of the remaining layers were popped up using 3M VHB – 2 sided tape.

Card Recipe:

Stamp: Bunny Love – S054 from (High Hopes Rubber Stamps)

Sentiment: Hoppy Valentines – F092 (High Hopes Rubber Stamps)

Inks: Memento – Tuxedo Black, Tim Holtz Distress Ink – Barn Door, Tim Holtz Distress Ink – Aged Mahagony

Paper: Copic Marker X-Press It Blending Card, K&Company – Kelly Panacci – KP Valentine – 30-599345, K&Company – Kelly Panacci – KP Valentine – 30-599338, AC Cardstock – Christmas, Recollections –

Die Cuts: My Creative Time -Stitched Squares Inside and Out, Sizzix Framelets by Stephanie Barnard – 562676 – Hearts Dotted, Whimsy Stamps – Quick Strips Die Set – WSD330, Recollections – Christmas Noel

Tools and Miscellaneous: MISTI – Most Incredible Stamping Tool, Sakura Glaze – Black, 3M VHB – 2 sided tape

Image coloured with Copic Markers:

Bunnies: BV23, BV20, B60, E43, E42, E40, R85, R83, R81, Sakura Glaze – Black (Eyes)

Hope you like it and have a fantastic week!

You can find lots of inspiration from the Design Team Divas at the High Hopes blog, and the High Hopes Rubber Stamps Facebook Fan page plus you can also follow us on
Instagram, Twitter and Pinterest.

Thank Ewe!!


Hi Everyone! On December 11, 2020, I went in to have Laparoscopic Hysterectomy Surgery. The surgery went really well with no complications and I was home on the same day. I had a lot of rest over the past month, recovering, sleeping long hours and sleeping peacefully knowing that I no longer had to worry. I started back to work remotely last week. It was a long awaited surgery and I was extremely happy to have been lucky enough to have it during these Covid times, as many surgery’s were being cancelled. I had been dealing with Pre-Cancer off and on for the past 12 years beginning in my late 40’s, having multiple smaller operations and taking medication. My aunt had died in her 50’s because she didn’t seek help from a doctor until it was too late and my mother was also diagnosed with Uterine Cancer in her early 50’s as well. Thankfully, my mom was just in the early stages and had the operation in time and has had no issues since. It’s amazing how far technology and science have come. Not long ago, you would have spent a minimum of 2 weeks in the hospital and then another 5 – 6 weeks to recover at home.

As a thank you to the surgeons and nurses that took such good care of me before, during and after my surgery, I made them all cards to express my thanks. I thought I would share them with you and hope you like them too.

All of the cards used Hammermill 5.5″ x 4.25″ for the base. For the front of my cards, I made them all the same using Wooly Lambs (Craftin Desert Divas) retired stamp for the sentiment and main image. I coloured it in with Copic markers and then stamped the image again onto Post-It note to used as a mask. I layered the mask over top of the lamb and used my cloud stencil that I made from Avery Elle – PiercedCloudsDie and Tim Holtz Distress Ink – Salty Ocean to create the clouds. The embossed front was made using Cuttlebug – Thank You Embossing Folder.

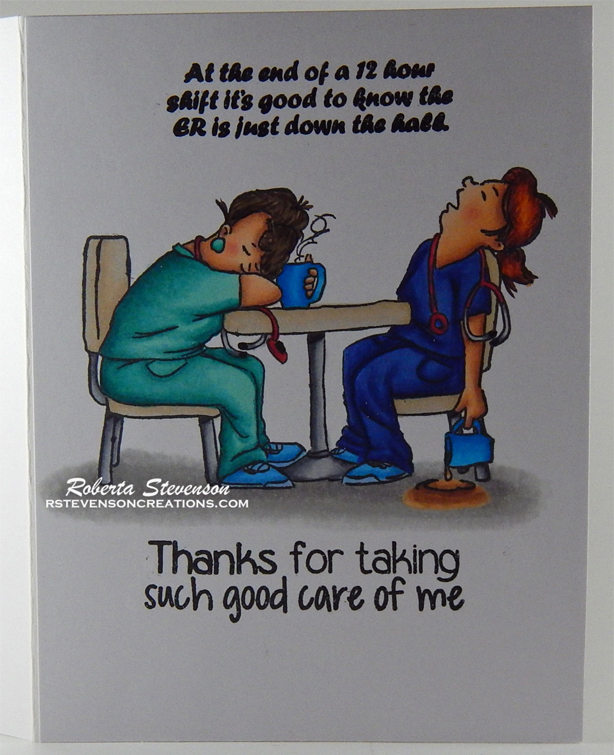
To make the inside of the nurses card, I used Proud Nurse Set – 4899 (Art Impressions) for the main image and top sentiment and Craftin Desert Divas – Tissue Time for the bottom sentiment. I coloured in the image with Copic markers.

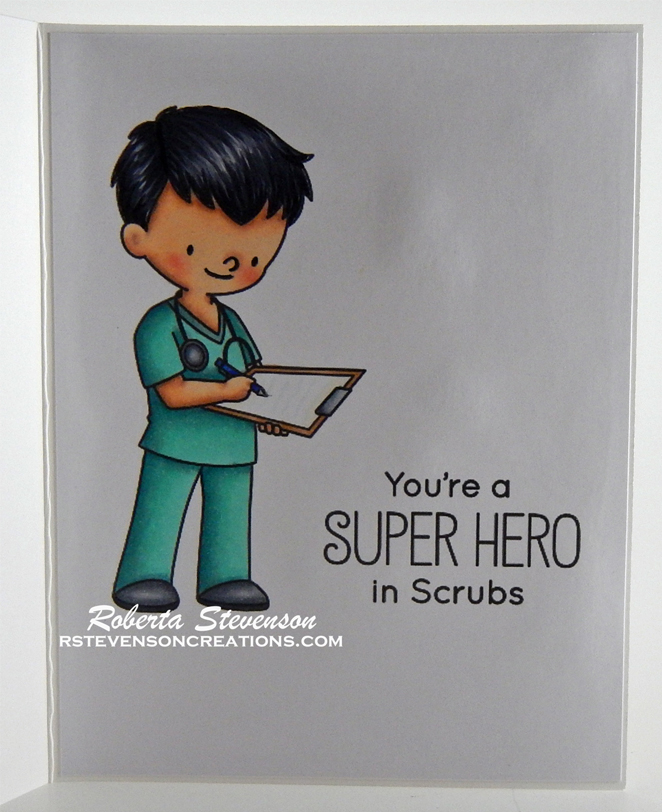
For the inside of the cards for the surgeons, I printed out the stamps from MFT_BB090_SuperHeroinScrubs_Printable (My Favourite Things) and MFT_BB091_DoctorsOrders_Printable (My Favourite Things) for the images and sentiments using High Quality Grayscale. Then coloured them in with Copic Markers.


Card Recipe:

Stamps: Wooly Lambs (Craftin Desert Divas), Proud Nurse Set – 4899 (Art Impressions), MFT_BB091_DoctorsOrders_Printable (My Favourite Things), MFT_BB090_SuperHeroinScrubs_Printable (My Favourite Things)

Sentiments: Proud Nurse Set – 4899 (Art Impressions), Wooly Lambs (Craftin Desert Divas), Craftin Desert Divas – Tissue Time, MFT_BB090_SuperHeroinScrubs_Printable (My Favourite Things)

Inks: HP Printer Grayscale, Tim Holtz Distress Ink – Salty Ocean, Versa Fine – Onyx Black

Paper: Copic Marker X-Press It Blending Card, Hammermill – Premium Colour 100 lb.

Die Cut: Avery Elle – Custom Steel Dies – Made in the USA – D-05-01 PiercedCloudsDie, My Creative Time – Rectangle Frame Die Layers – MCT-D274, MFT_BB091_DoctorsOrders_Printable (My Favourite Things)

Embossing Folder: Cuttlebug – Thank You

Tools: 3M VHB – 2 sided tape, Ranger – Clear Super Fine Detail embossing powder, Marvy Uchida – Embossing Heat Tool

Image coloured with Copic Markers:

Lamb: B60, C5, C3, C1, B05, B04, B00, T7, T5, T3, R22, R20, Colorless Blender, Gelly Roll Sakura #10 Pen

Bell: YR24, YR23, Y15, Y11

Bow: R89, R85, R83, R81

Fence: E25, E23, E21, Pental Sunburst Metalic Med Gel Pen

Greenery: YG17, YG13, YG03, YG01

Flowers: V04, BV01, Y17, Y15, Y13, B02

Skin: E000, E00, E04, E11, E22, R22, R20

Hair: E18, E08, YR18, YR14, E47, E44, E43

Hat and Outfits: B29, B26, B24, B23, BG49, BG15, BG13, BG11

Shoes: B41, B21, B14, B12

Table and Chairs: E42, E41, E40, C5, C3, C1

Coffee Mugs and Coffee: B06, B05, B04, B02, E25, E23, E21

Stethescopes: R39, R37, R24, 100 – Black, C3, C1

Shadow: T3, T2, T1

Doctors:

Hair: E49, E47, E44, E43, 100, C7, C5

Scrubs: BG72, BG57, BG32, BG11

Coat: B60, C1, C00, Colorless Blender

Stethascope and Shoes: T5, C7, C5, C3, C1

Pen: B28, B26, Pental Sunburst Metalic Med Gel Pen

Clipboard: C5, C3, C1, E34, E33, YR30, B0000, Colorless Blender

Hope you like it and have a great week!

Happy Birthday Flower Frame


Today, I’m sharing Floral Window 1 from KLM Digital Designs January Release. The image comes with 3 different sentiments, “You’re so Sweet”, “You’re the Best” and “Happy Birthday”. I really love how the frame comes with this image. It makes it so easy to create cards for multiple occasions and the design makes it so easy to make a quick card for someone special.

To make the card, I printed out the image onto Copic Marker X-Press It Blending Card using my HP Printer. I coloured in the image with Copic markers and then I used my Brother Scan ‘N Cut to cut around the image. A black marker was used to go around all of the edges of the flower and outer leaf. The image frame was coloured in with Sharpie – Gold Medium Point – Water Based Paint.

For the base card, Hammermill – Premium Colour 100 lb. was folded to the size of 5.5″ x 5.5″. I cut Heartfelt Creations – Winter’s Eve Collection paper to the same size as the base card. I inked around the edges with Sharpie – Gold Medium Point – Water Based Paint and adhered it directly to the base using double-sided tape. Hot Buy Craft Smart – Holiday Glitz Glitter Paper was die cut with my Cuttlebug and My Creative Time -Stitched Squares Inside and Out and attached with double-sided tape. The main image was popped up using 3M VHB – 2 sided tape. A little bit of Stickles – Yellow was added to the centre of the flower and some dots were added to finish off the card.

Card Recipe:

Stamp and Sentiment: Floral Window 1 (KLM Digital Designs)

Inks: HP Printer Grayscale

Paper: Copic Marker X-Press It Blending Card, Hammermill – Premium Colour 100 lb., Hot Buy Craft Smart – Holiday Glitz Glitter Paper 12″ x 12″, Heartfelt Creations – Winter’s Eve Collection – HCDP1-281

Die Cuts: My Creative Time -Stitched Squares Inside and Out

Tools: Brother Scan ‘N Cut, Stickles – Yellow, Cuttlebug, 3M VHB – 2 sided tape

Image coloured with Copic Markers:

Flower: R89, R85, R83, R81, Y17, Y15, Y08, R23

Leaves: YG17, YG13, YG03, YG01

Gold Frame: Sharpie – Gold Medium Point – Water Based Paint

Hope you like it and have a great week!

You can find more cards to inspire you at KLM Designs, KLM Digital Design Team and KLM Digital Designs on the Facebook Fan page from the rest of our design team.

P.S. I Love You!!


Today, I’m sharing Loving Rat from KLM Digital Designs December Release. The image comes with 3 different sentiments, “Love You Most”, “Everything is Better with You” and “P.S. I Love You”. I was born in the Year of the Rat, so this image is extra special to me. Who couldn’t love that adorable face? LOL!

To make the card, I printed out the image onto Copic Marker X-Press It Blending Card using my HP Printer. I coloured in the image with Copic markers and then I used my Brother Scan N’ Cut to cut around it, leaving a small white border. After it was coloured, I used a Gelly Roll Sakura #8 Pen to trace over the sentiment and add a sparkle to the eyes. I felt the finished image still needed something to make it pop on the background, so I ran the image through my Xyron Creative Station and adhered it to some Recollections Black cardstock. Then I fussy cut around the image again.

To create the card, I began with a base card of 4.25″ x 5.5″ using Hammermill – Premium Colour 100 lb. paper. I cut K&Company – Kelly Panacci – KP Valentine – 30-599345 to the same size as the base and adhered it to the base using double-sided tape. I cut the top row of hearts from the same paper, added some glue to the back of it and placed it on the top of the card so that it matched the bottom pattern. Then I inked around all of the edges with Tim Holtz Distress Ink – Barn Door. I popped up the image onto the card using 3M VHB – 2 sided tape. I die cut some hearts using Sizzix Framelets by Stephanie Barnard – 562676 – Hearts Dotted, my Cuttlebug and Martha Stewart Crafts – Enchanted Woodland 12″ x 12″ paper. I really love the glitter of this paper. Lastly, I added the hearts with some glue to complete the card.

Card Recipe:

Stamp and Sentiment: Loving Rat (KLM Digital Designs)

Inks: HP Printer Grayscale, Tim Holtz Distress Ink – Barn Door

Paper: Copic Marker X-Press It Blending Card, Hammermill – Premium Colour 100 lb., Martha Stewart Crafts – Enchanted Woodland 12″ x 12″, K&Company – Kelly Panacci – KP Valentine – 30-599345, Recollections – Black cardstock

Die Cuts: Sizzix Framelets by Stephanie Barnard – 562676 – Hearts Dotted

Tools: Gelly Roll Sakura #8 Pen, 3M VHB – 2 sided tape, Cuttlebug, Brother Scan ‘N Cut

Image coloured with Copic Markers:

Rat: W3, W2, W1, W0, R30, R12, R11, R02, R01, R000, E23, PrismaColor Premier Pencils – 70% Warm Grey PC1056, 50% Warm Grey PC1054, 30% Warm Grey PC1052, 20% Warm Grey PC1051, 10% Warm Grey PC1050, Beige Sienna PC1080, Light Umber PC941

Eyes: YG17, YG13, YG03, C9, C1, Gelly Roll Sakura #8 Pen

Hearts: C2, R39, R37, R35

Hope you like it and have a great week!

You can find more cards to inspire you at KLM Designs, KLM Digital Design Team and KLM Digital Designs on the Facebook Fan page from the rest of our design team.

Congrats Grad!!!


It’s Wednesday, and this week I’m sharing a Graduation Card featuring Grad Boy – R114 from (High Hopes Rubber Stamps) for the main image and Lg. Fancy Congrats – J006 (High Hopes Rubber Stamps) for the sentiment. My nephew graduated a while ago, but we just found out about it. So this is a belated graduation card. LOL! You know what they say, better late than never!!


To create the card this week, I stamped the main image and sentiment onto Copic Marker X-Press It Blending Card cut at 5.25″ x 4″ using my MISTI and Memento – Tuxedo Black ink. Then I used just the hat and stamped it at different angles to create my background. The images were coloured in with Copic Markers. I decided to pop one hat up in the air. I stamped it separately, fussy cut the image and then coloured it in and popped it up using 3M VHB – 2 sided tape.

To finish off the card, I used double-sided tape and attached the coloured image onto 5.5″ x 4.25″ cardstock from The Paper Studio – Christmas Box of Cards.

Card Recipe:

Stamp: Grad Boy – R114 (High Hopes Rubber Stamps)

Sentiment: Lg. Fancy Congrats – J006 (High Hopes Rubber Stamps)

Inks: Memento – Tuxedo Black

Paper: Copic Marker X-Press It Blending Card, The Paper Studio – Christmas Box of Cards 2012

Tools and Miscellaneous: MISTI – Most Incredible Stamping Tool, Sakura Glaze – Black, 3M VHB – 2 sided tape

Image coloured with Copic Markers:

Skin and Mouth: E21, E11, E04, E00, E000, R89, R85, R83, R29, Sakura Glaze – Black (Eyes)

Hair: C10, C7, C5

Gown: N10, N6, N5, N4

Hats: 100, N10, N8, N6, R39, R29

Shirt, Tie and Socks: B39, B37, B18, C1, C00

Pants: T5, T3, T2

Shoes: C5, C3, C1, 100

Diploma: B60, C1, Colorless Blender

Hope you like it and have a fantastic week!

You can find lots of inspiration from the Design Team Divas at the High Hopes blog, and the High Hopes Rubber Stamps Facebook Fan page plus you can also follow us on
Instagram, Twitter and Pinterest.

Grad Nurse!!


My niece graduated last year to become a Registered Nurse. We are so proud of her. She has joined several of my cousins in this profession who are also Nurses and Nurse Practitioners. I made her this card to congratulate her using Cute Nurses from The Paper Shelter and Proud Nurse Set – 4899 (Art Impressions)

I stamped the image of the nurse on the right and inside of the card onto Copic Marker X-Press It Blending Card using my MISTI and Memento Tuxedo Black Ink. For the nurse on the left, I printed the image out on my printer using High Quality Grayscale.  I coloured in the images with Copic markers and then fussy cut around them. I wanted the images on the front of the card to pop, so I ran them through my Xyron Creative Station and attached them to black cardstock. Then I fussy cut around them again. I stamped the sentiment on the inside of the card using Versa Fine – Onyx Black. This was embossed using Ranger – Clear Super Fine Detail embossing powder and my Marvy Uchida – Embossing Heat Tool. The sentiment on the front was printed on my printer, using digital stamp from Graduation Gnome With Diploma (KLM Digital Designs). Then it was die cut using Die-Namics MFT-489 PCD Fishtail Figs STX.

For the inside of the card, I couldn’t resist using this fun image from Proud Nurse Set – 4899 (Art Impressions), because I know especially today, nurses are working really long hours. My niece said the sentiment and was so true when she received her card. LOL! We have to give all of the front-line workers credit for all of the hard work they are doing during these Covid times.

I used Hammermill paper to create the base shape of the card 5.5″ x 4.25″. I cut the background paper from Polkadoodles – Winnie Celebrations 1 – Top Banana Kit to the same size and inked around the edges using Tim Holtz Distress Inks – Peacock Feathers. For the sentiment on the front, I inked around the edges using Tim Holtz Distress Ink – Blueprint Sketch. I popped up images and sentiment with 3M VHB – 2 sided tape. On the inside of the card, I ran the coloured image through my Xyron Creative Station and attached it.

Card Recipe:

Stamps: Cute Nurses (The Paper Shelter), Proud Nurse Set – 4899 (Art Impressions)

Sentiments: Proud Nurse Set – 4899 (Art Impressions), Graduation Gnome With Diploma (KLM Digital Designs)

Inks: Memento – Tuxedo Black, Versa Fine – Onyx Black, Tim Holtz Distress Ink – Blueprint Sketch, Tim Holtz Distress Inks – Peacock Feathers. HP Printer High Quality Grayscale

Paper: Copic Marker X-Press It Blending Card, Hammermill – Premium Colour 100 lb., Polkadoodles – Winnie Celebrations 1 – Top Banana Kit

Embossing Powder: Ranger – Clear Super Fine Detail embossing powder

Die Cut: Die-Namics MFT-489 PCD Fishtail Figs STX

Tools: 3M VHB – 2 sided tape, Xyron Creative Station, Marvy Uchida – Embossing Heat Tool

Image coloured with Copic Markers:

Skin: E000, E00, E04, E11, E22, R22, R20

Hair: E18, E08, YR18, YR14, E47, E44, E43

Eyes: B05, B02, B01

Hat and Outfits: B29, B28, B26, B24, B23, BG49, BG15, BG13, BG11

Cross on Hat: R39, R37, R35

Shoes: B41, B21, B14, B12

Tray and Items: BG34, BG32, R89, R85, R83, R81, E44, E43, E42, E41, E51, E50, BV20

Table and Chairs: E42, E41, E40, C5, C3, C1

Coffee Mugs and Coffee: B05, B04, B02, E57, E55, E53

Stethoscopes: R39, R37, R25, 100 – Black, C3, C1

Shadow: T3, T2, T1


Hope you like it and have a great week!