It’s Wednesday, and this week, I made a Hallowe’en card using High Hopes Rubber Stamps By The Moonlight – TT047 for the image and Block Happy Halloween – FF049 for the sentiment. These little friends are ready for some spooky fun on Hallowe’en.
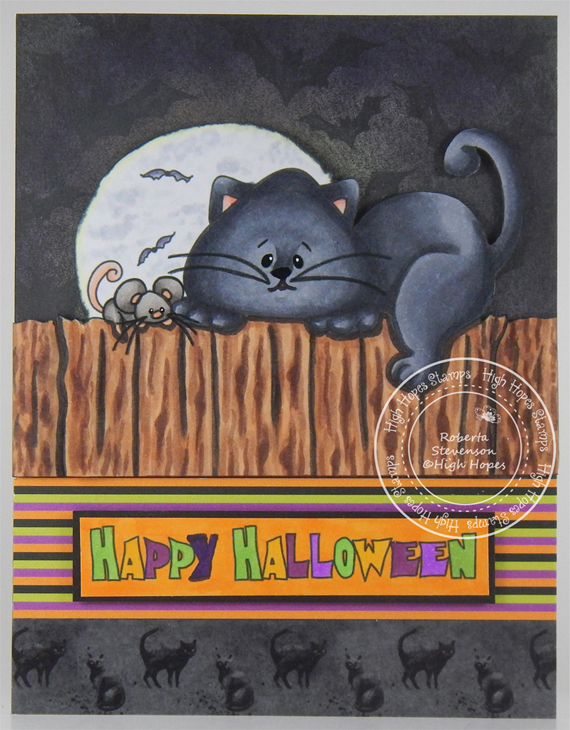
To make my card this week, I began with a card base of Hammermill – Premium Colour 100 lb., cut and scored to be 5.5″ x 4.25″. I die cut the background from Stampin’ UP! – Magic In This Night Designer Series Paper to be the same size as the base. Using a combination of Tim Holtz Distress Ink – Black Soot, Villainous Potion, Seedless Preserves and Fossilized Amber and finger daubers, I added some extra colour to the background. Martha Stewart – Hallowe’en Washi Tape was placed across the bottom. I cut Doodlebug Design Inc. – Hallowe’en Parade cardstock to the size of 1-1/8″ x 4.25″. I ran this through my Xyron Create a Sticker and adhered it to the base card above the washi tape.
I stamped the main image and sentiment onto Copic Marker X-Press It Blending Card cardstock using my MISTI and Memento – Tuxedo Black ink. The main image was a little short for the full width of the card so I added some double-sided tape to a couple scraps of Copic Marker X-Press It Blending Card cardstock and adhered them to both sides of the fence. The image and sentiment were then both coloured in. The image was fussy cut and U-Line double-sided tape was applied to it. I popped it up onto the card and then cut off the excess from the fence on both sides. I cut around the sentiment and then ran it through my Xyron Create a Sticker and applied it to a piece of Recollections – Black cardstock. Once again, I used my cutter to go around the sentiment, leaving a slight border. U-Line double-sided tape was applied to the back of the sentiment and it was popped up onto the striped paper background to complete the card.
Card Recipe:
Stamps: By The Moonlight – TT047 (High Hopes Rubber Stamps)
Sentiment: Block Happy Halloween – FF049 (High Hopes Rubber Stamps)
Inks: Memento – Tuxedo Black, Tim Holtz Distress Ink – Black Soot, Villainous Potion, Seedless Preserves and Fossilized Amber
Paper: Copic Marker X-Press It Blending Card, Hammermill – Premium Colour 100 lb., Doodlebug Design Inc. – Hallowe’en Parade (6 in. x 6 in.), Recollections – Black cardstock, Stampin’ UP! – Magic In This Night Designer Series Paper (12″ x 12″)
Tools: MISTI – Most Incredible Stamping Tool, U-Line double-sided tape, Xyron Create a Sticker
Image coloured with Copic Markers:
Black Cat: C8, C6, C4, C3, BV17, R22, R30
Mouse: W5, W3, W1, R02, R00
Bats: BV25, BV23
Fence: E49, E27, E25, E23, E21
Moon: Y00, BV20, C1, C00, Colorless Blender
Sentiment: YR04, Y17, V09, V06, V04, YG23, YG05
Hope you like it and have a fantastic week!
Check out more adorable Fall images at High Hopes Rubber Stamps!
You can find lots of inspiration from the Design Team Divas at the High Hopes blog, and the High Hopes Rubber Stamps Facebook Fan page plus you can also follow us on
Instagram, Twitter and Pinterest.