Archive | April 2021

Surfing Gabriel!!


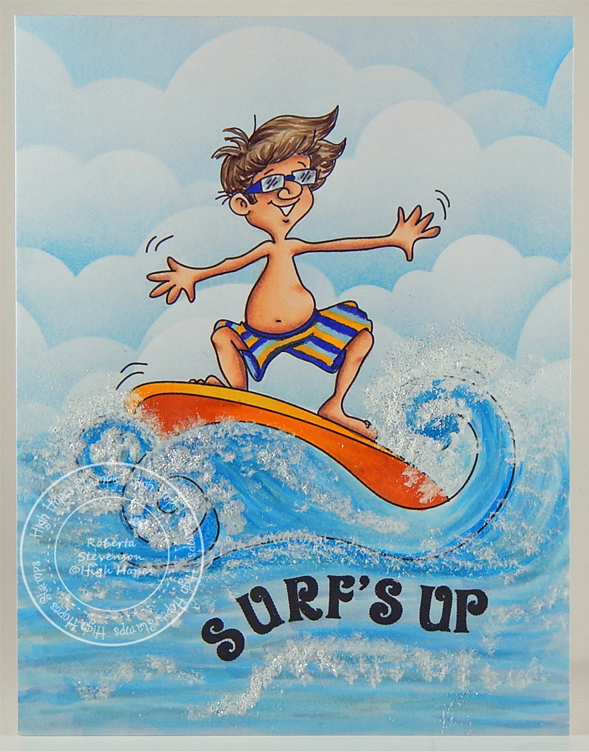
It’s Wednesday, and this week, I made a masculine card using Surfing Gabriel – TT516 by High Hopes Rubber Stamps for the main image and No Waves – FR011 (High Hopes Rubber Stamps) for the sentiment. Gabriel is enjoying the waves and the bright skies. I can’t wait for the weather to warm up here so that I can start swimming again too!

To make my card this week, I die cut a square from Copic Marker X-Press It Blending Card using My Creative Time -Stitched Squares Inside and Out. A larger square was cut using Waffle Flower – Nesting Square dies and spare blue cardstock. The image and sentiment were both stamped using my MISTI and Memento – Tuxedo Black ink. I coloured in the image with Copic markers. Then, I created a mask and put it over top of the coloured image and added in my clouds using various Tim Holtz inks listed below and Avery Elle – Pierced Clouds Die (Used to create stencils). To create the spray on the waves, I mixed a little bit of FolkArt – Extreme Glitter Acrylic Paint and Delta Ceramcoat – White paint and applied it to the coloured image using a 1/4″ H.J. Domed Dry Stipple brush. For a little extra sparkle, I added some DecoArt Glamour Dust while the paint was still wet.

Brother Scan and Cut was used to die-cut around the sentiment. Edges were inked with Tim Holtz Distress Ink – Blueprint Sketch. A second circle was die cut using Lifestyle Crafts Cutting Dies – Nesting Circles out of aqua cardstock and inked with Tim Holtz Distress Inks – Peacock Feathers.

To assemble the card, I used Recollections – Winter 4.25″ x 5.5 for the base. Tim Holtz Distress Ink – Salty Ocean was used to ink around the edges of the card. The coloured image was glued to the larger square and the sentiment was glued to the larger circle. 3M VHB – 2 sided tape was attached to the backs of the larger circle and square and attached to the base card. To finish it off, YNS Gumdrops were added.

Card Recipe:

Stamp: Surfing Gabriel – TT516 (High Hopes Rubber Stamps)

Sentiment: No Waves – FR011 (High Hopes Rubber Stamps)

Inks: Memento – Tuxedo Black, Tim Holtz Distress Ink – Salty Ocean, Tim Holtz Distress Inks – Tumbled Glass, Tim Holtz Ranger Distress Ink – Broken China, Tim Holtz Distress Ink – Blueprint Sketch, Tim Holtz Distress Inks – Peacock Feathers

Paper: Copic Marker X-Press It Blending Card, Recollections – Winter 4.25″ x 5.5 (Assorted Box of Cards), Aqua cardstock, Blue cardstock

Die Cuts: My Creative Time -Stitched Squares Inside and Out, Waffle Flower – Nesting Square dies, Lifestyle Crafts Cutting Dies – Nesting Circles

Stencil: Avery Elle – Custom Steel Dies – Made in the USA – D-05-01 PiercedCloudsDie (Used to create stencils)

Tools: MISTI – Most Incredible Stamping Tool, Picket Fence – Blending Brush, 1/4″ H.J. Domed Dry Stipple, YNS Gumdrops, 3M VHB – 2 sided tape

Image coloured with Copic Markers:

Skin: E21, E11, E04, E00, E000, R30, R20 (Eyes: Sakura Glaze – Black, Gelly Roll Sakura #8 Pen)

Hair: E47, E44, E43, E40

Swim Trunks: B79, B69, B66, YG03, YG01

Surf Board: Y38, Y17, Y15, YR18, YR16, BG57, BG32, BG11

Water: BG70, B93, B91, B52, B41, B06, B02, B01, B000

Water Droplets: B06, B02, B00

Sentiment: B000

Foamy Water: FolkArt – Extreme Glitter Acrylic Paint, Delta Ceramcoat – White, DecoArt Glamour Dust

Check out some other fun new stamps from the vault for Boys and Men here:
THE VAULT IS OPEN! MEN & BOYS RELEASE Archives – High Hopes Rubber Stamps (highhopesstamps.com)

Hope you like it and have a fantastic week!

You can find lots of inspiration from the Design Team Divas at the High Hopes blog, and the High Hopes Rubber Stamps Facebook Fan page plus you can also follow us on
Instagram, Twitter and Pinterest.

Gardening Gnome!!


Sharing a card I made today using KLM Digital Designs new April Release called Tulip Planter Gnome. He loves gardening and so does my husband. My husband has a real green thumb and always makes our garden and flowers look amazing! Unfortunately, I’ve never been very good with plants. I think they shrivel in fear when they see me coming!!! LOL!

To make the card, I first imported the image into Microsoft Word and printed it out onto Copic Marker X-Press It Blending Card using my HP Printer. I coloured in the image with Copic markers.

For the base card, Hammermill – Premium Colour 100 lb. paper was used at the size of 5.5″ x 4.25″. I used Leane Creatif BV – Art.nr.35.0225 embossing folder and AC Autumn cardstock for the base background. After I embossed the paper, I used a very light sandpaper to sand off the raised elements. I cut 2 ovals using some spare cardstock using Hero Arts – Infinity Die Ovals. The outside of the smaller oval and card were inked with Tim Holtz Distress Ink – Mowed Lawn and Tim Holtz Distress Ink – Forest Moss. I cut out the sentiment with my small cutter and then mounted it on top of some dark brown cardstock. Using my cutter, I created the small border. I die cut the little garden trowel with Marianne Designs Collectibles – COL1346 using silver and brown paper scraps.

To assemble the card, I mounted the embossed background directly to the base using 2-sided tape. The larger oval was glued on. The smaller oval, coloured image, and sentiment were all applied using 3M VHB – 2 sided tape. Lastly, to finish off the card, I glued on the trowel and added a few YNS Gumdrops.

Card Recipe:

Stamp: Tulip Planter Gnome – KLM Digital Designs

Inks: HP Printer Grayscale, Tim Holtz Distress Ink – Mowed Lawn, Tim Holtz Distress Ink – Forest Moss

Paper: Copic Marker X-Press It Blending Card, Hammermill – Premium Colour 100 lb., AC Autumn cardstock

Die Cuts: Marianne Designs Collectibles – COL1346, Hero Arts – Infinity Die Ovals

Stencil: Leane Creatif BV – Art.nr.35.0225

Miscellaneous: YNS Gumdrops, 3M VHB – 2 sided tape

Image coloured with Copic Markers:

Skin: E21, E11, E04, E00, E000

Beard: W5, W4, W3, W1, W0

Shirt: E89, E87, E84

Pants: B26, B23, B21

Hat: R59, R37, R35

Apron: E47, E44, E43, E42

Boots: E27, E25, E23, E21

Gloves : E34, E33, E31

Flower Pot, Stems, Leaves and Flowers: E99, E97, E08, G17, G14, G07, YG17, YG13, YG11, R17, R02, Y17

Garden Trowel: E25, E23, C5, C3

Seed Pkg.: Y19, Y17, R17, R14, R02, Y06

Hope you like it and have a great week!

You can find more cards to inspire you at KLM Designs, KLM Digital Design Team and KLM Digital Designs on the Facebook Fan page from the rest of our design team.

Fisherman Gnome!!


Sharing a card I made today using KLM Digital Designs new April Release called Fisherman Gnome. The image comes with 3 sentiments, 2 I’ve used on my card and the 3rd is, “Reel cool Dad”. This image and sentiments are fantastic for all of the Fishermen dads out there. A lot of the men in our family love to fish and do it year round.

To make the card, I first imported the image into Microsoft Word and printed it out onto Copic Marker X-Press It Blending Card using my HP Printer. I coloured in the image with Copic markers.

For the base card, The Paper Studio – Primary Simply Solids (4.25″ x 5.5″) was used. After the image was coloured, double-sided tape was used to adhere to the base.

Card Recipe:

Stamp: Fisherman Gnome – KLM Digital Designs

Inks: HP Printer Grayscale

Paper: Copic Marker X-Press It Blending Card, The Paper Studio – Primary Simply Solids (4.25″ x 5.5″)

Image coloured with Copic Markers:

Skin: E21, E11, E04, E00, E000

Beard: W5, W4, W3, W1, W0

Shirt: E57, E55, E53

Pants: B26, B23, B21

Hat and Vest: E89, E87, E84

Boots: E27, E25, E23, E21

Rock: N8, N6, N4, N2

Fish: YR61, YR02, YR00, R02, W3, W2, W1, Y35, E93

Fishing Rod: E37, E35, E33

Hope you like it and have a great week!

You can find more cards to inspire you at KLM Designs, KLM Digital Design Team and KLM Digital Designs on the Facebook Fan page from the rest of our design team.

Fishing Gnomes!!


Sharing a birthday card that I made recently for my dad using Stampendous – Gnome Fishing (SSC1341). My dad lives to fish and loves to go whenever possible. Lucky for him, the fisheries usually stock the lake where his camp is. It’s in a secluded spot, so the fish have time to mature and grow.

Using Memento – Tuxedo Black and my MISTI – Most Incredible Stamping Tool, I stamped all of the images onto Copic Marker X-Press It Blending Card. The images were coloured in with Copic markers.

Once the images were completed, My Creative Time – Rectangle Frame Dies and My Creative Time – Rectangle Frame Die Layers were used to die cut the papers. Double-sided tape was used to add the 2 layers to the base of the card.

Card Recipe:

Stamp: Stampendous – Gnome Fishing (SSC1341)

Inks: Memento – Tuxedo Black

Paper: Copic Marker X-Press It Blending Card, Recollections – Black, The Paper Studio – Primary Simply Solids (4.25″ x 5.5″)

Die Cuts: My Creative Time – Rectangle Frame Dies, My Creative Time – Rectangle Frame Die Layers – MCT-D274

Miscellaneous: MISTI – Most Incredible Stamping Tool

Image coloured with Copic Markers:

Skin: E53, E51, E50, R30, R20

Beards: W5, W4, W3, W1

Shirts: YG17, YG13, YG03, B04, B02

Pants: B26, B23, B21

Hats and Boat: R39, R37, R35

Boots: E27, E25, E23, E21

Fish: R83, R81, BG000, C0, G000, YG03, B000

Sand: E37, E35, E33, E31

Trees: YG17, YG13, YG03, YG01, G19, G17, G09, G05, BG99, BG96, BG93

Water: BG72, BG70, B93, B91, B52, B41, B06, B000, C0

Sky, Sun and Mountains: BV25, BV23, Y04, B04, B02, B01, B00

Hope you like it and have a great week!

Surfer Bob!!


It’s Wednesday, and this week, I made a masculine card using Surfer Bob – TT519 by High Hopes Rubber Stamps for the main image and Surf’s Up – FR009 (High Hopes Rubber Stamps) for the sentiment. Wild and crazy Bob has awesome balance on his surf board. We had the opportunity to see surfers in Hawaii riding the waves on one of our trips. It was amazing!!! I’ve never tried surfing before, but I would sure love to. It’s definitely on my bucket list. LOL!

To make my card this week, I used Hammermill – Premium Colour 100 lb. paper folded to 4.25″ x 5.5″ for the base. I cut Copic Marker X-Press It Blending Card to the same size as the base and stamped the image and sentiment using my MISTI and Memento – Tuxedo Black ink. I coloured in the image with Copic markers and created my own background.

To create the background, I first created a mask of Surfer Bob using Post-It Note paper and fussy cut around the image. Then I put it over top of the coloured image. Using a Picket Fence – Blending Brush and Lawn Fawn – Cloudy Stencil, I began the top of the sky with Tim Holtz Distress Ink – Salty Ocean. I did this for 2 rows and then switched to Tim Holtz Distress Inks – Tumbled Glass, followed by Tim Holtz Ranger Distress Ink – Broken China. The mask was removed and the water was created by just adding a mixture of strokes with the Copic colours listed below.

I added double-sided tape to the coloured image and attached it to the base. Then, I mixed a little bit of FolkArt – Extreme Glitter Acrylic Paint and Delta Ceramcoat – White paint. Using a 1/4″ H.J. Domed Dry Stipple brush, I created the water spray for the waves. For a little extra sparkle, I added some DecoArt Glamour Dust while the paint was still wet.

Card Recipe:

Stamp: Surfer Bob – TT519 (High Hopes Rubber Stamps)

Sentiment: Surf’s Up – FR009 (High Hopes Rubber Stamps)

Inks: Memento – Tuxedo Black, Tim Holtz Distress Ink – Salty Ocean, Tim Holtz Distress Inks – Tumbled Glass, Tim Holtz Ranger Distress Ink – Broken China

Paper: Copic Marker X-Press It Blending Card, Hammermill – Premium Colour 100 lb.

Stencil: Lawn Fawn – Cloudy Stencil

Tools: MISTI – Most Incredible Stamping Tool, Picket Fence – Blending Brush, 1/4″ H.J. Domed Dry Stipple

Image coloured with Copic Markers:

Skin: E21, E11, E04, E00, E000, R30, R20

Hair: E47, E44, E43, E40

Swim Trunks: B69, B52, Y17, C01 for shading

Surf Board: Y17, Y15, YR18, YR16, YR14

Water: BG72, BG70, B93, B91, B52, B41, B06, B02, B01, B000, C0

Foamy Water: FolkArt – Extreme Glitter Acrylic Paint, Delta Ceramcoat – White, DecoArt Glamour Dust

Check out some other fun new stamps from the vault for Boys and Men here:
THE VAULT IS OPEN! MEN & BOYS RELEASE Archives – High Hopes Rubber Stamps (highhopesstamps.com)

Hope you like it and have a fantastic week!

You can find lots of inspiration from the Design Team Divas at the High Hopes blog, and the High Hopes Rubber Stamps Facebook Fan page plus you can also follow us on
Instagram, Twitter and Pinterest.

Snoozing Gnome!!


Sharing a card I made today using KLM Digital Designs new April Release called Snoozing Gnome. This little gnome is relaxing and enjoying the day. The image also comes with 2 other sayings, “pause and Reset” and “just Breathe”.

To make the card, I first imported the image into Microsoft Word and printed it out onto Copic Marker X-Press It Blending Card using my HP Printer. I coloured in the image with Copic markers.

For the base card, Hammermill – Premium Colour 100 lb. paper was used at the size of 5.5″ x 4.25″. I created the cloud background using Tim Holtz Distress Ink – Salty Ocean, Broken China and Tumbled Glass and Lawn Fawn Cuts – Cloudy Stencil.

Card Recipe:

Stamp: Snoozing Gnome – KLM Digital Designs

Inks: HP Printer Grayscale, Tim Holtz Distress Ink – Salty Ocean, Tim Holtz Distress Inks – Broken China, Tim Holtz Distress Inks – Tumbled Glass

Paper: Copic Marker X-Press It Blending Card, Hammermill – Premium Colour 100 lb.

Die Cuts Stencils: Lawn Fawn Cuts – Cloudy Stencil

Image coloured with Copic Markers:

Skin: E21, E11, E04, E00, E000

Beard: E49, E47, E44, E42

Shirt: BG72, BG57, BG32, BG11

Pants: B26, B23, B21

Hat: R59, R37, R35

Boots: E27, E25, E23, E21

Mushroom: R46, R14, R08, E43, E42, E40, C1, C00, Colorless Blender

Grass: YG17, YG13, YG03, YG01

Hope you like it and have a great week!

You can find more cards to inspire you at KLM Designs, KLM Digital Design Team and KLM Digital Designs on the Facebook Fan page from the rest of our design team.

Soccer Fun!!


It’s Wednesday, and this week, I made a masculine card using Soccer Gabriel – SS525 by High Hopes Rubber Stamps for the main image and Awesome & Wonderful – FR001 (High Hopes Rubber Stamps) for the sentiment. Soccer has become a really big sport in North America over the last while. In Europe, they call it “Football”! We have 6 soccer fields at the end of our street in the park and before Covid, the fields were packed with both young and old from morning till night with teams competing. It looks like Gabriel is saving the day for his team today! LOL!

To make my card this week, I used Hammermill – Premium Colour 100 lb. paper folded to 4.25″ x 5.5″ for the base. I cut Copic Marker X-Press It Blending Card to 4-1/8″ x 5-3/8″ and stamped the image and sentiment using my MISTI and Memento – Tuxedo Black ink. I coloured in the image with Copic markers and created my own background.

To create the background it was fairly easy. After stamping the main image, I drew in the net using a lead pencil and ruler for the main frame and the goal line. Once I was satisfied with the look, I erased the harsh lines so that they were barely visible. I used a combination of green Copic markers and just made small circles everywhere to give the lawn some texture. I also used the chisel edge nib to cover more of the background easier. For the trees, again I used another combination of greens. I based the entire tree line with YG91 and then just drew a bunch of squiggly lines to create round and triangular shapes using the various markers listed below to give the effect of a forest. Lastly, I took a Gelly Roll Sakura #5 Pen and using a ruler made vertical and horizontal lines to create the netting.

To assemble the card, I applied some Tombow Multi Mono Liquid glue to the back of the coloured image and applied it to the base. I stamped out the sentiment and inked around the edges first with Tim Holtz Distress Ink – Mowed Lawn and then a black marker to make the outer lines crisp.

Card Recipe:

Stamp: Soccer Gabriel – SS525 (High Hopes Rubber Stamps)

Sentiment: Awesome & Wonderful – FR001 (High Hopes Rubber Stamps)

Inks: Memento – Tuxedo Black, Tim Holtz Distress Ink – Mowed Lawn

Paper: Copic Marker X-Press It Blending Card, Hammermill – Premium Colour 100 lb.

Tools: MISTI – Most Incredible Stamping Tool, Tombow – Multi Mono Liquid Glue

Image coloured with Copic Markers:

Skin: E21, E11, E04, E00, E000, R24, R20, Eyes (Sakura Glaze – Black, Gelly Roll Sakura #5 Pen)

Hair: E47, E44, E43, E40

Shirt, Socks and Shoes: B18, B16, B14, B12, B04, B02, C3, C1, C0, C00, Colorless Blender

Shorts: C9, C8, C5, B04, B02

Soccer Ball: C9, C1, C0, C00

Goal Post and Goal Line: C1, C00, Colorless Blender

Grass: YG17, YG13, YG11, YG03

Trees: G99, G94, G85, YG97, YG91, YG63

Check out some other fun new stamps from the vault for Boys and Men here:
THE VAULT IS OPEN! MEN & BOYS RELEASE Archives – High Hopes Rubber Stamps (highhopesstamps.com)

Hope you like it and have a fantastic week!

You can find lots of inspiration from the Design Team Divas at the High Hopes blog, and the High Hopes Rubber Stamps Facebook Fan page plus you can also follow us on
Instagram, Twitter and Pinterest.

Let’s Ride!!


It’s Wednesday, and this week, I made a masculine card using Skateboarder Gabriel – TT521 by High Hopes Rubber Stamps for the main image and Let’s Ride – FR006 (High Hopes Rubber Stamps) for the sentiment. It’s always fun to see skateboarders at our local park doing their awesome tricks and showing off their amazing skills. Unfortunately, I have never had the co-ordination to stay on one. LOL! How about you?

To make my card this week, I used The Paper Studio – Primary Simply Solids (4.25″ x 5.5″) paper for the base. I cut Copic Marker X-Press It Blending Card to the same size as the base and stamped the image and sentiment using my MISTI and Memento – Tuxedo Black ink. I coloured in the image with Copic markers and created my own background. I wanted it to look like Gabriel was on his way down the ramp. Once the image was coloured, I took a little bit off of each side, so that when I glued it to the base, the base card would create a slim frame around the image.

Card Recipe:

Stamp: Skateboarder Gabriel – TT521 (High Hopes Rubber Stamps)

Sentiment: Let’s Ride – FR006 (High Hopes Rubber Stamps)

Inks: Memento – Tuxedo Black

Paper: Copic Marker X-Press It Blending Card, The Paper Studio – Primary Simply Solids (4.25″ x 5.5″)

Tools: MISTI – Most Incredible Stamping Tool, Tombow – Multi Mono Liquid Glue

Image coloured with Copic Markers:

Skin: E21, E11, E00, E000, R24, R20, Eyes (Sakura Glaze – Black, Gelly Roll Sakura #5 Pen)

Hair: E47, E44, E43

T-Shirt: BG07, BG05, BG02

Jeans: B26, B23, B21

Shoes: E27, E25, E23, E21

Skateboard: Y17, Y08, R39, R37, R35

Ramp: T7, T6, T5, T4, T3, T1

Sky: B01, B00, B000, Colorless Blender

Check out some other fun new stamps from the vault for Boys and Men here:
THE VAULT IS OPEN! MEN & BOYS RELEASE Archives – High Hopes Rubber Stamps (highhopesstamps.com)

Hope you like it and have a fantastic week!

You can find lots of inspiration from the Design Team Divas at the High Hopes blog, and the High Hopes Rubber Stamps Facebook Fan page plus you can also follow us on
Instagram, Twitter and Pinterest.

Purr-fect Day!!


Today, I’m sharing a birthday card that I made using Dreamerland Crafts stamps called Meow Meow 03 – D20015. This little kitten is having an amazing day, getting up early, playing, relaxing and then saying her prayers for the next day to be the same all over again. If we could all live the life of a spoiled kitten, life would be amazing! LOL!

To make this card I used a base card of 6.5″ x 8.25″ using Hammermill – Premium Colour 100 lb. cardstock. I scored it at 3.25″.  Next, using my Couture Creations – Go Power and Emboss and Whimsy Stamps – Slimline Pillows Die, I die cut Copic Marker X-Press It Blending Card and Recollections – Petite Floral – Double Sided paper.  Using my MISTI and Memento – Tuxedo Black ink, I stamped all of the images onto the various shaes and coloured them in with Copic markers. I created the sentiment using a ruler and Pigma Micron 03 black marker.

To assemble the card, I applied glue to the back of the patterned paper and attached it directly to the base. Tim Holtz Distress Ink – Picked Raspberry was used to ink around all of the outside and inside edges of the die cut. For all of the images and sentiment, I first ran them through my Xyron Creative Station to turn them into stickers. Also, this would give me full coverage to lay them flat. I inserted each of them into their respective places of the die cut.

Card Recipe:

Stamps: Meow Meow 03 – D20015 (Dreamerland Crafts)

Inks: Memento – Tuxedo Black, Tim Holtz Distress Ink – Picked Raspberry

Paper: Copic Marker X-Press It Blending Card, Hammermill – Premium Colour 100 lb., Recollections – Petite Floral – Double Sided 12 x 12 in (30.4 x 30.4 cm)

Die Cut: Whimsy Stamps – Slimline Pillows Die (WSD473)

Tools: MISTI – Most Incredible Stamping Tool, Couture Creations – Go Power and Emboss, Pigma Micron 03 black marker, Xyron Creative Station

Image coloured with Copic Markers:

Cats: C7, C5, C3, R30, R20, 100

Sun, Window, Sky:  Y08, Y06, Y04, B04, B02, B01, E25, E23

Bandana: RV02, RV000, R27

Coffee Cup: R85, R83, R81, E23, E21, C3, C1, C0

Backgrounds: G02, G00, G000, G0000, RV10, RV02

Hope you like it and have a great week!

You can find more cards to inspire you at Dreamerland Crafts and Pointer Scrapbooking on the Facebook Fan pages from the rest of our design team.

Have A Blessed Easter!


Today, I’m sharing an Easter card using Three Pane Easter – M043 by High Hopes Rubber Stamps for the main image and Blessed Easter Greetings – G151 (High Hopes Rubber Stamps) for the sentiment. Happy Easter to family, friends and everyone!

To make my card this week, I started with Craft Smart Card Paper pre-made to 5.5″ x 4.25″. I stamped the images and sentiment using MISTI and Memento – Tuxedo Black ink onto Copic Marker X-Press It Blending Card. Using my Brother Scan and Cut, I cut out each of the images. My Creative Time – Rectangle Frame Die Layers and my Cuttlebug were used to die cut the sentiment and Craft Sparkling Stickers – Purple (02-3068629) paper.

The main images were coloured in with Copic Markers. The background papers were all from Your Next Stamp – Happy Spring (6″x6″) paper pad. I cut each section at 4″ x 1.5″ and then inked around all of the edges with Tim Holtz Distress Ink – Wilted Violet. The sentiment was inked with Tim Holtz Distress Ink – Fossilized Amber.

To assemble the card, using glue, I attached the 3 background papers onto the base card. Crafts ribbon was attached using double-sided tape. The images, sentiment and sentiment background were attached to the background papers using 3M VHB – 2 sided tape. Lastly, to finish off the card, I cut 3 Easter eggs out of some watercolour paper that I had used various Cosmic Shimmer colours on previously. I inked around the edges with Tim Holtz Distress Ink – Wilted Violet and glued them directly to the background paper.

Card Recipe:

Stamp: Three Pane Easter – M043 (High Hopes Rubber Stamps)

Sentiment:  Blessed Easter Greetings – G151 (High Hopes Rubber Stamps)

Inks: Memento – Tuxedo Black, Tim Holtz Distress Ink – Wilted Violet, Tim Holtz Distress Ink – Fossilized Amber

Paper: Copic Marker X-Press It Blending Card, Craft Smart – Cards and Envelopes, Your Next Stamp – Happy Spring (6″x6″) 

Die Cuts: My Creative Time – Rectangle Frame Die Layers – MCT-D274

Tools: MISTI – Most Incredible Stamping Tool, Cuttlebug, 3M VHB – 2 sided tape, Cosmic Shimmer, Brother Scan and Cut

Image coloured with Copic Markers:

Bunny: E35, E34, E33, E31, E30, R30, R24, R20, Eyes (Sakura Glaze – Black)

Chick: Y17, Y08, Y04, YR18, YR16, YR12, Eyes (Sakura Glaze – Black)

Lamb: BV20, C3, C1, C00, Eyes (Sakura Glaze – Black)

Backgrounds for images: Y17, Y08, Y04, V17, V15, V12

Hope you like it and have a fantastic week!

You can find lots of inspiration from the Design Team Divas at the High Hopes blog, and the High Hopes Rubber Stamps Facebook Fan page plus you can also follow us on
Instagram, Twitter and Pinterest.

Dam Good Birthday!


Sharing a card I made for my younger brother’s birthday. He sometimes likes to use “choice” words, so I couldn’t resist  these little characters and sentiment from Whimsy Stamps called Beaver Birthday Clear Stamps. LOL! The little tree stump and stacked logs are from Your Next Stamp – Autumn Animals (CYNS605) and the larger log is from Craftin Desert Diva’s – Build A Scene (Retired).

To make this card, I first stamped all of the images onto Copic Marker X-Press It Blending Card using Memento – Tuxedo Black and my MISTI.  My Brother Scan and Cut was used to cut around all of the images, which were then coloured with copic markers. The sentiment was stamped with VersaMark ink and then heat embossed with Ranger Embossing Powder White – Extra Fine Detail and Marvy Uchida – Embossing Heat Tool.

The base card was created using Hammermill – Premium Colour 100 lb. cardstock folded to the size of 8-1/4″ x 3-1/4″. To create the clouds in the background, I used the same paper cut to the same size as the base and using a template that I had previously created using Whimsy Stamps – Grass and Cloud Edger Die Set and Tim Holtz Distress Oxide Inks – Broken China and Blueprint Sketch. For the slim-line die cut, I used Whimsy Stamps – Slimline Wave Dies and Craftsmart Hot Buy – Christmas Embossed paper. Then I inked around the entire die cut with Tim Holtz Distress Ink – Tea Dye to make it pop more. The tree along the left side and the long log along the bottom were drawn free hand and then coloured in with Copic markers.

To assemble the card, I first attached the cloudy background to the base of the card using double-sided tape. Next, I attached the slim-line die cut using some glue. The large tree, long log and small log pile were all attached using glue. The remainder of the images and sentiment were all attached using 3M VHB – 2 sided tape. I added some twine to the balloons and beaver to finish it off.

Card Recipe:

Stamp and Sentiments: Whimsy Stamps – Beaver Birthday (KHB157), Your Next Stamp – Autumn Animals (CYNS605), Craftin Desert Divas – Build A Scene (Retired)

Inks: Memento – Tuxedo Black, Tim Holtz Distress Ink – Tea Dye, Tim Holtz Distress Ink – Gathered Twigs, Tim Holtz Distress Oxide Ink – Broken China, Tim Holtz Distress Oxide Ink – Blueprint Sketch

Paper: Copic Marker X-Press It Blending Card, Craftsmart Hot Buy – Christmas Embossed, Hammermill – Premium Colour 100 lb.

Die Cuts: Whimsy Stamps – Slimline Wave Dies, Whimsy Stamps – Grass and Cloud Edger Die Set

Tools: MISTI – Most Incredible Stamping Tool, Couture Creations – Go Power and Emboss, 3M VHB – 2 sided tape, AC Premium Ribbon, Tombow – Multi Mono Liquid Glue

Beavers: E99, E97, E37, E35, E34, E33, E29, E25, E15, E09, E08, R30, R20

Balloons: B06, B04, B02, B00, G09, G07, G02, G00

Cake and Candle: YR19, Y08, R24, B28, B24, B14, B12, B04, B02, AtyouSpica: Skyblue (09), Baby Blue (18)

Logs and Stump: E49, E27, E25, E23, E21

Tree and Log along the bottom: E37, E35, E33, Tim Holtz Distress Ink – Gathered Twigs

Hope you like it and have a great week!