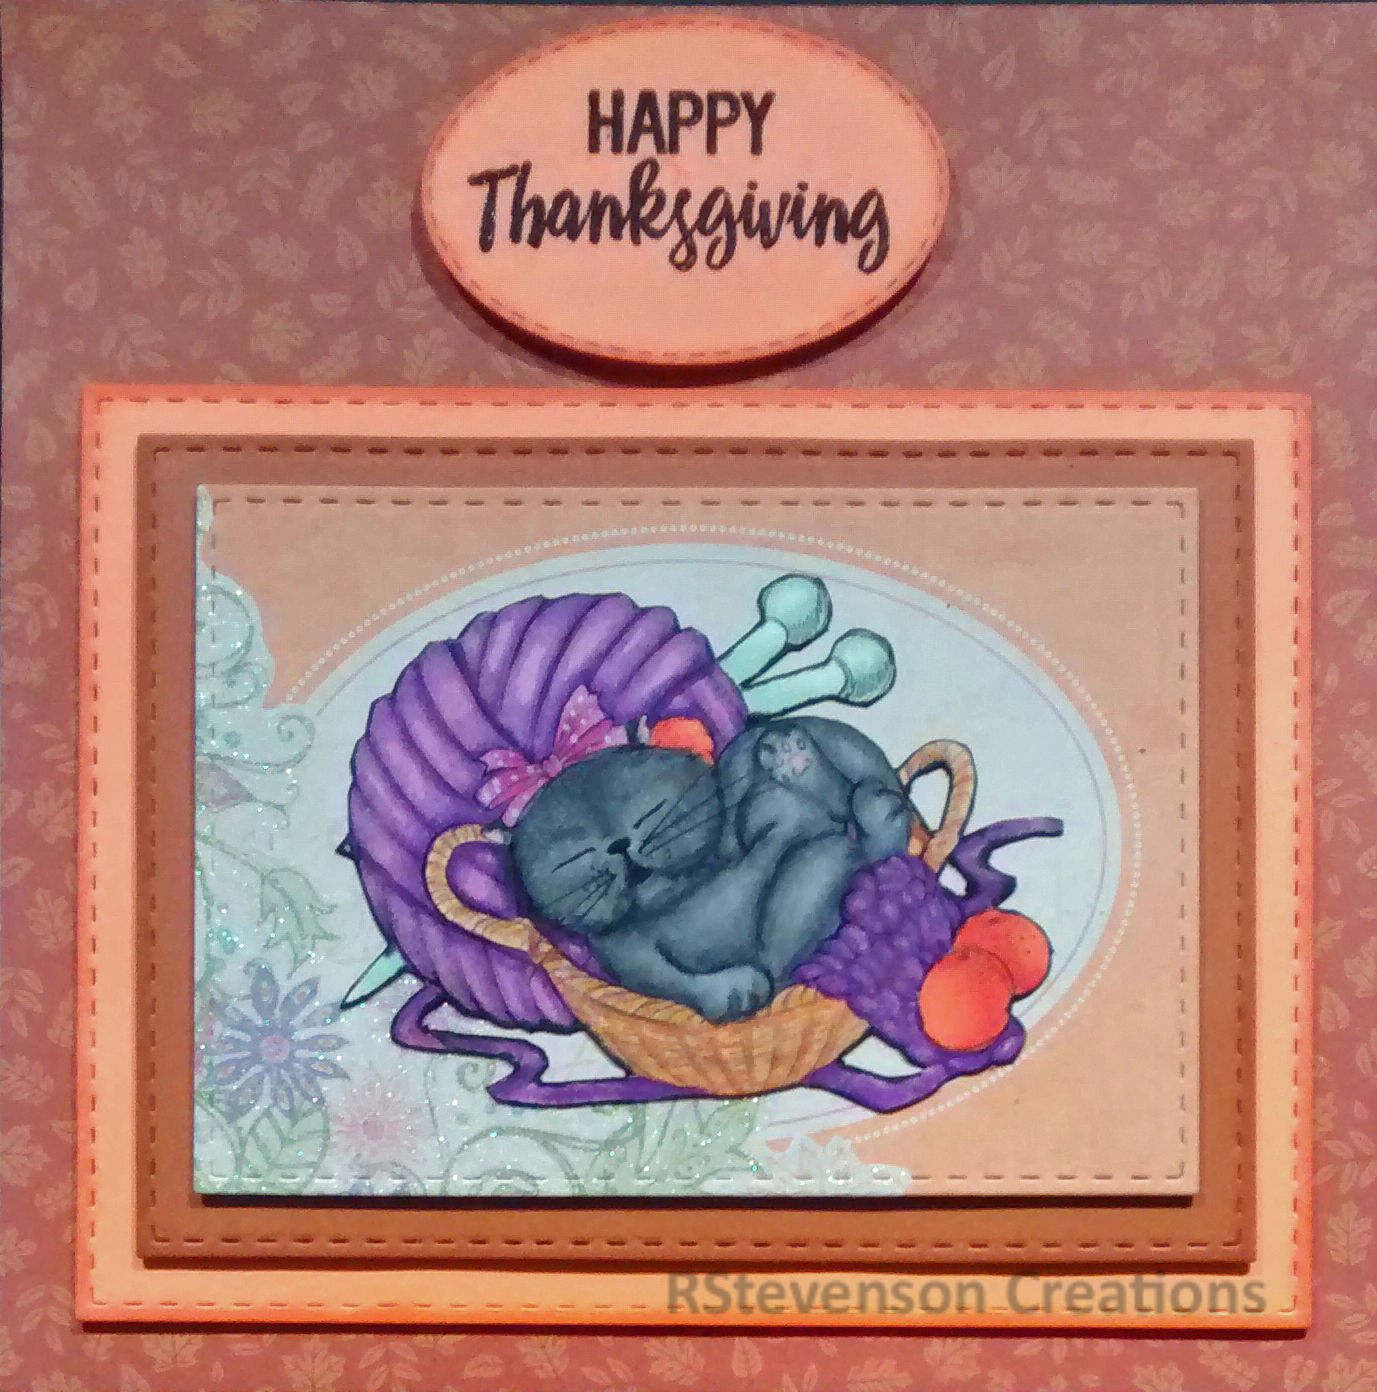
Archive | July 2016

Super Chunky – The East Wind Card


Hi There,

This sweet little image is from The East Wind called Super Chunky. They were offering it as part of the celebration going on at Kit and Clowder.

There is also a contest, which I will be entering the 10,000 Party – Colouring Challenge TEW on Kit and Clowder Facebook page.

Loved this image as soon as I saw it!!! Reminded me so much of my sweet little girl “Boo”.  As many of you know, I make cards for my vet for practically every occasion from “Boo” and the staff and vet love receiving them. (They’ve actually kept every card I’ve made for them and display them!!!) LOL! Does make me feel really good though! Thought this would be perfect for a Thanksgiving card this year from her, resting after a nice big meal.

I coloured this image using Spectrum Noir Markers and then added in a few shadows with PrismaColor Premier coloured pencils.

Super-Chunky-EastWinHere is a close-up:

Super-Chunky-EastWinCU


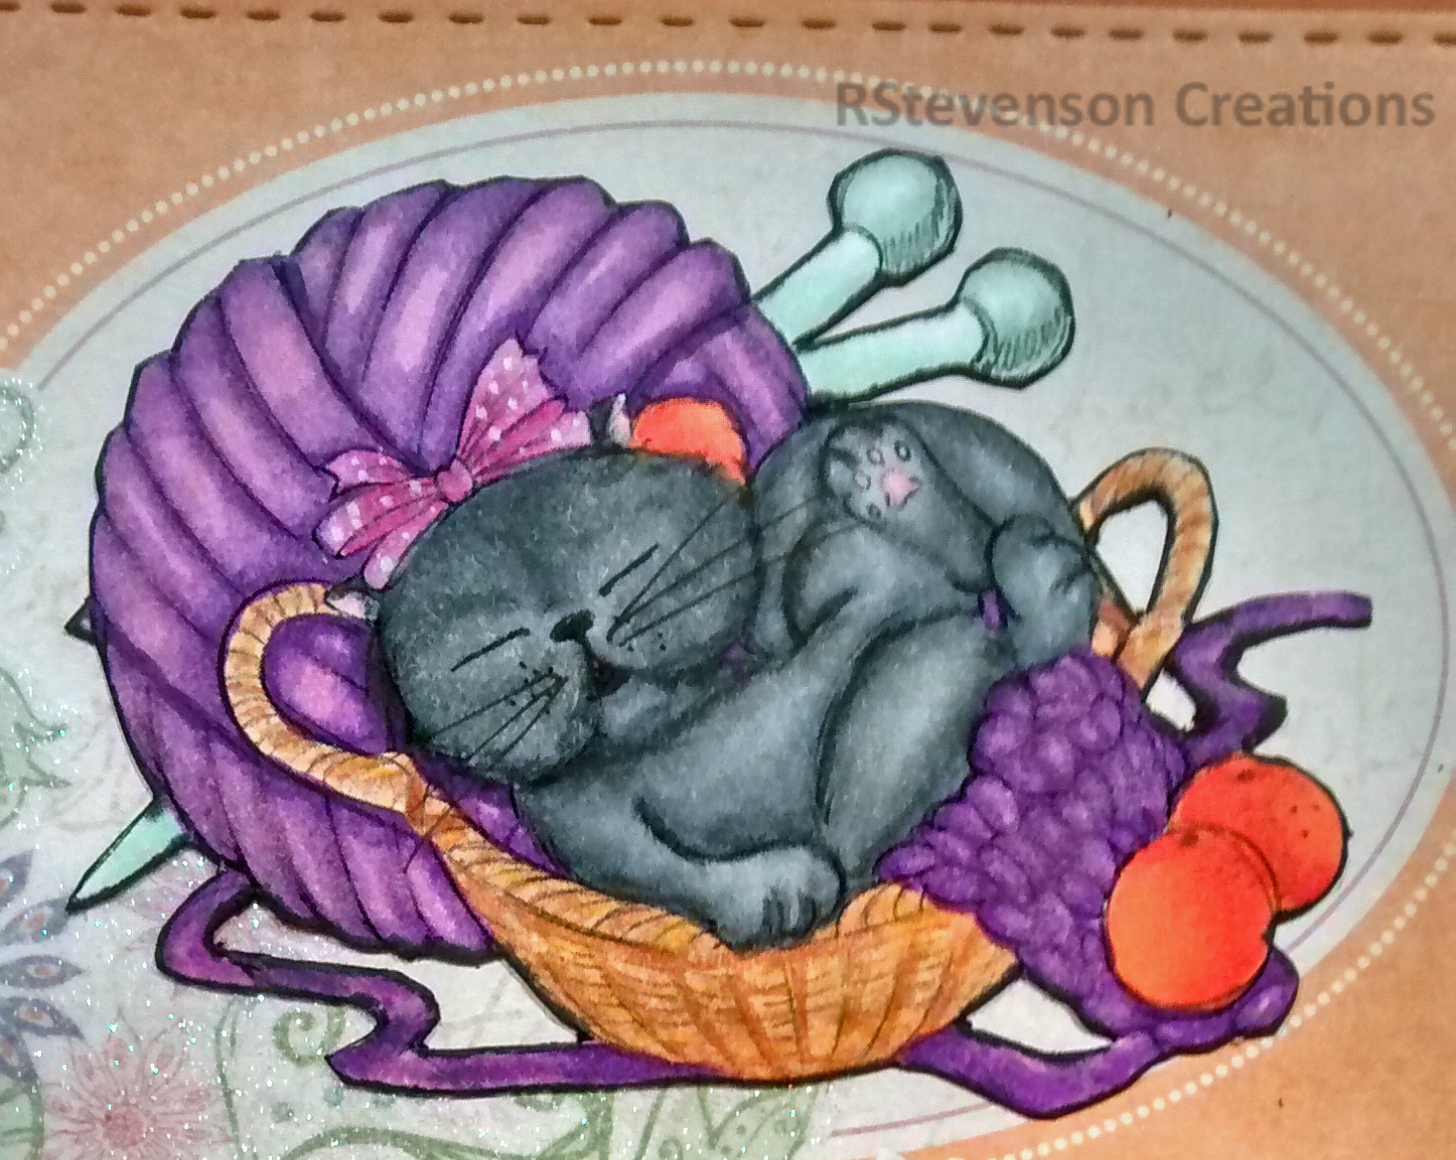
Basket – GB1, TN1, TN3, PC1003, PC943

Cat – IG4, IG6, IG8, PC935 (Ears – CR4)

Whiskers – Micron 01 Archival Ink Marker

Wool – PL2, PL4, PL5

Needles – BT1, BT2, BT4

Oranges – OR1, OR2, OR3

Bow – PL1, BP2, BP6, Permanent Chalk Markers – White for polka dots

Paper – Recollections Signature – Kaitlin – 12 x 12″

Pebbles – Harvest Paper Pad – 6 x 6″

Sentiment – My Creative Time – Belly Bands Sentiment Stamp Set

Hope you like it.


Santa’s Little Helper


Hi There,

Sharing a card I made using a file from Scrapper’s Delights called Santa’s Little Helper.

Santa-Little-Helper

Here is a close-up.

Santa-Little-Helper-CU

To colour the image, I used Spectrum Noir Markers and PrismaColor Premier Pencils.

Skin – TN1, TN2, FS1, FS7

Hair – TN2, TN4, TN6, PC941, PC943, PC945, PC942, PC938, PC947

Eye Shadow – GT2, GT3, JG1

Eyes – JG2

Lips and Nails – Atayou Spica – Red – 03

Boots – JG1, JG4, JG5

Bell – IG1, IG2, IG3, then went over it with Ataou Spica – Silver – 12 (Also used for little bells on sleeves)

Clothes and Hat – CR8, CR10, CR11

Stars – Atayou Spica – Buttermilk – 16

Bell and Merry Christmas – QuickKutz – 2008 Holiday Limited Edition Gift Set

Paper

Recollections – Sugarplums 12 x 12″

American Crafts – Heidi Swap – Marquee Love – Gold and Silver

Entered into Scrapper’s Delight July Face Book Challenge.

Hope you like it!

Bee Tag


Hi There,

Sharing a tag I made for the Challenge at JessicaLynn Original called Challenge #5 – Create Your Best Tag.

Bee-Tag

I work with a lady who is a beekeeper. I thought this would be perfect to give her the next time I purchase some more fresh honey. MMMMM, it is sooo good!!!

To make the tag, I used the bee from JessicaLynn Original Big Fat Bumble Bee digi. I sized it multiple times and arranged their position using Microsoft Word and then printed it out to colour.d

Used Spectrum Noir markers to colour bee and then added a little yellow texture with PrismaPremier coloured pencil.

The sentiment is from Craftin Desert Diva’s “Just Because” Stamps for “Buzzing by….” and “to say”. (I covered up the “hi” with tape before I stamped it.

The sentiment “Thank You!” is from My Creative Time – Hey There Little Lady.

For the tag, I used the tag die from SpellBinders “Tags and Flags” – S5-095 and shortened it.

Coloured around the edges with Tim Holtz Distress Ink – Mustard Seed and a little dauber.

Finished it off with some black and yellow ribbon.

Hope you like it!

Carousel Card


Hi There,

Stopping by to share a carousel card that I made using Too Cute by Jessica .svg cuts from Scrapbooking Mice – Jessica Owens 2016 and HB2U Car – Jessica Owens 2015.

I wanted to make a unique and different card using the Scrapbooking mice, so I decided to make it a step-by-step card using a carousel look.

Used largest die from Marianne Design CR1236 to make doilies for joining papers to make the carousel.

Here a few different views of the card.

Front – Closed and side view.

Carousel-Card-Front-with-Bo carousel-card-side-view

Open view – looking down.

Car-Card-OpenCarousel-TopViewCar-Top-Angle

Here are the steps on how I put this card together in more detail.

Uploaded all files into Cricut Design Space and then cut out pieces with Cricut Explore.

Front of card – HB2U Car.

Balloons from Craftin Desert Diva’s Party Dies. Balloon strings from My Creative Time – Stitched Circle Balloon Dies.

Background paper from Echo Parks Paper Co. – Birthday Wishes by Alisha Gordon – 6″ x 6″ Paper Pads.

HB2U-bear

All instructions – Typed out on laptop in word and then printed out. Die cut backgrounds using Craftin Desert Diva’s Fancy Frames. Smallest die cut from Your Next Stamp – Stitched Rectangle Die Set – (YNSD214) All highlights on eyes and nose are done using Gelly Roll Sakura #8 Pen.

Background frames for all Mice are from Cricut. Background papers are all from Doodle Bug Designs Inc. – Sugar Shoppe – 6″ x 6″ paper pad.

Stage 1 of Carousel. Mouse #1.  Put together.

Car-Step1

Stage 1 of Carousel. Mouse #1.  Separate pics before joining together.

Carousel-P1    Carousel-P2

Here is a close up of Mouse #1.

Carousel-P2-CU

Stage 2 of Carousel. Mouse # 2.  Put together.

Car-Step2

Stage 2 of Carousel. Mouse #2.  Separate pics before joining together.

Carousel-P3

Carousel-P4


Here is a close up of Mouse #2.

Carousel-P4-CU

Stage 3 of Carousel. Mouse #3.  Put together.

Car-Step3

Stage 3 of Carousel. Mouse #3.  Separate pics before joining together.

Carousel-P5

Carousel-P6

Here is a close up of Mouse #3.

Carousel-P6CU

Stage 4 of Carousel. Mouse #4.  Put together.

Car-Step4

Stage 4 of Carousel. Mouse #4.  Separate pics before joining together.

Carousel-P7

Carousel-P8

Here is a close up of Mouse #4. Carousel-P8-CU

Hope you like it!

 Entered into contest: http://cutitupchallenges.blogspot.com/2016/07/cut-it-up-100-anything-goes.html.