Archive | May 2021

Feel Good!!


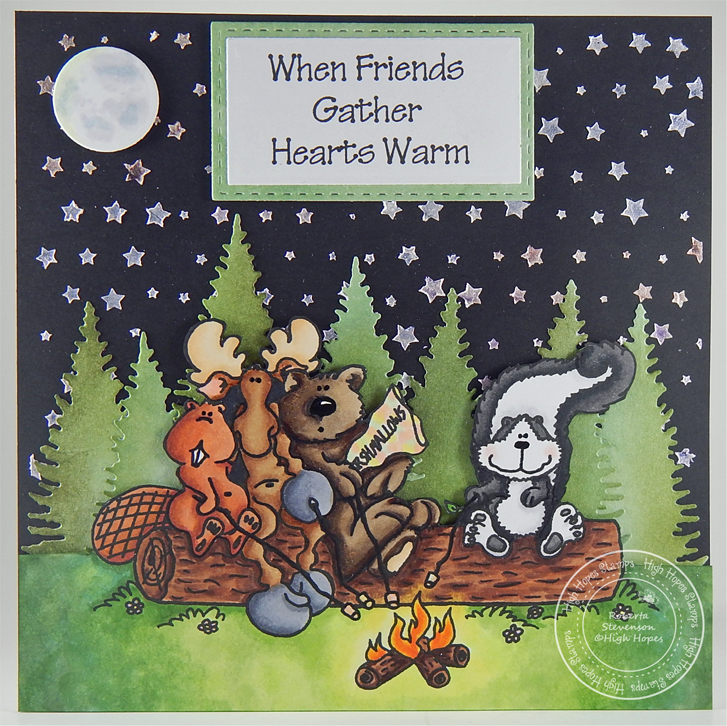
Today, I’m sharing a card that I made using Dreamerland Crafts stamps called Having You Around – D19078 for the main image and sentiment. There’s nothing like the love between a boy and his faithful companion. They become best friends as they both grow older together!!!

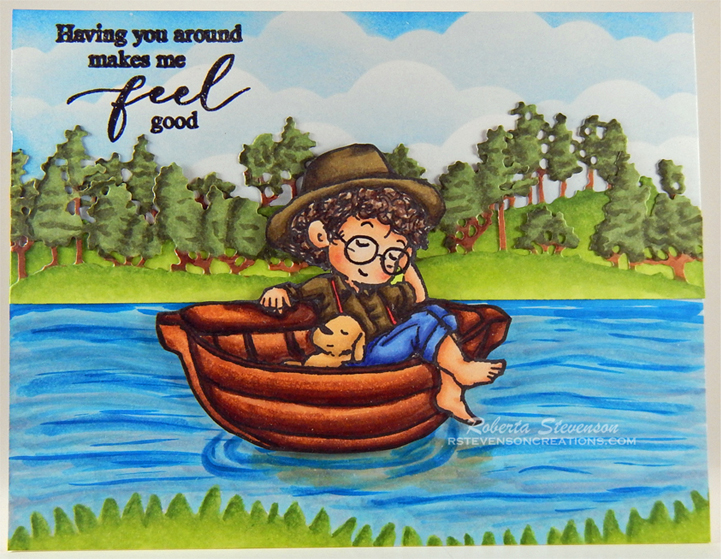
To make this card I used a base card of 5.5″ x 4.25″ using Hammermill – Premium Colour 100 lb. cardstock. I also cut a panel the same size out of Copic Marker X-Press It Blending Card. I used this to create my background using stencils I created to make clouds by Avery Elle – Pierced Clouds Die (D-05-01) and inks listed below by Tim Holtz. Copic markers were used to colour in the water and I used My Favourite Things – Slimline Grassy Edges Stencil as a guide for the grass on the bottom of the card. Using my MISTI and Versa Fine – Onyx Black ink, I stamped the sentiment and then embossed the ink with Ranger – Clear Super Fine Detail embossing powder. This was heat set with Marvy Uchida – Embossing Heat Tool. I used double-sided tape and attached my background panel to the base card.

Using my Cuttlebug and dies from Studio Light – Wonderful Autumn, I cut the trees and landscape out of Copic Marker X-Press It Blending Card. Using my Copic markers, I coloured these in as well. Then I layered them on top of each other and used glue to adhere them to the coloured background.

Next, using my MISTI and Memento – Tuxedo Black ink, I stamped the main image onto Copic Marker X-Press It Blending Cardstock and coloured it in with Copic markers. I fussy cut around the image by hand and used a black marker to go around all of the edges. 3M VHB – 2 sided tape was applied to the back of the image and it was placed on top of the background to finish off the card.

Card Recipe:

Stamp and Sentiment: Having You Around – D19078 – Dreamerland Crafts

Inks: Memento – Tuxedo Black, Tim Holtz Distress Ink – Salty Ocean, Tim Holtz Distress Inks – Broken China, Versa Fine – Onyx Black

Paper: Copic Marker X-Press It Blending Card, Hammermill – Premium Colour 100 lb.

Die Cuts: Studio Light – Wonderful Autumn – StencilWA311, Avery Elle – Pierced Clouds Die (D-05-01)

Stencil: My Favourite Things – Slimline Grassy Edges Stencil (ST-151)

Embossing Powder: Ranger – Clear Super Fine Detail

Tools: MISTI – Most Incredible Stamping Tool, Cuttlebug, Picket Fence Studio Blender Brushes, Marvy Uchida – Embossing Heat Tool

Image coloured with Copic Markers:

Skin: E21, E11, E00, E000, R22, R20

Hair: E47, E44, E43, E40

Shirt and Hat: E89, E87, E84, R24

Jeans:  B26, B23, B21

Dog: E55, E53, E51

Boat: E49, E27, E25, E23, E21

Trees: E25, E23, G99, G94, G82

Grass: YG17, YG13, YG03, YG01

Water: B93, B91, B52, B41, B06, B04, B02, B01, B000

Hope you like it and have a great week!

You can find more cards to inspire you at Dreamerland Crafts and Pointer Scrapbooking on the Facebook Fan pages from the rest of our design team.

Hearts Warm!!!


It’s Wednesday, and this week, I made a card using Toasting Marshmallows – T026 by High Hopes Rubber Stamps for the main image and Hearts Warm – G063 (High Hopes Rubber Stamps) for the sentiment. This image brings back so many memories of going camping and sitting around the campfire roasting marshmallows. I gave my image coloured marshmallows, because growing up they were always my favourite! LOL!

To make my card this week, I started with a base of 6″ x 6″ using Recollections – Black cardstock. I taped Echo Park – Star Stencil on top of the cardstock and applied several Cosmic Shimmer – Opal Blaze Polishes using a spatula to create the nice starry background. I wanted my scene to look like the friends were in the woods, so I die cut some trees of various sizes using Nellie’s Choice – Nature Scene Dies – NSD001 – Mountains and Momenta – Cardstock. Once I die cut the trees, I added some Tim Holtz Distress Ink – Forest Moss and Tim Holtz Distress Inks – Peeled Paint to add some more colour to them. Then, I ran the trees through my Xyron Create a Sticker to make it easier to apply them later. I felt the scene also needed a moon, so I die cut one using Nellie’s Choice – Nature Scene Dies – NSD002 – Sky and then coloured it in and added 3M VHB – 2 sided tape to the back of it and set everything aside.

I stamped my image and sentiment using my MISTI and Memento – Tuxedo Black ink onto Copic Marker X-Press It Blending Cardstock. I fussy cut around the top part of the image and then used a ruler to know where to cut the remainder of the bottom piece with my cutter. I coloured in the image using Copic markers and then used a black marker to go around all of the fussy cut part of the image and Copic marker – YG67 was used to go around the edges of the grassy area. For the sentiment, I used My Creative Time – Rectangle Frame Dies and My Creative Time – Rectangle Frame Layers to cut out the sentiment and background layer. I ran the sentiment through my Xyron Create a Sticker and applied it directly to the outer frame.

My card was now ready to assemble. I first adhered my starry background to a card base of AC – White cardstock sized at 6″ x 6″ using double-sided tape. Then, I used my coloured image to help me with the placement of where the trees would go. Since, I had already made stickers out of my trees, this was a fairly easy process. Once I was satisfied with their positioning, I applied 3M VHB – 2 sided tape, to the back of the coloured image and sentiment frame and attached them directly to the base card. Lastly, I attached the moon to complete the scene.

Card Recipe:

Stamp: Toasting Marshmallows – T026 (High Hopes Rubber Stamps)

Sentiment: Hearts Warm – G063 (High Hopes Rubber Stamps)

Inks: Memento – Tuxedo Black, Tim Holtz Distress Inks – Peeled Paint, Tim Holtz Distress Ink – Forest Moss

Paper: Copic Marker X-Press It Blending Card, Recollections – Black Cardstock, AC Cardstock – White, Momenta – Cardstock

Die Cuts: Nellie’s Choice – Nature Scene Dies – NSD001 – Mountains, Nellie’s Choice – Nature Scene Dies – NSD002 – Sky, My Creative Time – Rectangle Frame Dies, My Creative Time – Rectangle Frame Layers

Stencil: Echo Park – Star Stencil (6″ x 6″)

Cosmic Shimmer: Opal Blaze Polish – Sapphire Grape, Sunset Orange, Pink Blueberry, Turquoise Peach

Tools Miscellaneous: MISTI – Most Incredible Stamping Tool, Xyron Create a Sticker, Cuttlebug, Spatula

Image coloured with Copic Markers:

Beaver: E99, E97, E11, E07, (Eyes – Sakura Glaze – Black)

Moose: E53, E51, E50, E35, E34, E33, E31, R30, R20, Colorless Blender, (Eyes – Sakura Glaze – Black)

Bear: E53, E51, E50, E47, E44, E43, E42, (Eyes and Nose – Sakura Glaze – Black)

Skunk: C10, T6, T4, C1, C00, R30, R20, Colorless Blender, (Eyes and Nose – Sakura Glaze – Black)

Logs: E29, E27, E25, E23, E21

Marshmallows: YR00, R30, G20, Y11

Fire and Glow: YR09, YR04, Y08, Y02, Y00

Grass: YG67, YG63, YG45, YG17, YG13, YG03, YG01

Moon: BV20, C1, C00, Y000, Colorless Blender

Hope you like it and have a fantastic week!

You can find lots of inspiration from the Design Team Divas at the High Hopes blog, and the High Hopes Rubber Stamps Facebook Fan page plus you can also follow us on
Instagram, Twitter and Pinterest.

Sunshine and Seashells!!


Sharing a card I made today using KLM Digital Designs – Seascape Gnome from the May releases. This image also comes with 2 more sentiments, “Seas Every Opportunity” and “Be Shore of Yourself”! I don’t know about you, but I love walking along a beach to collect seashells. It’s always so much fun!

To make the card, I first imported the image into Microsoft Word and printed it out onto Copic Marker X-Press It Blending Card and a second copy onto regular copy paper using my HP Printer. Using my Brother Scan and Cut, I cut out the image from the copy paper. I used this as a mask to put over my main image. With the mask in place, I used Tim Holtz Distress Inks: Salty Ocean, Broken China and Tumbled Glass along with cloud stencils I had created using Avery Elle – Pierced Clouds Die (D-05-01) set.

Once this was completed, I removed the mask and began to colour in the water and sand. It was now time to colour my gnome. I unfortunately colured the first layer for the bottom of the beard blue, thinking it was part of the robe he was wearing. Uggggh! I didn’t want to start over, so I just finished colouring the mustache with my Copic markers and then tried to see if I could use the same colours to colour over the blue. It  didn’t quite work out a 100%, so I decided to use my PrismaColor Pencils to colour over top of the Copic markers. This seemed to fix it. I moved on to finish the rest of image.

After I was satisfied with the colouring of the image, I trimmed it down to 5.25″ x 4″. I applied double-sided tape to the back of the image and adhered it to a card base of 5.5″ x 4.25″ to complete my card.

Card Recipe:

Stamp: Seascape Gnome – KLM Digital Designs

Inks: HP Printer Grayscale, Tim Holtz Distress Inks: Salty Ocean, Broken China and Tumbled Glass

Paper: Copic Marker X-Press It Blending Card, Hot Buy – Cards and Envelopes (5.5″ x 4.25″)

Die Cut Stencils: Avery Elle – Pierced Clouds Die (D-05-01)

Image coloured with Copic Markers:

Skin: E21, E11, E00, E000

Beard: E49, E47, E44, E43, E40, PrismaColor Pencils – Gingeroot (PC1084), Dark Brown (PC946), Sandbar Brown (PC1094), Cream (PC914)

Clothing: B16, B04, B02, B01

Hat: B16, B04, B02, B01, BG53, BG49, BG45, BG02, BG01, BG000, Smooch – Pool

Sand: E37, E35, E33, E31

Water: BG70, B93, B91, B52, B41, B02, B01, B000, BG11, BG10

Starfish: YR31, YR09, YR04

Conch: YR31, YR21, YR20, R00, R000

Seashell: YR02, YR01, YR00, YR000

Pail: BG53, BG49, BG45, Pental Sunburst Metalic Med Gel Pen

Lettering: Atyou Spica – Lemon (05)

Hope you like it and have a great week!

You can find more cards to inspire you at KLM Designs, KLM Digital Design Team and KLM Digital Designs on the Facebook Fan page from the rest of our design team.

Soccer For You!!


Sharing a card I made today using KLM Digital Designs – Soccer Gnome from the new May release. This image also comes with 3 more sentiments, “I Bet You Play Soccer”, “Because Your A Keeper” and “I Get A Kick Out of You!”.

To make the card, I first imported the image into Microsoft Word and printed it out onto Copic Marker X-Press It Blending Card and then again on to plain paper using my HP Printer. Using my Brother Scan and Cut, I cut the image out of the plain paper to use as a mask. I put this over top of my main image character and added in the clouds using Tim Holtz Distress Ink – Salty Ocean, Broken China and Tumbled Glass and a mixture of cloud stencils I created using Avery Elle – Pierced Clouds Dies. Then I removed the mask. I coloured in the remainder of the image with Copic markers and then trimmed it off to be 5.25″ x 4″.

For the base, The Paper Studio – Christmas Box of Cards 2012 pre-made cards was used at the size of 5.5″ x 4.25″. I attached the coloured image directly to the base card using double-sided tape.

Card Recipe:

Stamp and Sentiment: Soccer Gnome – KLM Digital Designs

Inks: HP Printer Grayscale, Tim Holtz Distress Inks – Salty Ocean, Broken China and Tumbled Glass

Paper: Copic Marker X-Press It Blending Card, The Paper Studio – Christmas Box of Cards 2012

Die Cuts Stencils: Avery Elle – Custom Steel Dies – Made in the USA – D-05-01 PiercedCloudsDie

Image coloured with Copic Markers:

Skin: E21, E11, E04, E00, E000

Beard: E49, E47, E44, E43, E42

Shirt, Hat and Shoes: R59, R39, R37, R35

Pants and Shoes: C1, C00, Colorless Blender

Soccer Ball: C1, C00, Colorless Blender

Grass: YG17, YG13, YG11, YG03, YG01

Hope you like it and have a great week!

You can find more cards to inspire you at KLM Designs, KLM Digital Design Team and KLM Digital Designs on the Facebook Fan page from the rest of our design team.

Birthday Celebration!!


Today, I’m sharing a miniature birthday card that I made using Dreamerland Crafts stamps called Meow Meow 01 – D20013 for the main image and for the sentiments Birthday 07 – DCS17058 and Birthday 08 – DCS17059. I always wanted to try this type of miniature card! I just love the way you get the 3-D effect when you open the card.  So much fun. LOL!

Inside the card:

To make this card I used Lawn Fawn – Centre Picture Window Card to create the base card out of Hot Pink cardstock. The same dies were also used to create the centre pieces and banner using Your Next Stamp Designer Paper Pad – Birthday Girl. The same paper was also used to create the background on the card, front panel and side panels using Lawn Fawn – Centre Picture Window Card Add-On dies. Your Next Stamp – Mini Balloon Trio Die Set was used to die cut the floating balloons and then I tied some black thread to the base of the balloons. I cut 3 small pieces of clear plastic about a 1/4″ wide and attached the double-sided tape to the back of the balloon and at the base of the plastic as well to be used later.

Using my MISTI and Memento – Tuxedo Black ink, I stamped the image onto Copic Marker X-Press It Blending Card and also the sentiments onto the patterned pieces. I coloured the image in with Copic markers and then fussy cut around it.

I assembled the card using double-sided tape for each of the panels and centre pieces. I attached the balloons by putting 2 behind the presents and 1 from the top centre piece. Lastly, I added a little bit of double-sided tape to the bottom of the coloured image and attached it to the front of the main centre piece. For the sentiment on the front panel, I inked around the edges with Tim Holtz Distress Ink – Fossilized Amber and then popped it up using 3M VHB – 2 sided tape. I added 2 balloons and used a black marker to create the tails for the balloons.

Card Recipe:

Stamps: Meow Meow 01 – D20013 – Dreamerland Crafts

Sentiments: Birthday 07 – DCS17058 – Dreamerland Crafts, Birthday 08 – DCS17059 – Dreamerland Crafts

Inks: Memento – Tuxedo Black, Tim Holtz Distress Ink – Fossilized Amber

Paper: Copic Marker X-Press It Blending Card, Your Next Stamp Designer Paper Pad – Birthday Girl – 6″ x 6″

Die Cut: Lawn Fawn – Centre Picture Window Card, Lawn Fawn – Centre Picture Window Card Add-On, Your Next Stamp – Mini Balloon Trio Die Set (YNSD241)

Tools: MISTI – Most Incredible Stamping Tool, 3M VHB – 2 sided tape, Cuttlebug

Image coloured with Copic Markers:

Kitten: C8, C6, C4, R30, R24, R20 (Noses – Sakura Glaze – Black)

Cake and Icing:  RV66, RV55, RV52, RV06, RV04, RV02, G02, Y08, YR16

Hope you like it and have a great week!

You can find more cards to inspire you at Dreamerland Crafts and Pointer Scrapbooking on the Facebook Fan pages from the rest of our design team.

Just Bee-Cause!!!


It’s Wednesday, and this week, I made a card using Hunny Bear – Q021 by High Hopes Rubber Stamps for the main image and Just Bee Cause – G055 (High Hopes Rubber Stamps) for the sentiment. This little bear really loves his honey and so do I. We always went to the local farms or farmer’s market when it was open to buy pure unpasteurized honey. Now during Covid, we purchase it from the stores that they supply. Honey goes so well with tea too and has so many fantastic health benefits! Yum! Yum! So good! LOL!

To make my card this week, I started with a base of 5.5″ x 4.25″ using Hammermill – Premium Colour 100 lb. paper. Using a Picket Fence – Blending Brush I created the background using Tim Holtz Distress Inks: Fossilized Amber, Mustard Seed, Scattered Straw and Wild Honey. I cut 2 pieces of golden yellow cardstock and put them through my Xyron Creative Station to make them into stickers. Then, I ran them through my Cuttlebug using Memory Box – Honeycomb Corner die. This made it very easy to adhere the die cuts to the base card. Using Copic Marker X-Press It Blending Card, and my Cuttlebug, I die cut the bee-hive with Memory Box – Honey Bee Skep die. I used Copic Markers to colour the die cut and then using a small piece of Scotch Tape, I put the door back into place. Then I used 3M VHB – 2 sided tape to pop it up onto the base of the card.

I stamped my image using my MISTI and Memento – Tuxedo Black ink onto Copic Marker X-Press It Blending Cardstock and the sentiment onto Yellow Cardstock. I coloured in the image using Copic markers and then fussy cut around it. I used a black marker to go around all of the edges of the coloured image. Using my cutter, I cut around the sentiment and then ink around all of the edges using Tim Holtz Distress Ink – Wild Honey. Using 3M VHB – 2 sided tape, I attached the coloured image and sentiment to the base. Then I used, Copics Y17 and Y15 to create a shadow below the bee-hive and image.

To finish off the card I assembled some of the small die-cut pieces from the honeycomb in various parts of my card and added some little bees using Buttons Galore & More – Sprinkletz Embellishments – Bumble Bees. Also, I added some Ranger Glossy Accents to the honey seeping over the lid of the jar.

Card Recipe:

Stamp: Hunny Bear – Q021 (High Hopes Rubber Stamps)

Sentiment: Just Bee Cause – G055 (High Hopes Rubber Stamps)

Inks: Memento – Tuxedo Black, Tim Holtz Distress Ink: Fossilized Amber, Mustard Seed, Scattered Straw and Wild Honey.

Paper: Copic Marker X-Press It Blending Card, Hammermill – Premium Colour 100 lb., Golden Yellow Cardstock

Die Cuts: Memory Box – Honeycomb Corner – Style No. 99448, Memory Box – Honey Bee Skep – Style No. 98491

Tools Miscellaneous: MISTI – Most Incredible Stamping Tool, Buttons Galore & More – Sprinkletz Embellishments – Bumble Bees – NK137, Ranger Glossy Accents, Picket Fence – Blending Brush, Xyron Creative Station, Cuttlebug

Image coloured with Copic Markers:

Bear: E49, E37, E35, E34, E33, E31, R24, Colorless Blender, (Eyes and Nose – Sakura Glaze – Black, Gelly Roll Sakura #5 Pen)

Outfit and Wings: Y17, Y15, Y11, Y00, YR21

Honey: Y38, Y35, Y18, Y17, YR21

Bee-Hive: Y38, Y35, Y17, Y15, Y08, Y06, Y04

Hope you like it and have a fantastic week!

You can find lots of inspiration from the Design Team Divas at the High Hopes blog, and the High Hopes Rubber Stamps Facebook Fan page plus you can also follow us on
Instagram, Twitter and Pinterest.

Happy Canada Day!!


Sharing a card I made for Canada Day today using KLM Digital Designs – Canadian Gnome. I paired this up with stickers from Photoplay – O Canada 2. So proud to be a Canadian and being able to celebrate it every July 1.

To make the card, I first imported the image into Microsoft Word and printed it out onto Copic Marker X-Press It Blending Card using my HP Printer. I coloured in the image with Copic markers and fussy cut around it. Using a black marker, I went around all of the edges.

For the base card, Hammermill – Premium Colour 100 lb. paper was used at the size of 5.5″ x 4.25″. I created the background using Tim Holtz Distress Ink – Salty Ocean and a mixture of cloud stencils I created using Avery Elle – PiercedCloudsDie and Whimsy Stamps – Grass and Cloud Edger Die Sets. The grass was made using Tim Holtz Distress Ink – Mowed Lawn and stencils I created using Lawn Fawn – Lawn Cut dies and Lawn Fawn – Stitched Hillside Borders.

To complete the card, I drew a flag pole with rope and attached the flag sticker. I added the small Maple Leaf sticker onto the hat and attached the image using 3M VHB – 2 sided tape. I applied some Copic Y17 and Y13 below the gnome. Lastly, I added the “Happy Canada Day” sticker.

Card Recipe:

Stamp: Canadian Gnome – KLM Digital Designs

Inks: HP Printer Grayscale, Tim Holtz Distress Ink – Mowed Lawn, Tim Holtz Distress Ink – Salty Ocean

Paper: Copic Marker X-Press It Blending Card, Hammermill – Premium Colour 100 lb., PhotoPlay – O Canada 2 by Becky Moore (Stickers)

Die Cuts \ Stencils: Avery Elle – Custom Steel Dies – Made in the USA – D-05-01 PiercedCloudsDie, Whimsy Stamps – Grass and Cloud Edger Die Set, Lawn Cuts – Simple Stitched Hillside Borders – Lawn Fawn, Lawn Fawn – Stitched Hillside Borders

Miscellaneous: 3M VHB – 2 sided tape

Image coloured with Copic Markers:

Skin: E21, E11, E00, E000

Beard: E49, E47, E44, E42

Shirt: C3, C1, C00, R37, Colorless Blender

Pants: B26, B23, B21

Hat and Maple Leaf: R39, R37, R35, C1, C00

Boots: E57, E55, E53, E27, E25, E23, E21

Hope you like it and have a great week!

You can find more cards to inspire you at KLM Designs, KLM Digital Design Team and KLM Digital Designs on the Facebook Fan page from the rest of our design team.

Create Sunshine!!!


It’s Wednesday, and this week, I made a card using Goat Your Back – TT137 by High Hopes Rubber Stamps for the main image and Somedays – GG024 (High Hopes Rubber Stamps) for the sentiment. This momma goat and her babes are out enjoying the warmer weather. Spring is finally here! We just planted our flowers this past weekend, or I should say, I helped pick them out and my husband actually did the planting. He has a green thumb. I definitely don’t. LOL!

To make my card this week, I started with a base of 6″ x 6″ using AC White Cardstock. I cut Bo Bunny – Sweet Moments Divine paper to be the same size as the base card and then inked around the edges with Tim Holtz Distress Ink – Crushed Olive. I attached this directly to the base using double-sided tape. Using Doodlebug Design Inc. – Spring Solid Assortment paper, I die cut the yellow rectangle, large green rectangle and small green rectangle using My Creative Time – Rectangle Frame Dies and My Creative Time – Rectangle Frame Layers. The edges were inked with Tim Holtz Distress Ink – Crushed Olive and Tim Holtz Distress Ink – Fossilized Amber. The same dies were also used to die cut Copic Marker X-Press It Blending Card for the main image. Gina Marie Designs – Nested Scalloped Stitched Rectangles were used to die cut Recollections – Petite Floral paper. The edges of this die cut were inked with Tim Holtz Distress Ink – Scattered Straw.

I stamped my image using my MISTI and Memento – Tuxedo Black ink onto the Copic Marker X-Press It Blending Card die cut. I coloured in the image and background using Copic markers. The sentiment was stamped onto white cardstock using my MISTI and Memento – Tuxedo Black ink. I used my small cutter to cut around the sentiment and inked it with Tim Holtz Distress Ink – Crushed Olive. I die cut the sun and clouds using Copic Marker X-Press It Blending cardstock and Nellie’s Choice – Nature Scene Dies – NSD002 – Sky. I coloured these with Copic markers. I added 3M VHB – 2 sided tape to the back of 1 cloud and the sun and attached them to the main image. The other cloud was attached using glue and tucked under the sun.

The card was now ready to assemble. I attached the large green rectangle to the patterned paper base with 3M VHB – 2 sided tape. The main image and yellow rectangle were attached to the large scalloped rectangle using glue. Then the scalloped rectangle was attached to the large green rectangle with 3M VHB – 2 sided tape. I attached the sentiment to the smaller green rectangle and popped it up using 3M VHB – 2 sided tape. To finish off the card I used a few pop dots and some yellow flowers.

Card Recipe:

Stamp: Goat Your Back – TT137 (High Hopes Rubber Stamps)

Sentiment: Somedays – GG024 (High Hopes Rubber Stamps)

Inks: Memento – Tuxedo Black, Tim Holtz Distress Inks: Scattered Straw, Crushed Olive, Fossilized Amber

Paper: Copic Marker X-Press It Blending Card, Recollections – Petite Floral – 12 x 12″ (30.4 x 30.4 cm), Doodlebug Design Inc. – Spring Solid Assortment (12″ x 12″), Bo Bunny – Sweet Moments Divine – 12 x 12 in., AC Cardstock – White

Die Cuts: Gina Marie Designs – Nested Scalloped Stitched Rectangles, My Creative Time – Rectangle Frame Dies, My Creative Time – Rectangle Frame Layers, Nellie’s Choice – Nature Scene Dies – NSD002 – Sky

Tools \ Miscellaneous: MISTI – Most Incredible Stamping Tool, 3M VHB – 2 sided tape, Dodz Small – Adhesive Dots, Flowers, Pop-dots

Image coloured with Copic Markers:

Goats: E53, E51, E50, E35, E34, E33, E31, E30, C5, C3, C1, C0, C00, R30, R27, R20, R14, Y38, Y35, Y17, Y08, Colorless Blender, (Eyes and Nose – Sakura Glaze – Black, Gelly Roll Sakura #5 Pen)

Grass: YG17, YG13, YG03, YG01

Sky: B02, B01, B00, B000, B0000

Clouds: B60, C00, Colorless Blender

Sun: Y19, Y18, Y17

Check out some other fun new stamps from High Hopes Rubber Stamps
Furry and Friends Release

Hope you like it and have a fantastic week!

You can find lots of inspiration from the Design Team Divas at the High Hopes blog, and the High Hopes Rubber Stamps Facebook Fan page plus you can also follow us on
Instagram, Twitter and Pinterest.

Wine Gnome!!


Sharing a card I made today from KLM Digital Designs May Release called Wine Gnome for the image and sentiment. This image also comes with 2 more sayings: “I make pour decisions” and “I will always be your partner in wine!”.

To make the card, I first imported the image into Microsoft Word and printed it out onto Copic Marker X-Press It Blending Card using my HP Printer. I coloured in the image with Copic markers. Hammermill – Premium Colour 100 lb. was used at the size of 5.5″ x 4.25″ to create the base card. I added double-sided tape to the back of the image and attached it directly to the base.

Card Recipe:

Stamp: Wine Gnome – KLM Digital Designs

Ink: HP Printer Grayscale

Paper: Copic Marker X-Press It Blending Card, Hammermill – Premium Colour 100 lb.

Image coloured with Copic Markers:

Skin: E21, E11, E04, E00, E000

Beard: E49, E47, E44, E42

Hat: V17, V15, V12

Shirt: E89, E87, E84

Pants: B26, B23, B21

Boots: E27, E25, E23, E21

Wine Bottle, Wine Glass, Grapes: RV99, R89, R59, R39, R37, R24, C5, C4, C3, C1, C0, Colorless Blender

Leaves and Vines: G07, YG13, YG09

Hope you like it and have a great week!

You can find more cards to inspire you at KLM Designs, KLM Digital Design Team and KLM Digital Designs on the Facebook Fan page from the rest of our design team.

Miss You!!


Today, I’m sharing a slim-line card that I made using Dreamerland Crafts stamps called Meow Meow 04 – D20016 for the main image and for the sentiment Just A Note To Say – DCS17038Dreamerland Crafts. Love this new set and I as soon as I saw it, I knew I wanted to make a card to show how a lot of us are feeling right now during these Covid times missing family and friends.

To make this card I used a base card of 7″ x 8.25″ using Hammermill – Premium Colour 100 lb. cardstock. I scored it at 3.25″.  Next, using my Couture Creations – Go Power and Emboss and Whimsy Stamps – Slimline Marquee Die, I die cut Copic Marker X-Press It Blending Card.  Using my MISTI and Memento – Tuxedo Black ink, I stamped all of the images onto the shaped die cuts and coloured them in with Copic markers.

The frame die cut was coloured using Picket Fence Studio Blender Brush and Tim Holtz Distress Inks: Picked Raspberry, Spun Sugar and Worn Lipstick. The sentiments were stamped and embossed onto black cardstock using Versamark ink and Ranger Embossing Powder White – Extra Fine Detail. This was heat set using Marvy Uchida – Embossing Heat Tool. My cutter was used to cut the stamped sentiments into small strips. 3M VHB – 2 sided tape was applied to the back of each of the sentiments.

To assemble the card, I first turned the die cuts upside down and used a little bit of Scotch Tape on the back side to keep the inserts in place. Then, I applied double-sided tape across the entire back and attached it directly to the card base. I attached each of the sentiments and finished off the card with Crafts – Rhinestone Stickers.

Card Recipe:

Stamps: Meow Meow 04 – D20016 – Dreamerland Crafts

Sentiments: Just A Note To Say – DCS17038 – Dreamerland Crafts, Love and Cuddles – Penny Black

Inks: Memento – Tuxedo Black, Tim Holtz Distress Ink – Picked Raspberry, Tim Holtz Distress Ink – Spun Sugar, Tim Holtz Distress Ink -Worn Lipstick, Versamark

Paper: Copic Marker X-Press It Blending Card, Hammermill – Premium Colour 100 lb.

Die Cut: Whimsy Stamps – Slimline Marquee Die (WSD347)

Embossing Powder: Ranger Embossing Powder White – Extra Fine Detail

Tools: MISTI – Most Incredible Stamping Tool, Couture Creations – Go Power and Emboss, Picket Fence Studio Blender Brushes, Marvy Uchida – Embossing Heat Tool, Crafts – Rhinestone Stickers – 02-3048783

Image coloured with Copic Markers:

Cats: C7, C5, C3, R30, R22, R20, 100, YG23, YG17, G07 (Noses – Sakura Glaze – Black)

Bunny:  E35, E33, E31

Grass: YG17, YG13, YG03, YG01

Sky: B02, B01, B00, B000

Hope you like it and have a great week!

You can find more cards to inspire you at Dreamerland Crafts and Pointer Scrapbooking on the Facebook Fan pages from the rest of our design team.

Birthday Presents and Cake!!


Sharing a birthday card that I made for a friend using a digital image from Polkadoodles called Cake Time Digi – Winnie Celebrations 2. I really love this awesome collection.

To make the card, I first imported the image and sentiment into Microsoft Word and then printed everything out onto Copic Marker X-Press It Blending Card using my HP Printer using High Quality Grayscale. I found this to be the best setting as it doesn’t smudge when you colour. Next, I used Gina Marie Designs – Loopy Oval dies to die cut the image out. The image was coloured in with Copic markers.

Using Hot Buy – Recollections – Jewel Tones – 5.5″ x 4.25″ cardstock as the base. I stamped the sentiment using Versa Fine – Onyx Black and Ranger – Clear Super Fine Detail embossing powder. Marvy Uchida – Embossing Heat Tool was used to heat the embossing powder. All of the edges of the card were inked with Tim Holtz Distress Ink – Picked Raspberry.

3M VHB – 2 sided tape was applied to the back of the die cut and attached directly to the base. Lastly to finish off the card, I added some Crafts – Rhinestone Stickers.

Card Recipe:

Stamp: Cake Time Digi – Winnie Celebrations 2 – Polkadoodles

Inks: HP Printer Grayscale, Tim Holtz Distress Ink – Picked Raspberry, Versa Fine – Onyx Black

Paper: Copic Marker X-Press It Blending Card, Hot Buy – Recollections – Jewel Tones

Die Cut: Gina Marie Designs – Loopy Oval

Embossing Powder: Ranger – Clear Super Fine Detail

Miscellaneous: Marvy Uchida – Embossing Heat Tool, 3M VHB – 2 sided tape, Crafts – Rhinestone Stickers

Image coloured with Copic Markers:

Skin: E21, E11, E00, E000, R22, R20

Hair: E47, E44, E43, E42

Dress and Shoes: B06, B04, B02, B01, RV66, RV63, RV55, RV52, E50, E30, Atyou Spica – Blossom – 14

Cake: RV55, RV02, RV00, E25, E23, G07, G02, Gelly Roll Sakura #5 Pen

Flowers in Hair: RV55, RV00, Y17, Y02, Y00

Presents: G02, G00, RV55, RV52, RV02, B02, Gelly Roll Sakura #10 Pen

Shadow: C3, C2, C1, Colorless Blender

Hope you like it and have a great week!

Life Without Dogs???


It’s Wednesday, and this week, I made a slim-line card using Teacup Pup – SS035 by High Hopes Rubber Stamps for the main image and Life Without Dogs – GG029 (High Hopes Rubber Stamps) for the sentiment. Growing up, we always had dogs for pets. We would often take them on nice long walks and they always brightened our day with their tails wagging or playing and making us laugh.

To make my card this week, using Gina Marie Designs – Ric Rac Nested Circle die cuts, I cut out Copic Marker X-Press It Blending Card and stamped my image using my MISTI and Memento – Tuxedo Black ink. I coloured in the image and background using Copic markers and also created the flower pattern on the tea cup.

For the sentiment, Gina Marie Designs – Big and Little Pierced Chain Round dies were used to die cut the rectangle for the sentiment. I stamped the sentiment using my MISTI and Memento – Tuxedo Black ink. Copic R89 was used to create a border around the die cut. I had some tiny pieces from the paw print frame left over so I ran them through my Xyron Create a Sticker and attached them to the sentiment.

To assemble the card, I first took some light tan brown cardstock and cut it to 7″ x 7.25″. Then I scored it at 3.5″ for a finished card base of 3.5″ x 7.25″. Using dark brown cardstock, My Creative Time – Tall Paw Frame Dies were used to create the main frame. I glued this directly to the base card. My Creative Time – Tall Frame Dies were used to die cut the patterned paper from Echo Park Paper Co. – Imagine That!. Tim Holtz Distress Ink – Evergreen Bough was used to ink around the edges. This too, was also glued directly onto the paw frame. 3M VHB – 2 sided tape was used to attach both the completed image and the sentiment to the card. To finish it off, I applied some Crafts Scrapbooking Pearls – 02-3006207.

Card Recipe:

Stamp: Teacup Pup – SS035 (High Hopes Rubber Stamps)

Sentiment: Life Without Dogs – GG029 (High Hopes Rubber Stamps)

Inks: Memento – Tuxedo Black, Tim Holtz Distress Ink – Evergreen Bough

Paper: Copic Marker X-Press It Blending Card, Echo Park Paper Co. – Imagine That 6″ x 6″, Light Brown Cardstock and Dark Brown Cardstock

Die Cuts: Gina Marie Designs – Ric Rac Nested Circle, Gina Marie Designs- Big and Little Pierced Chain Round, My Creative Time – Tall Frame Dies, My Creative Time – Tall Paw Frame Dies

Tools: MISTI – Most Incredible Stamping Tool, 3M VHB – 2 sided tape

Image coloured with Copic Markers:

Puppy: E59, E57, E55, B60, C1, C00, Colorless Blender, (Eyes and Nose – Sakura Glaze – Black, Gelly Roll Sakura #5 Pen)

Flowers and Leaves: R89, R85, YG09, YG06, Gelly Roll Sakura #8 Pen

Tea Cup and Saucer: R89, R85, R83

Bone: E53, E51, E50

Shadow: BG72, BG57, BG32, BG13

Check out some other fun new stamps from High Hopes Rubber Stamps
Furry and Friends Release

Hope you like it and have a fantastic week!

You can find lots of inspiration from the Design Team Divas at the High Hopes blog, and the High Hopes Rubber Stamps Facebook Fan page plus you can also follow us on
Instagram, Twitter and Pinterest.

Anniversary Gnomes!!


Sharing a card I made today combining the image from KLM Digital Designs April Release called Bride Gnome and image and sentiment from Groom Gnome. These images could be used separately or together and come with multiple sentiments.

To make the card, I first imported the image into Microsoft Word and printed it out onto Copic Marker X-Press It Blending Card using my HP Printer. I coloured in the image with Copic markers. Then I printed them out again on regular copy paper and used my Brother Scan and Cut  to cut around them. I used these as masks over top of the coloured images. Using multiple Tim Holtz inks listed below, I created the sky with a stencil I had created from Avery Elle – Pierced Clouds Die and grass stencil I created from Lawn Fawn – Grassy Hillside Borders.

For the base card, Recollections – Christmas Cards and envelopes paper was used at the size of 5.5″ x 4.25″. I die cut the finished coloured image with Your Next Stamp – Stitched Rectangle Die Set (YNSD214) and glued it to the base.

Card Recipe:

Stamp: Bride Gnome – KLM Digital Designs, Groom Gnome – KLM Digital Designs

Sentiment: Groom Gnome – KLM Digital Designs

Inks: HP Printer Grayscale, Tim Holtz Distress Ink: Peeled Paint, Mowed Lawn, Crushed Olive, Salty Ocean, Broken China, Tumbled Glass

Paper: Copic Marker X-Press It Blending Card, Recollections – Christmas Cards and Envelopes – 5″ x 6.5″

Die Cuts: Avery Elle – Pierced Clouds Die (D-05-01), Lawn Fawn – Grassy Hillside Borders, Your Next Stamp – Stitched Rectangle Die Set (YNSD214)

Image coloured with Copic Markers:

Skin: E21, E11, E04, E00, E000, R30, R20

Beard: E49, E47, E44, E42

Hat and Tuxedo: C9, C7, C5, C3, C2

Shirt Sleeves: C00, Colorless Blender

Shoes: 100, C10, C8, C6, C5

Hair: E18, E08, YR18, YR14

Dress and Shoes : B60, C00, Colorless Blender

Flowers, Leaves, Vest and Ribbon: BV04, BV02, BV01, BV00, Y17, Y04, YG17, YG13, YG03, Gelly Roll Sakura #10 Pen

Hope you like it and have a great week!

Take advantage of this special at KLM Digital Designs!

MOTHER’S DAY SALE 20% OFF EVERYTHING UNTIL MAY 10TH
CODE:MOTHERSDAY21

You can find more cards to inspire you at KLM Designs, KLM Digital Design Team and KLM Digital Designs on the Facebook Fan page from the rest of our design team.

Love Lifts Me Up!!


Today, I’m sharing an inspirational slider card that I made using Dreamerland Crafts stamps called Your Love Lifts Me Up – D20001. Love this stamp and image for lifting someone’s spirit up.

To make this card I used a base card of 5.5 x 4.25″ using Hammermill – Premium Colour 100 lb. cardstock. I cut the background to be the same size using Asuka Studio – Sparkly Sky. I really love this paper. Using my MISTI and Memento – Tuxedo Black ink, I stamped the image onto Copic Marker X-Press It Blending Card and coloured them in with Copic markers. Then, I fussy cut around it leaving a small white border.

I stamped the sentiment using Versa Fine – Onyx Black and embossed it with Ranger – Clear Super Fine Detail embossing powder. The little cloud was die cut with my Cuttlebug and Nellie’s Choice – Nature Scene Dies – NSD002 – Sky. Then I used a Picket Fence – Blending Brush that still had some blue ink on it from my last project to give it some colour. I cut a small strip just over a .5″ wide and about 4″ long to be a pull tab. I die cut a circle out of the top background paper with Lifestyle Crafts Cutting Dies – Nesting Circles and then glued the piece that I cut onto the pull tab. Using 2 layers of 3M VHB – 2 sided tape, I created the path on the back of the background and added some tape where I wanted the tab to stop. I glued 2 small magnets to the back of the cloud and also to the pull tab. (4 in total). Then I used an embossing pillow against the taped sides and over the magnets so that it would glide easier. I added some more double-sided tape to the remainder of the back of the background and then attached it to the card.

Card Recipe:

Stamps: Your Love Lifts Me Up – D20001 (Dreamerland Crafts)

Inks: Memento – Tuxedo Black, Versa Fine – Onyx Black

Paper: Copic Marker X-Press It Blending Card, Hammermill – Premium Colour 100 lb., Asuka Studio – Sparkly Sky (6″x6″)

Die Cut: Lifestyle Crafts Cutting Dies – Nesting Circles, Nellie’s Choice – Nature Scene Dies – NSD002 – Sky

Tools: MISTI – Most Incredible Stamping Tool, Cuttlebug, Ranger – Clear Super Fine Detail embossing powder, Marvy Uchida – Embossing Heat Tool, Picket Fence – Blending Brush

Image coloured with Copic Markers:

Skin: E21, E11, E4, E00, E000, R30, R20

Hair:  E47, E44, E43 (Eye – Sakura Glaze – Black, Gelly Roll Sakura #8 Pen)

Flowers and Leaves: Y17, Y08, YG05, YG01

Dress: B06, B04, B01, B000

Shadow: B00, B000

Hope you like it and have a great week!

You can find more cards to inspire you at Dreamerland Crafts and Pointer Scrapbooking on the Facebook Fan pages from the rest of our design team.