Sharing this adorable image called St. Patty’s Day Gnome from KLM Digital Designs today from the new February release. My grandmother and her family migrated from Ireland to Canada many, many years ago, so St. Patrick’s Day is extra special to our family. We even used to joke that my one Uncle looked like a Leprechaun. LOL! May the luck of the Irish be with you all this coming St. Patrick’s Day.
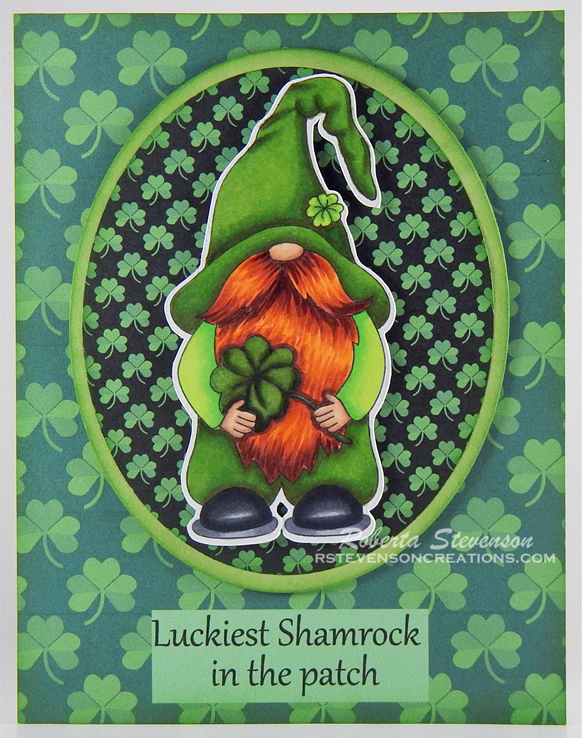
To make the card, I printed out the main image onto Copic Marker X-Press It Blending Card using my HP Printer. I used my Brother Scan and Cut to cut around the image and coloured it in with Copic markers.
I used Hammermill paper to create the base shape of the card 8.5″ x 4.25″. I scored the paper at 4.25″. I opened up Microsoft Word and imported the background papers from Leska’s Digitals – St. Patrick’s Day. For the main background I sized the image to to 5.5″ x 4.25″ and then imported the sentiment from KLM Digital Designs St. Patty’s Day Gnome and gave it a green background. I brought the sentiment to the front on the main background so that it would print out in one piece. For the smaller oval, I imported the image from Leska’s Digitals – St. Patrick’s Day papers and sized it to 4.25″ x 3.5″.

For the inside of the card, I imported the papers image and then sized it at 5.25″ x 4″. I drew a white rectangle at 4.75″x3.5″ and placed it over top of the background. I imported the images for the 2 KLM sentiments St. Patty’s Day Gnome and brought them to the front within Microsoft Word. I also added a small square with a larger shamrock. Then I printed out everything on my printer.
I used Hero Arts – Infinity Die Ovals to die cut the background oval and green oval on the front of the card. Tim Holtz Distress Ink – Forest Moss was used to ink around all of the edges of the card and the ovals. Using double sided tape, I attached the large background directly to the base of the card and the sentiment print out to the inside of the card. I fussy cut around the large shamrock, applied some glue to the back of it and attached it to the inside of the card.
I ran the small oval through my Xyron Creative Station to make it a sticker and then attached it directly to the larger oval. To complete the card, I applied 3M VHB – 2 sided tape to the back of the large oval and coloured image and then popped them both up on the front of the card.
Card Recipe:
Stamp and Sentiments: St. Patty’s Day (KLM Digital Designs)
Inks: HP Printer Grayscale, HP Printer – Colour, Tim Holtz Distress Ink – Forest Moss
Paper: Copic Marker X-Press It Blending Card, Hammermill – Premium Colour 100 lb., Leska’s Digitals – St. Patrick’s Day
Die Cut: Hero Arts – Infinity Die Ovals
Tools: 3M VHB – 2 sided tape, Cuttlebug
Image coloured with Copic Markers:
Skin: E000, E00, E04, E11, E21
Beard: YR18 YR14, E18, E08
Hat and Pants: YG97, YG25, YG17
Shirt: YG07, YG05, YG01
Shamrocks: G99, G94, G24, YG07, YG05, YG01, YG00
Shoes: C9, C7, C5, C2
Hope you like it and have a great week!
You can find more cards to inspire you at KLM Designs, KLM Digital Design Team and KLM Digital Designs on the Facebook Fan page from the rest of our design team.


