Tag Archive | black cat

Hallowe’en Kitty and Friends!!


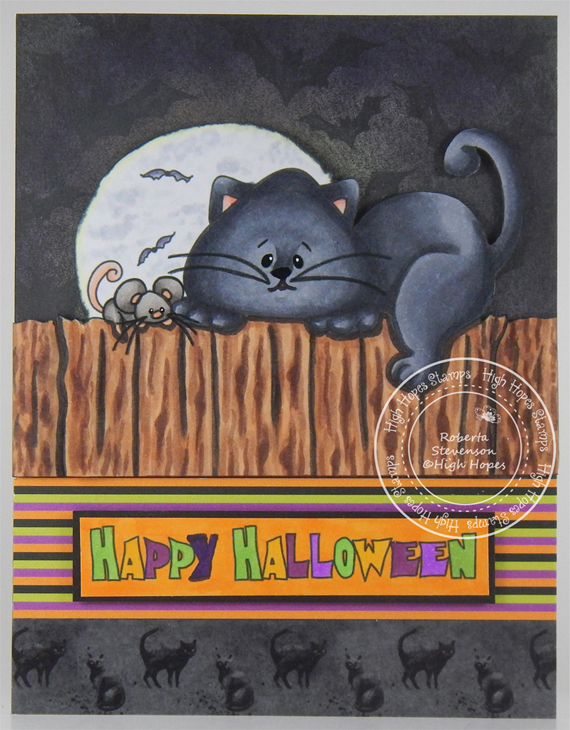
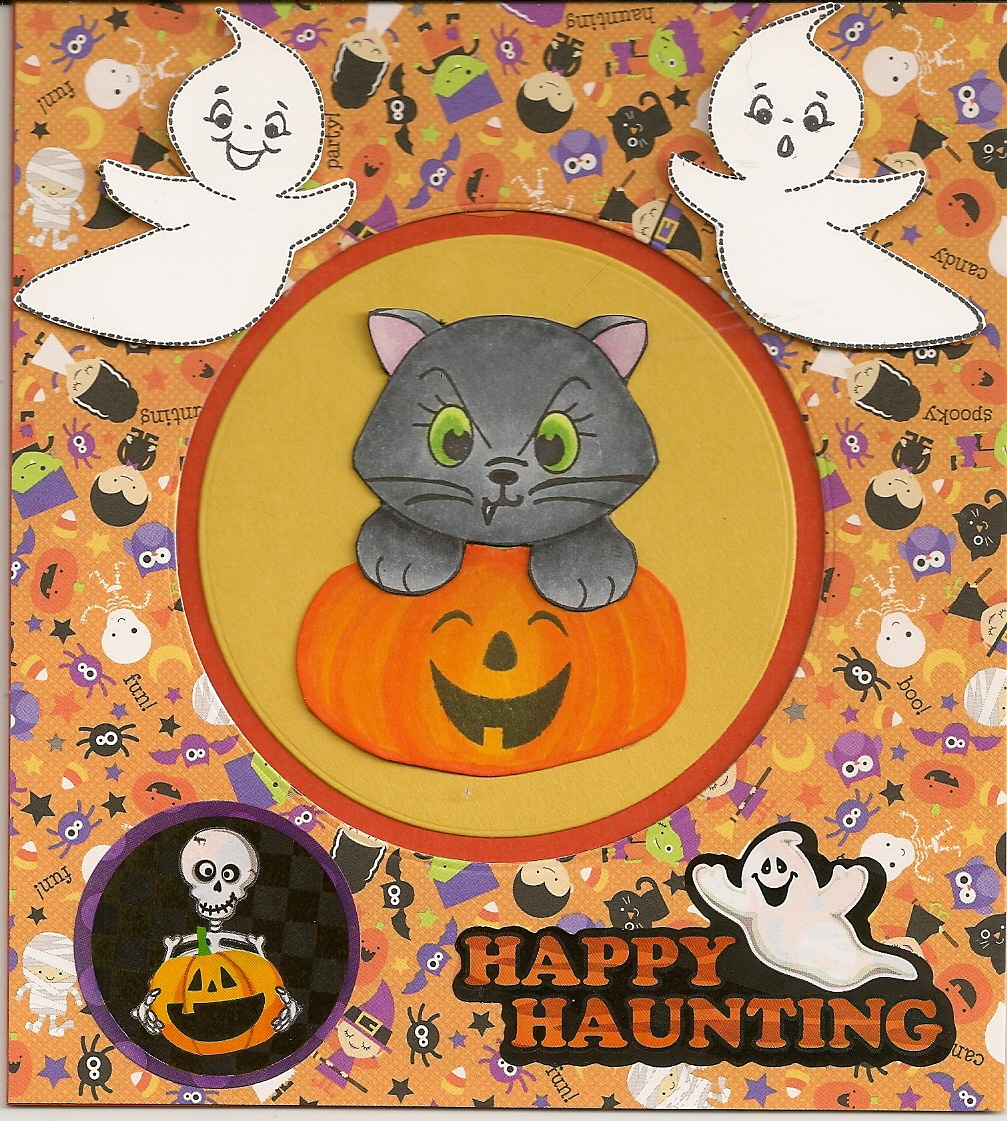
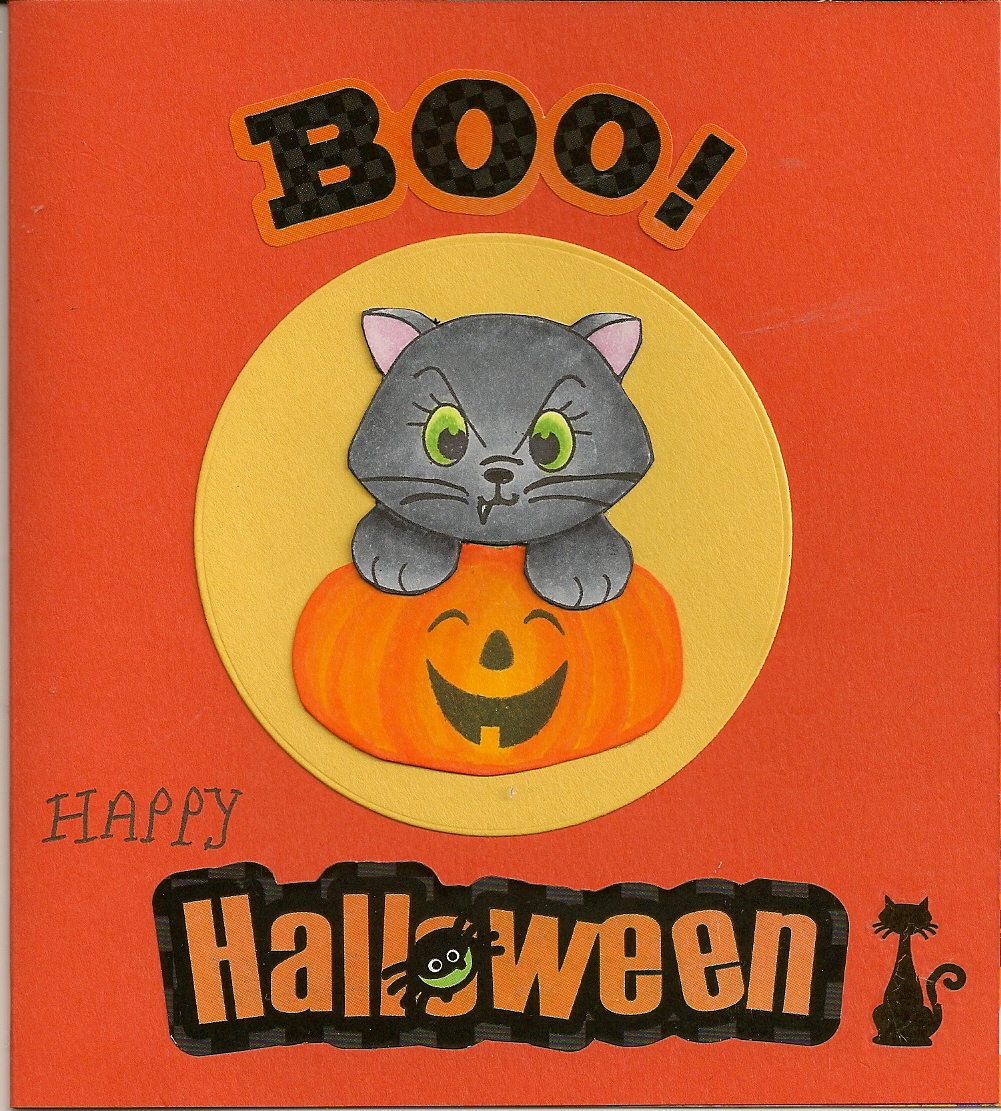
It’s Wednesday, and this week, I made a Hallowe’en card using High Hopes Rubber Stamps Hallowe’en Kitty – TT042 for the image and Happy Halloween – H232 for the sentiment. I thought it would be fun to end the month off with another spooky card since Hallowe’en is only a few days away from now.

To make my card this week, I began with a card base of Hammermill – Premium Colour 100 lb. cardstock, cut and scored to be 5.5″ x 4.25″. Textura Select Cardstock – Tropicana was cut to the same size as the base and adhered using double-sided tape. Using my Cuttlebug, Copic Marker X-Press It Blending Card was die cut using My Creative Time – Rectangle Frame Dies. I stamped the main image onto the die cut and the sentiment onto a scrap piece of orange cardstock using my MISTI and Memento – Tuxedo Black ink. Using my Cuttlebug and Gina K Designs – Sentiment Strips, I die cut the sentiment that I stamped.

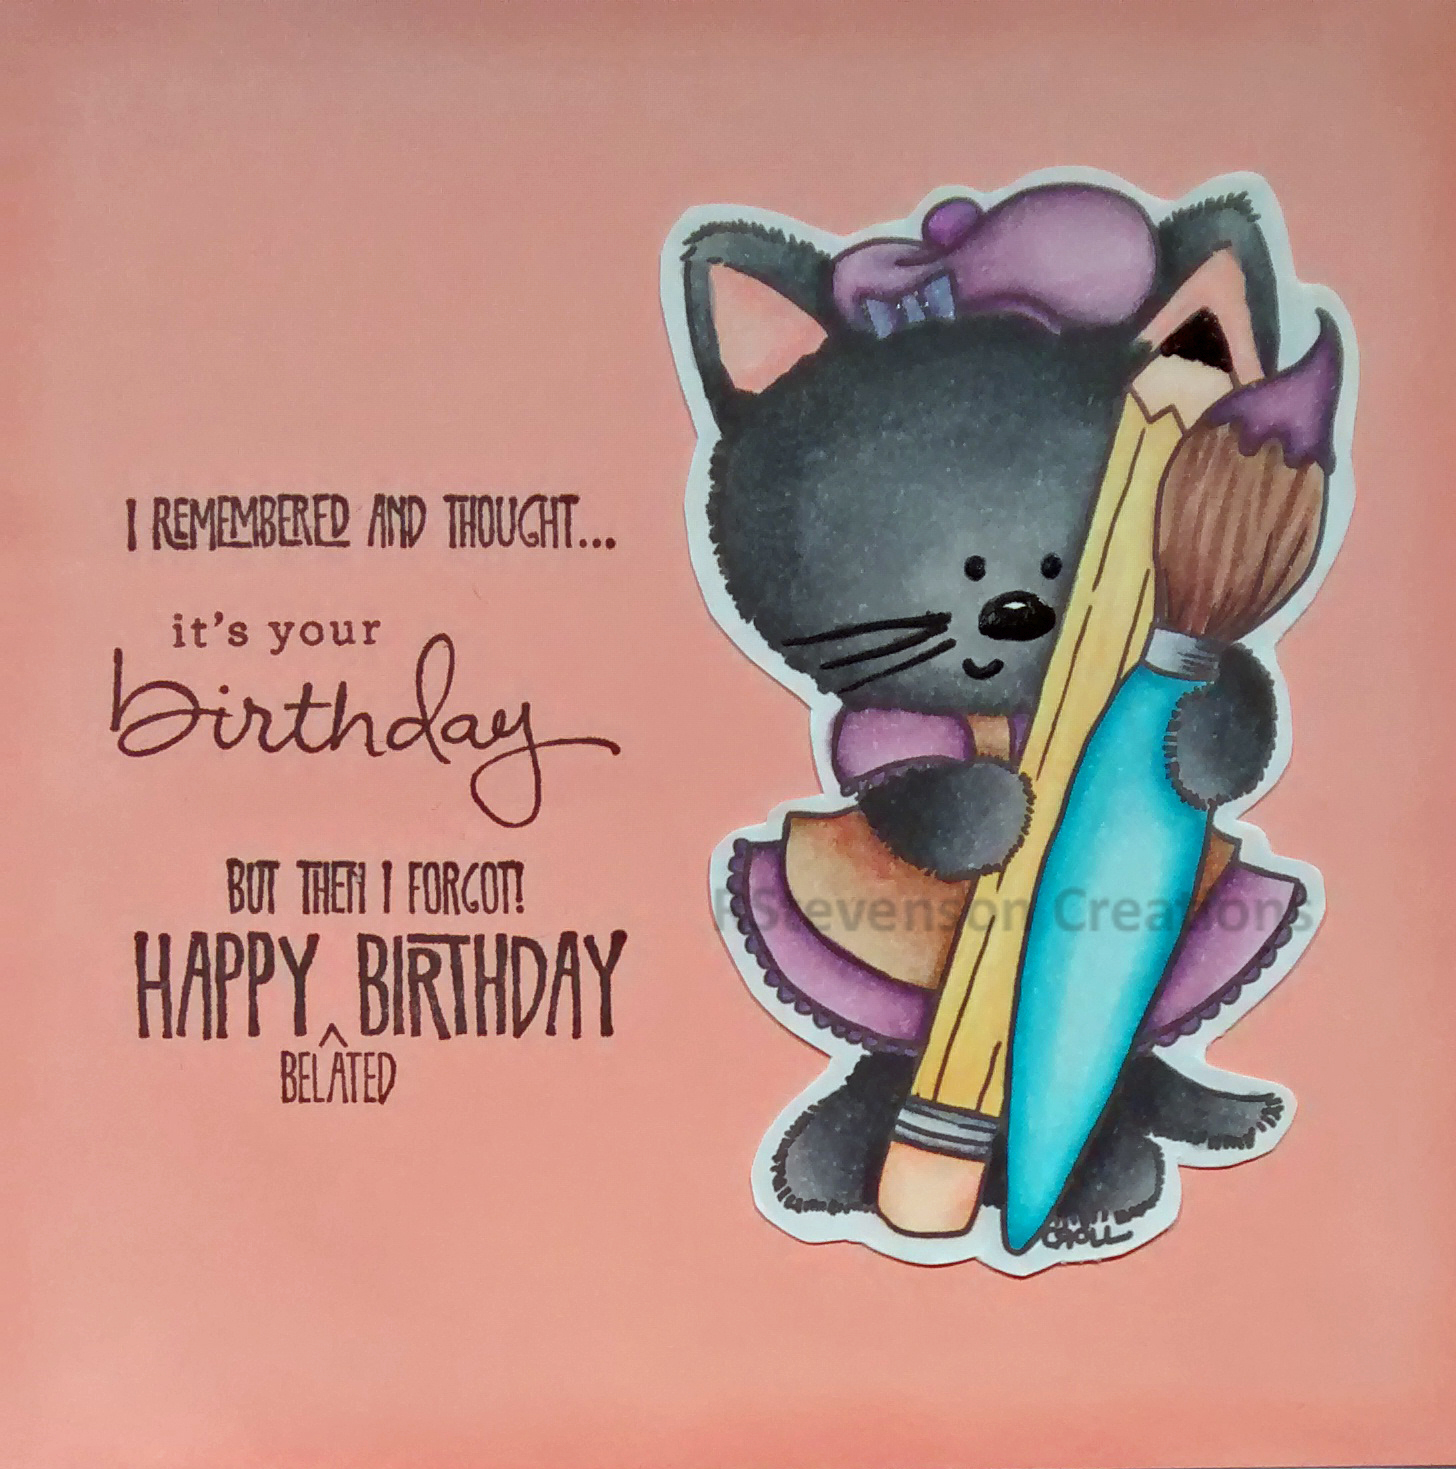
The image was coloured in and then I used a black Prismacolor Premier Pencil to highlight a few of the areas to make them stand out a little more. I also extended the fence to the ends of the die cut on both sides. I added back in the whites of the eyes with a Gelly Roll Sakura #8 Pen and some stars in the night sky. U-Line double-sided tape was applied to the back of the sentiment and the coloured image. They were both popped up onto the base to complete the card.

Card Recipe:

Stamps: Hallowe’en Kitty – TT042 (High Hopes Rubber Stamps)

Sentiment: Happy Halloween – H232 (High Hopes Rubber Stamps)

Inks: Memento – Tuxedo Black

Paper: Copic Marker X-Press It Blending Card, Hammermill – Premium Colour 100 lb., Textura Select Cardstock – Tropicana (12″ x 12″)

Die Cuts: My Creative Time – Rectangle Frame Dies, Gina K Designs – Sentiment Strips

Tools: MISTI – Most Incredible Stamping Tool, U-Line double-sided tape, Gelly Roll Sakura #8 Pen

Image coloured with Copic Markers:

Black Cat: C9, C7, C5, R22, R20

Hat: V17, V09, V06, V04, YR68, YR24, YR18, YR16, YR04, E15, Y35, Y08

Mouse: W5, W3, W1, R20

Bat: BV29, BV25, BV23

Ghost: BV20, C00, Colorless Blender

Moon: Y00, BV20, C00, Colorless Blender

Gravestone: YR18, YR16, T5, T3, T1

Grass: G99, YG67, YG17

Sky: C9, BV29, BV25, BV23, BV20

Hope you like it and have a fantastic week!

Check out more adorable Fall images at High Hopes Rubber Stamps!

You can find lots of inspiration from the Design Team Divas at the High Hopes blog, and the High Hopes Rubber Stamps Facebook Fan page plus you can also follow us on
Instagram, Twitter and Pinterest.


Also entered this into the following contests

https://herpeacefulgarden.blogspot.com/

https://lostcoastportaltocreativity.blogspot.com/2022/10/challenge-154-cats-and-dogs-challenge.html


By The Moonlight!!


It’s Wednesday, and this week, I made a Hallowe’en card using High Hopes Rubber Stamps By The Moonlight – TT047 for the image and Block Happy Halloween – FF049 for the sentiment. These little friends are ready for some spooky fun on Hallowe’en.

To make my card this week, I began with a card base of Hammermill – Premium Colour 100 lb., cut and scored to be 5.5″ x 4.25″. I die cut the background from Stampin’ UP! – Magic In This Night Designer Series Paper to be the same size as the base. Using a combination of Tim Holtz Distress Ink – Black Soot, Villainous Potion, Seedless Preserves and Fossilized Amber and finger daubers, I added some extra colour to the background. Martha Stewart – Hallowe’en Washi Tape was placed across the bottom. I cut Doodlebug Design Inc. – Hallowe’en Parade cardstock to the size of 1-1/8″ x 4.25″. I ran this through my Xyron Create a Sticker and adhered it to the base card above the washi tape.

I stamped the main image and sentiment onto Copic Marker X-Press It Blending Card cardstock using my MISTI and Memento – Tuxedo Black ink. The main image was a little short for the full width of the card so I added some double-sided tape to a couple scraps of Copic Marker X-Press It Blending Card cardstock and adhered them to both sides of the fence. The image and sentiment were then both coloured in. The image was fussy cut and U-Line double-sided tape was applied to it. I popped it up onto the card and then cut off the excess from the fence on both sides.  I cut around the sentiment and then ran it through my Xyron Create a Sticker and applied it to a piece of Recollections – Black cardstock. Once again, I used my cutter to go around the sentiment, leaving a slight border. U-Line double-sided tape was applied to the back of the sentiment and it was popped up onto the striped paper background to complete the card.

Card Recipe:

Stamps: By The Moonlight – TT047 (High Hopes Rubber Stamps)

Sentiment: Block Happy Halloween – FF049 (High Hopes Rubber Stamps)

Inks: Memento – Tuxedo Black, Tim Holtz Distress Ink – Black Soot, Villainous Potion, Seedless Preserves and Fossilized Amber

Paper: Copic Marker X-Press It Blending Card, Hammermill – Premium Colour 100 lb., Doodlebug Design Inc. – Hallowe’en Parade (6 in. x 6 in.), Recollections – Black cardstock, Stampin’ UP! – Magic In This Night Designer Series Paper (12″ x 12″)

Tools: MISTI – Most Incredible Stamping Tool, U-Line double-sided tape, Xyron Create a Sticker

Image coloured with Copic Markers:

Black Cat: C8, C6, C4, C3, BV17, R22, R30

Mouse: W5, W3, W1, R02, R00

Bats: BV25, BV23

Fence: E49, E27, E25, E23, E21

Moon: Y00, BV20, C1, C00, Colorless Blender

Sentiment: YR04, Y17, V09, V06, V04, YG23, YG05

Hope you like it and have a fantastic week!

Check out more adorable Fall images at High Hopes Rubber Stamps!

You can find lots of inspiration from the Design Team Divas at the High Hopes blog, and the High Hopes Rubber Stamps Facebook Fan page plus you can also follow us on
Instagram, Twitter and Pinterest.

Boo Pals!!


It’s Wednesday, and this week, I made a Hallowe’en card using High Hopes Rubber Stamps Boo Pals – SS007 for the image and Boo-tiful Day – E233 for the sentiment. Hallowe’en is now only a few months away! Wow! Where has this year gone? Time seems to be flying by so fast!

To make my card this week, I began with a card base of Hammermill – Premium Colour 100 lb. cardstock, cut and scored to be 5.5″ x 4.25″. I cut the background paper from Recollections – Black cardstock to be the same size as the base card and attached it using double-sided tape. Using My Creative Time – Rectangle Frame Layers and my Anna Griffin Empress Mini Machine, I die cut Doodlebug – Pumpkin Party cardstock. I just love these little ghosts. With a finger dauber and Tim Holtz Distress Ink – Villainous Potion, I inked around all of the edges of the die cut. U-Line double-side tape was applied to the back of this piece and I popped it up onto the base card. Using the same cutting machine, I die cut Copic Marker X-Press It Blending Card cardstock using Nestabilities Dies – Deckled Rectangles – Large.

I stamped the main image onto the Copic Marker X-Press It Blending Card die cut using my MISTI and Memento – Tuxedo Black ink and coloured it in. I created my own moon shape using a 2″ circle mask that I had created earlier with a Fiskars hand punch. The eyes and nose for the cat and ghost were added in using a Sakura Glaze – Black pen. I ran the coloured image through my Xyron Creative Station and attached it to Recollections – Black cardstock. I didn’t have a larger die of the same shape, so I put the piece that I had adhered together into my Brother Scan ‘N Cut and created a .08″ border around it. This created the small black border to make the image pop. The sentiment was stamped onto a scrap piece of Copic Marker X-Press It Blending Card cardstock using my MISTI and Memento – Tuxedo Black ink and then it was die cut using my cutting machine and Poppystamps – Christmas Quotes. Tim Holtz Distress Ink – Wilted Violet and a finger dauber were used to go around the die cut.

The card was now ready to assemble. I added U-Line double-sided tape to the back of the frame and sentiment and popped them both up onto the card to finish it off.

Card Recipe:

Stamps: Boo Pals – SS007 (High Hopes Rubber Stamps)

Sentiment: Boo-tiful Day – E233 (High Hopes Rubber Stamps)

Inks: Memento – Tuxedo Black, Tim Holtz Distress Ink – Wilted Violet, Tim Holtz Distress Ink – Villainous Potion

Paper: Copic Marker X-Press It Blending Card, Hammermill – Premium Colour 100 lb., Doodlebug – Pumpkin Party (12″ x 12″), Recollections – Black cardstock

Die Cuts: My Creative Time – Rectangle Frame Layers, Spellbinders Nestabilities Dies – Deckled Rectangles Large (S4-202), Poppystamps – Christmas Quotes

Tools: MISTI – Most Incredible Stamping Tool, U-Line double-sided tape, Anna Griffin Empress Mini Machine, Sakura Glaze – Black, Brother Scan ‘N Cut, Xyron Creative Station

Image coloured with Copic Markers:

Black Cat: C8, C6, C4, C3, R30, R22, (Eyes and Nose – Sakura Glaze – Black)

Ghost: BV20, C0, Colorless Blender, (Eyes and Nose – Sakura Glaze – Black)

Tombstone: W5, W3, W1, W0, 100

Grass: G99, G94, G21, YG97, YG17

Sky: BV29, BV25, BV23. BV20

Moon: BV23, BV20, C1, C0, C00, Y00, Colorless Blender

Hope you like it and have a spooktacular week!

You can find lots of inspiration from the Design Team Divas at the High Hopes blog, and the High Hopes Rubber Stamps Facebook Fan page plus you can also follow us on
Instagram, Twitter and Pinterest.

Kitty In Training!!


It’s Wednesday, and this week, I made a Hallowe’en card using High Hopes Rubber Stamps Kitty In Training – TT052 for the image and Happy Halloween Script – F232 for the sentiment. Hallowe’en is one of our favourite times of year and my husband likes to go all out decorating our front yard. I always have fun finding new animated toys to add to our decorations and love seeing the little trick or treaters faces light up when they come to our house.

To make my card this week, I began with a card base of Hammermill – Premium Colour 100 lb., cut and scored to be 5.5″ x 4.25″. I die cut the background paper from Pebbles – Boo! cardstock to be the same size and attached it to the base using double-sided tape. Using My Creative Time – Rectangle Frame Layers and my Anna Griffin Empress Mini Machine, I die cut Scrapbook.com – Brights Smooth Cardstock for the larger frame. Using the same machine, I die cut Copic Marker X-Press It Blending Card cardstock using My Creative Time – Rectangle Frame Dies. The thin stripes were die cut using Scrapbook.com – Rainbow Smooth Cardstock and PinkFresh Studio – Slim Stripes dies. Lastly, I cut a black strip using Recollections – Black cardstock to the size of 4.25″ x 1-3/8″.

I stamped the main image onto the Copic Marker X-Press It Blending Card die cut using my MISTI and Memento – Tuxedo Black ink and coloured it in. The sentiment was stamped onto a scrap piece of orange paper cardstock using my MISTI and Memento – Tuxedo Black and then it was die cut using my cutting machine and Gina K Designs – Sentiment Strips.

The card was now ready to assemble. I ran the thin strips through my Xyron Create a Sticker and adhered them to the black strip leaving small spaces in between them to be the same as the witch’s socks. I ran this whole piece through my Xyron Create a Sticker again so that it would lay completely flat when I adhered it to the base card. I added U-Line double-sided tape to the backs of the rectangles and sentiment and popped up all of the layers onto the card. Tim Holtz Distress Ink – Black Soot was used to ink around all of the edges of the card and Stickles – Diamond was added to the small dots at the top of the card above the stripe lines. Gelly Roll Sparkle Pen was added to the sky to create some sparkly stars.

Card Recipe:

Stamps: Kitty In Training – TT052 (High Hopes Rubber Stamps)

Sentiment: Happy Halloween Script – F232 (High Hopes Rubber Stamps)

Inks: Memento – Tuxedo Black, Tim Holtz Distress Ink – Black Soot

Paper: Copic Marker X-Press It Blending Card, Hammermill – Premium Colour 100 lb., Pebbles – Boo! (6×6 in / 15.2×15.2 cm), Scrapbook.com – Brights Smooth Cardstock (4.25″ x 5.5″), Scrapbook.com – Rainbow Smooth Cardstock (4.25″ x 5.5″), Recollections – Black cardstock

Die Cuts: My Creative Time – Rectangle Frame Layers, My Creative Time – Rectangle Frame Dies, Gina K Designs – Sentiment Strips, PinkFresh Studio – Slim Stripes

Tools: MISTI – Most Incredible Stamping Tool, U-Line double-sided tape, Anna Griffin Empress Mini Machine, Xyron Create a Sticker, Stickles – Diamond, Gelly Roll Sparkle Pen

Image coloured with Copic Markers:

Blacks: N10, N9, N7, N6, N5, N4, N3

Skin: E21, E11, E04, E00, E000, R30, R20

Hair and Stripes on Socks and Hat: G19, G14, RV66, RV55, RV53, Y19, B63, Y38, Y18

Pumpkins: E07, YR18, YR16, YR15, YR12, YR08

Tree Stump: E79, E27, E25, E23, E21

Broomstick: E35, E34, E33, C5, C3, C00, Y35, Y32, Y19, YR31

Leaves and Grass: G99, G94, G21, YG97, YG17, YG63

Sky: BV29, BV25, BV23. BV20, Gelly Roll Sparkle Pen

Hope you like it and have a fantastic week!

Check out more adorable images in the new “Spring Fever Release” at High Hopes Rubber Stamps!

You can find lots of inspiration from the Design Team Divas at the High Hopes blog, and the High Hopes Rubber Stamps Facebook Fan page plus you can also follow us on
Instagram, Twitter and Pinterest.

Witchy and Friends!!


It’s Wednesday, and this week, I made a Hallowe’en card using High Hopes Rubber Stamps Witchy & Friends – TT019 for the image and Take Flight – HH008 for the sentiment. This little witch and her crew don’t look like they could frighten anyone, but I’m sure they will have lots of fun trying! LOL!

To make my card this week, I began with a card base of Hammermill – Premium Colour 100 lb. cardstock, cut and scored to be 4.25″ x 5.5″. I cut the background to be the same size using Doodlebug Design Inc. – Ghost Town patterned paper and adhered it to the base card using double-sided tape. Doodlebug Design Inc. – Hallowe’en Parade patterned paper was cut to the size of 1-7/8″ x 5.5″ and adhered directly to the base background using double-sided tape.

I stamped the sentiment and image using my MISTI and Memento – Tuxedo Black ink onto Copic Marker X-Press It Blending Card cardstock. Using my Anna Griffin Empress Mini die-cutting Machine and Hero Arts – Infinity Die Ovals, the image was die cut. A cutter was used to cut around the sentiment. Tim Holtz Distress Ink – Villainous Potion and a finger dauber were used to ink around the base card and sentiment. The image was coloured in and then I used a Sakura Glaze – Black pen for the eyes and noses on the characters. Then, I applied a small dot of Gelly Roll Sakura #8 Pen to the eyes and also to create stars in the night sky. U-Line double-sided tape was added to the back of the coloured image and sentiment and then they were both popped up onto the card. To finish it off, I added some YNS Gumdrops – Pretty Peacock Matte.

Card Recipe:

Stamp: Witchy & Friends – TT019 (High Hopes Rubber Stamps)

Sentiment: Take Flight – HH008 (High Hopes Rubber Stamps)

Inks: Memento – Tuxedo Black, Tim Holtz Distress Ink – Villainous Potion

Paper: Copic Marker X-Press It Blending Card, Hammermill – Premium Colour 100 lb., Doodlebug Design Inc. – Ghost Town (6″ x 6″), Doodlebug Design Inc. – Hallowe’en Parade (6 in. x 6 in.)

Die Cuts: Hero Arts – Infinity Die Ovals

Tools: MISTI – Most Incredible Stamping Tool, Anna Griffin Empress Mini Machine, U-Line double-sided tape, Sakura Glaze – Black, Gelly Roll Sakura #8 Pen, YNS Gumdrops – Pretty Peacock Matte

Image coloured with Copic Markers:

Skin: E21, E11, E04, E00, E000, R30, R20, Eyes (Sakura Glaze – Black, Gelly Roll Sakura #8 Pen)

Hair: RV66, RV63, RV55, G09, G05, YG03

Hat: 100, C8, C6, C4, V09, V06, V04, YR24, Y38, Y32

Cat and Spider: 100, C8, C6, C4, RV42, R30

Dress, Cape, Socks and Shoes: 100, C9, C7, C5, BV29, BV225, BV23, BV20, V17, V15, V12, V09, V06, V04, YR68, YR65, YR61, YG07, YG03, YG01

Bat: BV29, BV25, BV23 (Eyes – Sakura Glaze – Black, Gelly Roll Sakura #8 Pen)

Broom: E27, E25, E23, Y38, YR21, Y11

Pumpkin: YR09, YR07, YR04, YR02, Y08

Grass: YG99, YG97, YG95

Sky: BV31, BV25, BV23, BV20

Moon: B60, Y000, C1, C0, C00, Colorless Blender

Hope you like it and have a fantastic week!

You can find lots of inspiration from the Design Team Divas at the High Hopes blog, and the High Hopes Rubber Stamps Facebook Fan page plus you can also follow us on
Instagram, Twitter and Pinterest.

Free Broom Rides!!!


It’s Wednesday, and this week, I made a card using Free Broom Rides – TT017 by High Hopes Rubber Stamps for the main image and Wicked – FF052 (High Hopes Rubber Stamps) for the sentiment. Wouldn’t you love to go on a magical broom for a ride? I know I would.

To make my card this week, I began with a card base made from Hammermill – Premium Colour 100 lb. cut and scored to be 5.5″ x 5.5″. I cut the background paper from Echo Park – I Love Halloween paper pad to be the same size as the base and inked around the edges and onto the paper using Tim Holtz Distress Ink – Carved Pumpkin and a Picket Fence – Blending Brush. I applied this directly to the base card using double-sided tape. Using my Cuttlebug and Essentials by Tattered Lace Dies – Easel Slider dies, I die cut Copic Marker X-Press It Blending Card and orange cardstock. Using black cardstock I cut another piece to the size of 5.5″ x 1.25″. I applied this to the base using double-sided tape. I inked around the orange die cut with a Picket Fence – Blending Brush and Tim Holtz Distress Ink – Black Soot. I applied 3M VHB – 2 sided tape to the back of the orange die cut and applied it to the base.

The image and sentiment were then stamped using my MISTI and Memento – Tuxedo Black ink. I coloured in the image with Copic markers. The sentiment was die cut with my Cuttlebug and Whimsy – Quick Strips Die Set dies. I inked around the edges and on top by first using Tim Holtz Distress Ink – Carved Pumpkin with a Picket Fence – Blending Brush and then around the edges again, this time using Tim Holtz Distress Ink – Black Soot. To finish off the card, I applied 3M VHB – 2 sided tape to the back of the image and sentiment and popped them both up.

Card Recipe:

Stamp: Free Broom Rides – TT017 (High Hopes Rubber Stamps)

Sentiment: Wicked – FF052 (High Hopes Rubber Stamps)

Inks: Memento – Tuxedo Black, Tim Holtz Distress Ink – Black Soot, Tim Holtz Distress Ink – Carved Pumpkin

Paper: Copic Marker X-Press It Blending Card, Hammermill – Premium Colour 100 lb., Echo Park – I Love Halloween (6″x6″), Orange cardstock, Black Cardstock

Die Cuts:  Essentials by Tattered Lace Dies – Easel Slider, Whimsy – Quick Strips Die Set

Tools: MISTI – Most Incredible Stamping Tool, 3M VHB – 2 sided tape, Sakura Glaze – Black, Pen Gelly Roll Sakura #5 Pen, Gelly Roll Stardust – Clear, Picket Fence – Blending Brush

Image coloured with Copic Markers:

Skin: E21, E11, E00, E000, R30, R24, R20 (Eyes: Sakura Glaze – Black, Pen Gelly Roll Sakura #5 Pen)

Hair: YG67, YG23, YG17

Dress: BV29, BV25, BV23, V06, V04, V01, Gelly Roll Stardust – Clear

Socks: BV25, BV23, V04, V01, YG23, YG17

Boots, Cat and Hat: BV29, BV25, BV23, R30, R20, V04, V01, YG17, YG13, E15, YR24, Y08 (Eyes: Sakura Glaze – Black, Pen Gelly Roll Sakura #5 Pen)

Sign Post, Pole and Broom Handle: E37, E35, E34, E31

Broom: E08, YR18, YR15, YR12, YR02, E97, C5, C3, C1

Spider: C7, C5, C3 (Eyes: Sakura Glaze – Black)

Grass: G17, G14, G07

Sky: B02, B01, B00, B000, B000

Hope you like it and have a fantastic week!

You can find lots of inspiration from the Design Team Divas at the High Hopes blog, and the High Hopes Rubber Stamps Facebook Fan page plus you can also follow us on
Instagram, Twitter and Pinterest.

Pumpkin Buddies!!!


It’s Wednesday, and this week, I made a card using Pumpkin Buddies – TT020 by High Hopes Rubber Stamps for the main image and Happy Halloween Script – F232 (High Hopes Rubber Stamps) for the sentiment. These little Hallowe’en friends look like they’re getting ready to scare unsuspecting little ones this year. LOL!

To make my card this week, I began with die-cutting Copic Marker X-Press It Blending Card with My Creative Time – Rectangle Frame Layers for the main image and Whimsy Stamps – Quick Strips Die Set for the sentiment. The image and sentiment were then stamped using my MISTI and Memento – Tuxedo Black ink onto the die cuts. The image and grass were coloured in with Copic markers. The nose and eyes for the characters were coloured in using Sakura Glaze – Black Pen and Gelly Roll Sakura #8 Pen. I stamped out the image a second time and used my Brother Scan and Cut to cut it out so that I could use it as a mask to put over the coloured image. I also die cut a 1.5″ circle out of Inkadoo Stamping Mask Paper for the moon.

I placed the mask over top of the coloured image and the moon masked circle onto the large rectangle before I inked in the sky using various Tim Holtz inks listed below. I watched a video on YouTube by Glitter Grunge Greetings for inspiration on how to create my night sky. Once the sky was complete, I removed the mask for the moon and used the outside paper that I had cut the moon from to protect the sky while I inked in the texture for it using Picket Fence Studio Blender Brushes, Tim Holtz Ranger Distress Oxide – Fossilized Amber and Tim Holtz Distress Ink – Hickory Smoke. I spritzed the moon and sky with some water. I removed all of the masks at this point and using double-sided tape, I applied the coloured image to my card base using The Paper Studio – Primary Base Colours 4.25″ x 5.5″. Lastly, I applied some Tim Holtz Ranger Distress Oxide – Fossilized Amber to the outside edges of my sentiment and pop it up on the card using 3M VHB – 2 sided tape.

Card Recipe:

Stamp: Pumpkin Buddies – TT020 (High Hopes Rubber Stamps)

Sentiment: Happy Halloween Script – F232 (High Hopes Rubber Stamps)

Inks: Memento – Tuxedo Black, Tim Holtz Ranger Distress Oxide: Fossilized Amber, Wilted Violet, Black Soot, Faded Jeans and Seedless Preserves, Tim Holtz Distress Ink – Stormy Sky, Chipped Sapphire, Tumbled Glass, Hickory Smoke

Paper: Copic Marker X-Press It Blending Card, The Paper Studio – Primary Base Colours 4.25″ x 5.5″

Die Cuts:  My Creative Time – Rectangle Frame Layers, Whimsy Stamps – Quick Strips Die Set – WSD330

Tools: MISTI – Most Incredible Stamping Tool, 3M VHB – 2 sided tape, Sakura Glaze – Black, Pen Gelly Roll Sakura #8 Pen, Brother Scan and Cut, Inkadoo Stamping Mask Paper, Picket Fence Studio Blender Brushes

Image coloured with Copic Markers:

Bat: BV29, BV25, BV23

Pumpkin: E08, YR18, YR16, YR12, Y04, G99, G21, YG67, YG19, Y17, Y15, Y08

Cat: N10, N6, N5, R30, R20, YG06

Dog: E29, E27, E25, E23, E34, E33, E31

Oak Leaves: E13, E07, YR27, YR12

Grass: G99, G21, YG67, YG19

Hope you like it and have a fantastic week!

You can find lots of inspiration from the Design Team Divas at the High Hopes blog, and the High Hopes Rubber Stamps Facebook Fan page plus you can also follow us on
Instagram, Twitter and Pinterest.

Happy Trick or Treating!


It’s Wednesday, and today I’m sharing a CAS card using Witchy Poo with Kitty Frame – P120 (High Hopes Rubber Stamps) for the main image and Trick or Treat Greeting – H231 (High Hopes Rubber Stamps) for the sentiment. Witchy Poo and Kitty are looking out to see all of the wonderful little trick or treaters coming to visit them for their treats! What are you dressing up as this year?

To make the card, I started with a 5.5″ x 4.25″ cards base. My Mind’s Eye – Dolled Up – 6″ x 6″ was cut to the same size and adhered to the base card with double-sided tape. Tim Holtz Distress Ink – Walnut Stain ink was used to edge across the bottom of the card. The image was stamped and then coloured in with Copic Markers. I used my Brother Scan and Cut to cut around the image and then used a black marker to go around all of the edges.

The sentiment was stamped and then die cut with Essentials by Tattered Lace Dies – Easel Slider. Tim Holtz Distress Ink – Carved Pumpkin and a black marker were used to ink all of the 4 sides of the sentiment.

The coloured image and sentiment were popped up onto the card using 3M VHB – 2 sided tape and some stickers were add for embellishments.

Card Recipe:

Stamp: Witchy Poo with Kitty Frame – P120 (High Hopes Rubber Stamps)

Sentiment: Trick or Treat Greeting – H231 (High Hopes Rubber Stamps)

Inks: Memento – Tuxedo Black, Tim Holtz Distress Ink – Carved Pumpkin, Tim Holtz Distress Ink – Walnut Stain

Paper: Copic Marker X-Press It Blending Card, My Mind’s Eye – Dolled Up – 6″ x 6″, Orange Cardstock

Die Cut: Essentials by Tattered Lace Dies – Easel Slider

Tools: MISTI – Most Incredible Stamping Tool, Cuttlebug, Hallowe’en Stickers – HCM0001F, HCM0001C, HCM0001A, Brother Scan and Cut

Image coloured with Copic Markers:

Skin: BG96, BG93, BG90, YG23, G40, R22, R20

Hair: E18, E08, YR18, YR14

Hat and Dress: V25, V17, V15, V09, V06, V04, YR68, YR65, YR18, YR15, YR12, YR00, Gelly Roll Sparkle Pen for Swirls

Cat: C9, C7, C5, C3, YG09, YG07, YG03, Y02, R22, R02, R00

Moon and Stars: V17, V15, V09, V06, V04

Window Background: E15, Y38, Y35, Y15, Y06

Window Frame: E29, E25, E23

Hope you like it and have a spooktacular week!

You can find lots of inspiration from the Design Team Divas at the High Hopes blog, and the High Hopes Rubber Stamps Facebook Fan page plus you can also follow us on
Instagram, Twitter and Pinterest.


Witchy Poo Hallowe’en


Welcome High Hopes Rubber Stamps Fans!

It’s Wednesday, and this month at High Hopes Rubber Stamps we are celebrating Hallowe’en.  This week, I used Witchy Poo with Kitty S145 (High Hopes Rubber Stamps) and decided she would make a great bookmark. Witchy Poo is all dressed up in her finest and ready for all of the little trick or treaters coming to visit. Kitty wasn’t overly excited but he’ll be participating too! LOL!

I decided to make it a spooky night sky for the background and added in stars with some Glitter Ink and Hologaphic Embossing. I also drew in the moon and clouds.

Lastly, to finish it off, I used some rub-ons that I had in my craft stash.

Card Recipe:

Stamp: Witchy Poo with Kitty S145 (High Hopes Rubber Stamps)

Sentiment: (High Hopes Rubber Stamps)

Inks: Memento – Tuxedo Black

Paper: Copic Marker X-Press It Blending Card

Die Cut: Die-Namics MFT-489 PCD Fishtail Figs STX

Tools: MISTI – Most Incredible Stamping Tool, Cuttlebug

Image coloured with Copic Markers:

Skin: BG96, BG93, BG90, YG23, G40

Hair: V17, RV04, YG23, YR02, RV93

Hat and Dress: V09, V06, V04, YR18, YR15

Pantaloons: YG09, YG07, YG03

Socks: V06, V04, YR18, YR15, YG07, YG03

Shoes: V09, V06, V04, N4, N6

Cat: C10, C8, C6, C5

Night Sky: BV08, BV04, BV02, BV00, VersaMarker, Ranger Holographic Embossing Powder, Stardust Clear Glittering Gel Ink

Moon: Y000, Y11

Clouds: W3, W1, W00

Ground: E39, E33, E31


Hope you like it and have a spooktacular week!

You can find lots of inspiration from the Design Team Divas at the High Hopes blog, and the High Hopes Rubber Stamps Facebook Fan page plus you can also follow us on
Instagram, Twitter and Pinterest.


Beary Happy Birthday 2017


Hi There,

Back to Birthday card that I made for my friend who LOVES Pandas.

marilynbdin2017fr

Close Up of Panda:

marilynbdin2017frcu

Image: High Hopes – Sitting Pretty Panda – S270.

Background Paper – Sugar Shoppe – Doodlebug Design Inc. – 6 x 6 paper pad.

Sentiment Front: Jaded Blossom – Forest Friends

Die Cuts – My Creative Time -Stitched Squares Inside and Out, My Creative Time – Sentiment Label Dies – MCT224, My Creative Time – Scalloped Stitched Oval Dies and for the balloons – Craftin Desert Diva’s Party Dies.

marilynbdin2017

Sentiments Inside:

Stampin Up! – Endless Birthday Wishes, Stampin Up! Remembering Your Birthday

Inside Image – Larissa Artist – Tiddly Inks

Both images coloured with a mixture of Copic and Spectrum Noir markers. Used Sakura Glaze – Black for the nose, eyes and whiskers.

Hope you like it!

Entered card into High Hopes February Challenge which can be found here: “http://highhopesstamps.blogspot.ca/p/challenges.html”.


Meowy Christmas


Sharing a card made from Too Cute By Jessica – Christmas Animals SVG Cuts designed by Jesssica Owens 2014.

xmascat

Here is a close-up of the image.

xmascat-cu

Using my Cricut Explore and Cricut Design Space, I uploaded the images and then cut the pieces out for the cat and wreath.

I decided to add some layers to the wreath using Martha Stuart branch punch and then adding some Xmas Red stickles to make some holly.

For the eyes, I used Gelly Roll Sakura #8 Pen.  I drew in some eyelashes with Pigma Micron 01 black marker, but you can’t really see them. Thought it would be a cool idea to use black thread for the whiskers to show up.

Sentiment was stamped with VersaMark ink and heat embossed with Ranger Embossing Powder White – Extra Fine Detail.

Stamp used is from Jaded Blossom Stamps – Meow and Forever.

Die cuts are from My Creative Time – Scalloped Stitched Oval Dies.

Embossing folder used – Swiss Dots was then used on the scalloped die cut and on oval – Christmas Ornaments on Recollections – Christmas Inkjet Printable Glitter Paper – 8.5 x 11″.

Background paper is from American Crafts – Holiday – 6 x 6″ (15.2 x 15.2 cm) paper pack.

Hope you like it!


Super Chunky – The East Wind Card


Hi There,

This sweet little image is from The East Wind called Super Chunky. They were offering it as part of the celebration going on at Kit and Clowder.

There is also a contest, which I will be entering the 10,000 Party – Colouring Challenge TEW on Kit and Clowder Facebook page.

Loved this image as soon as I saw it!!! Reminded me so much of my sweet little girl “Boo”.  As many of you know, I make cards for my vet for practically every occasion from “Boo” and the staff and vet love receiving them. (They’ve actually kept every card I’ve made for them and display them!!!) LOL! Does make me feel really good though! Thought this would be perfect for a Thanksgiving card this year from her, resting after a nice big meal.

I coloured this image using Spectrum Noir Markers and then added in a few shadows with PrismaColor Premier coloured pencils.

Super-Chunky-EastWinHere is a close-up:

Super-Chunky-EastWinCU


Basket – GB1, TN1, TN3, PC1003, PC943

Cat – IG4, IG6, IG8, PC935 (Ears – CR4)

Whiskers – Micron 01 Archival Ink Marker

Wool – PL2, PL4, PL5

Needles – BT1, BT2, BT4

Oranges – OR1, OR2, OR3

Bow – PL1, BP2, BP6, Permanent Chalk Markers – White for polka dots

Paper – Recollections Signature – Kaitlin – 12 x 12″

Pebbles – Harvest Paper Pad – 6 x 6″

Sentiment – My Creative Time – Belly Bands Sentiment Stamp Set

Hope you like it.


Hubby Easter Card


Hi There,

Back again to share the Easter card that I had made for my husband from me and our cat “Boo”. He loved it!!!

I made the card using Too Cute by Jessica Hallowe’en Cats by Jessica Weible Illustrations, LLC. and DoodleBug Ballerina by Faery Ink.

BooEasterFaeryInk

The faces on the cat was stamped with Memento – Tuxedo Black ink using Peachy Keen Stamps PK-110 Here Kitty Kitty Face Assortment.

The ballerina was coloured in with Spectrum Noir markers. Used Gelly Roll Sakura #8 Pen for the whites on the eyes.

Background paper is from Recollections Easter Printed Stock and also Cardstock Paper – All Seasons 6 x 6″ (15.2 x 15.2 cm).

Used My Creative Time -Stitched Squares Inside and Out to cut out the borders.

Hope you like it!

Xmas Card for Vet 2015


Back to share this year’s card for our vet Dr. Aziz and his wonderful staff from “Boo” our cat.

VetXmas2015F_300 dpi VetXmas2015IN_300 dpi


The stamp on the front page is from High Hopes Rubber Stamps – “Wasn’t Me! TT013” by Dina Gerner.

The sentiment was typed out on my computer in Word. I saw this sentiment at “One Crazy Stamper” on another card created by Sheri Burry and loved it!

The image was coloured with my Spectrum Noir markers.

For the cat I used – IG2, IG4, IG6 and IG8. CR4 for cheeks and ears. Bow – DR6, DR8. Nose and Eyes – Sakura Glaze – Black

Tree: LG2, J3, GT2. EB2, EB4, EB6 and DR6.

Christmas Balls – DR6, DR8. PL2, PL3, PL4. CT2, CT4. BT4, BT8. Wink of Stella – Clear.

Mouse – TN2, TN3, TN4.

Ribbon – American Crafts

Background Paper – American Crafts – “Holiday” 6″ x 6″ (15.2 x 15.2 cm)

Frames – My Creative Time – Stitched Squares Inside and Out

Gold border around frames – Sharpie  – Medium Gold

Inside of card:

Image: Penny Black – Holly Day Critters

For the cat I used – IG2, IG4, IG6 and IG8. CR4 for cheeks and ears

Tree Boughs – Tree: LG2, J3, GT2.

Christmas Balls – DR6, DR8 and BT4, BT8. Wink of Stella – Clear.

IG1 was used for shadow on both images.

Sentiment: Just Rite Cling – Sparky and Friends

Hope you like it.

Also entered into “http://onecrazystampercom.blogspot.ca/2015/12/december-challenge-christmaswinter.html”

Entered into https://www.facebook.com/High-Hopes-Rubber-Stamps-1041614605853195/ (Christmas / Winter Challenge)


OCS_WonChallengeButton


Hallowe’en 2015


Happy Hallowe’en 2015

Halloween Front 2015-2 in 300 dpi - CopyHalloween Inside 2015 in 300 dpi

This is my card for the vet this year from our black cat “Boo”. For each occasion the vet and staff get a new card from “Boo”.

Hallowe’en is our favourite though.

The black cats and caption “Don’t be a Scaredy Cat” are from the set “Don’t be a Scaredy Cat” by Too Cute by Jessica – Jessica Owens 2014.

I fell in love with set as soon as I saw it.

The word “Boo” was a weekly freebie from “Treasure Box Designs”.

The “Happy Hallowe’en” sentiment on the inside of the card is from Cricut Cartridge “Phrases”.

The following stamps:

Lamp post and sign, ghost, mummy, little spiders and “Trick or Treat” sentiment are all from “My Creative Time – Too Cute to Spook” Stamp and Die set.

Coloured in the mummy’s face with PrismaColor Premier pencils and the used Gamsol for shading. On the pumpkins and “Boo” title, I outlined everything with chalk.

All svg files were cut using my Cricut Explore and Cricut Design Studio.

Patterned paper is from “doodlebug design inc. – 6 x 6 paper pad – Halloween parade”.

Happy early Hallowe’en everyone!

Happy Easter to the Vet From Boo


Happy Easter Everyone!

Here is the latest card that I made for the vet from

our black cat Boo for this year.

Boo Easter 2015 front

The digi stamp is free from Sliekje’s digi stamps. (http://sliekje.blogspot.ca/).

Thanks for sharing Sliekje. Love your designs.

The little rabbits are from my new stamp set from Craftin Desert Divas (www.craftindesertdivas.com) Hunny Bunny stamp set. I just love it.

I used Memento Tuxedo Black Ink to stamp the little bunnies and the sentiment. Next I drew in the inside of the rabbit ears, face, hands, feet and tail with my Micron 05 Black pen. I used my copics to colour the background for the sentiment.

I used We R memory keepers Quickutz Nesting Frame 7 dies to cut the layers of coloured paper using my Cuttlebug.

Inside the card:

Boo Easter 2015 inside

I used the same stamp set for the bunny in the basket and the sentiment. I coloured in the bunny, eggs, basket, etc. with my Spectrum Noir and Copic markers. Finished off the highlights with my PrismaColor Premier coloured pencils and Gamsol.


Boo’s Valentine Card


This was Boo’s Valentine card to the vet this year. I make cards for all occasions for her vet.

This is a little late getting posted, but I thought I would share it with you anyways.

To make this easel card, I used my Cricut Explore to cut the heart out of the cardstock and the really adorable cat from Miss Kate Cuttables.

The cat was a free svg download from http://www.misskatecuttables.com/.

It can be found here: http://www.misskatecuttables.com/products/animals-pets/freebie-of-the-day-cute-valentine-kitty.php

I altered the pattern to give my cat pink paw pads and a tail that was all black.

The sentiment is from Peachy Keen stamps PKS-13 January 2103.

Boo V card

Above is a close up from my scanner of the finished image.

IMG_20150213_072807

This was taken with my phone to show how it stands as an easel card.

Materials used: Light and hot pink cardstock. Black, light and medium grey cardstock. Miniature green gems for the eyes. Background paper from K&C Company Kelly Panacci designer paper, KP  Valentine. Inkssentials Glossy Accents for the nose. A small piece of hot pink ribbon.


Merry Christmas From Boo 2014


Merry Christmas and A Happy New Year from Boo (our cat)!!!

This year I used a stamp from Stampa Rosa I22-2628 Kitty under the Tree and first stamped with Memento Tuxedo Black ink.

Boo Xmas Card 2014

To colour, I used my Copic, Spectrum Markers and Prismacolor Premier Pencils with some Gamsol and blending stumps.

Then I added a little bit of glitter with my Atyou Spica coloured pens.

For the silver around the picture and the frame, I used Pilot Silver Marker Medium Point.

The background red paper pattern is from some scrap paper that I had and the main card is from Recollections Christmas card collection.

Lastly, I stamped the sentiment with Top Boss embossing pad and Stampendous Stamp-n Stuff Silver Tinsel Opaque using Poly Clear Hero Arts Stamp.


Hope you like it. Have a joyous wonderful Christmas and a Happy New Year!


Happy Hallowe’en 2014


Halloween 2014 Front Halloween 2014 Inside

Hi There,

Here is my latest addition for a Hallowe’en card to the vet this year from “Boo” our black cat.

To make the card I used orange cardstock. I then layered the front with some paper from Doodlebug Design Inc. Hallowe’en Parade.

Used my Cuttlebug and Nesting circle cutting die to cut a hole through the front of the card. I used a smaller circle die and some yellow cardstock to make the moon on the inside of the card.

I used Mememto ink to stamp the pumpkin using a stamp from PKSC-09_September 2012. Then I used copic markers to colour and outline the stamp. For the face I used PKSC-22_October 2013.

Next I used just the face portion of the cat from PK-1333 Faceless Puppy and Faceless Kitten and the kitten face that also came with the stamp. Coloured in the stamp using Spectrum Noir markers.

The ghosts were made using PK-131 Happy Haunting Ghosts.

PK and PKSC are all stamps from Peach Keen Stamps.

Lastly, I added a few embellishments to finish off the card.

Happy Hallowe’en everyone!

Happy Bird-ay Canada!


Canada Day 2014Ft Canada Day 2014In

Hi There,

Happy Canada Day everyone! Here is “Boo’s” new card for the vet this year. For those of you who don’t know her, “Boo” is our black cat. We met Boo about 4 years ago, fell in love with her and brought her home to live with us. She was 6.5 years old. She was a rescue cat and because here name was Boo, I thought it would be fun to make a card for Hallowe’en from her. The vet and staff loved it and I’ve been making cards for the vet for every occasion from her since. Hope you like this one!

Supplies: Front of Card

Peachy Keen Stamps PKSC-06 June 2012, Bird and Sentiment

Peachy Keen Stamps PK-1350 Cool Cats

Cricut – Go Canada! Cartridge; Fireworks from Creative Memories.

Inside of Card:

Penny Black 30-180 Sunny Days

PrismaColor Premier Coloured Pencils, Blender stumps and Blending solution for colouring.