Tag Archive | Doodle Bug Designs Inc. – Sugar Shoppe – 6″ x 6″ paper pad

Wine Birthday Divas!!!


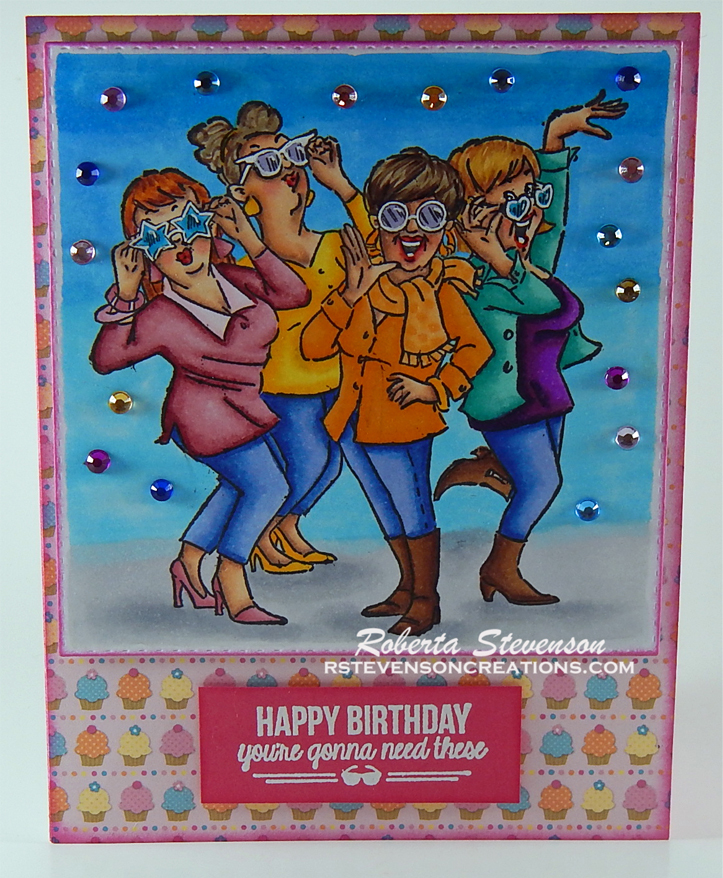
Sharing a birthday card today that I made for my aunt using Wine Divas – SC0677 (AI Art Impressions) for both the images and sentiments. My aunt is into crafts and cardmaking too and sometimes when I stay over at her house, we like to share a bottle of wine together, talk and laugh. That is why when I saw this stamp set, I knew I had to make this special card for her birthday. LOL!

To make this card, I used my MISTI to get a nice clean stamped image using Memento – Tuxedo Black and Copic Marker X-Press It Blending Card. Next I die-cut out the stamped image using my Cuttlebug and Your Next Stamp – Stitched Rectangle Die Set (YNSD214). I cut the background paper from Doodle Bug Designs Inc. – Sugar Shoppe at 5.5″ x 4.25″ and mounted it onto top of a white card base 5.5″ x 4.25″. I then inked around all of the edges using Tim Holtz Distress Ink – Picked Raspberry. Before, popping up the base image onto the background with 3M VHB – 2 sided tape, I used my MISTI, Versa Fine – Onyx Black and Ranger – Clear Super Fine Detail embossing powder to add in the sentiment. I heat set the embossing powder with my Marvy Uchida – Embossing Heat Tool.

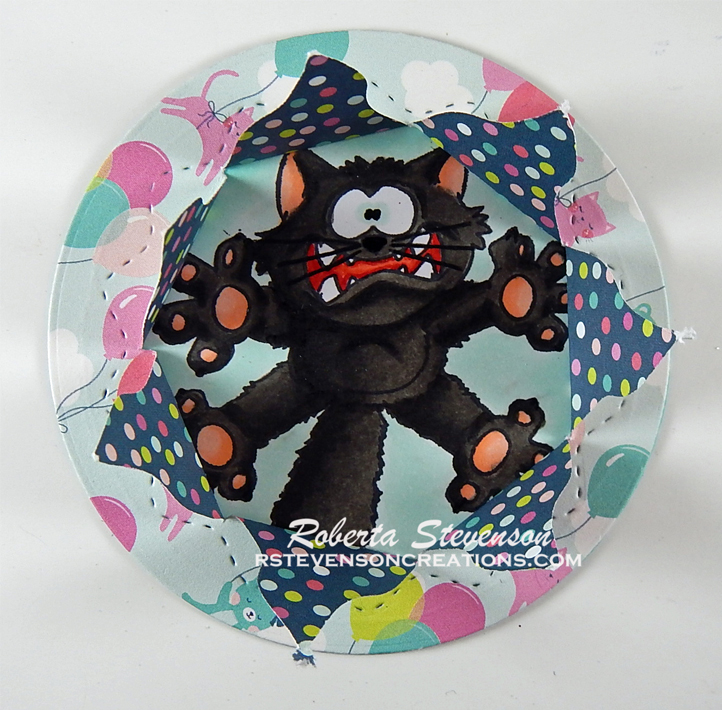
For the inside of the card, I mounted the background paper from Doodle Bug Designs Inc. – Sugar Shoppe – 6″ x 6″ paper pad onto a card base of 5.5″ x 4.25″. Then, I fussy cut around the image and attached it to the card base using 2 sided tape. I embossed the sentiment to finish off the inside.

Card Recipe:

Stamp and Sentiment: Wine Divas – SC0677 (AI Art Impressions)

Inks: Memento – Tuxedo Black, VersaFIne – Onyx Black, Tim Holtz Distress Ink – Picked Raspberry

Embossing Powder: Ranger – Clear Super Fine Detail embossing powder

Paper: Copic Marker X-Press It Blending Card, Doodle Bug Designs Inc. – Sugar Shoppe – 6″ x 6″ paper pad

Die Cuts:  Your Next Stamp – Stitched Rectangle Die Set (YNSD214)

Tools: MISTI – Most Incredible Stamping Tool, Cuttlebug, 3M VHB – 2 sided tape, Marvy Uchida – Embossing Heat Tool

Image coloured with Copic Markers:

Skin: E000, E00, E04, E11, E21, R29, R24, R22, R20

Hair Combos: E47, E44, E43, E18, E08, YR18, YR14, E29, E25, E21, E15, YR23, Y21

Blouses, Dress, Earrings and Shoes: BG15, BG11, BG10, BV04, BV02, BV01, BV00, E35, E34, E33, Colorless Blender

Pants: B26, B23, B21

Table and Chairs:  W3, W2, W1, W0

Big Chair: E37, E35, E34, E33

Wine: R29, R17, R14

Wine Bottle: R29, R17, R14, E15, Y38, Y17, Y08

Purse: E15, Y38, Y17, Y08, YR27

Background: R85, R83, R81, Y08, Y04, Y02

My Aunt loved her card and I hope that you do too! Hope you like it and have a great week!

Birthday Girl! We Need To Put the Shades On!


Sharing a birthday card today that I made using Sunny Shades Set – SC4988 (AI Art Impressions) for both the image and sentiment.

To make this card, I used my MISTI to get a nice clean stamped image using Memento – Tuxedo Black and Copic Marker X-Press It Blending Card. Next I die-cut out the stamped image and background papers using my Cuttlebug and My Creative Time – Stitched Squares Inside and Out. I then inked around the edges using Tim Holtz Distress Ink – Picked Raspberry and Tim Holtz Distress Inks – Peacock Feathers.

I mounted the background paper from Doodle Bug Designs Inc. – Sugar Shoppe – 6″ x 6″ paper pad onto a card base of 5.5″ x 4.25″. Then, I popped up the next layer using 3M VHB – 2 sided tape. I mounted the main coloured image onto some Hotpink cardstock and then cut a narrow edge around it. Lastly, I popped up it up with 3M VHB – 2 sided tape.

Card Recipe:

Stamp and Sentiment: Sunny Shades Set – SC4988 (AI Art Impressions)

Inks: Memento – Tuxedo Black, VersaMark, Tim Holtz Distress Ink – Picked Raspberry

Embossing Powder: Ranger Embossing Powder White – Extra Fine Detail

Paper: Copic Marker X-Press It Blending Card, Doodle Bug Designs Inc. – Sugar Shoppe – 6″ x 6″ paper pad, Hotpink cardstock

Die Cuts:  My Creative Time – Stitched Squares Inside and Out

Tools: MISTI – Most Incredible Stamping Tool, Cuttlebug, 3M VHB – 2 sided tape

Image coloured with Copic Markers:

Skin: E000, E00, E04, E11, E21, R29, R24, R22, R20

Hair Combos: E47, E44, E43, E18, E08, YR18, YR14, E29, E25, E21, E15, YR23, Y21

Blouses, Earrings and Shoes: BG18, BG13, BG11, Y19, Y15, Y13

Pants: B26, B23, B21

Boots: E27, E25, E23

Blouse 1, Earrings and Shoes:  R89, R85, R83, R81, RV01, RV000

Blouse 2, Earrings and Shoes: Y17, Y15, Y13

Blouse 3, Earrings and Scarf: YR21, YR20, YR16, YR14, YR12

Blouse 4 and Jacket: BG15, BG13, BG11, V09, V06, V04

Glasses: BG05, BG02, BV01, BV00, Gelly Roll Sakura #5 Pen

Background: B04, B02, B01, B00, C2, C1, C0

Hope you like it and have a great week!

Aged to Perfection!!!


Sharing a card today that I made using Big Birthday Wishes – SC0794 (AI Art Impressions) for both the image and sentiment.

To make this card, I used my MISTI to get a nice clean stamped image using Memento – Tuxedo Black and Copic Marker X-Press It Blending Card. Next I die-cut out the stamped image and background papers using my Cuttlebug and My Creative Time – Stitched Squares Inside and Out. I then inked around the edges using Tim Holtz Distress Ink – Picked Raspberry and Tim Holtz Distress Inks – Peacock Feathers.

I mounted the background paper from Doodle Bug Designs Inc. – Sugar Shoppe – 6″ x 6″ paper pad onto a card base of 5.5″ x 5.5″. Then, I popped up the next layer using 3M VHB – 2 sided tape. I mounted the main coloured image onto some Hotpink cardstock and then cut a narrow edge around it. Lastly, I popped up it up with 3M VHB – 2 sided tape.

Card Recipe:

Stamp and Sentiment: Big Birthday Wishes – SC0794 (AI Art Impressions)

Inks: Memento – Tuxedo Black, Versa Fine – Onyx Black, Tim Holtz Distress Ink – Picked Raspberry, Tim Holtz Distress Inks – Peacock Feathers

Embossing Powder: Ranger – Clear Super Fine Detail embossing powder

Paper: Copic Marker X-Press It Blending Card, Doodle Bug Designs Inc. – Sugar Shoppe – 6″ x 6″ paper pad, Hotpink cardstock

Die Cuts:  My Creative Time – Stitched Squares Inside and Out

Tools: MISTI – Most Incredible Stamping Tool, Cuttlebug, 3M VHB – 2 sided tape

Image coloured with Copic Markers:

Skin: E000, E00, E04, E11, E21, R22, R20

Hair: E47, E44, E43

Blouses, Earrings and Shoes: BG18, BG13, BG11, Y19, Y15, Y13

Pants: B26, B23, B21

Hats and Aprons:  BG13, BG11, RV04, RV02, C2, C1, C0, Colorless Blender

Cake: Y19, Y15, Y13, BG13, E29, E27, E25, R85, R83, R81

Candles: RV09, RV04

Cake Stand: E15, Y35, Y19

Background: B04, B02, B01, B00, N4, N2, N0

Hope you like it and have a great week!

Eek! You’re How Old???


Today I’m sharing a birthday card that I made for my sister-in-law whose nickname is “Kitty”. I have a lot of fun trying to come up with new creations with cats for her birthday each year. This year, I decided to use Going Catty – DP1021 (Clearly Whimsy Stamps), for my main image on the front of the card. Shown below is how it looked before I placed the die cut from Peek A Boo Poppers (YNSD219) – (#Your Next Die) over top of it.

To create the die-cut, I first used Lifestyle Crafts Cutting Dies – Nesting Circles to cut out the main image and then again to cut out the pop-out die cut using Echo Park Paper Co. – Imagine That. I then added glue all around the outside of the circle and glued the two pieces together as shown below.

I created a card base 5.5″ x 4.25″ and then mounted paper from Doodle Bug Designs Inc. – Sugar Shoppe. I popped up the circle previously cut out with 3M VHB – 2 sided tape. I used the sentiment from the same Whimsy Stamp Set. I embossed it using VersaMark and Ranger Embossing Powder White – Extra Fine Detail. Then I cut it out using Ribbon End Dies – My Creative Time. Lastly, I edged around all of the edges using Tim Holtz Distress Ink – Picked Raspberry. Shown below is the card with the pop-up closed.

This is the front of the card with the pop-up open.

On the inside of the card, I used the image from Birthday Critters – 30-466 (Penny Black) and sentiment from
Whatnot Sentiments Set Twelve – CYNS638 (#Your Next Stamp).

All images were stamped onto Copic Marker X-Press It Blending Card using Memento – Tuxedo Black ink and my MISTI.

Card Recipe:

Stamps: Going Catty – DP1021  (Clearly Whimsy Stamps), Birthday Critters – 30-466 (Penny Black)

Sentiment: Going Catty – DP1021 (Clearly Whimsy Stamps), Whatnot Sentiments Set Twelve – CYNS638 (#Your Next Stamp)

Inks: Memento – Tuxedo Black, Tim Holtz Distress Ink – Picked Raspberry, Versa Fine – Onyx Black, VersaMark

Embossing Powder: Ranger Embossing Powder White – Extra Fine Detail, Ranger – Clear Super Fine Detail embossing powder

Paper: Copic Marker X-Press It Blending Card, Doodle Bug Designs Inc. – Sugar Shoppe – 6″ x 6″ paper pad, Echo Park Paper Co. – Imagine That 6″ x 6″

Die Cuts: Peek A Boo Poppers (YNSD219) – (#Your Next Die), Ribbon End Dies – My Creative Time, Lifestyle Crafts Cutting Dies – Nesting Circles

Tools: MISTI – Most Incredible Stamping Tool, Cuttlebug, 3M VHB – 2 sided tape, Marvy Uchida – Embossing Heat Tool

Image coloured with Copic Markers:

Cats: W9, W8, W6, W5, R30, R27, R24, R22, R02, Sakura Glaze – Black

Party Hat and Birthday Banner: BG13, BG11, YR16, YR12, RV66, RV63, Y17, Y08, BG05, BG02

Background: BG13, BG11, BG10

Hope you like it and have a great week!

You can find more cards to inspire you at Roberta Stevenson on my Facebook page.

Birthday Wishes!


Today I’m sharing a birthday card that I made for my mom using Yummy Cupcake Bunny (CYNS592) (#Your Next Stamp) on the front of the card and  Rosie Rabbit Gift (CYNS542) (#Your Next Stamp) on the inside of the card.

On the inside:

To make the card I stamped the images on to Copic Marker X-Press It Blending Card using Memento – Tuxedo Black and my MISTI – Most Incredible Stamping Tool to get a nice clean crisp image. After colouring the images, I fussy cut around them both. I then used My Creative Time – Scalloped Stitched Oval Dies to die cut an oval out of Doodle Bug Designs Inc. – Sugar Shoppe paper. I cut the remainder of the paper to be 4″ x 5.25″ and turned it over to the opposite side and mounted it onto a card base of 4.25″ x 5.5″. I used Tim Holtz Distress Ink – Picked Raspberry to ink around the edges.

For the sentiments I used Versa Fine Onyx Black and VersaMark ink and then embossed both with Ranger embossing powders listed below.

To complete the card, I mounted the bunny on the front with 3M VHB – 2 sided tape to pop it up as well as the sentiment.

Card Recipe:

Stamp and Sentiment: Yummy Cupcake Bunny (CYNS592) (#Your Next Stamp), Rosie Rabbit Gift (CYNS542) (#Your Next Stamp)

Inks: Memento – Tuxedo Black, Tim Holtz Distress Ink – Picked Raspberry, Versa Fine – Onyx Black, VersaMark

Embossing Powder: Ranger Embossing Powder White – Extra Fine Detail, Ranger – Clear Super Fine Detail embossing powder

Paper: Copic Marker X-Press It Blending Card, Doodle Bug Designs Inc. – Sugar Shoppe – 6″ x 6″ paper pad, Hot Pink cardstock

Die Cuts:  My Creative Time – Scalloped Stitched Oval Dies

Tools: MISTI – Most Incredible Stamping Tool, Cuttlebug, 3M VHB – 2 sided tape, Marvy Uchida – Embossing Heat Tool

Image coloured with Copic Markers:

Bunnies: E29, E27, E25, E23, R30, R02, R85, R83

Cupcake and Wrapper: BG18, BG15, BG11, BG10, YR18, YR16, RV09, RV04, RV02, RV00, E35, E33, E31

Presents and Ribbons: BG18, BG15, BG11, BG10, YR18, YR15, Y06, Y04, Y02, RV04, RV02, RV00

Background: B04, B02, B00

Hope you like it and have a great week!

You can find more cards to inspire you at Roberta Stevenson on my Facebook page.

Hello My Friend


Welcome Back Dreamerland Craft Fans!

Dreamerland released some brand new stamps in October 2019 and today, I’m sharing Hello My Friend (D19080) from the October Character release!

I stamped the image onto Copic Marker X-Press It Blending Card and coloured it with Copic markers. Once it was all coloured, I fussy cut around it leaving a small white border. I then added the final touch on the pom-poms with Stickles Pink and Stickles Aqua.

I used a 5-1/2″ x 4-1/4″ white card for my base. I then cut the patterned paper from Doodle Bug Designs Inc. – Sugar Shoppe at 5-1/4″ x 4″ , inked the edges with Tim Holtz Distress Ink – Evergreen Bough and mounted it onto the white base.

For the ovals I used the die cuts from My Creative Time – Scalloped Stitched Oval Dies, to create the various layers. I used the same paper pad to cut the small oval. Miscellaneous scrap paper that I had for the second oval and white for the last oval. I popped up the first 2 ovals using 3M VHB – 2 sided tape onto the largest oval and then mounted the large oval directly onto the base. Then, I popped up the image using the same 2 sided tape on the top oval.

To finish off the card, I stamped the sentiment using Versa Fine – Onyx Black and then embossed with Ranger – Clear Super Fine Detail embossing powder. Cut around the sentiment and then mounted it onto card using 3M VHB – 2 sided tape.

All edges were inked with Tim Holtz Distress Ink – Evergreen Bough before mounting onto card.

Card Recipe:

Stamp and Sentiment: Hello My Friend (D19080) (Dreamerland Crafts Clear Stamps)

Inks: Memento – Tuxedo Black, Tim Holtz Distress Ink – Evergreen Bough, Versa Fine – Onyx Black

Embossing Powder: Ranger Embossing Powder White – Extra Fine Detail.

Paper: Copic Marker X-Press It Blending Card, Doodle Bug Designs Inc. – Sugar Shoppe – 6″ x 6″ paper pad, White Cardstock

Die Cuts:  My Creative Time – Scalloped Stitched Oval Dies

Embossing Powder: Ranger – Clear Super Fine Detail

Tools: MISTI – Most Incredible Stamping Tool, Cuttlebug, 3M VHB – 2 sided tape

Image coloured with Copic Markers:

Skin: E000, E00, E04, E11, E21, R22, R20

Girl 1:

Hair: E57, E55, E53, E50

Dress, Boots and Hat: BG57, BG34, BG32, BG11, BG000, Stickles – Aqua

Girl 2:

Dress 2, Boots and Hat: R59, R56, R34, R81, Stickles – Pink

Hair: E47, E44, E43

Hope you like it and have a great week!

You can find more cards to inspire you at Dreamerland Crafts on the Facebook Fan page from the rest of our design team.

Beary Happy Birthday!


Welcome Dreamerland Crafts Fans!

Today I’m sharing a card that I made with this little bear serving up a nice big cake for a very special person.  I used Super Tall Cake Dreamerland Crafts Clear Stamps and Birthday Sentiments Set 002 Dreamerland Crafts Clear Stamps to create this card.

Card Recipe:

Stamp: Super Tall Cake Dreamerland Crafts Clear Stamps,  Birthday Sentiments Set 002 Dreamerland Crafts Clear Stamps

Paper: Doodle Bug Designs Inc. – Sugar Shoppe – 6″ x 6″ paper pad, Copic Marker X-Press It Blending Card, Craft Glitter Cardstock – Green, Craft Sparkling Stickers – Hot Pink

Ink: Tim Holtz Distress Ink – Picked Raspberry, Memento – Tuxedo Black, Versa Fine – Onyx Black, Tim Holtz Distress Ink – Fossilized Amber

Die Cuts: My Creative Time – Scalloped Stitched Oval Dies, Craftin Desert Diva’s “Banner Dies”, Craftin Desert Diva’s Party Dies, Your Next Stamp – Mini Balloon Trio Die Set (YNSD241)

Tools: MISTI – Most Incredible Stamping Tool, Cuttlebug

Embossing Powder: Ranger – Clear Super Fine Detail embossing powder

Copic Markers

Bear: E53, E51, E50, E29, E25, E23, E21, R20, R02, Eyes (Sakura Glaze – Black, Gelly Roll Sakura #5 Pen)

Cake: E18, E17, E15, E13

Cake Topping, Bear Apron: RV19, RV09, RV04

Bunny: W4, W2, W0

Mitts, Cake Apron, Boots: BG07, BG05, BG02

Hat: N1, N0, Colourless Blender

Cart: W4, W2, W0, C6

Shadow: C3, C2, C0, Colourless Blender

Background: R83, R81, RV52


80th Birthday!


Hi There! Today I’m sharing a birthday card for my loving mom who turned 80 this year. It was a wonderful birthday and my husband and I managed to surprise her. She didn’t know we were coming to visit as we kept it a secret. As she was walking towards the restaurant in the parking lot, my mom and dad looked up and saw me standing there. My parents were both so shocked to see me, as I live 7 – 9 hours away from home. I also managed to surprise her again when we went back to my brother’s place for desert. I had made her a birthday cake, which everyone loved. It was a very quick visit, only for a couple of days, but I wouldn’t have missed it! After all, 80 only comes around once in a lifetime. LOL!

For the card I chose the stamp by “Sherri Baldy – My-Besties Stamps“. I stamped the image using Memento Ink, Copic Marker X-Press It Blending Card and MISTI – Most Incredible Stamping Tool to get a nice crisp image. The image was then coloured in with Copic Markers and edged with Tim Holtz Distress Ink – Picked Rasberry around the image frame, balloon and also the card.

I printed the sentiment out on my printer and then used my Cuttlebug and the die from My Creative Time – Stitched Large Balloons. Tied on a little bit of twine to complete the balloon. My mom loved her card and I hope that you do too!


Card Recipe:

Stamp: Sherri Baldy – My-Besties Stamps

Hair: E50, E35, YR24, YR31

Eyes: B16, B14, B12, C1, Gelly Roll Sakura Pen #8

Skin: E000, E00, E04, E11, E21, R22, R20

Dress: Y08, Y06, Y11, Y02; Hem: BG78, BG49, BG13, BG11, BV30, BV31, Colourless Blender

Shoes: BG49, BG13, BG11, C8, C6, Wink of Stella – Clear

Jewellery \ Bows: RV19, RV13, RV09, RV06; Wink of Stella – Clear, Gelly Roll Sakura Pen #8

Cupcake on Dress: E57, E55, E53, RV91, RV93, RV06, Wink of Stella – Clear

Leaves: G09, G07; Little Flowers: Y08, Y02

Background: Spectrum Noir: LY1, LY2, LY3, Copic: C3, C2, C1

American Crafts – Tazzle Glitter Tape

Background Papers: Doodle Bug Designs Inc. – Sugar Shoppe – 6″ x 6″ paper pad

Cutting Die: Spellbinders – Labels 17, My Creative Time – Stitched Large Balloons

Inks: Tim Holtz Distress Ink – Picked Rasberry, Memento – Tuxedo Black

Sentiment: Font: PS36, Cooper Black (Microsoft Word)

Embellishments: Ribbon, flowers

Tools: MISTI – Most Incredible Stamping Tool, Cuttlebug

Mice Birthday


Hi There!

Sharing a card that I made for my friend’s birthday this year. First time in over 20 years that it actually arrived on time. LOL!

I’ve added a close-up for you to see the image bigger.

This was coloured up using the image from Di’s Digi Stamps – Cute as Cupcake Mice, instructions from Kit and Clowder’s April 2018 Markers monthly class and Copic markers.

Next I added in the sentiment from Stampendous – Mice Birthday – CS075-Stamps.

Background paper:  Doodle Bug Designs Inc. – Sugar Shoppe – 6″ x 6″ paper pad; Echo Parks Paper Co. – Birthday Wishes by Alisha Gordon – 6″ x 6″ Paper Pads

Ink around edges: Tim Holtz Distress Ink – Picked Rasberry.

My friend really loved her card. Hope you do too!

Happy Birthday – Whimsy Elephants


Hi There,

Sharing another Birthday card that I made using Whimsy Stamps – What a Loot! C1121 shown on the front of the card and Whimsy Stamps – Jelly Bean – C1015, shown on the inside.

Here is a close-up:

Inside of card:

Stamped  both images using my MISTI and Memento – Tuxedo Black ink.

Coloured images with Copics and Spectrum Noir Alcohol Markers.

Sentiment on the front is from Stampin Up – Hostess Happiest Birthday Wishes 2 0f 2.

On the inside – Sentiment is from Craftin Desert Diva’s – It’s All About Zoo.

Background paper – Doodle Bug Designs Inc. – Sugar Shoppe – 6″ x 6″ paper pad.

Circles die cuts are from: My Creative Time – More Stitched Circles.

Edge card and circles with Tim Holtz Distress Inks – Peacock Feathers and Tim Holtz Distress Ink – Picked Rasberry.

Hope you like it!

Entered into http://onecrazystampercom.blogspot.ca/2017/03/march-challenge-anything-goes.html.


Birthday Rock Star


Back to share another birthday card that I made using a freebie from Kenny K Stamps called “Mad Skillz” Singer and Rapper.

samantha2016bd

Here is a close-up of the coloured image.

samantha2016bd-cu

Music notes are from Campin’ Critters Cricut Cartridge – Music Badge – #M31A26.

Sentiment is from Life’s A Party Cricut Cartridge – Party Like A Rock Star – #M37398.
Balloon Dies are from My Creative Time – Stitched Large Balloons.
Background paper – Doodle Bug Designs Inc. – Sugar Shoppe – 6″ x 6″ paper pad.
Background paper – Large balloon – My Mind’s Eye – Happy Day – 6″ x 6″ paper pad.
Small Balloon – Coloured in using Tim Holtz Distress Ink – Picked Rasberry.
Coloured image using Spectrum Noir Markers.
Skin: FS2, FS4, TN4, FS3, FS9

Eyes, Bangle and Top: GT1, GT2, GT3

Lips: DR4, DR6, CR7

Hair: TN2, TN4, TN9, OR1, OR3

Tongue: PP1, PP2, PP3

Pants and Hat: TB4, TB5, TB7

Mouth- CR1, CR2, CR3

Shoes – TB1, TB2, TB3, IG1, IG2, IG3

Hope you like it!


Carousel Card


Hi There,

Stopping by to share a carousel card that I made using Too Cute by Jessica .svg cuts from Scrapbooking Mice – Jessica Owens 2016 and HB2U Car – Jessica Owens 2015.

I wanted to make a unique and different card using the Scrapbooking mice, so I decided to make it a step-by-step card using a carousel look.

Used largest die from Marianne Design CR1236 to make doilies for joining papers to make the carousel.

Here a few different views of the card.

Front – Closed and side view.

Carousel-Card-Front-with-Bo carousel-card-side-view

Open view – looking down.

Car-Card-OpenCarousel-TopViewCar-Top-Angle

Here are the steps on how I put this card together in more detail.

Uploaded all files into Cricut Design Space and then cut out pieces with Cricut Explore.

Front of card – HB2U Car.

Balloons from Craftin Desert Diva’s Party Dies. Balloon strings from My Creative Time – Stitched Circle Balloon Dies.

Background paper from Echo Parks Paper Co. – Birthday Wishes by Alisha Gordon – 6″ x 6″ Paper Pads.

HB2U-bear

All instructions – Typed out on laptop in word and then printed out. Die cut backgrounds using Craftin Desert Diva’s Fancy Frames. Smallest die cut from Your Next Stamp – Stitched Rectangle Die Set – (YNSD214) All highlights on eyes and nose are done using Gelly Roll Sakura #8 Pen.

Background frames for all Mice are from Cricut. Background papers are all from Doodle Bug Designs Inc. – Sugar Shoppe – 6″ x 6″ paper pad.

Stage 1 of Carousel. Mouse #1.  Put together.

Car-Step1

Stage 1 of Carousel. Mouse #1.  Separate pics before joining together.

Carousel-P1    Carousel-P2

Here is a close up of Mouse #1.

Carousel-P2-CU

Stage 2 of Carousel. Mouse # 2.  Put together.

Car-Step2

Stage 2 of Carousel. Mouse #2.  Separate pics before joining together.

Carousel-P3

Carousel-P4


Here is a close up of Mouse #2.

Carousel-P4-CU

Stage 3 of Carousel. Mouse #3.  Put together.

Car-Step3

Stage 3 of Carousel. Mouse #3.  Separate pics before joining together.

Carousel-P5

Carousel-P6

Here is a close up of Mouse #3.

Carousel-P6CU

Stage 4 of Carousel. Mouse #4.  Put together.

Car-Step4

Stage 4 of Carousel. Mouse #4.  Separate pics before joining together.

Carousel-P7

Carousel-P8

Here is a close up of Mouse #4. Carousel-P8-CU

Hope you like it!

 Entered into contest: http://cutitupchallenges.blogspot.com/2016/07/cut-it-up-100-anything-goes.html.