Today I’m sharing a miniature Birthday card using Art Impressions – MB Craft Room Set – 5321, MB Template Dies (5317) and MB Envelope Die (5318) that I made for my Aunt’s Birthday in April. My aunt is a crafter like myself. When I first handed the card to her, she looked at me as if to say “What is this?” I started to laugh and said, “It’s your Birthday Card”. The card is the size of a matchbook. LOL! She couldn’t believe how tiny it was. I wrote the sentiment on the inside of the smaller envelope. When she opened her card, she fell in love with it and I hope that you do too! Proof that some big things do come in small packages!!!! 🙂
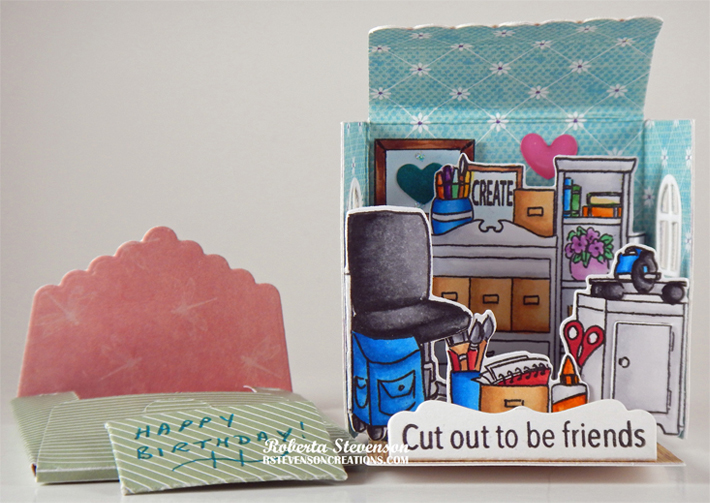
To create the card, I began with the card base using Hammermill – Premium Colour 100 lb. cardstock, Cuttlebug die-cutting machine and the Art Impressions – MB Template Dies (5317). I used this same die cut again to add the paper background for the inside of the card and adhered them together using liquid glue. From the same die set, the windows, window frames, hearts and bow were also cut out. Lastly, with the same dies, I cut out the floor using Joy Crafts – Artist Trading Card – Wood Texture paper.

With Memento – Tuxedo Black ink and my MISTI, I stamped all of the images and the sentiment onto Copic Marker X-Press It Blending Card. I coloured in all of the images and then, using the Cuttlebug again, I die cut all of the inside pop-ups using Art Impressions – MB Craft Room Set – 5321. Lastly, I die cut the envelopes out of some scrap double-sided paper that I had in my stash using the Art Impressions – MB Envelope Die (5318).
Double-sided tape was applied to do the assembly on the tabs and they were adhered to the base card. I wanted to create a small picture frame, so I drew one onto Copic Marker X-Press It Blending Card cardstock, coloured it in with Copic markers and then cut around the frame. The heart was then adhered into the centre of the frame with some liquid glue. A few small gems were also added above and below the heart.

Double-side tape was applied to the flaps of the larger envelope to complete the assembly. For the small envelope, I used the little bow and a pop-dot to close it so that it could be opened easily.
Card Recipe:
Stamps and Sentiment: Art Impressions – MB Craft Room Set – 5321
Inks: Memento – Tuxedo Black
Paper: Copic Marker X-Press It Blending Card, Hammermill – Premium Colour 100 lb., Miscellaneous cardstock from stash, Joy Crafts – Artist Trading Card – Tough Texture (3.25″ x 2-3/8″)
Dies: Art Impressions – MB Craft Room Set – 5321, MB Template Dies (5317) and MB Envelope Die (5318)
Miscellaneous: MISTI – Most Incredible Stamping Tool
Image coloured with Copic Markers:
Craft Bag, Paint Can Container and Pen Container: B06, B04, B02
Cutting Machine: B06, B02, N9, N7, N3, C1, C00
Shelves and Cabinets: C2, C1, C0, C00, Colorless Blender
Boxes and Bins: E55, E53, E51
Books: W9, W7, W5, C9, Y19, Y17, G07, G03, G00, B04. B01, Y23, R37, R35
Glue Bottle: C1, C0, YR16, YR14, YR12
Chair: N9, N7, N5, N3, C1, C00
Vase and Flowers: RV63, RV52, G03, V09, V04
Markers and Brushes: V06, V04, YR18, YR12, C5, C3, R37, R35
Sign: E25, E23, BG000
Hope you like it and have a great week!


