Tag Archive | Hot Buy – Recollections – Jewel Tones

Unicorn Birthday!


Today, I’m sharing a slim-line birthday card using Gerda Steiner DesignsMoody Unicorns (GSD471) for the May Share Your Designs Challenge.


To create the card, I began with a card base of 9.5″ x 7″ using Hammermill – Premium Colour 100 lb. cardstock. I searched my die collection to find the perfect oval and couldn’t find any to fit the images that I had in mind. Since I own a Cricut Explore machine, I thought why not make my own front panel? To do this, I signed into Cricut Design Space to create the slim-line design.

I used the free shapes and selected the square, which I re-porportioned to be 9.5″ x 7″. I imported Scalloped Oval (#M41B9A) from the Baby Steps cartridge. I then duplicated this image several times and used the slice tool to die cut the rectangle in 3 places and the ovals in several places until I was satisfied with the final result. Once I loaded my mat and had selected “Make it”, I chose 2 patterned papers from Craft Smart – Hot Buy – Kawaii Dream. The Unicorns were used for the main panel and the purple pattern was used for the back panel. For the larger scalloped oval,Hot Buy – Recollections – Jewel Tones paper was used and for the smaller scalloped oval, Recollections – Purple Passions was used.

Using my MISTI and Memento – Tuxedo Black ink, I stamped the image from Gerda Steiner DesignsMoody Unicorns (GSD471). The images were coloured in with Copic markers  and then Stickles – Diamond was applied to the manes, tails and cupcake icing. With my MISTI and VersaMark ink various sentiments from the same stamp set were stamped onto Recollections – Purple Passions paper. These were then embossed with Ranger Embossing Powder White – Extra Fine Detail. Marvy Uchida – Embossing Heat Tool was then used to heat emboss the embossing powder. All of the sentiments were then cut using a small slicer device.

To assemble the card, I applied liquid glue to the large patterned purple rectangle and applied it directly to the base card. For the front panel, I first glued on the larger scalloped ovals and then applied the smaller scallops in the same way. The completed piece was then glued on top of the purple patterned paper. Each of the little unicorns and the sentiments were popped up onto the card using U-Line double-sided tape. Lastly, Tim Holtz Distress Ink – Evergreen Bough was applied around the edges of the card with a small finger dauber and Stickles – Diamond was added to the hearts to make them sparkle.

Card Recipe:

Stamp: Gerda Steiner Designs – Moody Unicorns (GSD471)

Inks: Memento – Tuxedo Black, Tim Holtz Distress Ink – Evergreen Bough

Paper: Copic Marker X-Press It Blending Card, Hammermill – Premium Colour 100 lb., Recollections – Purple Passions 8.5″ x 11″, Craft Smart – Hot Buy – Kawaii Dream (12″ x 12″), Hot Buy – Recollections – Jewel Tones (12″ x 12″)

Cricut Explore and Cricut Design Space: Scalloped Oval (#M41B9A) – Baby Steps, Shapes – Rectangle

Embossing Powder: Ranger Embossing Powder White – Extra Fine Detail

Miscellaneous: U-Line double-sided tape, Marvy Uchida – Embossing Heat Tool, MISTI – Most Incredible Stamping Tool, Stickles – Diamond

Image coloured with Copic Markers:

Unicorns:

Tail and Mane: RV14, RV13, BG15, BG13, Y15, Y13, B14, B12, V15, V12

Hooves: C9, C7, C5, C3

Body: C1, C0, C00, Colorless Blender, R02, R00

Eyes: B14, B12, B01

Hope you like it and have a great week!

Entered into: https://gsd-stamps.com/blogs/share-your-designs/play-along-in-our-syd-challenge-may-2023

Ugly Sweaters!!!


It’s Wednesday, and this week, I made a Christmas card using Ugly Sweater Time – SLF025 by High Hopes Rubber Stamps for the main image and Ugly Sweater Time – FFL025 (High Hopes Rubber Stamps) for the sentiment. I have a few ugly Christmas sweaters, that I love wearing at Christmas time. How many do you have? LOL!

To make my card this week, I began with a card base of Hammermill – Premium Colour 100 lb. cardstock, cut and scored to be 5.5″ x 4.25″. I cut the main background paper from Hot Buy – Recollections – Jewel Tones to be the same size and applied this directly to the base card using double-sided tape. Your Next Stamp – Winter Knits patterns were cut to the size of a little over .5″ each x 4.25″ and applied to the top and bottom of the card using double-sided tape. My Cuttlebug and My Creative Time -Stitched Squares Inside and Out were used to die cut PhotoPlay – Tulla & Norbert’s Christmas Party paper to the size of 4″ x 4″. Tim Holtz Distress Ink – Evergreen Bough was applied around the edges and double-sided tape was used to adhere it to the base card. The large oval was die cut using my Cuttlebug, Hero Arts – Infinity Die Ovals and Hot Buy – Recollections – Jewel Tones paper. This was popped up onto the square using U-Line double-sided tape.

With my MISTI and Memento – Tuxedo Black ink, I stamped both the image and the sentiment onto Copic Marker X-Press It Blending Card. The image was die-cut using my Cuttlebug and Hero Arts – Infinity Die Ovals. I coloured the image in with Copic markers. The sentiment was die cut with Whimsy Stamps – Quick Strips Die Set and Tim Holtz Distress Ink – Evergreen Bough was used to ink around the edges. The coloured image and sentiment were both popped up onto the card using U-Line double-sided tape to finish it off.

Card Recipe:

Stamp: Ugly Sweater Time – SLF025 (High Hopes Rubber Stamps)

Sentiment: Ugly Sweater Time – FFL025 (High Hopes Rubber Stamps)

Inks: Memento – Tuxedo Black, Tim Holtz Distress Ink – Evergreen Bough

Paper: Copic Marker X-Press It Blending Card, Hammermill – Premium Colour 100 lb., PhotoPlay – Tulla & Norbert’s Christmas Party (6″ x 6″), Your Next Stamp – Winter Knits (6″ x 6″), Hot Buy – Recollections – Jewel Tones

Die Cut: Hero Arts – Infinity Die Ovals, My Creative Time -Stitched Squares Inside and Out, Whimsy Stamps – Quick Strips Die Set – WSD330

Tools: MISTI – Most Incredible Stamping Tool, U-Line double-sided tape

Image coloured with Copic Markers:

Skin: E21, E11, E00, E000

Beard: B60, C1, C0, C00

Hat and Clothing: BG72, BG57, BG32, BG11, Y17, Y15, Y13, R59, R37, R35

Shoes: C8, C6, C4, C2, C1, C0

Sweater: E53, E51, E50, E35, E34, E33, E31, G07, G05, G03, Y17, Y15, Y13, R59, R37, R35, R02, YG03, B16, B14, B12

Knitting Needles: YG03, G07

Shadow: N2, N1, N0, BG000

Hope you like it and have a fantastic week!

You can find lots of inspiration from the Design Team Divas at the High Hopes blog, and the High Hopes Rubber Stamps Facebook Fan page plus you can also follow us on
Instagram, Twitter and Pinterest.

Created With Love!!!


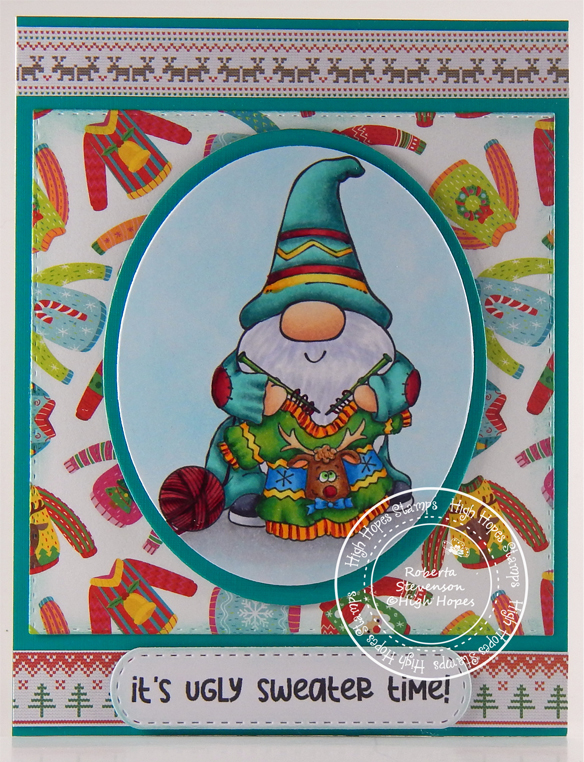
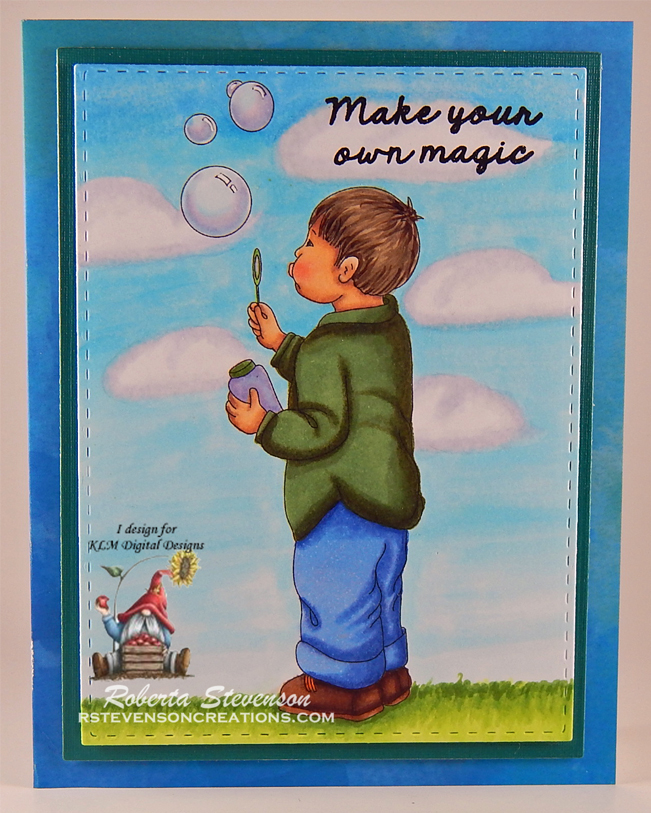
It’s Wednesday, and this week, I made a Crafty Gnome using Let’s Color – TLF028 by High Hopes Rubber Stamps for the main image and Created With Love – FFL012 (High Hopes Rubber Stamps) for the sentiment. Crafting is always so much fun and I love to colour up new stamps all the time! This month’s Gnome Mania at High Hopes Rubber Stamps has a lot of fun new gnome stamps to choose from.

To make my card this week, I began with a card base of Hammermill – Premium Colour 100 lb. cardstock, cut and scored to be 5.5″ x 5.5″. I cut the background paper from Photo-Play – Crafting With My Gnomies Paper Pack to be the same size and applied this directly to the base card using double-sided tape. Tim Holtz Distress Ink – Twisted Citron was used to ink around all of the edges. Using my Cuttlebug and dies from My Creative Time – Bunch of Fun Circle Dies, I die cut Copic Marker X-Press It Blending Card and then stamped the image onto it using my MISTI and Memento – Tuxedo Black ink. My Creative Time – Stitched Zig Zag Tie die was used to die cut Hammermill – Premium Colour cardstock and the sentiment was stamped using my MISTI and Memento – Tuxedo Black ink. I coloured in the main image with Copic markers and then Tim Holtz Distress Ink – Twisted Citron was used to go around the edges of both die cuts. The image and sentiment were both popped up onto the background using U-Line double-sided tape. Finally, I ran small pieces of paper through my Xyron Create a Sticker from Hot Buy – Recollections – Jewel Tones paper pack and then through my Cuttlebug using My Creative Time – Stitched Zig Zag Ties die cuts. I placed the hearts onto the card to finish it off.

Card Recipe:

Stamp: Let’s Color – TFL028 (High Hopes Rubber Stamps)

Sentiment: Created With Love – FLL012 (High Hopes Rubber Stamps)

Inks: Memento – Tuxedo Black, Tim Holtz Distress Ink – Twisted Citron

Paper: Copic Marker X-Press It Blending Card, Hammermill – Premium Colour 100 lb., Photo-Play – Crafting With My Gnomies (6″ x 6″), Hot Buy – Recollections – Jewel Tones

Die Cuts: My Creative Time – Bunch of Fun Circle Dies, My Creative Time – Stitched Zig Zag Ties

Tools: MISTI – Most Incredible Stamping Tool, U-Line – 2 sided tape, Xyron Create a Sticker

Image coloured with Copic Markers:

Skin: E21, E11, E00, E000

Beard: E47, E44, E43, E41

Hat: RV14, RV13, RV11, YG25, YG23, YG21

Clothing: BG09, BG05, BG02, BG01, E35, E34, E33, E31

Shoes: C8, C6, C4, C3, C1, C0

Table and Chair Legs: E35, E34, E33, E31

Chair: BG72, BG57, BG32, BG11

Markers and Box: C5, C4, C3, C2, C1, C0, C00, BG72, BG57, BG32, BG11, BG05, BG02, BG01, RV14, RV13, RV11, YG25, YG23, YG21, Y17, Y15, Y13, G19, G17, G16, B95, B93, B91

Paper: YR30

Shadow: C2, C1, C0, Colorless Blender

Hope you like it and have a fantastic week!

You can find lots of inspiration from the Design Team Divas at the High Hopes blog, and the High Hopes Rubber Stamps Facebook Fan page plus you can also follow us on
Instagram, Twitter and Pinterest.

Christmas Cheer!!


Today we are having a sponsor day over at the Passionate Paper Creations & Friends FB group and I’m sharing a snowman card I made using this digital image from Whimsy Stamps – Snowman’s New Hope and clear stamp for the sentiment Dragon Christmas Cheer.

For the base card, I used AC Cardstock – White and cut it and scored it to be 6″ x 6″. The image was printed out using HP High Quality Grayscale onto Copic Marker X-Press It Blending Card. The background paper was cut to the size of 6″ x 6″ using Hot Buy – Recollections – Jewel Tones paper. This was applied directly to the base using double-sided tape. I die cut Doodlebug Design Inc. – Winter Wonderland paper using my Couture Creations – Go Power and Emboss and Creative Expression Craft Dies by Sue Wilson – Noble Dies – Double Pierced Squares – Set B. This was inked around the edges with Lawn Fawn – Peacock Ink and applied directly over top of the bottom layer using double-sided tape. The circles were cut with my Cuttlebug, various colours from Hot Buy – Recollections – Jewel Tones paper and Copic Marker X-Press It Blending Card using Lifestyle Crafts Cutting Dies – Nesting Circles. I applied the 1st 2 circles with double-sided tape over top of the snowman background.

The image was coloured in with Copic markers. I popped up the image and applied it to to the card using 3M double sided tape. I added snow to the bottom of the snowman using Stickles – Diamond to add texture. The snowy background was created with a Ranger – Emboss It Pen Clear and the sentiment was stamped with Versamark ink. Ranger Embossing Powder White – Extra Fine Detail was applied and heat embossed using Marvy Uchida – Embossing Heat Tool. I fussy cut around the sentiment and it was popped up using 3M double-sided tape onto the card to finish it off.

Card Recipe:

Stamp: Snowman’s New Hope – Whimsy Digital Stamps

Sentiment: Dragon Christmas Cheer Whimsy Clear Stamps

Inks: HP High Quality Grayscale, Lawn Fawn – Peacock Ink, Versamark, Ranger – Emboss It Pen Clear

Paper: Copic Marker X-Press It Blending Card, AC Cardstock – White, Hot Buy – Recollections – Jewel Tones, Doodlebug Design Inc. – Winter Wonderland (6″ x 6″)

Die Cuts: Creative Expression Craft Dies by Sue Wilson – Noble Dies – Double Pierced Squares – Set B, Lifestyle Crafts Cutting Dies – Nesting Circles

Embossing Powder: Ranger Embossing Powder White – Extra Fine Detail

Miscellaneous: Couture Creations – Go Power and Emboss, 3M double-sided tape, Stickles – Diamond, Marvy Uchida – Embossing Heat Tool

Image coloured with Copic Markers:

Snowman: YR18, YR15, YR12, R30, R20, B60, C0, C00, Colorless Blender

Hat and Scarf: B37, B26, B23, B21, B14, B12, BG72, BG57, BG34, BG11

Sky: BG10, BG000, BG0000

Hope you like it and have a great week!

Come and check us out on Passionate Paper Creations & Friends FB group
as we are currently sponsoring Whimsy Stamps until Sunday, October 31, 2021.

If you are a member of Passionate Paper Creations & Friends FB group
you can go to the top of the page and get a shopping discount.


If you are not a member just click join. We are a fun loving group with a lot of inspiration.

Time to Celebrate!!


Today, I’m sharing a Christmas card using Dreamerland Crafts stamps called Let’s Celebrate – D19074 for the main image and Christmas Snow Scene – M18313 for the background. For the sentiment, I used Holiday Sentiments Set 001 – D163001


To make this card I used a base of 5.5″ x 4.25″ using Hammermill – Premium Colour 100 lb. cardstock. My Cuttlebug and My Creative Time – Rectangle Frame Layers Die were used to die-cut Copic Marker X-Press It Blending Cardstock. Using the background stamps, I stamped the background using my MISTI and Memento – Summer Sky ink. I coloured in the sky, trees and house with Copic markers and then added some snow using Gelly Roll Sakura #8 Pen. Once this was done, I added Gina K Designs – Glitz Glitter Gel – Iridescent to the remainder of the die cut for the sparkling snow. I added a little bit more where the boys feet would land and set it aside to dry. Once again, I used my MISTI and Memento – Tuxedo Black ink and stamped the main images. I coloured them in with Copic markers and then applied Ranger – Emboss It Pen Clear to the fur trims for the hats and clothing. I applied WOW! Sparkling Snow Embossing Glitter to the inked areas and then heat embossed everything with my Marvy Heat Embossing Tool. For the pompoms, I applied Cosmic Shimmer Fluffy Stuff and then heat embossed the liquid for it to puff up. For the present, I added some gold swirls using a Pental Sunburst Metalic Med Gel Pen. Then I fussy cut around the images leaving a thin white border. I stamped the sentiment using my MISTI and Lawn Fawn – Peacock Ink on to the base card. Then I stamped it again, this time using Versamark ink and then added Ranger – Clear Super Fine Detail embossing powder and heat embossed it.

The card was now ready to assemble. Using double-sided tape, I attached the background to the scalloped border. I added 3M double-sided tape to the back of the scalloped border and popped it up onto the base card. Using 3M double-sided tape, I popped up the main image and present onto the background. A little more of the Stickles – Diamond was added to snow where his feet are to complete the card.

Card Recipe:

Stamps: Let’s Celebrate – D19074 – Dreamerland Crafts, Christmas Snow Scene – M18313 – Dreamerland Crafts

Sentiment: Holiday Sentiments Set 001 – DS163001 – Dreamerland Crafts

Inks: Memento – Tuxedo Black, Versamark, Lawn Fawn – Peacock Ink, Memento – Summer Sky ink

Paper: Copic Marker X-Press It Blending Card, Hammermill – Premium Colour 100 lb., Hot Buy – Recollections – Jewel Tones

Die Cuts: My Creative Time – Rectangle Frame Layers, Gina Marie Designs – Nested Scalloped Stitched Rectangles

Stickles: Diamond

Embossing Powder: WOW! Sparkling Snow Embossing Glitter, Cosmic Shimmer Fluffy Stuff, Ranger – Clear Super Fine Detail embossing powder

Tools: MISTI – Most Incredible Stamping Tool, Cuttlebug,  Marvy Heat Embossing Tool, Sakura Glaze – Black, Gelly Roll Sakura #8 Pen, Gelly Roll Sakura #5 Pen, 3M VHB – 2 sided tape and Pental Sunburst Metalic Med Gel Pen

Image coloured with Copic Markers:

All Eyes and Small Noses:  Sakura Glaze – Black pen, Gelly Roll Sakura #5 Pen

Skin: E21, E11, E00, E000, R30, R22, R20

Hair: E47, E44, E43

Clothing and Hat: B37, B14, B12

Mitts: YG67, YG63, YG61

Boots: C8, C6, C4, C2, C1

Bear: E57, E55, E53, E51

Pig: E95, E93, R00, R000

Rabbit: C2, C1, C00, R30, R20

Present and Bow: BG09, BG05, BG02, BG01, E15, Y38, Y15, Y08

House: E40, E41, E30, E18, E15, Y04

Trees: G99, G21, YG67, YG17

Sky: B04, B02, B01, B00

Hope you like it and have a great week!

You can find more cards to inspire you at Dreamerland Crafts and Pointer Scrapbooking on the Facebook Fan pages from the rest of our design team.

Hot Cocoa and Snowfolk!!!


It’s Wednesday, and this week, I made a card using Snowman Cup Of Love – S149 by High Hopes Rubber Stamps for the main image and Dot Warm Heart – G117 (High Hopes Rubber Stamps) for the sentiment. Hot chocolate is one of my favourite drinks during cold winter days. It looks like it is for this snowman too!

To make my card this week, I began with a card base of AC Cardstock – White cut and scored to be 6″ x 6″. I cut the background paper from Hot Buy – Recollections – Jewel Tones cardstock to the same size as the base and used double-side tape to apply it directly to it. Pebbles – Winter Wonderland paper was cut to the size of 5.75″ x 5.75″ and inked around the edges using Tim Holtz Distress Ink – Mermaid Lagoon. I applied this directly to the main background using double-sided tape. I cut 2 more strips from the Hot Buy – Recollections – Jewel Tones paper at 6″ x 1.5″ and 6″ x .75″ and applied them midway across the card using double-sided tape.

The image and sentiment were stamped using my MISTI and Memento – Tuxedo Black ink. I die-cut the sentiment using my Cuttlebug and Hero Arts – Infinity Dies – Rounded Rectangle and inked around the edges with Tim Holtz Distress Ink – Mermaid Lagoon. This was popped up on the card using 3M double-sided tape. The image was die cut with Creative Expression Craft Dies by Sue Wilson – Noble Dies – Double Pierced Ovals and inked around the edges with Tim Holtz Distress Ink – Mermaid Lagoon. I coloured in the image in with Copic markers and popped it up on the card using 3M double-sided tape. Lastly, I added some Clear Glitter Glue to the bottom of the snowman to create some snow. You can’t see it in this picture, but I also added Wink of Stella – Clear to make the snowman sparkle too!

Card Recipe:

Stamp: Snowman Cup Of Love – S149 (High Hopes Rubber Stamps)

Sentiment: Dot Warm Heart – G117 (High Hopes Rubber Stamps)

Inks: Memento – Tuxedo Black, Tim Holtz Distress Ink – Mermaid Lagoon

Paper: Copic Marker X-Press It Blending Card, AC Cardstock – White, Hot Buy – Recollections – Jewel Tones, Pebbles – Winter Wonderland 6″ x 6″

Die Cuts: Hero Arts – Infinity Dies – Rounded Rectangle (DI465), Creative Expression Craft Dies by Sue Wilson – Noble Dies – Double Pierced Ovals

Tools: MISTI – Most Incredible Stamping Tool, 3M – 2 sided tape, Sakura Glaze – Black Pen, Gelly Roll Sakura #8 Pen, Cuttlebug, Wink of Stella – Clear

Image coloured with Copic Markers:

Eyes: Sakura Glaze – Black Pen, Gelly Roll Sakura #8 Pen

Snowman: YR18, YR16, YR12, B60, C1, C0, C00, Colorless Blender

Hat, Scarf, Mitts, Coat, Patches and Cup: BG09, BG05, BG02, BG01, G99, YG67, YG17, R85, R83, R81

Cinnamon Stick: E27, E23

Background: G43, G40, G12

Snow: Clear Glitter Glue

Hope you like it and have a fantastic week!

You can find lots of inspiration from the Design Team Divas at the High Hopes blog, and the High Hopes Rubber Stamps Facebook Fan page plus you can also follow us on
Instagram, Twitter and Pinterest.

Surfin’ Dudley!


It’s Wednesday, and this week, I used High Hopes Stamps’ image Surf Scene Dudley – S244. I’ve seen surfers in action while travelling the world, but have never gone on one myself. Who knows, maybe someday???? Dudley, sure looks happy sporting his vacation pose. LOL!

Using my MISTI and Memento – Tuxedo Black ink, I stamped the image onto Copic Marker X-Press It Blending Card. I coloured in the image with Copic markers and used Copic – Opaque White to create the splash on the waves. My Creative Time – Rectangle Frame Dies and My Creative Time – Rectangle Frame Layers were both used to die cut the coloured image and background papers. The edges were inked around with Tim Holtz Distress Ink – Evergreen Bough. The image was then attached to the Aqua background using double-sided tape.

To assemble the card, I began with a base card of Hot Buy – Cards and Envelopes (5.5″ x 4.25″). I popped up the 2 backgrounds with 3M VHB – 2 sided tape and attached them both to the base card. Lastly, I added some pop-dots from CC Designs – Dragon Dreams Enamel to finish it off.

Card Recipe:

Stamp: Surf Scene Dudley – S244 (High Hopes Rubber Stamps)

Inks: Memento – Tuxedo Black, Tim Holtz Distress Ink – Evergreen Bough

Paper: Copic Marker X-Press It Blending Card, DCWV – Coastal – 12″ x 12″, Hot Buy – Recollections – Jewel Tones, Hot Buy – Cards and Envelopes (5.5″ x 4.25″)

Die Cuts: My Creative Time – Rectangle Frame Dies, My Creative Time – Rectangle Frame Layers

Tools: MISTI – Most Incredible Stamping Tool, Cuttlebug, 3M VHB – 2 sided tape, CC Designs – Dragon Dreams Enamel Dots

Images coloured with Copic Markers:

Dragon: G94, G82, G46, YG07, YG03, YG00, BV04, BV02, BV01 (Eyes – Sakura Glaze – Black)

Bathing Suit: YR18, YR16, Y08

Surf Board: BG72, BG57, BG32, BG11, YR16, YR14, Y08, Y04

Water: BG70, BG32, BG11, B93, B91, B52, B41, B06, B04, B02, B01, (Copic – Opaque White)

Sky: B02, B01, B00, B000

Sand: E37, E35, E33, E31

Clouds: BG70, C1, C00, Colorless Blender

Hope you like it and have a fantastic week!

You can find lots of inspiration from the Design Team Divas at the High Hopes blog, and the High Hopes Rubber Stamps Facebook Fan page plus you can also follow us on
Instagram, Twitter and Pinterest.

Birthday Presents and Cake!!


Sharing a birthday card that I made for a friend using a digital image from Polkadoodles called Cake Time Digi – Winnie Celebrations 2. I really love this awesome collection.

To make the card, I first imported the image and sentiment into Microsoft Word and then printed everything out onto Copic Marker X-Press It Blending Card using my HP Printer using High Quality Grayscale. I found this to be the best setting as it doesn’t smudge when you colour. Next, I used Gina Marie Designs – Loopy Oval dies to die cut the image out. The image was coloured in with Copic markers.

Using Hot Buy – Recollections – Jewel Tones – 5.5″ x 4.25″ cardstock as the base. I stamped the sentiment using Versa Fine – Onyx Black and Ranger – Clear Super Fine Detail embossing powder. Marvy Uchida – Embossing Heat Tool was used to heat the embossing powder. All of the edges of the card were inked with Tim Holtz Distress Ink – Picked Raspberry.

3M VHB – 2 sided tape was applied to the back of the die cut and attached directly to the base. Lastly to finish off the card, I added some Crafts – Rhinestone Stickers.

Card Recipe:

Stamp: Cake Time Digi – Winnie Celebrations 2 – Polkadoodles

Inks: HP Printer Grayscale, Tim Holtz Distress Ink – Picked Raspberry, Versa Fine – Onyx Black

Paper: Copic Marker X-Press It Blending Card, Hot Buy – Recollections – Jewel Tones

Die Cut: Gina Marie Designs – Loopy Oval

Embossing Powder: Ranger – Clear Super Fine Detail

Miscellaneous: Marvy Uchida – Embossing Heat Tool, 3M VHB – 2 sided tape, Crafts – Rhinestone Stickers

Image coloured with Copic Markers:

Skin: E21, E11, E00, E000, R22, R20

Hair: E47, E44, E43, E42

Dress and Shoes: B06, B04, B02, B01, RV66, RV63, RV55, RV52, E50, E30, Atyou Spica – Blossom – 14

Cake: RV55, RV02, RV00, E25, E23, G07, G02, Gelly Roll Sakura #5 Pen

Flowers in Hair: RV55, RV00, Y17, Y02, Y00

Presents: G02, G00, RV55, RV52, RV02, B02, Gelly Roll Sakura #10 Pen

Shadow: C3, C2, C1, Colorless Blender

Hope you like it and have a great week!

Easter Gnome!!


Sharing a card I made today using KLM Digital Designs – Easter Delivery Gnome from the new March release. This Easter gnome is collecting coloured eggs for the Easter Bunny to hand out to all of the little children. This stamp comes with 2 more sentiments as well as the one shown here on my card. “Easter Blessings” and “some bunny loves you”.

To make the card, I first imported the image and sentiment into Microsoft Word. I sized both the image and sentiment to fit 5.5″ x 4.25″ and printed everything out onto Copic Marker X-Press It Blending Card using my HP Printer. I used my Brother Scan and Cut to cut around the image and my cutter to cut around the sentiment and scissors to round the corners. The image and sentiment were coloured in with Copic markers.

For the base card, Hammermill – Premium Colour 100 lb. paper was used at the size of 5.5″ x 4.25″. I die cut the base to be same size using Your Next Stamp – Happy Spring paper and used double-sided tape to attach it directly to the base card. Tim Holtz Distress Ink – Evergreen Bough was used to ink around the edges. Hot Buy – Recollections – Jewel Tones was cut to 5.5″ x 3″ and glued on top of the patterned paper. Lastly, I had some watercolour paper that I had created a pattern on using some inks, a roller and Gel plate from a class a few years back. I though it went great with the colour scheme and almost look like a wood pattern. This was cut to 5.5″ x 2.5″ and glued on top of the Purple paper. To complete the card, I attached both the sentiment and image using 3M VHB – 2 sided tape and added a few Your Next Stamp Gumdrops.

Card Recipe:

Stamp and Sentiments: Easter Delivery Gnome (KLM Digital Designs)

Inks: HP Printer Grayscale, Tim Holtz Distress Ink – Evergreen Bough

Paper: Copic Marker X-Press It Blending Card, Hammermill – Premium Colour 100 lb., Hot Buy – Recollections – Jewel Tones, Your Next Stamp – Happy Spring (6″x6″)

Miscellaneous: Your Next Stamp Gumdrops, 3M VHB – 2 sided tape

Image coloured with Copic Markers:

Skin: E21, E11, E04, E00, E000

Beard: E49, E47, E44, E42

Shirt: V17, V15, V12

Pants: B26, B23, B21

Hat: BG72, BG57, BG32, BG11

Bunny Ears: R30, R20, BV20, C1, C0

Boots: E57, E55, E47, E44, E33, E30, E27, E25, E23

Large stick: E59, E57, E55, E53

Nest: E53, E23, Y19, YR31, YR21

Eggs: BG72, BG57, BG32, BG11, Y08, Y04, Y00, RV06, RV04, RV02

Pot: E99, E97, E08

Sentiment: Y08, Y04, Y02, V17, V15, V12

Hope you like it and have a great week!

You can find more cards to inspire you at KLM Designs, KLM Digital Design Team and KLM Digital Designs on the Facebook Fan page from the rest of our design team.

Easter Fun!


It’s Wednesday, and this week, I made an Easter card using Easter Fun – Q023 by High Hopes Rubber Stamps for the main image and Hoppy Easter – H245 (High Hopes Rubber Stamps) for the sentiment. This image reminds me so much of when I was younger. Every year, my mom would make boiled eggs and then we would all sit around the table and put them in the various dies to make some cool colourful eggs. It was always so much fun.

To make my card this week, I used AC White Paper for my base folded at 6″ x 6″. I combined 2 separate pieces of purple ribbon and some patterned ribbon eggs together using double sided tape. I attached this to Your Next Stamp Designer – Happy Spring paper. Then I attached this directly to the base using double-side tape. The sides were all inked with Tim Holtz Distress Ink – Wilted Violet. The egg embellishments were die cut using my Cuttlebug and Lawn Fawn – Mini Easter Eggs. The top layers were cut from Copic Marker X-Press It Blending Card and coloured with Copic B01 and BG32. The bottom layers were cut from Crafts – Sparkling Stickers  – 02-3068629. I added some glue to the top layer and attached them to the base egg. I attached these directly to the base.

The background for the bunny image was cut using Whimsy – Nested Frames Die Set. The background die was cut from Hot Buy – Recollections – Jewel Tones and them main image cut was from Copic Marker X-Press It Blending Card. The base frames were attached to the background using 3M VHB – 2 sided tape. The main image Easter Fun – Q023 (High Hopes Rubber Stamps) and Hoppy Easter – H245 sentiment were stamped using my MISTI and Memento – Tuxedo Black ink. The main image was coloured in with Copic Markers and the sentiment was coloured in using Zig Clean Color Real Brush Markers. Clear – Wink of Stella was brushed over top to make it sparkle.

To assemble the remainder of my card, I ran the coloured image and sentiment through my Xyron’s and then attached them to the base shapes on the card.

Card Recipe:

Stamp: Easter Fun – Q023 (High Hopes Rubber Stamps)

Sentiment: Script Easter Greetings – F093 (High Hopes Rubber Stamps)

Inks: Memento – Tuxedo Black, Tim Holtz Distress Ink – Wilted Violet

Paper: Copic Marker X-Press It Blending Card, AC White, Hot Buy – Recollections – Jewel Tones, YNS Designer Paper Pad – Happy Spring, Crafts – Sparkling Stickers  – 02-3068629

Die Cuts: Whimsy – Nested Frames Die Set, Lawn Fawn – Mini Easter Eggs

Tools: MISTI – Most Incredible Stamping Tool, Cuttlebug, 3M VHB – 2 sided tape, Clear – Wink of Stella, Xyron Create a Sticker, Xyron Creative Station

Image coloured with Copic Markers:

Bunnies: E35, E34, E33, E31, E30, R30, R20, C2, C1, C0, Eyes (Sakura Glaze – Black, Gelly Roll Sakura #8 Pen)

Shirts: BG72, BG57, BG32, BG11, V17, V15, V12

Eggs and Paint Tins: BG32, B04, B02, B01, Y17, Y13, C5, C3, C1, E53, E51, E50

Water and Egg Carton: E53, E51, E50, B000, B0000

Table and Shadow: W2, W1, W0

Background: Y02

Sentiment: Zig Clean Color Real Brush Markers – English Lavender (803), Lilac (083), Yellow (050), Orange (070), Turquoise Green (042), Green Shadow (049), Light Pink (026)

Hope you like it and have a fantastic week!

You can find lots of inspiration from the Design Team Divas at the High Hopes blog, and the High Hopes Rubber Stamps Facebook Fan page plus you can also follow us on
Instagram, Twitter and Pinterest.

Easter Egg Gift!


It’s Wednesday, and this week, I made an Easter card using this hoppy little Bunny With Gift – S118 by High Hopes Rubber Stamps for the main image and Script Easter Greetings – F093 (High Hopes Rubber Stamps) for the sentiment. Look at how “hoppy” he is to share his  decorated egg with a special person! I don’t know about you, but I hope it’s filled with chocolate. LOL!

To make my card this week, I used Recollections – Hot Buy Pre-Cut Cards for my base folded at 5.5″ x 4.25″. Next I die cut Hot Buy – Recollections – Spring Posies using my Cuttlebug and My Creative Time – Rectangle Frame Die. Using some spare ribbon I had, using some double-sided tape, I attached it directly to this die-cut. Then, using double sided tape, I attached this piece directly to the base card. The aqua colour paper is from Hot Buy – Recollections – Jewel Tones. I created this die cut using my Cuttlebug and Gina Marie Designs – Loopy Rectangle Die Set.

The frame for the sentiment was created in Microsoft Word and then printed out onto white cardstock. This was coloured in with ZIG Clean Color Markers – 050 – Yellow and 025 – Pink. I stamped the Bunny With Gift – S118 (High Hopes Rubber Stamps) and Script Easter Greetings – F093 sentiment using my MISTI. Using my Brother Scan and Cut, I cut around the image leaving a small white border. This was coloured in with Copic Markers.

To assemble the remainder of my card, I first used some double-side tape to attach the finished sentiment to the bottom of the aqua die cut. 3M VHB – 2 sided tape was added to both pieces and attached to card. Lastly, the completed image was attached to the die cut, using 3M VHB – 2 sided tape.

Card Recipe:

Stamp: Bunny With Gift – S118 (High Hopes Rubber Stamps)

Sentiment: Script Easter Greetings – F093 (High Hopes Rubber Stamps)

Inks: Memento – Tuxedo Black

Paper: Copic Marker X-Press It Blending Card, Craft Smart – Cards and Envelopes, Hot Buy – Recollections – Jewel Tones, Hot Buy – Recollections – Spring Posies

Die Cuts: My Creative Time – Rectangle Frame Dies, Gina Marie Designs – Loopy Rectangle Die Set

Tools: MISTI – Most Incredible Stamping Tool, Cuttlebug, 3M VHB – 2 sided tape

Images coloured with Copic Markers:

Bunny: E35, E34, E33, E31, E30, R30, R20

Egg and Bow: BG72, BG57, BG32, BG11, Y17, Y08, Y04, R83, R81, RV00, RV000

Easter Greetings: ZIG Clean Color Markers – 050 – Yellow, 025 – Pink

Hope you like it and have a fantastic week!

You can find lots of inspiration from the Design Team Divas at the High Hopes blog, and the High Hopes Rubber Stamps Facebook Fan page plus you can also follow us on
Instagram, Twitter and Pinterest.

Little Cup of Cocoa


Coffee Loving Cardmakers is currently hosting the 2020 Fall / Winter Coffee Lovers Blog Hop! For my Fourth entry into this hop, I chose this loveable snowman in a hot tub of Cocoa called Snow Yummy – S182  by High Hopes Rubber Stamps. For the sentiments I used High Hopes Rubber Stamps, Cup of Cocoa – M009 and Holiday All Year – H200.

The image was stamped with Memento – Tuxedo Black ink onto Copic Marker X-Press It Blending Card using my MISTI to give me a nice clean image. The image was coloured with copic markers and then I fussy cut around it. I used a black marker to go around all of the edges where I had cut out the image.

I cut Hammermill – Premium Colour 100 lb. paper to be 4.25″ x 11″. Then I scored the paper at 5.5″ and again at 8.25″. (2.75″ from the original score line). I cut another piece of the cardstock at 4.25″ x 5.5″ to be the front panel. I then cut Stampin’ Up – Snowflake Splendor Designer Series Paper to be 4.25″ x 5″ and used double-side tape to place it directly to the front panel piece. Hot Buy Craft Smart – Holiday Glitz Glitter Paper was used to create the snow. I cut it 4.25″ wide and then just tore a piece across the width to create the shape. I used double-sided tape to adhere this directly to the bottom of the front panel.

The sentiments were then added with Versa Fine – Onyx Black and embossed with Ranger – Clear Super Fine Detail embossing powder. This was then heat set with Marvy Uchida – Embossing Heat Tool. To create the rectangles, I used  My Creative Time – Rectangle Frame Layers  for the patterned paper and My Creative Time – Rectangle Frame Dies for the background rectangle using Hot Buy – Recollections – Jewel Tones. Next, I ran the small sentiment and the coloured image through my Xyron Creative Station to create stickers out of them. This made it easer to adhere the larger image to the background and the smaller sentiment to the larger rectangle.

The card was now ready to assemble. I applied double-sided tape to only the lower half of the scored card and then placed the finished scene panel onto it. I cut another piece of patterned paper at 4-1/8″ x 3″ and adhered it the lower half of the inside card. Then I popped up the sentiment using 3M VHB – 2 sided tape. I added some Wink of Stella – Clear  to the snowman to make him sparkle and Gelly Roll Stardust – Clear and the Wink of Stella – Clear to the large snowflake on the mug. Lastly, I added some Stickles – Diamond to add some texture to the snow.

Card Recipe:

Stamp: Snow Yummy – S182 (High Hopes Rubber Stamps)

Sentiments: Cup of Cocoa – M009 (High Hopes Rubber Stamps)Holiday All Year – H200 (High Hopes Rubber Stamps)

Inks: Memento – Tuxedo Black, Versa Fine – Onyx Black

Embossing Powder: Ranger – Clear Super Fine Detail embossing powder

Paper: Copic Marker X-Press It Blending Card, Hammermill – Premium Colour 100 lb., Stampin’ Up – Snowflake Splendor Designer Series Paper, Hot Buy Craft Smart – Holiday Glitz Glitter Paper 12″ x 12″

Die Cuts: My Creative Time – Rectangle Frame Layers, My Creative Time – Rectangle Frame Dies

Tools: MISTI – Most Incredible Stamping Tool, Cuttlebug, 3M VHB – 2 sided tape, Xyron Creative Station, Wink of Stella – Clear, Stickles – Diamond

Image coloured with Copic Markers:

Snowman: B60, BG000, YR18, YR14, Y08, C9, N8, N5, R30, R27, R24, R22, R20, Colorless Blender, Wink of Stella – Clear

Mug and Hot Cocoa: E23, E25, E27, B37, B14, B12, Wink of Stella – Clear and Gelly Roll Stardust – Clear

Hat and Scarf: C9, C7, C5, R59, R39, R37, R35

Hope you like it and have a great week!

Blowing Bubbles


Today I’m sharing  Summertime Fun (KLM Digital Designs) image from KLM Digital Designs. This little boy is enjoying his day just having a wonderful time not thinking about what is going on around him. He is just living in the moment and having fun blowing bubbles. I remember doing this on many occasions as a child. Do you?

I printed out the main image onto Copic Marker X-Press It Blending Card using my HP Printer. The image was then die cut with my Cuttlebug and My Creative Time – Rectangle Frame Dies Layers and then coloured in with Copic markers. The sentiment was then added using Versa Fine – Onyx Black and embossed with Ranger – Clear Super Fine Detail embossing powder. This was heat embossed using Marvy Uchida – Embossing Heat Tool.

For the main background, Hot Buy – Recollections – Watercolour Solids 5.5″ x 4.25″ was used. My Creative Time – Rectangle Frame Dies were used to die cut Hot Buy – Recollections – Jewel Tones paper. All of the layers were now ready to be assembled. The image and background layer were both popped up with 3M VHB – 2 sided tape.

Card Recipe:

Stamp: Summertime Fun (KLM Digital Designs)

Sentiment: Craftin Desert Divas – Adventure Awaits (Retired Stamp)

Inks: HP Printer Grayscale, Versa Fine – Onyx Black

Paper: Copic Marker X-Press It Blending Card, Hot Buy – Recollections – Jewel Tones, Hot Buy – Recollections – Watercolour Solids Cards & Envelopes

Die Cuts: My Creative Time – Rectangle Frame Dies, My Creative Time – Rectangle Frame Layers

Embosssing Powder: Ranger – Clear Super Fine Detail embossing powder

Tools: 3M VHB – 2 sided tape, Marvy Uchida – Embossing Heat Tool

Image coloured with Copic Markers:

Skin: E000, E00, E04, E11, E21, R22, R20

Hair: E47, E44, E43

Shirt: YG99, YG97, YG63, G21

Pants: B26, B24, B21

Shoes: E29, E27, E25, E23, YR14, YR07

Bubbles: BV00, RV00, B000, B0000, Gelly Roll Sakura #8 Pen

Grass: YG17, YG13, YG03, YG01

Sky and Clouds: B60, B02, B01, B00, B000, B000, C0, Colorless Blender

Hope you like it and have a great week!

You can find more cards to inspire you at KLM Designs, KLM Digital Design Team and KLM Digital Designs on the Facebook Fan page from the rest of our design team.