Archive | November 2024

Happy Pawlidays!


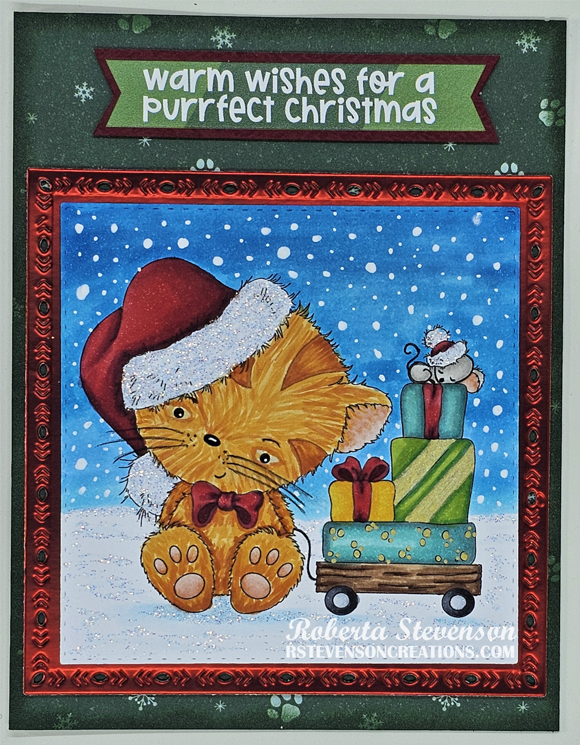
Today I’m sharing another Christmas card that I made using KLM Digital DesignsKitty – Santa Hat from the new November 2024 Release. This image also comes with the 2 other sentiments, “Merry Christmas” and “Santa Paws is Comin’ to town”. Purrrfect for all of the cat lovers out there or for your own little kitty cat! LOL!

The image and sentiment were printed out with my HP Printer onto Copic Marker X-Press It Blending Card using High Quality Grayscale. The image was coloured in with Copic markers and a Prismacolor Premier black pencil was used to colour in the eyes and the whiskers.  Sakura Glaze – Black Pen was used to colour in the nose and a White Gelly Roll Sakura #10 Pen was used to create the highlight. The White Gelly Roll Sakura #10 Pen was also applied to the sky and highlights on the snow drifts. Stickles – Diamond was applied to the top of the snow and on the white parts of the hat.

The base card was created to the size of 4.25″ x 5.5″ out of Hammermill – Premium 110 lb. cardstock. Recollections – Navy Cardstock was cut to the same size as the base card and it was adhered to it with liquid glue. U-Line Double-Sided Foam Tape was applied to the completed image and it was popped up onto the  centre of the card.

Card Recipe:

Stamp and Sentiment: KLM Digital DesignsKitty – Santa Hat

Inks: HP Printer High Quality Grayscale

Paper: Copic Marker X-Press It Blending Card, Hammermill – Premium Cardstock 110 lb., Recollections – Navy Cardstock

Miscellaneous: U-Line Double-Sided Foam Tape, Sakura Glaze – Black Pen, White Gelly Roll Sakura #10 Pen, Stickles – Diamond

Image coloured with Copic Markers:

Cat: C8, C7, C6, C5, C4, C3, R29, R27, R24, R02, R01, R00, PrismaColor Premier Pencil – Black, Sakura Glaze – Black Pen, Gelly Roll Sakura #10 Pen (Nose)

Hat: R59, R37, R35, R24, B91, C01, C0, Colorless Blender, Stickles – Diamond

Sky: B04, BO2, B01, B00, Gelly Roll Sakura #10 Pen

Snow: B91, C1, C0, Colorless Blender, Gelly Roll Sakura #10 Pen, Stickles – Diamond

Hope you like it and have a great week!

You can find more cards to inspire you at KLM Designs, KLM Digital Design Team and KLM Digital Designs on the Facebook Fan page from the rest of our design team.

Christmas Tree Gnome!


Today I’m sharing a Christmas card that I made using KLM Digital DesignsChristmas Tree Gnome II from the new November 2024 Release.

The base card was created to the size of 4.25″ x 5.5″ out of Hammermill – Premium 110 lb. cardstock.  The image was printed out onto Copic Marker X-Press It Blending Card using High Quality Grayscale and then it was die cut using a Cuttlebug and My Creative Time – Rectangle Frame Die Layers (3.5″ x 4.75″). The image was then coloured in with Copic markers listed below.  A white Gelly Roll Sakura #10 Pen was used to create the white snow in the sky and also the sparkles on the snow drifts on the ground. Recollections – Red cardstock was cut to the size of approximately x 3.75″ x 5″ and the finished image was directly applied to this using liquid glue. Once again, liquid glue was applied to the red rectangle and it was adhered directly to the base card. Finally to finish it off, I popped up a sentiment from Creative Expressions – Wordies Sentiment Sheets – Christmas Script (CEW022) using U-Line Double-Sided Foam Tape.

Card Recipe:

Stamp: KLM Digital DesignsChristmas Tree Gnome II

Inks: HP Printer High Quality Grayscale

Paper: Copic Marker X-Press It Blending Card, Hammermill – Premium Cardstock 110 lb., Recollections – Red cardstock

Die Cut: My Creative Time – Rectangle Frame Die Layers – MCT-D274

Miscellaneous: U-Line Double-Sided Foam Tape, Gelly Roll Sakura #10 Pen, Creative Expressions – Wordies Sentiment Sheets – Christmas Script (CEW022)

Image coloured with Copic Markers:

Skin: E21, E11, E04, E00, E000, R24, R22

Sweater:  R59, R37, R35, BG09, BG05, BG02, BG01, C2, C1

Pants: B99, B97, B95, B91

Hat: R59, R37, R35

Boots: C9, C7, C7, C3

Mitten: R59, R37, R35, BG09, BG05, Gelly Roll Sakura #10 Pen

Tree and Branches: E59, E29, E27, E25, E21, G99, YG67, YG63, YG61

Sky: B06, B05, B04, B02

Snow: B91, C1, C0, Colorless Blender, Gelly Roll Sakura #10 Pen

Hope you like it and have a great week!

You can find more cards to inspire you at KLM Designs, KLM Digital Design Team and KLM Digital Designs on the Facebook Fan page from the rest of our design team.

Christmas Wagon Kitty!


Today I’m sharing a Christmas card that I made using Dis Digi StampsChristmas Wagon Kitty (Retired).

The base card was created to the size of 4.25″ x 5.5″ out of Hammermill – Premium 110 lb. cardstock. Craft Smart – Hot Buy – Happy Pawlidays paper was cut to the same size and adhered to the base using double-sided tape. Tim Holtz Distress Ink – Rustic Wilderness was inked around all of the edges of the card using a finger dauber. I chose a sentiment from Photo-Play Santa Paws Cats – Stickers and applied it to some red cardstock from my stash and then fussy cut around it and set it aside. With my Cuttlebug, I die cut Crafter’s Companion Luxury Cardstock – Red matte finish with PinkFresh Studio – Essentials: Folk Edge Squares.

The image was printed out with my HP Printer onto Copic Marker X-Press It Blending Card using High Quality Grayscale. The image was coloured in with Copic markers. Sakura Glaze – Black Pen was used to colour in the eyes and nose. The eyebrows, mouth, tail and finer details on mouse were enhanced using a PrismaColor Black pencil. The whiskers were also added using the black pencil. Gelly Roll Sakura #5 Pen was applied to create the dots in the eyes and on the nose. To create the snow in the sky, Gelly Roll Sakura #10 Pen was applied to make some snowflakes larger and smaller than others. On the presents, a UNI Posca Pen – Gold was used on the ribbon and dots on the presents. Lastly, Stickles – Diamond was applied to the cuff of the hats, pompoms and snow on the ground.

The card was now ready to assemble. U-Line Double-Sided Foam Tape was applied to the image and it was popped up onto the red square die cut. Once again, it was applied to the die cut and the sentiment. Both items were then popped up onto the card to complete it.

Card Recipe:

Stamp and Sentiment: Dis Digi StampsChristmas Wagon Kitty (Edited -2) (Retired)

Inks: HP Printer High Quality Grayscale, Tim Holtz Distress Ink – Rustic Wilderness

Paper: Copic Marker X-Press It Blending Card, Hammermill – Premium Cardstock 110 lb., Crafter’s Companion Luxury Cardstock – Red, Craft Smart – Hot Buy – Happy Pawlidays (12″ x 12″), Photo-Play Santa Paws Cats – Stickers

Dies: PinkFresh Studio – Essentials: Folk Edge Squares

Miscellaneous: U-Line Double-Sided Foam Tape, Sakura Glaze – Black Pen, UNI Posca Pen – Gold, Stickles – Diamond

Image coloured with Copic Markers:

Kitty Cat: YR68, YR18, YR31, Y38, R02, R01, R00, PrismaColor Premier Pencil – Black, Sakura Glaze – Black Pen (Nose)

Mouse: W3, W1, W0, R02, R01, R00, PrismaColor Premier Pencil – Black, Sakura Glaze – Black Pen (Nose)

Hats and Bows: R59, R37, R35

Presents: BG72, BG57, BG32, BG11, G16, YG25, YG23, Y19, Y17, Y15, UNI Posca Pen – Gold, Gelly Roll Sakura #5 Pen, Gelly Roll Sakura #10 Pen

Wagon and Wheels: E27, E25, E23, E21, C9, C7, C5, CC, C1, C0

Sky: B05, B04, B02, B01, Gelly Roll Sakura #10 Pen (Snow)

Snow and Shadows: BG000, BG0000

Hats and Sparkle on Snow: Stickles – Diamond

Hope you like it and have a great week!

Thankful for You!


Today I’m sharing a simple Thanksgiving card that I made using KLM Digital DesignsPre-Colored Dinosaur Pumpkin from the new November 2024 Release. Our Canadian Thanksgiving has past, but the American Thanksgiving is happening soon!

The base card was created to the size of 4.25″ x 5.5″ out of Hammermill – Premium 110 lb. cardstock.  Chocolate brown paper from the Creative Memories – Croptoberfest 2021 Sampler Pack , was cut to the same size as the base and adhered to the card. Next, I cut 2 strips from PhotoPlay – Gnome for the Holidays Thanksgiving paper to the size of 4-1/8″ x 1″ and some Thanksgiving paper 4-1/8″ x 3-3/8″ from my scrap stash paper. The followings inks were used to apply ink around the edges of the papers: Tim Holtz Distress Ink – Carved Pumpkin, Tim Holtz Distress Ink – Aged Mahogony and Tim Holtz Distress Inks – Peeled Paint. All of the pieces were adhered to the base with liquid glue.

I chose a sentiment from PhotoPlay – Autumn Greetings by Becky Moore – Element Stickers and applied it to some regular cardstock and then fussy cut around it. U-Line Double-Sided Foam Tape was applied to the image and sentiment and both items were popped up onto the card. Kraftin’ Kimmie  Dots were added to the bottom to complete the card.

Card Recipe:

Stamp: KLM Digital DesignsPre-Colored Dinosaur Pumpkin

Sentiment: PhotoPlay – Autumn Greetings by Becky Moore – Element Stickers

Inks: HP Printer, Tim Holtz Distress Ink – Carved Pumpkin, Tim Holtz Distress Ink – Aged Mahogony, Tim Holtz Distress Inks – Peeled Paint

Paper: Copic Marker X-Press It Blending Card, Hammermill – Premium Cardstock 110 lb., Creative Memories – Croptoberfest 2021 Sampler Pack (12″ x 12″), PhotoPlay – Gnome for the Holidays Thanksgiving

Miscellaneous: U-Line Double-Sided Foam Tape, Kraftin’ Kimmie Dots

Hope you like it and have a great week!

You can find more cards to inspire you at KLM Designs, KLM Digital Design Team and KLM Digital Designs on the Facebook Fan page from the rest of our design team.

Purfect Birthday!


Today I’m sharing a birthday card that I made using KLM Digital DesignsKitty – Flower Pot from the new October 2024 Release. This image also comes with the 2 other sentiments, “Let’s Pawty!” and “Hugs, kisses and a lot of Birthday wishes“.

The base card was created to the size of 4.25″ x 5.5″ out of Hammermill – Premium 110 lb. cardstock. Forever in Time – Birthday Blast was cut to the size of 2″ x 5.5″ and adhered to the base with liquid glue.

The image and sentiment were printed out with my HP Printer onto Copic Marker X-Press It Blending Card using High Quality Grayscale. The image was coloured in with Copic markers and a Prismacolor Premier black pencil was used to colour in the eyes, the whiskers and add some deeper definition to the cat’s facial features and flower centres. Sakura Glaze – Black Pen was used to colour in the nose. Once the colouring of the image was completed, Copic marker BG000 was used to colour around the entire image and then it was fussy cut leaving a slim border. The sentiment was fussy cut and then attached to a scrap piece of Recollections – Matte Gold Foil cardstock using liquid glue. Once again, the sentiment was fussy cut.

The card was now ready to assemble. U-Line Double-Sided Foam Tape was applied to the image and sentiment. Both items were popped up onto the card. Kraftin’ Kimmie – Fruity Dots were added to complete the card.

Card Recipe:

Stamp and Sentiment: KLM Digital DesignsKitty – Flower Pot

Inks: HP Printer High Quality Grayscale

Paper: Copic Marker X-Press It Blending Card, Hammermill – Premium Cardstock 110 lb., Forever in Time – Birthday Blast – 6″x6″ paper, Recollections – Matte Gold Foil cardstock

Miscellaneous: U-Line Double-Sided Foam Tape, Kraftin’ Kimmie – Fruity Dots, Sakura Glaze – Black Pen

Image coloured with Copic Markers:

Cat: C8, C7, C6, C4, C3, R29, R27, R24, R02, R01, R00, PrismaColor Premier Pencil – Black, Sakura Glaze – Black Pen (Nose)

Flower Pot: E99, E97, E95, Colorless Blender

Flowers and Leaves: E15, Y19, Y17, Y15, Y11, Y08, G16, YG25, YG23

Hope you like it and have a great week!

You can find more cards to inspire you at KLM Designs, KLM Digital Design Team and KLM Digital Designs on the Facebook Fan page from the rest of our design team.