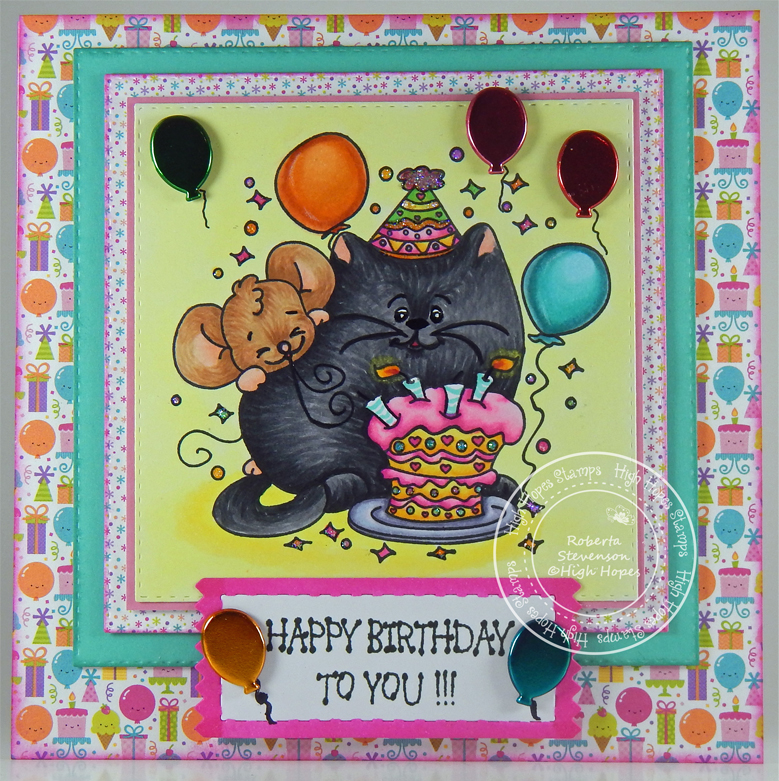
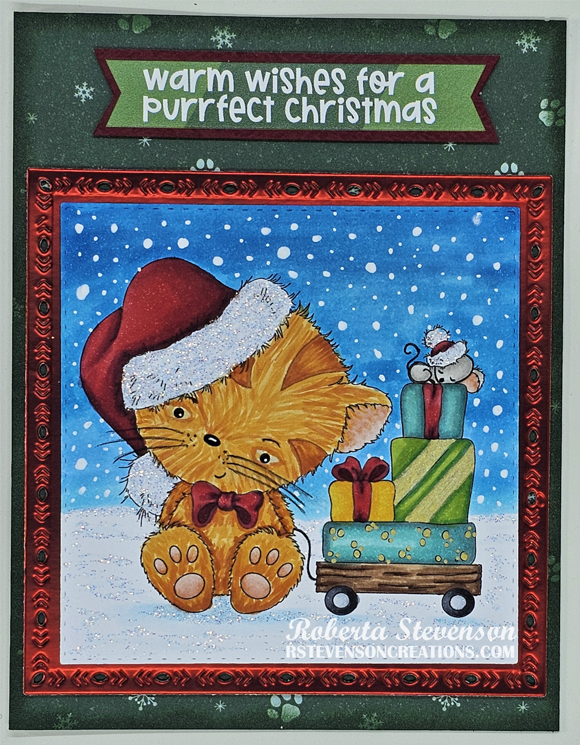
Tag Archive | Mouse

Udderly Fabulous Christmas!!!


It’s Wednesday, and this week, I made a CAS Christmas card using High Hopes Rubber Stamps Decorating With Charlie – TT060 for the main image and Udderly Fabulous – HDG007 for the sentiment. These little farm friends have started to decorate their tree. Have you started to decorate yours?

To make my card this week, I began with a card base of 4.25″ x 5.5″ Hammermill – Premium Colour 100 lb. cardstock. I cut Copic Marker X-Press It Blending Card cardstock to be the same size as the base card and then with my MISTI and Memento – Tuxedo Black ink, I stamped the image onto it. I coloured in the image and then placed it back into my MISTI to stamp the sentiment onto it. I applied VersaMark ink and then embossed it with Ranger Embossing Powder White – Extra Fine Detail. I heated this with my Marvy Uchida – Embossing Heat Tool. Snow was added to the sky using a UNIPosca PC-3M White marker. For the snow at the bottom of the card, Brutus Monroe – Snow Paste was applied with a small spatula and DecoArt Glamour Dust was sprinkled over top while it was still wet to give it even more sparkle. Once the snow was dry, I applied double-sided tape and liquid glue to adhere the image directly to the base card.

Card Recipe:

Stamp: Decorating With Charlie – TT060 (High Hopes Rubber Stamps)

Sentiment: Udderly Fabulous – HDG007 (High Hopes Rubber Stamps)

Inks: Memento – Tuxedo Black, VersaMark

Paper: Copic Marker X-Press It Blending Card, Hammermill – Premium Colour 100 lb.

Embossing Powder: Ranger Embossing Powder White – Extra Fine Detail

Tools: MISTI – Most Incredible Stamping Tool, Marvy Uchida – Embossing Heat Tool, DecoArt Glamour Dust, Brutus Monroe – Snow Paste, UNIPosca PC-3M White marker

Image coloured with Copic Markers:

Cow: C8, C6, C4, C3, C1, C00, B60, R30, R20, R00, R000, E95, E93, E53, E51, E50

Mouse: R30, R20, R02, R01, W5, W3, W1, W0, W00

Sky: B05, B04, B02, B01, B00

Tree and Pines: E49, E27, E23, G29

Bauble, Scarf and Collar: R59, R37, R35

Holly and Bell: G43, G29, YG63, YR24, Y35, Y08, E15

Grass: YG67, YG63

Hope you like it and have a fantastic week!

You can find lots of inspiration from the Design Team Divas at the High Hopes blog, and the High Hopes Rubber Stamps Facebook Fan page plus you can also follow us on
Instagram, Twitter and Pinterest.

Hallowe’en Kitty and Friends!!


It’s Wednesday, and this week, I made a Hallowe’en card using High Hopes Rubber Stamps Hallowe’en Kitty – TT042 for the image and Happy Halloween – H232 for the sentiment. I thought it would be fun to end the month off with another spooky card since Hallowe’en is only a few days away from now.

To make my card this week, I began with a card base of Hammermill – Premium Colour 100 lb. cardstock, cut and scored to be 5.5″ x 4.25″. Textura Select Cardstock – Tropicana was cut to the same size as the base and adhered using double-sided tape. Using my Cuttlebug, Copic Marker X-Press It Blending Card was die cut using My Creative Time – Rectangle Frame Dies. I stamped the main image onto the die cut and the sentiment onto a scrap piece of orange cardstock using my MISTI and Memento – Tuxedo Black ink. Using my Cuttlebug and Gina K Designs – Sentiment Strips, I die cut the sentiment that I stamped.

The image was coloured in and then I used a black Prismacolor Premier Pencil to highlight a few of the areas to make them stand out a little more. I also extended the fence to the ends of the die cut on both sides. I added back in the whites of the eyes with a Gelly Roll Sakura #8 Pen and some stars in the night sky. U-Line double-sided tape was applied to the back of the sentiment and the coloured image. They were both popped up onto the base to complete the card.

Card Recipe:

Stamps: Hallowe’en Kitty – TT042 (High Hopes Rubber Stamps)

Sentiment: Happy Halloween – H232 (High Hopes Rubber Stamps)

Inks: Memento – Tuxedo Black

Paper: Copic Marker X-Press It Blending Card, Hammermill – Premium Colour 100 lb., Textura Select Cardstock – Tropicana (12″ x 12″)

Die Cuts: My Creative Time – Rectangle Frame Dies, Gina K Designs – Sentiment Strips

Tools: MISTI – Most Incredible Stamping Tool, U-Line double-sided tape, Gelly Roll Sakura #8 Pen

Image coloured with Copic Markers:

Black Cat: C9, C7, C5, R22, R20

Hat: V17, V09, V06, V04, YR68, YR24, YR18, YR16, YR04, E15, Y35, Y08

Mouse: W5, W3, W1, R20

Bat: BV29, BV25, BV23

Ghost: BV20, C00, Colorless Blender

Moon: Y00, BV20, C00, Colorless Blender

Gravestone: YR18, YR16, T5, T3, T1

Grass: G99, YG67, YG17

Sky: C9, BV29, BV25, BV23, BV20

Hope you like it and have a fantastic week!

Check out more adorable Fall images at High Hopes Rubber Stamps!

You can find lots of inspiration from the Design Team Divas at the High Hopes blog, and the High Hopes Rubber Stamps Facebook Fan page plus you can also follow us on
Instagram, Twitter and Pinterest.


Also entered this into the following contests

https://herpeacefulgarden.blogspot.com/

https://lostcoastportaltocreativity.blogspot.com/2022/10/challenge-154-cats-and-dogs-challenge.html


By The Moonlight!!


It’s Wednesday, and this week, I made a Hallowe’en card using High Hopes Rubber Stamps By The Moonlight – TT047 for the image and Block Happy Halloween – FF049 for the sentiment. These little friends are ready for some spooky fun on Hallowe’en.

To make my card this week, I began with a card base of Hammermill – Premium Colour 100 lb., cut and scored to be 5.5″ x 4.25″. I die cut the background from Stampin’ UP! – Magic In This Night Designer Series Paper to be the same size as the base. Using a combination of Tim Holtz Distress Ink – Black Soot, Villainous Potion, Seedless Preserves and Fossilized Amber and finger daubers, I added some extra colour to the background. Martha Stewart – Hallowe’en Washi Tape was placed across the bottom. I cut Doodlebug Design Inc. – Hallowe’en Parade cardstock to the size of 1-1/8″ x 4.25″. I ran this through my Xyron Create a Sticker and adhered it to the base card above the washi tape.

I stamped the main image and sentiment onto Copic Marker X-Press It Blending Card cardstock using my MISTI and Memento – Tuxedo Black ink. The main image was a little short for the full width of the card so I added some double-sided tape to a couple scraps of Copic Marker X-Press It Blending Card cardstock and adhered them to both sides of the fence. The image and sentiment were then both coloured in. The image was fussy cut and U-Line double-sided tape was applied to it. I popped it up onto the card and then cut off the excess from the fence on both sides.  I cut around the sentiment and then ran it through my Xyron Create a Sticker and applied it to a piece of Recollections – Black cardstock. Once again, I used my cutter to go around the sentiment, leaving a slight border. U-Line double-sided tape was applied to the back of the sentiment and it was popped up onto the striped paper background to complete the card.

Card Recipe:

Stamps: By The Moonlight – TT047 (High Hopes Rubber Stamps)

Sentiment: Block Happy Halloween – FF049 (High Hopes Rubber Stamps)

Inks: Memento – Tuxedo Black, Tim Holtz Distress Ink – Black Soot, Villainous Potion, Seedless Preserves and Fossilized Amber

Paper: Copic Marker X-Press It Blending Card, Hammermill – Premium Colour 100 lb., Doodlebug Design Inc. – Hallowe’en Parade (6 in. x 6 in.), Recollections – Black cardstock, Stampin’ UP! – Magic In This Night Designer Series Paper (12″ x 12″)

Tools: MISTI – Most Incredible Stamping Tool, U-Line double-sided tape, Xyron Create a Sticker

Image coloured with Copic Markers:

Black Cat: C8, C6, C4, C3, BV17, R22, R30

Mouse: W5, W3, W1, R02, R00

Bats: BV25, BV23

Fence: E49, E27, E25, E23, E21

Moon: Y00, BV20, C1, C00, Colorless Blender

Sentiment: YR04, Y17, V09, V06, V04, YG23, YG05

Hope you like it and have a fantastic week!

Check out more adorable Fall images at High Hopes Rubber Stamps!

You can find lots of inspiration from the Design Team Divas at the High Hopes blog, and the High Hopes Rubber Stamps Facebook Fan page plus you can also follow us on
Instagram, Twitter and Pinterest.

Cat & Mouse Party!!


It’s Wednesday, and this week, I made a birthday card using High Hopes Rubber Stamps Cat & Mouse Party – TDG036 for the image and Dot Happy Birthday To You! – F065 for the sentiment. These animals are ready to party, are you?

To make my card this week, I began with a card base of AC Cardstock – White paper cut and scored to be 6″ x 6″. Using my Cuttlebug and My Creative Time -Stitched Squares Inside and Out, I die cut 3 squares out of Doodlebug Design Inc. – Fairy Tales, Recollections – Spring Inks paper and Copic Marker X-Press It Blending Card. I also used Doodlebug Design Inc. – Fairy Tales 6″ x 6″ paper for my main background. I applied this directly to the base card using double-sided tape. Tim Holtz Distress Ink – Evergreen Bough and Tim Holtz Distress Ink – Picked Raspberry were both used to go around the edges of the die-cut paper. I applied U-Line double-sided tape to the backs of the aqua coloured square and patterned paper and popped them both up onto the background.

The image and sentiment were both stamped onto Copic Marker X-Press It Blending Card using my MISTI – Most Incredible Stamping Tool and Memento – Tuxedo Black ink. The image was coloured in with Copic Markers. I die cut the sentiment using my Anna Griffin Empress Mini Machine and My Creative Time – Stitched Zig Zag Ties. Copic marker RV06 was used to go around the edges. I attached the coloured image to Recollections – Spring Inks paper using double-sided tape and then cut a slim border around the image. I applied U-Line double-sided tape to the back of this piece and popped it up into the centre of the patterned square. 4 layers of U-Line double-sided tape were attached to the back of the sentiment on the bottom portion and liquid glue was applied to the top. I popped this up onto the card at the bottom. Lastly, to finish the card off, I applied Creative Impressions – Metallic Balloon Brads by adding 2 layers of U-Line double-sided tape. I popped them onto the sentiment and the card and drew in some string for the balloons. Stickles – Star Dust was added to the cake and confetti.

Card Recipe:

Stamps: Cat & Mouse Party – TDG036 (High Hopes Rubber Stamps)

Sentiment: Dot Happy Birthday To You! – F065 (High Hopes Rubber Stamps)

Inks: Memento – Tuxedo Black, Tim Holtz Distress Ink – Evergreen Bough, Tim Holtz Distress Ink – Picked Raspberry

Paper: Copic Marker X-Press It Blending Card, AC Cardstock – White, Doodlebug Design Inc. – Fairy Tales (6″ x 6″), Recollections – Spring Inks (12″ x 12″)

Die Cuts: My Creative Time -Stitched Squares Inside and Out, My Creative Time – Stitched Zig Zag Ties

Tools: MISTI – Most Incredible Stamping Tool, U-Line double-sided tape, Cuttlebug, Anna Griffin Empress Mini Machine, Creative Impressions – Metallic Balloon Brads – Item 90613, Stickles – Star Dust

Image coloured with Copic Markers:

Cat: N9, N7, N6, N5, N4, R46, R30, R20

Mouse: E35, E34, E33, E31, E30, R46, R30, R20, R02, R01, R00

Cake, Hat and Confetti: BG57, BG32, RV06, RV04, RV02, RV00, Y17, Y15, Y11, YR15, YR14, YR12, V04, YG07, YG05, YG03

Balloons: BG72, BG57, BG32, BG11, BG000, YR18, YR16, YR12, YR00

Candles: BG32, R46, YR14, Y08, Y04

Plate: BV25, BV23, BV20, BV0000

Background: Y04, Y02, Y00

Hope you like it and have a fantastic week!

You can find lots of inspiration from the Design Team Divas at the High Hopes blog, and the High Hopes Rubber Stamps Facebook Fan page plus you can also follow us on
Instagram, Twitter and Pinterest.

Not Horsin’ Round


It’s Wednesday, and this week, I’m sharing another Valentine’s card I made using High Hopes Rubber Stamps Horsin’ Around Horsey – P130. This little horse and his little friend are trotting by to wish you a Happy Valentine’s Day.

To make my CAS card today, I used The Paper Studio – Primary Base Colours 4.25″ x 5.5″. I die cut the 2 background hearts papers from Martha Stewart Crafts – Enchanted Woodland, using my Cuttlebug and My Creative Time – Rectangle Frame Dies. I die cut Copic Marker X-Press It Blending Card using My Creative Time – Scalloped Stitched Oval Dies. The image was stamped onto the die cut using my Misti and Memento – Tuxedo Black ink. I coloured in the image using Copic Markers. Then I used Tim Holtz Distress Inks – Festive Berries to ink around the edges of all of the die cuts.

To assemble the card, double-sided tape was used to adhere the first layer directly to the card base. 3M VHB – 2 sided tape was added to the backs of the coloured image and second layer of pattened paper and then they were added to the base. To complete the card, I added 3 hearts from Buttons Galore & More – Heartfelt Shimmerz Embellishments.

Card Recipe:

Stamp:  Horsin’ Around Horsey – P130 (High Hopes Rubber Stamps)

Inks: Memento – Tuxedo Black, Tim Holtz Distress Inks – Festive Berries

Paper: Copic Marker X-Press It Blending Card, Martha Stewart Crafts – Enchanted Woodland 12″ x 12″, The Paper Studio – Primary Base Colours 4.25″ x 5.5″

Die Cuts: My Creative Time – Scalloped Stitched Oval Dies, My Creative Time – Rectangle Frame Dies

Tools: MISTI – Most Incredible Stamping Tool, Cuttlebug, 3M VHB – 2 sided tape, Buttons Galore & More – Heartfelt Shimmerz Embellishments

Images coloured with Copic Markers:

Horse: E37, E35, E33, E31, T6, T4, T2, R81

Mouse: W2, R81

Grass: YG17, YG13, YG03, YG01

Flower and Stem: G07, G03, RV06, RV04, Y15

Hearts: R39, R37, R35

Hope you like it and have a fantastic week!

You can find lots of inspiration from the Design Team Divas at the High Hopes blog, and the High Hopes Rubber Stamps Facebook Fan page plus you can also follow us on
Instagram, Twitter and Pinterest.

All Dreams Come True


It’s Wednesday, and this week, High Hopes Rubber Stamps new release Dreamy Willa – SLF010 is looking up into the stars and sharing this special moment with her little friend. I thought All Dreams Come True – G011 (High Hopes Rubber Stamps) was the perfect sentiment to go with this adorable new image. Sometimes it’s nice to be just like Willa and just gaze up at the stars and just live in the peace and tranquility of the moment. Have you ever done this? I know I have.


To make my card this week, I started out with a base card of 6″ x 6″. Then I cut the main background the same size using Hot Buy Craft Smart – Moon Flower Magic. I just fell in love with this paper and thought it went so perfectly with the new image. I also die cut some miscellaneous cardstock that I had which had little stars and is navy blue using My Creative Time – Scalloped Stitched Oval Dies. I also, die cut the main image with the same set of dies out of Copic Marker X-Press It Blending Card. The sentiment was die cut using My Creative Time – Ribbon End Dies. All of the die cuts were then edged with Sharpie – Gold Medium Point – Water Based Paint.

Both the main image and sentiment were stamped using my Misti and Memento – Tuxedo Black ink. The image was then coloured in using Copic markers which I have listed below. Once the image was all coloured, I bumped up the background, image and sentiment with 3M VHB – 2 sided tape.

Card Recipe:

Stamp:  Dreamy Willa – SLF010 (High Hopes Rubber Stamps)

Sentiment Background: All Dreams Come True – G011 (High Hopes Rubber Stamps)

Inks: Memento – Tuxedo Black

Paper: Copic Marker X-Press It Blending Card, Hot Buy Craft Smart – Moon Flower Magic, Miscellaneous Cardstock

Die Cuts: My Creative Time – Scalloped Stitched Oval Dies, My Creative Time – Ribbon End Dies

Tools: MISTI – Most Incredible Stamping Tool, Cuttlebug, 3M VHB – 2 sided tape, Sharpie – Gold Medium Point – Water Based Paint

Image coloured with Copic Markers:

Willa: W5, W4, W3, W1, W0, W00, E93, R20, R02, B05, B04, B02, C0, Gelly Roll Sakura #10 Pen, Sakura Glaze – Black, Pigma Micron 01 black marker

Grass: YG17, YG13, YG03, YG01

Sky: B99, B97, B79, B69, B39, B37, B29, B28

Moon: BV23, C1, C0, Y0000, Colorless Blender

Lady Bug: R24, Sakura Glaze – Black, Gelly Roll Sakura #8 Pen, Pigma Micron 01 black marker

Stars: Gelly Roll Stardust – Clear

Hope you like it and have a fantastic week!

You can find lots of inspiration from the Design Team Divas at the High Hopes blog, and the High Hopes Rubber Stamps Facebook Fan page plus you can also follow us on
Instagram, Twitter and Pinterest.