Tag Archive | Recollections – Burgundy

Fido – Love You


It’s Wednesday, and today I’m sharing a card I made using KLM Digital Design –  Fido – Love You from the new January 2023 release. Our pets always give us unconditional love and they make the best companions to talk to, play with and just cuddle with with when we need a big hug!

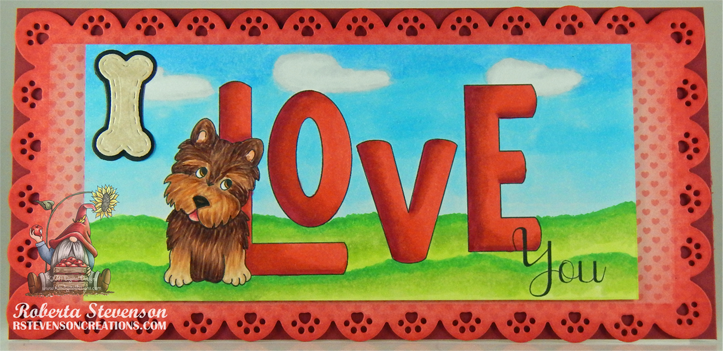
To make my card this week, I started with a 7.25″ x 3.5″ card base using Hammermill – Premium Colour 100 lb. cardstock. Recollections – Burgundy was cut to the size of 7.25″ x 3.5″ and adhered directly to the card. Using my Cuttlebug and My Creative Time – Tall Paw Frame Dies, I die cut Martha Stewart Crafts – Enchanted Woodland paper and the little bone using scraps of brown and black cardstock. Tim Holtz Distress Inks – Festive Berries and a blending brush were used to ink around the edges of the large die cut. This was popped up onto the base using U-Line Double-Sided tape.

The image and sentiment were imported into Microsoft Word and printed out onto Copic Marker X-Press It Blending Card. The paper was cut to be 5-5/8″ x 2-5/8″ and everything was coloured in. U-Line Double-Sided tape was added to this and it was popped up onto the die cut. I ran the bone die cuts through my Xyron Create a Sticker and attached them to the card to finish it off.

Card Recipe:

Stamp and Sentiment:  Fido – Love You – KLM Digital Designs

Inks: HP Printer Grayscale, Tim Holtz Distress Inks – Festive Berries

Paper: Copic Marker X-Press It Blending Card, Hammermill – Premium Colour 100 lb., Martha Stewart Crafts – Enchanted Woodland 12″ x 12″, Recollections – Burgundy

Die Cuts: My Creative Time – Tall Paw Frame Dies

Miscellaneous: 2 sided tape, Cuttlebug, Xyron Create a Sticker, U-Line Double-Sided tape

Image coloured with Copic Markers:

Letters: R46, R14, R08

Dog: E55, E53, E51, E50, E49, E47, E29, E27, E25, E23, R30, R29, R02, R00

Sky and Clouds: BG70, C1, B02, B01, B00, B000, Colorless Blender

Grass: YG23, YG09, YG05, YG03, YG01

Hope you like it and have a great week!

You can find more cards to inspire you at KLM Designs, KLM Digital Design Team and KLM Digital Designs on the Facebook Fan page from the rest of our design team.

Most Exciting Moment!!


Today, I’m sharing a Christmas card that I made using Dreamerland Crafts stamps called The Most Exciting Moment – D18035. This image reminds me so much of me and my brothers opening our gifts together every year in front of the Christmas tree.

To create this card I began by making a base of 6″ x 6″ using AC Cardstock – White. Recollections – Journey To The North Pole was cut to be the same size as the base and then adhered to the card using double-sided tape. Tim Holtz Distress Ink – Rustic Wilderness was applied around the outside edges of the card with a sponge dauber. Using my Cuttlebug and My Creative Time -Stitched Squares Inside and Out, I die cut Recollections – Burgundy and Hot Buy Craft Smart – Holiday Glitz Glitter Paper. U-Line double-sided tape was applied to the backs of each of them and they were both popped up onto the centre of the card. Utilizing the Cuttlebug again and Copic Marker X-Press It Blending Card cardstock, the die-cut for the image and frame was cut out with Lea’bilities – Star Christmas Frame. TCW – Stardust Butter – Champagne was applied to the star frame and I set it aside to dry.

With a MISTI, the main image was stamped onto the centre frame die cut using Memento – Tuxedo Black ink. I coloured it in with Copics and then with Scotch tape applied to the back of the image, rejoined it to the star frame. U-Line double-sided tape was added and the finished piece was popped up onto the centre of the card. YNS Gumdrops – Firefly Magic Sparkly Gumdrops and YNS Gumdrops – Firecracker Sparkly were added to the coloured image. Lastly, I placed the sentiment and 3 poinsettias to the card using Holiday Trendz – Foil Stickers – Seasonal Icons.

Card Recipe:

Stamps: The Most Exciting Moment – D18035 – Dreamerland Crafts

Inks: Memento – Tuxedo Black, Tim Holtz Distress Ink – Rustic Wilderness

Paper: Copic Marker X-Press It Blending Card, AC Cardstock – White, Recollections – Journey To The North Pole (6″ x 6″), Recollections – Burgundy, Hot Buy Craft Smart – Holiday Glitz Glitter Paper 12″ x 12″

Die Cuts: Lea’bilities – Star Christmas Frame (no. 45.0867), My Creative Time -Stitched Squares Inside and Out

Tools and Miscellaneous: MISTI – Most Incredible Stamping Tool, Marvy Uchida – Embossing Heat Tool, U-Line double-sided tape, Cuttlebug, TCW – Stardust Butter – Champagne, Holiday Trendz – Foil Stickers – Seasonal Icons (011-0522), YNS Gumdrops – Firefly Magic Sparkly Gumdrops and YNS Gumdrops – Firecracker Sparkly Gumdrops

Image coloured with Copic Markers:

Skin: E21, E11, E04, E00, E000, R30, R20

Girl’s Hair: E15, Y38, Y21, YR23

Boys’ Hair: E47, E44, E43

Jeans: B26, B23, B21, W1

Boy’s Sweaters: B18, B16, B14, B12, E74, E71, E70

Scarves and Girl’s Pants: BG09, BG05, B0G02, BG01

Girl’s Sweater, Gift and Baubles: R59, R37, R35

Boots and Teddy Bear: E33, E31, E27, E25, E23

Teddy Bear Box: E25, E23, E21

Puppy: E35, E33, E31

Tree: G99, G21, YG67, YG17

Round Gift Box: BG15, BG13, BG11, RV14, RV13, RV11

Star, Garland, Ribbon: Y28, Y26, Y23

Background and Flooring: YG03, Y01, YG00, E53, E51, E50

Hope you like it and have a great week!

You can find more cards to inspire you at Dreamerland Crafts and Pointer Scrapbooking on the Facebook Fan pages from the rest of our design team.

Lighting the Candles!!


Today, I’m sharing a Christmas card that I made using Dreamerland Crafts stamp called Lighting the Candles – D15204. This little angel is helping to light the way to a joyous Christmas for all!

To create this card I began by making a base of 5.5″ x 4.25″ using Hammermill – Premium Colour 100 lb. cardstock. Doodlebug Design Inc. – Winter Wonderland was cut to the same size and applied directly to the base card using double-sided tape. I cut a piece of Recollections – Burgundy to the size of 5.5″ x 2″ and from a scrap piece of patterned paper 5.5″ x 1.75″. Double-sided tape was used to attach the 2 pieces together. These were attached to the base card using double-sided tape.

With my Cuttlebug, I die-cut Crafter’s Companion – Luxury Cardstock – Ice Blue Pack and Copic Marker X-Press It Blending Card cardstock with Creative Expressions by Sue Wilson – Festive Collection – Holly Lattice Frame. U-Line double-sided tape was attached to the larger die-cut and it was popped up onto the centre of the card.

The image was stamped onto the the smaller die-cut using Memento – Tuxedo Black ink, MISTI and Dreamerland Crafts – Lighting the Candles stamp. It was coloured in with Copic markers and Stickles – Star Dust was added to the snow on the ground. For the sky, UNIPosca PC-3M White marker was used for the small snowflakes. Dress It Up – Holiday Collection – Itty Bitty Snowflakes and Dress It Up – Holiday Collection – It’s Cold Outside buttons were placed over top of the images’ snowflakes with liquid glue after I had removed the backing from them. Wink of Stella – Clear was applied to the wings to make them sparkle. I added U-Line double-sided tape to the back of the completed image and popped it up onto the centre of the card.  To complete the card, I placed a PinkFresh Glitter Drops – Lagoon in each corner.

Card Recipe:

Stamp: Lighting the Candles – D15204 – Dreamerland Crafts

Inks: Memento – Tuxedo Black

Paper: Copic Marker X-Press It Blending Card, Hammermill – Premium Colour 100 lb., Crafter’s Companion – Luxury Cardstock – Ice Blue Pack, Doodlebug Design Inc. – Winter Wonderland (6″ x 6″), Recollections – Burgundy

Die Cuts: Creative Expressions by Sue Wilson – Festive Collection – Holly Lattice Frame – CED3125

Tools and Miscellaneous: MISTI – Most Incredible Stamping Tool, U-Line double-sided tape, Cuttlebug, PinkFresh Glitter Drops – Lagoon, Dress It Up – Holiday Colllection – It’s Cold Outside, Dress It Up – Holiday Collection – Itty Bitty Snowflakes, UNIPosca PC-3M White marker, Wink of Stella – Clear

Image coloured with Copic Markers:

Skin: E21, E11, E04, E00, E000, R30, R20

Hair: E47, E44, E43, E42

Dress: BG09, BG05, BG02, BG01

Wings: BG0000, BG000, BV0000, Y00

Wreath: G99, G29, G28, G24, G21, YG67, YG17, R59, R39, R37

Candle: RV14, RV13, RV11, YR12, Y08, R24

Sky: B05, B04, B02, B01

Shadows in Snow: BV20, B0000, Colorless Blender

Hope you like it and have a great week!

You can find more cards to inspire you at Dreamerland Crafts and Pointer Scrapbooking on the Facebook Fan pages from the rest of our design team.

Christmas Wreath!!!


It’s Wednesday, and this week, I made a Christmas card using Wreath – TDG012 by High Hopes Rubber Stamps for the main image and Merry Christmas – FDG008 (High Hopes Rubber Stamps) for the sentiment. We love to decorate our home with Christmas wreaths outside and on our door! Do you decorate with Christmas wreaths too?

To make my card this week, I began with a card base of Hammermill – Premium Colour 100 lb. cardstock, cut and scored to be 5″ x 5″. I die cut Recollections – Burgundy to be the same size as the base and adhered it to the card using double-sided tape. DCWV – Holiday Cheer was cut to the size of 4.75″ x 4.75″ and a Sharpie – Medium Point Gold Water based paint was used to go around all of the edges. This was adhered to the base background using liquid glue. I die cut Copic Marker X-Press It Blending Card with my Cuttlebug and Crafting Desert Diva’s – Stitched in Circle Dies. With my MISTI and Memento – Tuxedo Black ink, I stamped the image onto the die cut and the sentiment onto Copic Marker X-Press It Blending Card cardstock. I coloured the image in with Copic markers and coloured in some of the berries with a Pental Sunburst Metalic Med Gel Pen – Gold. A Gelly Roll Sakura #5 Pen was used to add the little white dots on all of the red berries. Once the image was coloured in, I used the Sharpie – Medium Point Gold Water based paint to go around the scalloped part of the circle. I cut around the sentiment to the size of 1.25 x 2-1/8″ and then used a corner punch. Once again, I went around the edges with a Sharpie – Medium Point Gold Water based paint pen. I adhered the the finished image and sentiment to the base card using U-Line double-sided tape. Lastly, I applied Nuvo Crystal Drops – Autumn Red to complete the card.

Card Recipe:

Stamp: Wreath – TDG012 (High Hopes Rubber Stamps)

Sentiment: Merry Christmas – FDG008 (High Hopes Rubber Stamps)

Inks: Memento – Tuxedo Black

Paper: Copic Marker X-Press It Blending Card, Hammermill – Premium Colour 100 lb., DCWV – Holiday Cheer (6″ x 6″), Recollections – Burgundy

Die Cut: Crafting Desert Diva’s – Stitched in Circle Dies (Retired)

Nuvo Crystal Drops: Autumn Red

Tools: MISTI – Most Incredible Stamping Tool, U-Line double-sided tape, Gelly Roll Sakura #5 Pen, Sharpie – Medium Point Gold Water based paint

Image coloured with Copic Markers:

Wreath: G99, G21, YG67, YG17, R39, R27, R22, E27, E25, E23, G99, Pental Sunburst Metalic Med Gel Pen – Gold, Gelly Roll Sakura #5 Pen

Background: BG000, BG0000, Sharpie – Medium Point Gold Water based paint

Hope you like it and have a fantastic week!

You can find lots of inspiration from the Design Team Divas at the High Hopes blog, and the High Hopes Rubber Stamps Facebook Fan page plus you can also follow us on
Instagram, Twitter and Pinterest.

Winter Fun!!!


It’s Wednesday, and this week, I made a card using Bearly Swooshin’ – T202 by High Hopes Rubber Stamps for the main image and Roundin’ Up – G190 (High Hopes Rubber Stamps) for the sentiment. Winter was always a fun time for me growing up. We had so many outdoor rinks and played so many winter sports. I tried X-Country skiing, but in no way would ever attempt downhill skiing, I was dangerous enough on X-Cross Country skis. I wonder it that’s why everyone I ever went skiing with would only go once with me. LOL!

To make my card this week, I began with a card base of AC Cardstock – White cut and scored to be 6″ x 6″. I cut the background paper from Recollections – Burgundy cardstock to the same size as the base and used double-side tape to apply it directly to it. Photo-Play – O Canada 2 – Ice Rink paper was cut to the size of 5.75″ x 5.75″ and inked around the edges using Tim Holtz Distress Ink – Rustic Wilderness. I applied this directly to burgundy background using double-sided tape. Using Hero Arts – Infinity Dies – Rounded Rectangle dies and my Cuttlebug, I die cut the following: Copic Marker X-Press It Blending Card, Recollections – Burgundy cardstock, AC – Green Cardstock and Recollections – White cardstock.

The image and sentiment were stamped using my MISTI and Memento – Tuxedo Black ink. I coloured in the image with Copic markers and used a Gelly Roll Sakura #8 Pen to create the snow in the sky and whites of the bear’s eyes. Sakura Glaze – Black Pen was used for the eyes and nose. Just love the embossed look those 2 pens give to an image. Lastly, I added some Stickles – Diamond and some Clear Glitter glue for the snow. Once the glitter was all dry, I attached the finished image to the burgundy rounded rectangle with 3M VHB double-sided tape to pop it up. Then, I applied 3M double-sided tape onto the back of the larger rectangle to pop it up on the pictured background. The sentiment was inked with Tim Holtz Distress Ink – Rustic Wilderness and I ran it through my Xyron Create a Sticker and placed it on top of the small green rectangle. I added 3 layers of the 3M VHB – 2 sided tape to the one side to pop it up and some glue and placed it on top of the popped-up coloured image. Lastly, to complete the card, I added some YNS Gumdrops.

Card Recipe:

Stamp: Bearly Swooshin’ – T202 (High Hopes Rubber Stamps)

Sentiment: Roundin’ Up – G190 (High Hopes Rubber Stamps)

Inks: Memento – Tuxedo Black, Tim Holtz Distress Ink – Rustic Wilderness

Paper: Copic Marker X-Press It Blending Card, AC Cardstock – White, Photo-Play – O Canada 2 – Ice Rink (12″ x 12″), Recollections – Burgundy, AC – Green Cardstock and Recollections – White Cardstock

Die Cuts: Hero Arts – Infinity Dies – Rounded Rectangle (DI465)

Tools: MISTI – Most Incredible Stamping Tool, 3M – 2 sided tape, Sakura Glaze – Black Pen, Gelly Roll Sakura #8 Pen, Xyron Create a Sticker, 3M VHB – 2 sided tape, YNS Gumdrops, Cuttlebug

Image coloured with Copic Markers:

Eyes: Sakura Glaze – Black Pen, Gelly Roll Sakura #8 Pen

Bear: E47, E44, E43

Hat, Scarf, Mitts and Bindings: R59, R37, R35, C1, C0, C00, Colorless Blender

Skis, Goggles and Poles: B99, B95, B93, B91, B00, 100, T6

Background: G43, G40, G12

Snow: Stickles – Diamond, Clear Glitter Glue

Hope you like it and have a fantastic week!

You can find lots of inspiration from the Design Team Divas at the High Hopes blog, and the High Hopes Rubber Stamps Facebook Fan page plus you can also follow us on
Instagram, Twitter and Pinterest.

Merry Little Christmas!!


Today, I’m sharing a Christmas card using Dreamerland Crafts stamps called The Most Wonderful Gift Of All – D18038 and for the sentiment Happiness Is Time Spent With A Good Friend – D20009. Do you remember playing with your train sets at Christmas time? I remember playing with my brothers and cousins sets. It was always so much fun watching the trains go around the tracks.


To make this card I used a base of 5.5″ x 4.25″ using Hammermill – Premium Colour 100 lb. cardstock. For the background paper, I used Recollections – Burgundy cardstock cut to the same size as the base. The background layer was cut from Carta Bella – Santa’s Workshop paper, cut to the size of 5-3/8″ x 4-1/8″. Tim Holtz Distress Ink – Rustic Wilderness was used to ink around the edges and it was attached to the burgundy background using double-sided tape. My Cuttlebug and My Creative Time – Rectangle Frame Die was used to die-cut the Recollections – Burgundy cardstock for the background to go behind the coloured image. This was popped up onto the main background with 3M double-sided tape. Using my Cuttlebug and My Creative Time – Rectangle Frame Layers, I die cut Copic Marker X-Press It Blending Cardstock. With my MISTI and Memento – Tuxedo Black ink, I stamped the main image onto this die cut. I then taped the die cut back over the paper and coloured in the image using Copic markers. This allowed me to keep a thin white border around the coloured image. Stickles – Diamond was used to fill in the area on the inside of the tracks to represent a snowy base. I used Gelly Roll Sakura #8 Pen to add some snow to the little trees and some of the roof tops. Once the Stickles was all dry, I stamped the sentiment using Versamark ink. This was embossed using my Marvy Heat Embossing Tool and Ranger – Clear Super Fine Detail embossing powder. I added 3M double-sided tape to the back of the coloured image and popped it up.

Lastly, I placed some washi-tape onto white cardstock and trimmed it to have a thin white border. I ran this through my Xyron Create a Sticker so that it would lay flat and placed it onto some Recollections – Burgundy cardstock. Using my paper trimmer, I trimmed around the edges and them popped it up onto the background using 3M VHB – 2 sided tape to finish off the card.

Card Recipe:

Stamp: The Most Wonderful Gift Of All – D18038 – Dreamerland Crafts

Sentiment: Happiness Is Time Spent With A Good Friend – D20009 – Dreamerland Crafts

Inks: Memento – Tuxedo Black, Versamark, Tim Holtz Distress Ink – Rustic Wilderness

Paper: Copic Marker X-Press It Blending Card, Hammermill – Premium Colour 100 lb., Carta Bella – Santa’s Workshop (12″ x 12″), Recollections – Burgundy

Die Cuts: My Creative Time – Rectangle Frame Layers, My Creative Time – Rectangle Frame Dies

Stickles: Diamond

Embossing Powder: Ranger – Clear Super Fine Detail

Tools: MISTI – Most Incredible Stamping Tool, Cuttlebug,  Marvy Heat Embossing Tool, Sakura Glaze – Black, Gelly Roll Sakura #8 Pen, Xyron Create a Sticker, 3M VHB – 2 sided tape, Gelly Roll Sakura #5 Pen

Image coloured with Copic Markers:

Skin: E21, E11, E04, E00, E000, R30, R22, R20 (Eyes – Sakura Glaze – Black pen, Gelly Roll Sakura #5 Pen)

Hair: E47, E44, E43, E41

PJ’s: B37, B14, B12

Bear: E57, E55, E53, E51, R22, R20 (Eyes and Nose – Sakura Glaze – Black pen, Gelly Roll Sakura #5 Pen)

Trees: YG67, YG17, G21, E23

Homes: B02, B00, C2, C1, C00, E23

Train: Y17, Y15, Y02, T7, T5, T3, T1, C2, C1, C00, R37, R35

Floor: E43, E42, E41

Wall: Y08, Y06, Y04

Floor Boards: C1, C0, C00, Colorless Blender

Hope you like it and have a great week!

You can find more cards to inspire you at Dreamerland Crafts and Pointer Scrapbooking on the Facebook Fan pages from the rest of our design team.

Good Times!!!


It’s Wednesday, and this week, I made a card using Joy Ride – TT002 by High Hopes Rubber Stamps for the main image and Good Times – GLL006 (High Hopes Rubber Stamps) for the sentiment. Christmas is always a wonderful time to gather with family and friends. Thinking of snow right now is also a way to cool down with all of this summer heat too! LOL!


To make my card this week, I began with a card base made from AC White Cardstock cut and scored to be 6″ x 6″. I chose Echo Park Paper Co. – My Favorite Winter (6″ x 6″) for my background paper and trimmed just a little off of the sides. Then, I used Tim Holtz Distress Ink – Blueprint Sketch and inked around all of the edges. I added some glue to the back of the paper and applied it to the base card. Using My Creative Time -Stitched Squares Inside and Out, I die cut a larger square from Recollections – Burgundy cardstock and a smaller square from Copic Marker X-Press It Blending Card. I inked around the edges of the larger square with Tim Holtz Distress Ink – Aged Mahagony and applied 3M VHB – 2 sided tape to the back of it and applied to the background. I die cut the sentiment label with My Creative Time – Stitched Rectangular Frames Dies and More. The image and sentiment were then applied using my MISTI and Memento – Tuxedo Black ink. I applied Stickles – Unicorn around the edges of the label and set it aside to dry.

I coloured in the image with copic markers. Then I added Stickles – Eucalyptus to the lady’s cuff and collar and Stickles – Crystal to her hat and pompom. For the man, I applied Nuvo Glitter Accents – Fresh Snowfall to his hat and pompom. Lastly, I added some Brutus Monroe – Snow Paste using a spatula to the bottom outer edge of the image to represent a snow bank on the side of the road. Using a Gelly Roll Sakura #10 Pen, Gelly Roll Sakura #5 Pen, Glitter Glue Pen and DecoArt Glamour Dust, I created the snowy background. Gelly Roll Sparkle Pen was used to colour in the Holly on the wreath.

Once everything on the image was dry, I applied some glue to the back of it and applied it directly on top of the larger square. I applied some glue and some 3M VHB – 2 sided tape to the sentiment and applied that on an angle at the top of the card. I only put the tape in a few spots so that it would be the same height as the image. To finish off the card, I added some CC Designs – Dragon Dreams Enamel Dots on to the sentiment and some sequence.

Card Recipe:

Stamp: Joy Ride – TT002 (High Hopes Rubber Stamps)

Sentiment: Good Times – GLL006 (High Hopes Rubber Stamps)

Inks: Memento – Tuxedo Black, Tim Holtz Distress Ink – Aged Mahagony, Tim Holtz Distress Ink – Blueprint Sketch

Paper: Copic Marker X-Press It Blending Card, AC White Cardstock, Echo Park Paper Co. – My Favorite Winter (6″ x 6″), Recollections – Burgundy

Die Cuts: My Creative Time -Stitched Squares Inside and Out, My Creative Time – Stitched Rectangular Frames Dies and More

Stickles: Eucalyptus, Crystal, Unicorn, Nuvo Glitter Accents – Fresh Snowfall

Paste: Brutus Monroe – Snow Paste

Tools: MISTI – Most Incredible Stamping Tool, 3M VHB – 2 sided tape, Gelly Roll Sparkle Pen, Gelly Roll Sakura #10 Pen, Gelly Roll Sakura #5 Pen, Glitter Glue Pen, CC Designs – Dragon Dreams Enamel Dots.

Image coloured with Copic Markers:

Skin: E21, E11, E00, E000, R30, R20

Hair: E15, Y38, Y21, YR23, E29, E25, E23, E21

Hats, Jacket, Wreath: R59, R37, R35

Mitts, Jacket and Tie: G28, G24, G21

Pants: W9, W7, W5

Boots and Gloves: E27, E25, E23, E21

Bike and Wheels: C9, C7, C5, C4, C3, C2, C1, Y17, Y11, Y08, R59, R37, R35

Holly: G14, G07, YG03

Puffs of Smoke: B60, C1, C00

Sky: B99, B97, B39, B37, B29, B28, B26

Road: T7, T5, T3

Hope you like it and have a fantastic week!

You can find lots of inspiration from the Design Team Divas at the High Hopes blog, and the High Hopes Rubber Stamps Facebook Fan page plus you can also follow us on
Instagram, Twitter and Pinterest.