Tag Archive | Gina K Designs – Sentiment Strips

Paw-sitively Good!


It’s day 5 of the 2022 Cat Lovers Hop and today I’m sharing a Christmas card I made using Your Next Stamp –  Meowy Christmas – CYNS681. Having so much fun with this amazing hop and look forward to it every year.

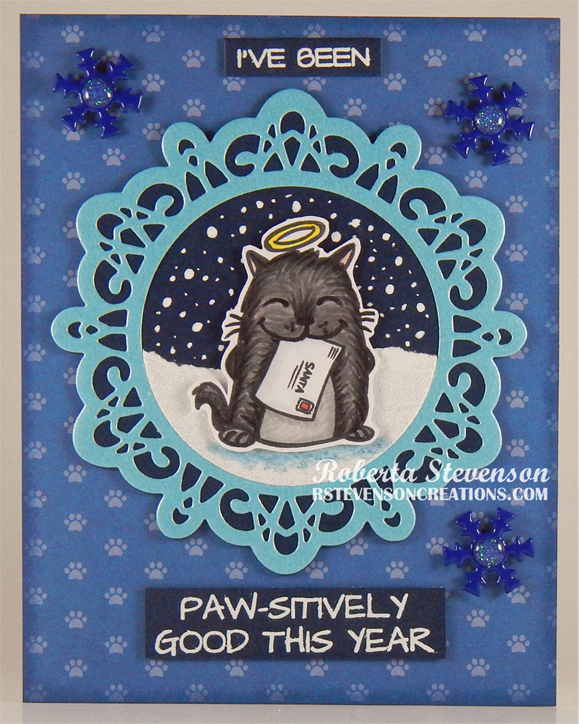
I created a 5.5″ x 4.25″ card base using Hammermill – Premium Colour 100 lb. cardstock. I cut the background to be the same size using My Favourite Things – Pawsome Prints paper and adhered it directly to the base using double-sided tape. Using my Cuttlebug, Creative Expressions – Festive Collection – Bold Snowflake Frame dies and Recollections – Blue Hues Shimmer Cardstock, I cut out the large snowflake and frame. Using some scrap dark blue paper, I die cut the large outline. I tore along the top of a small piece of Recollections – Christmas Inkjet Printable Glitter Paper and then die cut it with the larger cirlce die from the same die set. Using Tim Holtz Distress Ink – Faded Jeans and a finger dauber, the edges were inked all around the base card. With liquid glue, I attached the large snowflake to the background border. I then attached the snow piece that I had cut previously with liquid glue as well. Then, using a Gelly Roll Sakura #10 Pen, I coloured in some snow in the sky.

Using my MISTI and Memento – Tuxedo Black ink, I stamped the image onto Copic Marker X-Press It Blending Card. The image was coloured in with Copic markers and then I fussy cut around it. I added some U-Line double-sided tape to the image and popped it up into centre of the circle. The shadow was added using B52. The sentiments were both stamped onto the dark blue paper with VersaMark ink and then embossed with Ranger Embossing Powder White – Extra Fine Detail. I cut out the larger sentiment with my cutter and the smaller one using my Cuttlebug and Gina K Designs – Sentiment Strips. I attached U-line double sided tape the sentiments and coloured image frame and popped up everything onto the card base.

U-Line double-sided tape was applied to the backs of three Creative Impressions – Brads – Snowflake – Winter with a double layer. They were all popped up onto the card and then YNS Gumdrops – Firefly Magic Sparkly Gumdrops were applied to the centres to finish the card off.

Card Recipe:

Stamp and Sentiment:  Meowy Christmas – CYNS681 – Your Next Stamp

Inks: Memento – Tuxedo Black, VersaMark, Tim Holtz Distress Ink – Faded Jeans

Die Cuts: Creative Expressions – Festive Collection – Bold Snowflake Frame (CED3077), Gina K Designs – Sentiment Strips

Paper: Copic Marker X-Press It Blending Card, Hammermill – Premium Colour 100 lb., My Favourite Things – Pawsome Prints (6″ x 6″), Recollections – Blue Hues Shimmer Cardstock (8.5″ x 11″), Dark Blue paper, Recollections – Christmas Inkjet Printable Glitter Paper – 8.5 x 11″

Embossing Powder: Ranger Embossing Powder White – Extra Fine Detail

Miscellaneous: U-Line – 2-sided tape, YNS Gumdrops – Firefly Magic Sparkly Gumdrops, MISTI (Most Incredible Stamping Tool), Creative Impressions – Brads – Snowflake – Winter, Marvy Uchida – Embossing Heat Tool, Gelly Roll Sakura #10 Pen

Image coloured with Copic Markers:

Cat and Envelope: T9, T7, T5, T4, T3, T1, R21, C1, C0, Colorless Blender

Halo: Y08, Y04

Shadow: B52

Hope you like it and have a great week!

Also entered into https://blog.yournextstamp.com/challenge-191-midnight-comment-for-the-chance-to-win/


Hallowe’en Kitty and Friends!!


It’s Wednesday, and this week, I made a Hallowe’en card using High Hopes Rubber Stamps Hallowe’en Kitty – TT042 for the image and Happy Halloween – H232 for the sentiment. I thought it would be fun to end the month off with another spooky card since Hallowe’en is only a few days away from now.

To make my card this week, I began with a card base of Hammermill – Premium Colour 100 lb. cardstock, cut and scored to be 5.5″ x 4.25″. Textura Select Cardstock – Tropicana was cut to the same size as the base and adhered using double-sided tape. Using my Cuttlebug, Copic Marker X-Press It Blending Card was die cut using My Creative Time – Rectangle Frame Dies. I stamped the main image onto the die cut and the sentiment onto a scrap piece of orange cardstock using my MISTI and Memento – Tuxedo Black ink. Using my Cuttlebug and Gina K Designs – Sentiment Strips, I die cut the sentiment that I stamped.

The image was coloured in and then I used a black Prismacolor Premier Pencil to highlight a few of the areas to make them stand out a little more. I also extended the fence to the ends of the die cut on both sides. I added back in the whites of the eyes with a Gelly Roll Sakura #8 Pen and some stars in the night sky. U-Line double-sided tape was applied to the back of the sentiment and the coloured image. They were both popped up onto the base to complete the card.

Card Recipe:

Stamps: Hallowe’en Kitty – TT042 (High Hopes Rubber Stamps)

Sentiment: Happy Halloween – H232 (High Hopes Rubber Stamps)

Inks: Memento – Tuxedo Black

Paper: Copic Marker X-Press It Blending Card, Hammermill – Premium Colour 100 lb., Textura Select Cardstock – Tropicana (12″ x 12″)

Die Cuts: My Creative Time – Rectangle Frame Dies, Gina K Designs – Sentiment Strips

Tools: MISTI – Most Incredible Stamping Tool, U-Line double-sided tape, Gelly Roll Sakura #8 Pen

Image coloured with Copic Markers:

Black Cat: C9, C7, C5, R22, R20

Hat: V17, V09, V06, V04, YR68, YR24, YR18, YR16, YR04, E15, Y35, Y08

Mouse: W5, W3, W1, R20

Bat: BV29, BV25, BV23

Ghost: BV20, C00, Colorless Blender

Moon: Y00, BV20, C00, Colorless Blender

Gravestone: YR18, YR16, T5, T3, T1

Grass: G99, YG67, YG17

Sky: C9, BV29, BV25, BV23, BV20

Hope you like it and have a fantastic week!

Check out more adorable Fall images at High Hopes Rubber Stamps!

You can find lots of inspiration from the Design Team Divas at the High Hopes blog, and the High Hopes Rubber Stamps Facebook Fan page plus you can also follow us on
Instagram, Twitter and Pinterest.


Also entered this into the following contests

https://herpeacefulgarden.blogspot.com/

https://lostcoastportaltocreativity.blogspot.com/2022/10/challenge-154-cats-and-dogs-challenge.html


You’re O-Fish-Ally Awesome!


It’s Wednesday, and this week, I made a card using High Hopes Rubber Stamps Finnigan – P117 for the image and O-fish-ally – FLL019 for the sentiment. We have a lot of family and friends that love to fish and when I saw this image and sentiment, I could resist pairing them together.

To make my card this week, I began with a card base of Hammermill – Premium Colour 100 lb., cut and scored to be 5.5″ x 4.25″. Stampin’ UP! – Whale of a Time Designer Series Paper was cut to be the same size as the base and applied using double-sided tape. Using paper from the same pack, I fussy cut around the school of fish and applied it to the base card using a mixture of double-sided tape and glue. The excess was then trimmed off on the bottom and left side of the card. Tim Holtz Distress Ink – Evergreen Bough was applied around all of the outer edges of the card using a finger dauber. Using my Anna Griffin Empress Mini Machine and PinkFresh Studio Essentials – Blanket Stitched Circle, I die cut Copic Marker X-Press It Blending Card cardstock. Then, using my MISTI and Memento – Tuxedo Black ink, I stamped the image onto the die-cut piece. The sentiment was also stamped using my MISTI onto the same cardstock and then die cut using Gina K Designs – Sentiment Strips. Lastly, I combined the dies from PinkFresh Studio Essentials – Blanket Stitched Circle and Lifestyle Crafts Cutting Dies – Nesting Circles to create a frame using the paper from Stampin’ UP! – Whale of a Time Designer Series Paper and Anna Griffin Empress Mini Machine.

The image was coloured in with Copic markers listed below. I coloured in the fish first, then the water. Some sand was added to the bottom of the bowl using a Ranger – Emboss It Pen Clear and Seth Apter – Dirty Sand Embossing Powder. This was heat set with a Marvy Uchida – Embossing Heat Tool. I wanted the back part of the sand to appear lighter, so I just dabbed the pen in spots to add in the Embossing Powder after I had coloured it. Lastly, I applied Ranger Inkssentials – Glossy Accents to the inside of the bowl and puddles of water. This was set aside to dry.

Once the Glossy Accents was dry the card was ready to assemble.  I applied some glue to the circle frame I had created earlier and applied it over top of the coloured image circle. U-Line double-sided tape was applied to the back of the image and sentiment and they were both popped up onto the background designer papers. I thought these adorable buttons from Buttons Galore & More – Fun in the Sun Collection were perfect for this card. The button backings were removed from the backs of the fish buttons and U-Line double-sided tape was applied to them. I popped up the 3 fish on the card to finish it off.

Card Recipe:

Stamps: Finnigan – P117 (High Hopes Rubber Stamps)

Sentiment: O-fish-ally – FLL019 (High Hopes Rubber Stamps)

Inks: Memento – Tuxedo Black, Tim Holtz Distress Ink – Evergreen Bough

Die Cuts: PinkFresh Studio Essentials – Blanket Stitched Circle, Gina K Designs – Sentiment Strips, Lifestyle Crafts Cutting Dies – Nesting Circles

Embossing Powder: Seth Apter – Dirty Sand

Paper: Copic Marker X-Press It Blending Card, Hammermill – Premium Colour 100 lb., Stampin’ UP! – Whale of a Time Designer Series Paper (6″ x 6″)

Embellishments: Buttons Galore & More – Fun in the Sun Collection

Tools: MISTI – Most Incredible Stamping Tool, U-Line double-sided tape, Ranger – Emboss It Pen Clear, Marvy Uchida – Embossing Heat Tool, Ranger Inkssentials – Glossy Accents, Anna Griffin Empress Mini Machine

Image coloured with Copic Markers:

Fish: YR68, YR31, YR18, Y38, R89, R59, R39, R29, R24

Fish Bowl, Water, Sand and Water Droplets: B04, B02, B01, B00, E44, E43, E42, E41, C3, C2, C1, C00, Seth Apter – Dirty Sand

Background: BG72, BG57, BG32, BG11, E37, E35, E33, E31

Hope you like it and have a fantastic week!

Check out more adorable images at High Hopes Rubber Stamps!

You can find lots of inspiration from the Design Team Divas at the High Hopes blog, and the High Hopes Rubber Stamps Facebook Fan page plus you can also follow us on
Instagram, Twitter and Pinterest.

Kitty In Training!!


It’s Wednesday, and this week, I made a Hallowe’en card using High Hopes Rubber Stamps Kitty In Training – TT052 for the image and Happy Halloween Script – F232 for the sentiment. Hallowe’en is one of our favourite times of year and my husband likes to go all out decorating our front yard. I always have fun finding new animated toys to add to our decorations and love seeing the little trick or treaters faces light up when they come to our house.

To make my card this week, I began with a card base of Hammermill – Premium Colour 100 lb., cut and scored to be 5.5″ x 4.25″. I die cut the background paper from Pebbles – Boo! cardstock to be the same size and attached it to the base using double-sided tape. Using My Creative Time – Rectangle Frame Layers and my Anna Griffin Empress Mini Machine, I die cut Scrapbook.com – Brights Smooth Cardstock for the larger frame. Using the same machine, I die cut Copic Marker X-Press It Blending Card cardstock using My Creative Time – Rectangle Frame Dies. The thin stripes were die cut using Scrapbook.com – Rainbow Smooth Cardstock and PinkFresh Studio – Slim Stripes dies. Lastly, I cut a black strip using Recollections – Black cardstock to the size of 4.25″ x 1-3/8″.

I stamped the main image onto the Copic Marker X-Press It Blending Card die cut using my MISTI and Memento – Tuxedo Black ink and coloured it in. The sentiment was stamped onto a scrap piece of orange paper cardstock using my MISTI and Memento – Tuxedo Black and then it was die cut using my cutting machine and Gina K Designs – Sentiment Strips.

The card was now ready to assemble. I ran the thin strips through my Xyron Create a Sticker and adhered them to the black strip leaving small spaces in between them to be the same as the witch’s socks. I ran this whole piece through my Xyron Create a Sticker again so that it would lay completely flat when I adhered it to the base card. I added U-Line double-sided tape to the backs of the rectangles and sentiment and popped up all of the layers onto the card. Tim Holtz Distress Ink – Black Soot was used to ink around all of the edges of the card and Stickles – Diamond was added to the small dots at the top of the card above the stripe lines. Gelly Roll Sparkle Pen was added to the sky to create some sparkly stars.

Card Recipe:

Stamps: Kitty In Training – TT052 (High Hopes Rubber Stamps)

Sentiment: Happy Halloween Script – F232 (High Hopes Rubber Stamps)

Inks: Memento – Tuxedo Black, Tim Holtz Distress Ink – Black Soot

Paper: Copic Marker X-Press It Blending Card, Hammermill – Premium Colour 100 lb., Pebbles – Boo! (6×6 in / 15.2×15.2 cm), Scrapbook.com – Brights Smooth Cardstock (4.25″ x 5.5″), Scrapbook.com – Rainbow Smooth Cardstock (4.25″ x 5.5″), Recollections – Black cardstock

Die Cuts: My Creative Time – Rectangle Frame Layers, My Creative Time – Rectangle Frame Dies, Gina K Designs – Sentiment Strips, PinkFresh Studio – Slim Stripes

Tools: MISTI – Most Incredible Stamping Tool, U-Line double-sided tape, Anna Griffin Empress Mini Machine, Xyron Create a Sticker, Stickles – Diamond, Gelly Roll Sparkle Pen

Image coloured with Copic Markers:

Blacks: N10, N9, N7, N6, N5, N4, N3

Skin: E21, E11, E04, E00, E000, R30, R20

Hair and Stripes on Socks and Hat: G19, G14, RV66, RV55, RV53, Y19, B63, Y38, Y18

Pumpkins: E07, YR18, YR16, YR15, YR12, YR08

Tree Stump: E79, E27, E25, E23, E21

Broomstick: E35, E34, E33, C5, C3, C00, Y35, Y32, Y19, YR31

Leaves and Grass: G99, G94, G21, YG97, YG17, YG63

Sky: BV29, BV25, BV23. BV20, Gelly Roll Sparkle Pen

Hope you like it and have a fantastic week!

Check out more adorable images in the new “Spring Fever Release” at High Hopes Rubber Stamps!

You can find lots of inspiration from the Design Team Divas at the High Hopes blog, and the High Hopes Rubber Stamps Facebook Fan page plus you can also follow us on
Instagram, Twitter and Pinterest.

Love One An-udder!!


It’s Wednesday, and this week, I made an Anniversary card using High Hopes Rubber Stamps Cow Hugs – TT136 for the image and Love An Udder – F205 for the sentiment. Love this adorable combination and thought it would be great for an Inspirational card or an Anniversary card!

To make my card this week, I began with a card base of Hammermill – Premium Colour 100 lb. cardstock, cut and scored to be 5.5″ x 4.25″. Doodle Bug Designs Inc. – Down on the Farm cardstock background paper was cut to the size of 5.5″ x 4.25″ and adhered directly to the base using double-sided tape. Tim Holtz Distress Ink – Black Soot and a finger dauber were used to ink around all of the edgs of the card. Using my Anna Griffin Empress Mini Machine and dies from Whimsy Stamps – Wavy Nested Frame Dies Set, I die cut one pattern out of Recollections – Black cardstock and a smaller cut from Copic Marker X-Press It Blending Card. Using PinkFresh Studio – Slim Stripes dies and my Anna Griffin Empress Mini Machine, I die cut some black stripes using the half-inch die from Recollections – Black cardstock. I added some U-Line double-sided tape to the backs of the 2 black pieces and popped them up onto the patterned background. Using scisssors, I cut off the excess from the black stripe after it was adhered to the base.

I stamped the main image and sentiment onto the Copic Marker X-Press It Blending Card using my MISTI and Memento – Tuxedo Black. The image was coloured in with Copic Markers. I used a Sakura Glaze – Black pen, and Gelly Roll Sakura #8 Pen to create the eyes. After the image was coloured in, I added some U-Line double-sided tape to it and popped it up onto the black die cut. Using my machine again, I die cut the sentiment using Gina K Designs – Sentiment Strips. This was popped up with Scrapbook Adhesives – Black 3D Foam Strips onto the black stripe. To finish off my card, I added 2 little button cows on either side of the sentiment from Dress It Up – In the Barnyard and Dress It Up – Mooove It.

Card Recipe:

Stamps: Cow Hugs – TT136 (High Hopes Rubber Stamps)

Sentiment: Love An Udder – F205 (High Hopes Rubber Stamps)

Inks: Memento – Tuxedo Black, Tim Holtz Distress Ink – Black Soot

Paper: Copic Marker X-Press It Blending Card, Hammermill – Premium Colour 100 lb., Doodle Bug Designs Inc. – Down on the Farm – 6″ x 6″ paper pad, Recollections – Black

Die Cuts: PinkFresh Studio – Slim Stripes, Whimsy Stamps – Wavy Nested Frame Dies Set (WSD382), Gina K Designs – Sentiment Strips

Tools: MISTI – Most Incredible Stamping Tool, U-Line double-sided tape, Anna Griffin Empress Mini Machine, Sakura Glaze – Black Pen, Gelly Roll Sakura #8 Pen, Dress It Up – In the Barnyard and Dress It Up – Mooove It

Image coloured with Copic Markers:

Cows: N9, N7, N5, N0, E42, E41, E40, R30, R02, R01, R00, R000 (Eyes – Sakura Glaze – Black, Gelly Roll Sakura #8 Pen)

Leaves and Grass: G99, YG67, YG17, G21, G07, G05

Flowers: B29, B26, B24, B21, YR16, YR12, E15, Y35, Y11, Y08, Y06, Y04, R46, R14, R08

Bow and Cow Bell: R46, R14, R08, Y38, Y35, Y17, Y15

Sky and Clouds: B60, B01, B00, B000, B0000

Hope you like it and have a fantastic week!

You can find lots of inspiration from the Design Team Divas at the High Hopes blog, and the High Hopes Rubber Stamps Facebook Fan page plus you can also follow us on
Instagram, Twitter and Pinterest.