Today I’m sharing a Christmas card that I made using DisDigiStamps – Twas the Night Before Christmas for the main image and sentiment from Jaded Blossom – Mouse Bites!
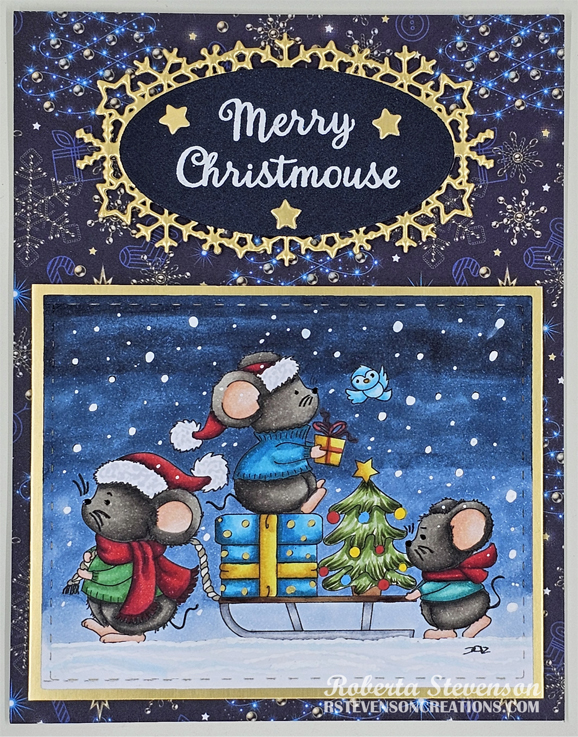
The image was printed out with my HP Printer onto Copic Marker X-Press It Blending Card using High Quality Grayscale and then die cut using a Cuttlebug and My Creative Time – Rectangle Frame Layers. The image was coloured in with Copic markers and then a White Gelly Roll Sakura #10 Pen was applied to create the snow falling from the sky and snow drifts in the snow. Uni Posca Pens – Yellow, Light Blue and Red were applied to the bobbles in the tree and Uni Posca Pen – Gold was applied to blue present.
The base card was created to the size of 4.25″ x 5.5″ out of Hammermill – Premium 110 lb. cardstock. The base pattern was cut to the same size using paper from Crafts Christmas and applied directly to base with double-sided tape. The gold frame for the image was die cut using a Cuttlebug, Chloe’s Crafts paper and My Creative Time – Rectangle Frame Dies and the frame for the sentiment was die cut from Frosty Frame Festive Collection Die Sue Wilson Creative Expressions.
Then using a MISTI, navy blue paper from my stash and VersaMark ink, I used Jaded Blossom – Mouse Bites to stamp the sentiment. Ranger Embossing Powder White – Extra Fine Detail was applied on top of the ink. The embossing powder was heated with a Marvy Uchida – Embossing Heat Tool and then die cut using Waffle Flower – Additional Oval dies.
The card was now ready to assemble. Double-sided tape was applied to the back of the image and sentiment and they were applied directly on the gold cuts. U-Line Double-Sided Foam Tape was applied to the backs of the gold die cuts and then both were popped up and layered onto the card. Lastly, liquid glue was applied to the gold stars left over from the die cut and they were placed around the sentiment.
Card Recipe:
Stamp: DisDigiStamps – Twas the Night Before Christmas
Sentiments: Jaded Blossom – Mouse Bites
Inks: HP Printer High Quality Grayscale, VersaMark
Paper: Copic Marker X-Press It Blending Card, Hammermill – Premium Cardstock 110 lb., Crafts Christmas – 09-3104340, Chloe’s Crafts – 02-3129420, Navy Blue from stash
Dies: Frosty Frame Festive Collection Die Sue Wilson Creative Expressions CED3122, My Creative Time – Rectangle Frame Layers, My Creative Time – Rectangle Frame Dies, Waffle Flower – Additional Oval dies
Embossing Powder: Ranger Embossing Powder White – Extra Fine Detail
Miscellaneous: U-Line Double-Sided Foam Tape, White Gelly Roll Sakura #10 Pen, Sakura Glaze – Black, Marvy Uchida – Embossing Heat Tool, Uni Posca Pens – Yellow, Light Blue and Red, Gold
Image coloured with Copic Markers:
Mice: W7, W5, W3, R30, R02, R00, (Eyes and Nose – Sakura Glaze – Black), (Tails and Whiskers – Prismacolor Premier Pencil – Black)
Hats and Scarves: R59, R37, R35, B91, C01, C0, Colorless Blender
Big Present and Sweater: BG09, BG05, BG02, BG01, Uni Posca Pen – Gold
Sweater2: G09, G07, G05, G02
Sweater3: G49, BG13, BG11
Small Present, Bow on Big Present and Star: Y17, Y15, Y11
Rope: E43, E41
Sky: B96, B97, B95, B93, Gelly Roll Sakura #10 Pen
Bird: BG02, BG01, BG00, BG000, Y14
Christmas Tree and Pot: E15, E11
Snow: B000, BG000, C1, C0, Colorless Blender, White Gelly Roll Sakura #10 Pen
Hope you like it and have a great week!