Tag Archive | Doodlebug – hey cupcake (6″x6″) paper pad

Cupcakes and Frosting!


Today I’m sharing a Birthday card using KLM Digital DesignFloral Cupcake Assortment from the new May 2024 release that I made. This image also comes with 2 more sentiments, “Happy Birthday Cupcake” and “Happiness is only a Cupcake away”, as well as 2 more cupcakes. This stamp set is amazing to create so many different card designs!

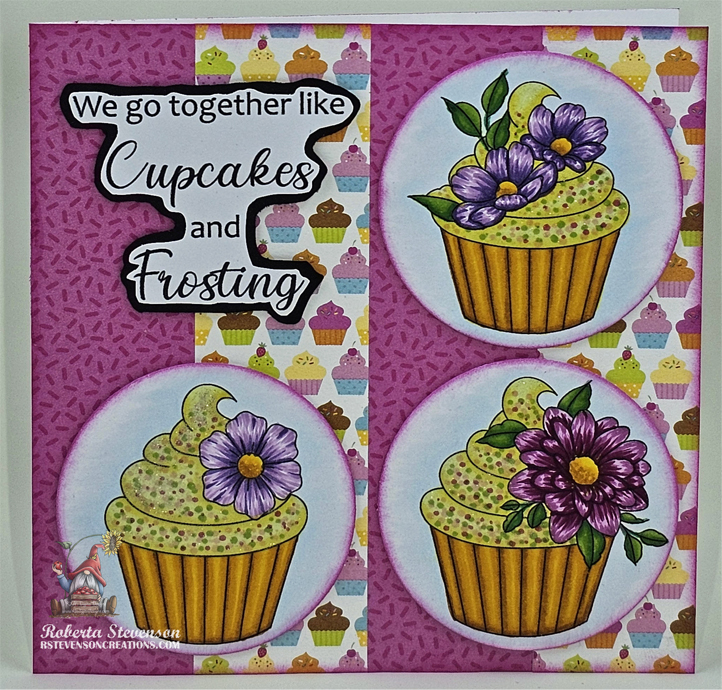
To make this card, I began with a 5″ x 5″ base card using Hammermill – Premium Cardstock 110 lb.. Doodlebug – hey cupcake designer paper was cut to 5″ x 5″ and then it was cut again to 4 x 1.25″ pieces. I applied double-sided tape and liquid glue to the individual pieces and then alternating each side adhered them each to the base card. Tim Holtz Distress Ink – Picked Raspberry was then applied to all of the edges around the card using a finger dauber.

The images and sentiment were imported into Microsoft Word and printed out onto Copic Marker X-Press It Blending Card. The images were coloured in with Copic markers. Using a Cuttlebug and Lifestyle Crafts Cutting Dies – Nesting Circles, I die cut each of the cupcakes out using 2.25″ circle die.  Using the finger dauber, I inked around all of the edges of the circles using Tim Holtz Distress Ink – Picked Raspberry. The sentiment was fussy cut and then adhered to black cardstock and fussy cut again.

U-Line Double-Sided Foam Tape was applied to all of the pieces and they were popped up onto the card. Lastly, Wink of Stella – Clear was applied to the frosting on the cupcakes.

Card Recipe:

Stamp and Sentiment:  KLM Digital DesignFloral Cupcake Assortment

Inks: HP Printer Grayscale, Tim Holtz Distress Ink – Picked Raspberry

Paper: Copic Marker X-Press It Blending Card, Hammermill – Premium Cardstock 110 lb., Doodlebug – hey cupcake (6″x6″) paper pad

Dies: Lifestyle Crafts Cutting Dies – Nesting Circles

Miscellaneous: Wink of Stella – Clear, U-Line Double-Sided Foam Tape

Image coloured with Copic Markers:

Cupcake Wrappers and Flower Centres: E15, Y19, Y17, Y08

Leaves: G16, YG25, YG23

Purple Flowers: V17, V15, V12

Red Violet Flower: RV69, RV66, RV63

Icing and Sparkles: Y02, Y00, Y000, Y25, RV17, V12

Shadow: BG000

Hope you like it and have a great week!

You can find more cards to inspire you at KLM Designs, KLM Digital Design Team and KLM Digital Designs on the Facebook Fan page from the rest of our design team.

Birthday Present Girl!!


Today, I’m sharing a birthday card that I made using this fun image from Polkadoodles called Surprise Gift Digi – Winnie Celebrations 2.

To make the card, I first imported the image and sentiment into Microsoft Word. I sized the image to fit 3.75″ x 2.5″ and printed it out onto Copic Marker X-Press It Blending Card using my HP Printer. Using my Cuttlebug and My Creative Time – Rectangle Frame Dies, I die-cut the image out. The frame was die cut using Hot Buy – Recollections – Jewel Tones paper and Gina Marie Designs – Loopy Rectangle Die Set. Hammermill – Premium Colour 100 lb. cardstock was used to create the base card at the size of 5.5″ x 4.25″. Doodlebug – hey cupcake paper was cut to the same size as the base and applied using double-sided tape. Tim Holtz Distress Ink – Picked Raspberry and a finger dauber were used to ink around all of the 4 sides of the card.

The image was coloured in with Copic markers and 3M double-sided pop-up tape were applied to the back of the image and Loopy rectangle. Both were attached to the centre of the card. The sentiment was stamped onto Fuschia paper using my MISTI and then die cut with a circle punch. Using a white gel pen, I created stitched lines. 2 layers of 3M double-sided popup tape were added to the back of the circle on one side and then glue on the other half and it was popped up onto the card. Lastly, I added a few Kraftin’ Kimmie – Festive Dots just to add a little bit more colour!

Card Recipe:

Stamp: Surprise Gift Digi Stamp – Winnie Celebrations 2Polkadoodles

Inks: HP Printer Grayscale, Tim Holtz Distress Ink – Picked Raspberry

Paper: Copic Marker X-Press It Blending Card, Hammermill – Premium Colour 100 lb., Doodlebug – hey cupcake (6″x6″) paper pad, Hot Buy – Recollections – Jewel Tones

Die Cuts: Gina Marie Designs – Loopy Rectangle Die Set, My Creative Time – Rectangle Frame Dies

Miscellaneous: Kraftin’ Kimmie – Festive Dots

Image coloured with Copic Markers:

Skin: E21, E11, E00, E000, R22, R20, Eyes (Gelly Roll Sakura #8 Pen, Sakura Glaze – Black)

Hair: E47, E44, E43, E40

Dress and Shoes: BG09,  BG05, BG02, BG01

Ribbons and Dress Trim: RV04, RV02, RV00

Presents and Bows: E15, Y35, Y17, Y08, G02, G00, G000

Shadow: C3, C2, C1, Colorless Blender

Hope you like it and have a great week!

Ex-Cuse Me!!


Sharing a birthday card I made for my sister-in-law this year using C.C. DesignsRoberto’s Rascals – Grouchy Pets and Roberto’s Rascals – Cutie Cats. Her name is Kitty and I always try to find fun images with cats to make her card. LOL!

To make the card, I began with the base of 3.5″ x 8.5″ Hammermill – Premium Colour cardstock. I also die cut the Hammermill – Premium Colour cardstock with the Whimsy Stamps – Slimline Marquee Die and my Cuttlebug. Using multiple Picket Fence – Blending Brushes and Tim Holtz Distress Inks listed below, I created my own background. Using the window pieces from the die cut, I traced around them onto Doodlebug – hey cupcake (6″x6″) paper and fussy cut around them. I applied some glue along the edges and attached them to the back of the panel.  Then I applied double-sided tape to the backing and attached this to the base.

Using my MISTI and Memento – Tuxedo Black ink, the images were stamped onto Copic Marker X-Press It Blending Cardstock and coloured in with Copic Markers. Once everything was coloured, I fussy cut around each of them. The sentiments were stamped onto Recollections – Black cardstock with Versamark ink and then heat embossed with Ranger Embossing Powder White – Extra Fine Detail and my Marvy Uchida – Embossing Heat Tool. Using my cutter, I cut around each of the sentiments. I added double-sided tape to the back of the images and sentiments and popped them all up onto the base card. Finally, I added some Kraftin’ Kimmie Pop Dots.

Inside of the card: 

For the inside of the card, I used my large MISTI and Memento – Tuxedo Black ink to stamp the sentiments from Art Impressions Glamour Pop-Ups – 5355 and Purrrfect Sentiments – HoneyBee Stamps. I ran the little kitty from the Roberto’s Rascals – Cutie Cats – C.C. Designs set that I had coloured earlier through my Xyron Create a Sticker and attached it directly to the card to finish everything off.

Thankfully, she loved her card and I hope you do too!

Card Recipe:

Stamp and Sentiments: Roberto’s Rascals – Grouchy Pets – C.C. Designs, Roberto’s Rascals – Cutie Cats – C.C. Designs

Sentiments: Purrrfect Sentiments – HoneyBee Stamps, Dance It Out Set – Art Impressions

Inks: Memento – Tuxedo Black, Versa Fine – Onyx Black, Tim Holtz Distress Ink: Picked Raspberry, Carved Pumpkin, Mustard Seed, Peacock Feathers

Paper: Copic Marker X-Press It Blending Card, Hammermill – Premium Colour 100 lb., Doodlebug – hey cupcake (6″x6″) paper pad

Die Cut: Whimsy Stamps – Slimline Marquee Die (WSD347)

Embossing Powder: Ranger Embossing Powder White – Extra Fine Detail

Miscellaneous: Marvy Uchida – Embossing Heat Tool, Gelly Roll Sakura #10 Pen, Kraftin’ Kimmie – Seashore Dots, Xyron Create a Sticker, Sakura Glaze – Black

Image coloured with Copic Markers:

Cats: N9, N7, N5, N3, RV11, R20, G14, YG23, YG11 (Gelly Roll Sakura #10 Pen, Sakura Glaze – Black)

Hope you like it and have a great week!