Tag Archive | Falalalala

Fa La La La!


Today I’m sharing a Christmas card that I made using KLM Digital DesignsWindow Kitty from the new September 2024 Release.

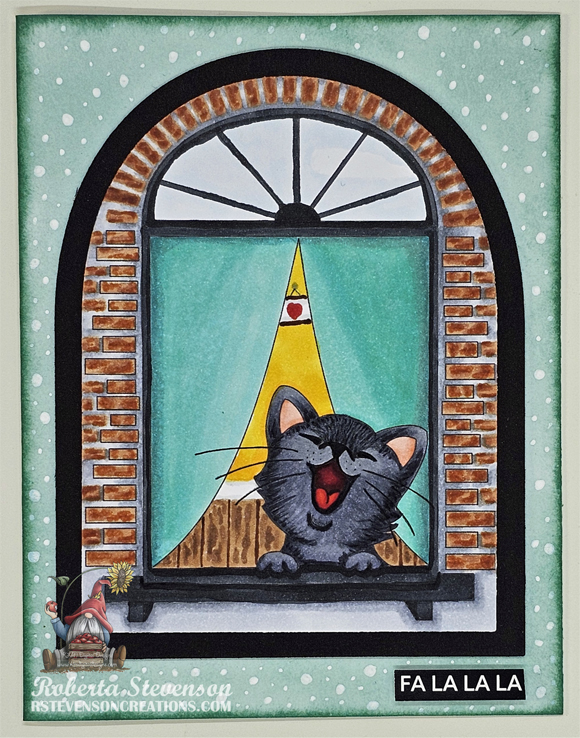
The base card was created to the size of 4.25″ x 5.5″ out of Hammermill – Premium 110 lb. cardstock. Tim Holtz Distress Ink – Evergreen Bough was applied around the outside edges with a finger dauber and a blender brush was used to apply ink around the inner edges of the card base.

The image was printed out with my HP Printer onto Copic Marker X-Press It Blending Card using High Quality Grayscale. With a Cuttlebug, Sizzix Rounded Tags were used to die cut the image and Recollections – Black cardstock. The image was coloured in with Copic markers and a Prismacolor Premier black pencil was used to add in some finer fur lines, the whiskers and to blacken around the mouth, nose and eyes.

The card was now ready to assemble. U-Line Double-Sided Foam Tape was applied to the image and large rounded tag. Both were applied together and popped up onto the card. A sentiment from Creative Expressions – Wordies Sentiment Sheets – Traditional Christmas was cut out and adhered to the card using Scrapbook Adhesives – 3D Foam Strips. Lastly, the snow flakes were added with a Gelly Roll Sakura #10 Pen.

Card Recipe:

Stamp and Sentiment: KLM Digital DesignsWindow Kitty

Inks: HP Printer High Quality Grayscale, Tim Holtz Distress Ink – Evergreen Bough

Paper: Copic Marker X-Press It Blending Card, Hammermill – Premium Cardstock 110 lb., Recollections – Black cardstock

Die Cuts: Sizzix Rounded Tags – 8 dies

Miscellaneous: U-Line Double-Sided Foam Tape, Creative Expressions – Wordies Sentiment Sheets – Traditional Christmas (CEW008), Gelly Roll Sakura #10 Pen, Scrapbook Adhesives – 3D Foam Strips

Image coloured with Copic Markers:

Cat: BV29, BV25, C4, W9, R89, R59, R56, R46, R29, R27, R24, R02, R01, R00

Brick Wall and Mortar: E19, E17, E13, C5, C3, C1

Drapes: BG72, BG57, BG32, BG11

Floor and Wall: E29, E27, E25, E23, Y17, Y15, C3, C1, R27

Window, Window Sill and Window Frame: BG000, C9, C7

Hope you like it and have a great week!

You can find more cards to inspire you at KLM Designs, KLM Digital Design Team and KLM Digital Designs on the Facebook Fan page from the rest of our design team.

Owl Carol


Today, I’m sharing a Christmas card that I made using a retired image from Di’s Digistamps called Owl Carol.

For the base card, I used Hammermill – Premium Cardstock 110 lb. and cut it and scored it to be 5.5″ x 5.5″. For the background, I cut Hunkydory Adorable Scorable Pattern Packs – Let It Snow paper to the same size as the base card and inked around the edges and along the bottom with Tim Holtz Distress Ink – Prize Ribbon. I adhered this to the base card with double-sided tape. Washi Tape was then applied directly to the left side of the card base. Waffle Flower – Nesting Square dies and Cuttlebug were used to die cut a 4.25″ x 4.25″ piece of dark blue cardstock.  Precision Cutting Dies by Frantic Stamper Inc. “Falalalala” was used to die cut the sentiment 4 times. 3 times with the dark blue cardstock and 1 time using Recollections – Matte Gold Foil cardstock.

The image using HP High Quality Grayscale was printed onto Copic Marker X-Press It Blending Card and die cut using Cuttlebug and My Creative Time -Stitched Squares Inside and Out. The image was coloured in with Copic markers and Cosmic Shimmer Fluffy Stuff was added to the bottom of the image for the snow. Marvy Uchida – Embossing Heat Tool was applied to the snow to puff it up. Stickles – Diamond was applied to the puffy snow to add a little more sparkle and also to the top of the lantern and tree branch. Gelly Roll Sakura #10 Pen was applied in the sky to create a snowy background. Sakura Glaze – Black and Gelly Roll Sakura #5 Pen were added to the noses on the mouse and rabbit. The finished image was popped up onto the blue square cardstock using 3M – double-sided foam tape and then this was attached to the base card using U-Line Double-Sided Foam Tape. The “Falalalala” sentiments were attached together to give the illusion of being 3-D and applied to the card using liquid glue to finish it off.

Card Recipe:

Stamp: Di’s DigistampsOwl Carol

Inks: HP High Quality Grayscale, Tim Holtz Distress Ink – Prize Ribbon

Paper: Copic Marker X-Press It Blending Card, Hammermill – Premium Cardstock 110 lb., Hunkydory Adorable Scorable Pattern Packs – Let It Snow, Recollections – Matte Gold Foil cardstock

Die Cuts: Waffle Flower – Nesting Square dies, My Creative Time -Stitched Squares Inside and Out, Precision Cutting Dies by Frantic Stamper Inc. “Falalalala”, My Creative Time -Stitched Squares Inside and Out

Miscellaneous: U-Line Double-Sided Foam Tape, Stickles – Crystal, Gelly Roll Sakura #10 Pen, Gelly Roll Sakura #5 Pen, Sakura Glaze – Black, Cosmic Shimmer Fluffy Stuff, Marvy Uchida – Embossing Heat Tool, 3M – double-sided foam tape, Stickles – Diamond

Image coloured with Copic Markers:

Owl: C1, C0, E23, YR15, YR12

Mouse: W7, W5, W3, W2, R30, R24, R02, Sakura Glaze – Black, Gelly Roll Sakura #5 Pen

Mouse Scarf: BG72, BG57, BG32, BG11

Rabbit: E55, E53, E51, R30, R02, C0, C00, Sakura Glaze – Black, Gelly Roll Sakura #5 Pen

Rabbit Scarf: G16, YG25, YG21

Guitar: E55, E53, E51, E35, E33

Tree Branch: E29, E25, E23

Lantern and Candle: R46, R14, R08, YR16, Y08, Y00, C8, C6, C4

Sky: B99, B97, B95, B93

Snow: Cosmic Shimmer Fluffy Stuff, Stickles – Diamond

Hope you like it and have a great week!

Added into Challenge:

Challenge #81 – Anything Goes with a Featured Critter