Tag Archive | Penny Black – Graceful Stackers (51-658)

Sending You Love!!


So happy to be colouring and creating again. I went away on a Southern Caribbean cruise at the beginning of the month and unfortunately, 3 days after being back ended up very sick with Covid. My husband was sick as well, even though we have both had all of our shots and 2 boosters. I’m so glad that we had our shots though, as I would never like to see what we would have gone through, had we not had the shots. We’re both slowly still recovering, but have a little more energy these days. We are still planning our next vacation though, as life must go on. LOL! On a good note, we did meet some really nice people on our voyage and one of them was even an international best selling author and his wife was wonderful too! Wow! How amazing is that? We were so blessed that he sent us two of his books, which I am really enjoying. I’m a little late in showcasing my cards for February, but hopefully, you’ll be seeing a lot more from me in the next little while!

*************

Today I’m sharing a special card using KLM Digital DesignValentine Gnome II from the new February release. I was a little late for Valentine’s Day, but I found this sentiment and thought it went perfect with this image.

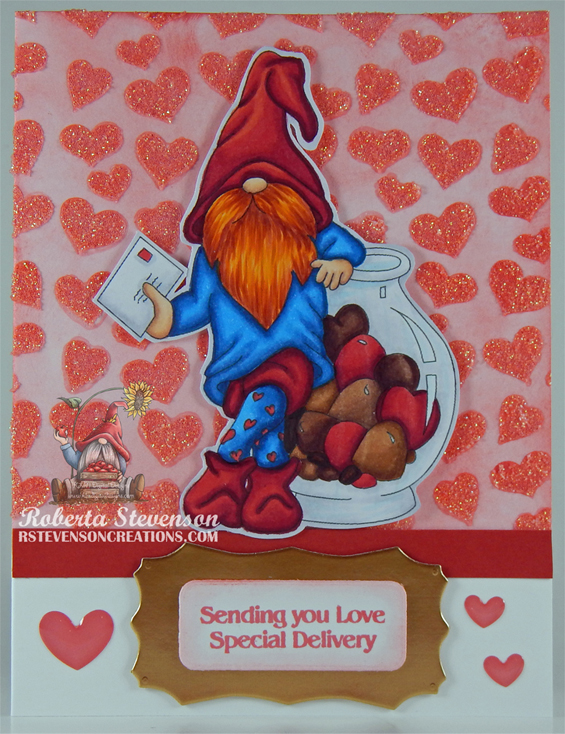
Hammermill – Premium Colour 100 lb. cardstock was used to create a 5.5″ x 4.25″ card base. I taped off the bottom half at 4.25″ from the top of the card with some Post-It Note tape. Using a blending brush and Tim Holtz Distress Inks – Festive Berries, I inked the whole top of the card. I taped Kraftin’ Kimmie – Happy Hearts Stencil on top of the inked portion of the base card and with a blending brush and Tim Holtz Distress Inks – Candied Apple, stenciled in the hearts. With the stencil remaining in place, using a spatula and Nuvo Glimmer Paste – Moonstone, I added glitter to the hearts and set the card aside to for the paste to dry.

The main image was brought into Microsoft Word and sized to approximately 3.75″ x 3″. It was printed out onto Copic Marker X-Press It Blending Card and coloured in with Copic markers. This was then fussy cut leaving a thin border around it. I used a C1 Copic marker to go around the entire image so that it wasn’t pure white. The sentiment was stamped onto Hammermill – Premium Colour 100 lb. cardstock using my MISTI and Sending Love Cubbies Stamp by Art Impressions using Memento – Lady Bug ink. With the Cuttlebug, the sentiment was cut out using Poppystamps – Christmas Quotes dies. Penny Black – Graceful Stackers dies were also used to cut out a scrap piece of Recollections – Matte Gold Foil cardstock at the same time. Using the same blending brush, I brushed around the edges of the sentiment die cut to give it some extra colour. I cut a small piece of red cardstock to the size of 3/8″ x 4.25″ and ran it through a Xyron Create a Sticker and applied it to the card to break up the joining between the stenciled background and white background.

The rest of the card was now ready to assemble. I applied U-Line double-side tape to the backs of the coloured image, sentiment and gold frame. I added some liquid glue to the tape behind the image to make it stick better to the background with the paste and popped it up onto the card. The sentiment and frame were both popped up onto the card below the coloured image and to finish everything off, Doodlebug Design Inc. – Shape Sprinkles – Love This! hearts were added.

Card Recipe:

Stamp:  Valentine Gnome II – KLM Digital Designs

Sentiment: Sending Love Cubbies – Art Impressions

Inks: HP Printer Grayscale, Tim Holtz Distress Inks – Festive Berries, Tim Holtz Distress Inks – Candied Apple, Memento – Lady Bug

Paper: Copic Marker X-Press It Blending Card, Hammermill – Premium Colour 100 lb., Recollections – Matte Gold Foil cardstock

Stencil: Kraftin’ Kimmie – Happy Hearts Stencil

Dies: Poppystamps – Christmas Quotes, Penny Black – Graceful Stackers (51-658)

Paste: Nuvo Glimmer Paste – Moonstone

Miscellaneous: U-Line double-sided tape, Cuttlebug, Xyron Create a Sticker, Doodlebug Design Inc. – Shape Sprinkles – Love This!

Image coloured with Copic Markers:

Skin: E21, E11, E04, E00, E000

Beard: E08, YR18, YR16, YR12

Shirt: B37, B14, B12

Hat, Pants and Shoes: R59, R37, R35, R24

Stockings: B37, B14, B12, R37

Chocolates: R59, R37, R35, E49, E47, E37, E35, E34, E29, E27, E25, E23

Bowl: C2, C1, C0, C00, B000, Colorless Blender

Letter: C2, C1, C0, R35, Colorless Blender

Hope you like it and have a great week!

You can find more cards to inspire you at KLM Designs, KLM Digital Design Team and KLM Digital Designs on the Facebook Fan page from the rest of our design team.

Snow Kisses!!


It’s Wednesday, and this week, I made a snow lady Christmas card using High Hopes Rubber Stamps Snow Kisses – TT059 for the main image and Holly Jolly – K048 for the sentiment. I’ve always loved snow people and birds and this stamp combo makes me smile because it has both.

To make my card this week, I began with a card base of AC Cardstock – White, cut and scored to be 6″ x 6″. I cut 2 strips of Doodlebug Design Inc. – Winter Wonderland coloured snowflake pattern to the size of 6″ x .75″. 2 strips of Doodlebug Design Inc. – Spring Solid Assortment paper to the size of 6″ x .25″ and 1 strip of Forever In Time – Textura Sky cut to the size of 6″ x 4″. With Tim Holtz Distress Ink – Evergreen Bough and a blending brush, I inked around all of the edges of the larger pieces. I ran all of the smaller pieces through my Xyron Create a Sticker. The pieces were then attached to the base card from top to bottom. I used liquid glue to attach the larger piece. I trimmed around the 3 sides of the card with a paper trimmer to make it all even.

For the frame around the image, using my Couture Creations – Go Power and Emboss die cutting machine, I die cut the entire frame with Doodlebug Design Inc. – Winter Wonderland paper and Penny Black – Graceful Stackers dies. 2 dies were pieced together for the pink frame using my cutting device and Forever In Time – Textura Blush cardstock. Lastly, I stamped the image with Memento – Summer Sky ink onto Lawn Fawn – Sparkle Cardstock in “Pixie Dust” using my MISTI. I took this piece and ran it through my Couture Creations – Go Power and Emboss die cutting machine again so that it would fit snug into the frame. I cut off the remainder following the stamped snow along the top and inked it with the Memento – Summer Sky ink. Using liquid glue, I applied the pink frame over top of the snowflake die cut while carefully matching up the edges. Liquid glue was applied to the lower back of the snow piece and it was attached to the snowflake background inside the frame.

The image was stamped onto Copic Marker X-Press It Blending Card using my MISTI and Memento – Tuxedo Black ink. After colouring the images, I fussy cut around all of them and then with a black marker, inked around all of the edges. I popped up the snowlady using U-Line double-sided tape and attached her to the card under the snow. The little bird was also popped up using U-Line double-sided tape and some liquid glue. Using Copic B41, I added in some shadows in the snow and Stickles – Hibiscus was applied to the scarf and pompom to give them some extra sparkle.

The sentiment was stamped onto Doodlebug Design Inc. – Spring Solid Assortment using my MISTI and Versamark ink. Ranger Embossing Powder White – Extra Fine Detail was applied and then heat embossed using a Marvy Uchida – Embossing Heat Tool. Using my Cuttlebug and My Creative Time – More Stitched Circles, I die cut the sentiment. The edges were inked around using a finger dauber and Tim Holtz Distress Ink – Evergreen Bough. The snowflake was cut using my Cuttlebug, Lawn Fawn – Sparkle Cardstock in “Pixie Dust” cardstock and die from Recollections – Christmas Snowflakes Clear Stamp & Die set. I popped up both the sentiment and snowflake using U-Line double-sided tape onto the card. Lastly, I added 3 Doodlebug Designs Inc. – Sprinkles onto the frame to finish it off.

Card Recipe:

Stamps: Snow Kisses – TT059 (High Hopes Rubber Stamps)

Sentiment: Holly Jolly – K048 (High Hopes Rubber Stamps)

Inks: Memento – Tuxedo Black, Tim Holtz Distress Ink – Evergreen Bough, Versamark, Memento – Summer Sky

Paper: Copic Marker X-Press It Blending Card, AC Cardstock – White, Doodlebug Design Inc. – Winter Wonderland (6″ x 6″), Doodlebug Design Inc. – Spring Solid Assortment (12″ x 12″), Lawn Fawn – Sparkle Cardstock in “Pixie Dust” (8.5″ x 11″), Forever In Time – Textura Sky, Forever In Time – Textura Blush

Die Cuts: Penny Black – Graceful Stackers (51-658), My Creative Time – More Stitched Circles MCT-D136, Recollections – Christmas Snowflakes Clear Stamp & Die 529291

Embossing Powder: Ranger Embossing Powder White – Extra Fine Detail

Tools: MISTI – Most Incredible Stamping Tool, U-Line double-sided tape, Stickles – Hibiscus, Cuttlebug, Blending Brush, Doodlebug Designs Inc. – Sprinkles, Xyron Create a Sticker, Couture Creations – Go Power and Emboss, Marvy Uchida – Embossing Heat Tool

Image coloured with Copic Markers:

Snow Lady: BV20, C00, Colorless Blender, YR18, YR12, YR07, YR04, R29, R27, R24, Eyes (Sakura Glaze – Black), Stickles – Hibiscus

Mitt’s, Coat and Hat: BG72, BG57, BG32, BG13, BG11

Scarf and Trim: RV69, RV09, RV06, RV04, RV02

Birds and Earmuffs: B97, B95, B93, B91, R46, R14, R08, YR12, YR07, YR04, R85, R83, R81, RV55, RV17, RV14, BV02, BV01, BV00

Hope you like it and have a fantastic week!

You can find lots of inspiration from the Design Team Divas at the High Hopes blog, and the High Hopes Rubber Stamps Facebook Fan page plus you can also follow us on
Instagram, Twitter and Pinterest.