Tag Archive | Whimsy Stamps – Slimline Pillows Die – WSD473

Open If You Dare!!


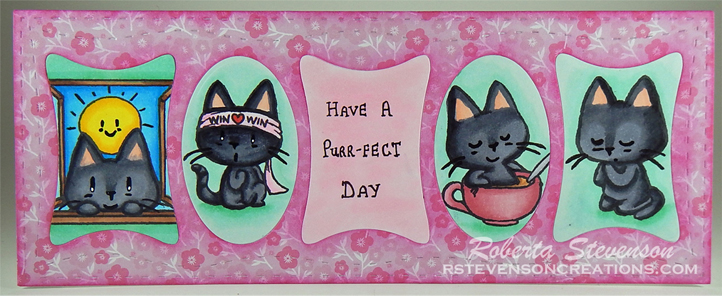
Sharing a Hallowe’en card I made today using these adorable images from 2CuteInk – Hallowe’en Animals Digital Stamp Set. Hallowe’en is one of my favourite times of the year when we get to see all of the little one’s all dressed up and having fun!

For the base card, I used Hammermill – Premium Colour 100 lb. and cut it and scored it to be 8.25″ x 3.25″. I die cut Stampin’ Up – Magic in this Night Designer Series Paper using my Couture Creations – Go Power and Emboss and Whimsy Stamps – Slimline Pillows Die – WSD473. This was used for the main background. I used the same die-cut again for the inserts, only this time I used Doodlebug Design Inc. – Ghost Town paper and also die-cut the sentiment. I glued the main background to the base and used Tim Holtz Distress Inks – Dusty Concord to ink around all of the outside edges and around each of the shapes. For the sentiment, I used my Blending brushes and Tim Holtz Distress Ink – Twisted Citron to colour it and ink around the edges. Each of the shapes were glued and placed into their corresponding places.

The images and sentiment were imported into Microsoft Word and then printed out onto onto Copic Marker X-Press It Blending Card using my printer and HP Printer High Quality Grayscale for the setting. This prevents them from smearing when colouring. My Brother Scan and Cut was used to die cut the images leaving a small white border. The images were coloured in with Copic markers and then popped up using 3M double-sided tape onto the card.

Card Recipe:

Stamps and sentiment: Hallowe’en Animals Digital Stamp Set – 2CuteInk

Inks: HP Printer High Quality Grayscale, Tim Holtz Distress Inks – Dusty Concord, Tim Holtz Distress Ink – Twisted Citron

Paper: Copic Marker X-Press It Blending Card, Hammermill – Premium Colour 100 lb., Stampin’ Up – Magic in this Night Designer Series Paper (12″ x 12″), Doodlebug Design Inc. – Ghost Town (6″ x 6″)

Die Cuts: Whimsy Stamps – Slimline Pillows Die – WSD473

Miscellaneous: Couture Creations – Go Power and Emboss, Brother Scan and Cut

Image coloured with Copic Markers:

Giraffe Mummy: E79, E77, E74, Y38, YR31, YR000, C1, C00

Vampire Pig: E95, E93, R01, R00, R000, E79, E77, E74, C8, C6, C4, R59, R39, R29, V17, V15, V12

Alligator Witch: C8, C6, C4, YG67, YG63, G43, G24, V17, V15, V12, Y38, YR31, Y23, Y21

Frankenstein Hippo: W5, W3, W1, YG67, YG63, G43, G24, C7, C4, R01, B26, B23, B21

Hope you like it and have a great week!

Come and check us out on Passionate Paper Creations & Friends FB group as we are currently sponsoring 2CuteInk.

If you are a member of Passionate Paper Creations & Friends FB group
you can go to the top of the page and get a shopping discount.

If you are not a member just click join. We are a fun loving group with a lot of inspiration.

Purr-fect Day!!


Today, I’m sharing a birthday card that I made using Dreamerland Crafts stamps called Meow Meow 03 – D20015. This little kitten is having an amazing day, getting up early, playing, relaxing and then saying her prayers for the next day to be the same all over again. If we could all live the life of a spoiled kitten, life would be amazing! LOL!

To make this card I used a base card of 6.5″ x 8.25″ using Hammermill – Premium Colour 100 lb. cardstock. I scored it at 3.25″.  Next, using my Couture Creations – Go Power and Emboss and Whimsy Stamps – Slimline Pillows Die, I die cut Copic Marker X-Press It Blending Card and Recollections – Petite Floral – Double Sided paper.  Using my MISTI and Memento – Tuxedo Black ink, I stamped all of the images onto the various shaes and coloured them in with Copic markers. I created the sentiment using a ruler and Pigma Micron 03 black marker.

To assemble the card, I applied glue to the back of the patterned paper and attached it directly to the base. Tim Holtz Distress Ink – Picked Raspberry was used to ink around all of the outside and inside edges of the die cut. For all of the images and sentiment, I first ran them through my Xyron Creative Station to turn them into stickers. Also, this would give me full coverage to lay them flat. I inserted each of them into their respective places of the die cut.

Card Recipe:

Stamps: Meow Meow 03 – D20015 (Dreamerland Crafts)

Inks: Memento – Tuxedo Black, Tim Holtz Distress Ink – Picked Raspberry

Paper: Copic Marker X-Press It Blending Card, Hammermill – Premium Colour 100 lb., Recollections – Petite Floral – Double Sided 12 x 12 in (30.4 x 30.4 cm)

Die Cut: Whimsy Stamps – Slimline Pillows Die (WSD473)

Tools: MISTI – Most Incredible Stamping Tool, Couture Creations – Go Power and Emboss, Pigma Micron 03 black marker, Xyron Creative Station

Image coloured with Copic Markers:

Cats: C7, C5, C3, R30, R20, 100

Sun, Window, Sky:  Y08, Y06, Y04, B04, B02, B01, E25, E23

Bandana: RV02, RV000, R27

Coffee Cup: R85, R83, R81, E23, E21, C3, C1, C0

Backgrounds: G02, G00, G000, G0000, RV10, RV02

Hope you like it and have a great week!

You can find more cards to inspire you at Dreamerland Crafts and Pointer Scrapbooking on the Facebook Fan pages from the rest of our design team.

More Bubbles!


It’s Wednesday, and this week, I made a fun card using  Burts Bath – R103 (High Hopes Rubber Stamps) for the main image and Filled With Bubbles – H119 (High Hopes Rubber Stamps) for the sentiment. Burt sure looks happy as he’s letting all of his troubles float away! LOL!

To make my card this week, I used Hammermill – Premium Colour 100 lb. cardstock for my base folded at 5.5″ x 4.25″. For the main background, I used Doodlebug Design Inc. – Under The Sea paper cut to the same size as the base and attached it using double-sided tape. Tim Holtz Distress Ink – Picked Raspberry was used to ink around all of the edges. Whimsy Stamps – Slimline Pillows Die was used to cut out the shape for the sentiment and Die-Namics My Favourite Things – PCD Fishtail Figs STX for the flag behind the sentiment. I inked around the edges of the sentiment die cut with Copic Marker – BV04 to frame it. Tim Holtz Distress Inks – Peacock Feathers was used to ink around the edges of the flag. Avery Elle – Wonky Stitches Die was used to die cut Copic Marker X-Press It Blending Card.

I stamped the image and sentiment using Memento – Tuxedo Black using my MISTI and coloured in the image using Copic markers. I added 3M VHB – 2 sided tape to the back of the coloured image and attached it to the base card. I ran the flag through my Xyron Create a Sticker as I wanted it to lay completely flat against the background. I attached this to the base and then added 3M VHB – 2 sided tape to the back of the sentiment and attached it over top of the flag and the base. To complete the card, I added a few bubble embellishments from The Robin’s Nest – Peony using Ranger Glossy Accents.

Card Recipe:

Stamp: Burts Bath – R103 (High Hopes Rubber Stamps)

Sentiment Background: Filled With Bubbles – H119 (High Hopes Rubber Stamps)

Inks: Memento – Tuxedo Black, Tim Holtz Distress Inks – Peacock Feathers, Tim Holtz Distress Ink – Picked Raspberry

Paper: Copic Marker X-Press It Blending Card, Doodlebug Design Inc. – Under The Sea – 6″x6″, Hammermill – Premium Colour 100 lb.

Die Cuts: Avery Elle – Wonky Stitches Die – D-04-11, Whimsy Stamps – Slimline Pillows Die – WSD473, My Creative Time – Rectangle Frame Dies, Die-Namics MFT-489 PCD Fishtail Figs STX

Tools: MISTI – Most Incredible Stamping Tool, Cuttlebug, 3M VHB – 2 sided tape, Xyron Create a Sticker, Ranger Glossy Accents, The Robin’s Nest – Peony – dd-8

Images coloured with Copic Markers:

Duck: Y19, Y18, Y15, Y13, Y08, YR16, YR14, YR12, YR07

Brush: E59, E39, E35, E31, Copic Multiliner – Sepia – 0.1

Hat: BG15, BG13, BG11, BV04, BV02, BV00, RV04, RV02, RV000, Y17

Bird Bath: C7, C5, C3, C2, C1, C0

Bubbles: BG15, BG13, BG11, BG10, BV04, BV02, BV00, BV0000, RV02, RV00, RV000, Y11, Y000, Y0000

Grass: YG13, YG11, YG03, YG01

Sky: B02, B01, B00, B000

Wonky Border: BV04, BV02, BG15

Hope you like it and have a fantastic week!

You can find lots of inspiration from the Design Team Divas at the High Hopes blog, and the High Hopes Rubber Stamps Facebook Fan page plus you can also follow us on
Instagram, Twitter and Pinterest.