Tag Archive | Kitten

Trick or Treat!


It’s the last day of the 2022 Cat Lovers Hop and today I’m sharing a CAS Hallowe’en card I made using Lawn FawnGiant Trick or Treat for the sentiment and Spellbinders – Die D-Lites Kitty Cats Etched Dies. Happy Hallowe’en everyone and happy hopping!


I created a 5.5″ x 4.25″ card base using Hammermill – Premium Colour 100 lb. cardstock. I cut the background to be the same size using DCWV Happy Haunts cardstock.and adhered it directly to the base using double-sided tape. Using Tim Holtz Distress Ink – Villainous Potion and a finger dauber, I inked around all of the edges of the card and put a few coats onto the bottom of the card. With my Cuttlebug, I die cut the sentiment 4 times and the kitty cats once. Using liquid glue, I adhered each of the sentiments together and then applied it to the card. I applied 2 layers of U-Line double-sided tape to the backs of the cats and a touch of glue and added them to the card.

Card Recipe:

Inks: Tim Holtz Distress Ink – Villainous Potion

Die Cuts: Lawn FawnGiant Trick or TreatSpellbinders – Die D-Lites Kitty Cats Etched Dies.

Paper: Hammermill – Premium Colour 100 lb., DCWV Happy Haunts (6″ x 6″), Orange and Purple Cardstock

Hope you like it and have a great week!


Meowy Christmas!


It’s the last day of the 2022 Cat Lovers Hop and today I’m sharing a Christmas card I made using Gerda Steiner Designs –  Deck The Halls – GSD438. I thought this image was adorable! Have fun hopping everyone!

I created a 5.5″ x 4.25″ card base using Hammermill – Premium Colour 100 lb. cardstock. I cut the background to be the same size using Wild Rose Studio – Winter Bauble Paper and adhered it directly to the base using double-sided tape. Using Tim Holtz Distress Inks – Tumbled Glass and a finger dauber, I inked around all of the edges of the card. With my Cuttlebug and Hero Arts – Infinity Dies – Ornaments, I die cut a large ornament from Copic Marker X-Press It Blending Card cardstock and the ribbon and topper from a scrap piece of gold cardstock.

Using my MISTI and Memento – Tuxedo Black ink, I stamped the image onto the Copic Marker X-Press It Blending Card cardstock and with Versafine – Majestic Blue, I stamped the sentiment onto the base card. I embossed the sentiment with Ranger – Clear Super Fine Detail embossing powder and then heat set it with a Marvy Uchida – Embossing Heat Tool. The image was coloured in with Copic markers and with a Gelly Roll Sakura #8 Pen designs were added to the ornaments and light bulbs. I tried to create the ornament as close to the paper as I could. Once this was completed, using liquid glue, I attached the top piece and the bow to the ornament. U-Line double-sided tape was added to the back of ornament die cut and it was popped up onto the background. With a Gelly Roll Sakura #8 Pen, I added in some string for the bauble.

Card Recipe:

Stamp and Sentiment:  Deck The Halls – GSD438 – Gerda Steiner Designs

Inks: Memento – Tuxedo Black, Versafine – Majestic Blue, Tim Holtz Distress Inks – Tumbled Glass

Die Cuts: Hero Arts – Infinity Dies – Ornaments (D1400)

Paper: Copic Marker X-Press It Blending Card, Hammermill – Premium Colour 100 lb., Wild Rose Studio – Winter Bauble Paper (6″ x 6)

Embossing Powder: Ranger – Clear Super Fine Detail embossing powder

Miscellaneous: U-Line – 2-sided tape, Gelly Roll Sakura #8 Pen, MISTI (Most Incredible Stamping Tool), Marvy Uchida – Embossing Heat Tool,

Image coloured with Copic Markers:

Kitten: T9, T7, T5, T3, R30, R22

Large Ornament: BG09, BG05, BG02, BG01, Y11, Y00, YG00, Gelly Roll Sakura #8 Pen

Baubles: BV11, BV02, BV00, BV000

Lights and Wire Cord: R14, RV42, G07, YG07, YG01, B06, B04, B000

Hope you like it and have a great week!

Also entered into:

https://gsd-stamps.com/blogs/share-your-designs/play-along-in-november-22-challenge


Wish Upon A Star!!


Today, I’m sharing a card using Dreamerland Crafts stamps called Being With Each Other – D17011.  This boy and his little kitty are enjoying the moment and wishing upon a star!

To make this card I used a base of 5.5″ x 4.25″ using Hammermill – Premium Colour 100 lb. I stamped the image using my MISTI and Memento – Tuxedo Black ink onto Copic Marker X-Press It Blending Card which was cut to the size of 5-1/8″ x 3-7/8″. I coloured in the image with Copic Markers and added some stars in the sky using Gelly Roll Sakura #5 Pen, Gelly Roll Sakura #8 Pen and Gelly Roll Stardust – Clear pen.  I adhered the completed image to the base card using double-sided tape.

Card Recipe:

Stamp: Being With Each Other – D17011 – Dreamerland Crafts

Inks: Memento – Tuxedo Black

Paper: Copic Marker X-Press It Blending Card, Hammermill – Premium Colour 100 lb.

Tools: MISTI – Most Incredible Stamping Tool, Gelly Roll Sakura #5 Pen, Gelly Roll Sakura #8 Pen and Gelly Roll Stardust – Clear

Image coloured with Copic Markers:

Skin: E21, E11, E00, E000, R30, R22, R20,

Hair: E47, E44, E43, E41, Sakura Glaze – Black – Eyes

Sweater: BG72, BG57, BG32, BG11, BG09, BG05, BG02, BG01, R46, R14, R08

Jeans: B26, B23, B21

Boots: E27, E25, E23, E21

Kitten: T7, T5, T3, R02

Grass: G99, YG67, YG17, G21

Night Sky and Moon: B99, B97, B95, B60, C7, C2, C1, C0, C00, BV23, BV20, Y000

Hope you like it and have a great week!

You can find more cards to inspire you at Dreamerland Crafts and Pointer Scrapbooking on the Facebook Fan pages from the rest of our design team.

Birthday Celebration!!


Today, I’m sharing a miniature birthday card that I made using Dreamerland Crafts stamps called Meow Meow 01 – D20013 for the main image and for the sentiments Birthday 07 – DCS17058 and Birthday 08 – DCS17059. I always wanted to try this type of miniature card! I just love the way you get the 3-D effect when you open the card.  So much fun. LOL!

Inside the card:

To make this card I used Lawn Fawn – Centre Picture Window Card to create the base card out of Hot Pink cardstock. The same dies were also used to create the centre pieces and banner using Your Next Stamp Designer Paper Pad – Birthday Girl. The same paper was also used to create the background on the card, front panel and side panels using Lawn Fawn – Centre Picture Window Card Add-On dies. Your Next Stamp – Mini Balloon Trio Die Set was used to die cut the floating balloons and then I tied some black thread to the base of the balloons. I cut 3 small pieces of clear plastic about a 1/4″ wide and attached the double-sided tape to the back of the balloon and at the base of the plastic as well to be used later.

Using my MISTI and Memento – Tuxedo Black ink, I stamped the image onto Copic Marker X-Press It Blending Card and also the sentiments onto the patterned pieces. I coloured the image in with Copic markers and then fussy cut around it.

I assembled the card using double-sided tape for each of the panels and centre pieces. I attached the balloons by putting 2 behind the presents and 1 from the top centre piece. Lastly, I added a little bit of double-sided tape to the bottom of the coloured image and attached it to the front of the main centre piece. For the sentiment on the front panel, I inked around the edges with Tim Holtz Distress Ink – Fossilized Amber and then popped it up using 3M VHB – 2 sided tape. I added 2 balloons and used a black marker to create the tails for the balloons.

Card Recipe:

Stamps: Meow Meow 01 – D20013 – Dreamerland Crafts

Sentiments: Birthday 07 – DCS17058 – Dreamerland Crafts, Birthday 08 – DCS17059 – Dreamerland Crafts

Inks: Memento – Tuxedo Black, Tim Holtz Distress Ink – Fossilized Amber

Paper: Copic Marker X-Press It Blending Card, Your Next Stamp Designer Paper Pad – Birthday Girl – 6″ x 6″

Die Cut: Lawn Fawn – Centre Picture Window Card, Lawn Fawn – Centre Picture Window Card Add-On, Your Next Stamp – Mini Balloon Trio Die Set (YNSD241)

Tools: MISTI – Most Incredible Stamping Tool, 3M VHB – 2 sided tape, Cuttlebug

Image coloured with Copic Markers:

Kitten: C8, C6, C4, R30, R24, R20 (Noses – Sakura Glaze – Black)

Cake and Icing:  RV66, RV55, RV52, RV06, RV04, RV02, G02, Y08, YR16

Hope you like it and have a great week!

You can find more cards to inspire you at Dreamerland Crafts and Pointer Scrapbooking on the Facebook Fan pages from the rest of our design team.

Miss You!!


Today, I’m sharing a slim-line card that I made using Dreamerland Crafts stamps called Meow Meow 04 – D20016 for the main image and for the sentiment Just A Note To Say – DCS17038Dreamerland Crafts. Love this new set and I as soon as I saw it, I knew I wanted to make a card to show how a lot of us are feeling right now during these Covid times missing family and friends.

To make this card I used a base card of 7″ x 8.25″ using Hammermill – Premium Colour 100 lb. cardstock. I scored it at 3.25″.  Next, using my Couture Creations – Go Power and Emboss and Whimsy Stamps – Slimline Marquee Die, I die cut Copic Marker X-Press It Blending Card.  Using my MISTI and Memento – Tuxedo Black ink, I stamped all of the images onto the shaped die cuts and coloured them in with Copic markers.

The frame die cut was coloured using Picket Fence Studio Blender Brush and Tim Holtz Distress Inks: Picked Raspberry, Spun Sugar and Worn Lipstick. The sentiments were stamped and embossed onto black cardstock using Versamark ink and Ranger Embossing Powder White – Extra Fine Detail. This was heat set using Marvy Uchida – Embossing Heat Tool. My cutter was used to cut the stamped sentiments into small strips. 3M VHB – 2 sided tape was applied to the back of each of the sentiments.

To assemble the card, I first turned the die cuts upside down and used a little bit of Scotch Tape on the back side to keep the inserts in place. Then, I applied double-sided tape across the entire back and attached it directly to the card base. I attached each of the sentiments and finished off the card with Crafts – Rhinestone Stickers.

Card Recipe:

Stamps: Meow Meow 04 – D20016 – Dreamerland Crafts

Sentiments: Just A Note To Say – DCS17038 – Dreamerland Crafts, Love and Cuddles – Penny Black

Inks: Memento – Tuxedo Black, Tim Holtz Distress Ink – Picked Raspberry, Tim Holtz Distress Ink – Spun Sugar, Tim Holtz Distress Ink -Worn Lipstick, Versamark

Paper: Copic Marker X-Press It Blending Card, Hammermill – Premium Colour 100 lb.

Die Cut: Whimsy Stamps – Slimline Marquee Die (WSD347)

Embossing Powder: Ranger Embossing Powder White – Extra Fine Detail

Tools: MISTI – Most Incredible Stamping Tool, Couture Creations – Go Power and Emboss, Picket Fence Studio Blender Brushes, Marvy Uchida – Embossing Heat Tool, Crafts – Rhinestone Stickers – 02-3048783

Image coloured with Copic Markers:

Cats: C7, C5, C3, R30, R22, R20, 100, YG23, YG17, G07 (Noses – Sakura Glaze – Black)

Bunny:  E35, E33, E31

Grass: YG17, YG13, YG03, YG01

Sky: B02, B01, B00, B000

Hope you like it and have a great week!

You can find more cards to inspire you at Dreamerland Crafts and Pointer Scrapbooking on the Facebook Fan pages from the rest of our design team.

Purr-fect Day!!


Today, I’m sharing a birthday card that I made using Dreamerland Crafts stamps called Meow Meow 03 – D20015. This little kitten is having an amazing day, getting up early, playing, relaxing and then saying her prayers for the next day to be the same all over again. If we could all live the life of a spoiled kitten, life would be amazing! LOL!

To make this card I used a base card of 6.5″ x 8.25″ using Hammermill – Premium Colour 100 lb. cardstock. I scored it at 3.25″.  Next, using my Couture Creations – Go Power and Emboss and Whimsy Stamps – Slimline Pillows Die, I die cut Copic Marker X-Press It Blending Card and Recollections – Petite Floral – Double Sided paper.  Using my MISTI and Memento – Tuxedo Black ink, I stamped all of the images onto the various shaes and coloured them in with Copic markers. I created the sentiment using a ruler and Pigma Micron 03 black marker.

To assemble the card, I applied glue to the back of the patterned paper and attached it directly to the base. Tim Holtz Distress Ink – Picked Raspberry was used to ink around all of the outside and inside edges of the die cut. For all of the images and sentiment, I first ran them through my Xyron Creative Station to turn them into stickers. Also, this would give me full coverage to lay them flat. I inserted each of them into their respective places of the die cut.

Card Recipe:

Stamps: Meow Meow 03 – D20015 (Dreamerland Crafts)

Inks: Memento – Tuxedo Black, Tim Holtz Distress Ink – Picked Raspberry

Paper: Copic Marker X-Press It Blending Card, Hammermill – Premium Colour 100 lb., Recollections – Petite Floral – Double Sided 12 x 12 in (30.4 x 30.4 cm)

Die Cut: Whimsy Stamps – Slimline Pillows Die (WSD473)

Tools: MISTI – Most Incredible Stamping Tool, Couture Creations – Go Power and Emboss, Pigma Micron 03 black marker, Xyron Creative Station

Image coloured with Copic Markers:

Cats: C7, C5, C3, R30, R20, 100

Sun, Window, Sky:  Y08, Y06, Y04, B04, B02, B01, E25, E23

Bandana: RV02, RV000, R27

Coffee Cup: R85, R83, R81, E23, E21, C3, C1, C0

Backgrounds: G02, G00, G000, G0000, RV10, RV02

Hope you like it and have a great week!

You can find more cards to inspire you at Dreamerland Crafts and Pointer Scrapbooking on the Facebook Fan pages from the rest of our design team.

Happiness


Hi Everyone! It’s the new year and it’s never too early to start making your Christmas cards. Today, I’m featuring a Christmas card from Dreamerland Crafts new Christmas release called Happiness Is Time Spent With A Good Friend – D20009.

To create this card, I first stamped my images using my MISTI and Memento – Tuxedo Black ink.  The images were coloured in with Copic markers. Then I fussy cut around them and went around the edges with a black marker and set them aside.

Next, I worked on the background. I cut Hammermill – Premium Colour 100 lb. to the size of 4.25″ x 5.5″. I created the sky using the Tim Holtz inks listed below and then added in some snow using Stamperi – Glamour Paste – Sparkling White and sprinkling on some Martha Stewart Crafts – Crystal Fine Glitter while it was still wet. I then set this aside to dry. Once the paste was dry, I stamped the sentiment using VersaMark ink. The sentiment was embossed with Ranger Embossing Powder White – Extra Fine Detail and Marvy Uchida – Embossing Heat Tool was used to heat set the embossing powder.

The bench was die cut using Joy Crafts – Floral Flourishes – 6002/0191, my Cutttlebug and Tim Holtz – Idea-ology – Christmas paper. Shadows were added in using T5 Copic Marker. I created a base card using Hammermill – Premium Colour 100 lb. to the size of 4.25″ x 5.5″. I added double-sided tape to the coloured background and adhered it directly to the base. Using double-sided tape, I added the bench to the background. I popped up the images on the bench using 3M VHB – 2 sided tape. The snow and stars were added in using a combination of Gelly Roll Sakura #8 Pen and Gelly Roll Sakura #10 Pen. Sequins was added from some mixed sparkles I had.

To finish off the card, I added in some Cosmic Shimmer – Fluffy Puff around the bottom of each of the legs of the bench and also onto the trim of the girl’s cape, kitten’s cape and pompom. Lastly, I added some Stickles – Diamond onto the snow and the girl’s cape for added texture.

Card Recipe:

Stamp and Sentiment:  Happiness Is Time Spent With A Good Friend – D20009 (Dreamerland Crafts)

Inks: Memento – Tuxedo Black, VersaMark, Tim Holtz Distress Ink: Black Soot, Blueprint Sketch, Chipped Sapphire, Salty Ocean, Salty Ocean

Paper: Copic Marker X-Press It Blending Card, Hammermill – Premium Colour 100 lb., Tim Holtz – Idea-ology – Christmas

Glitter \ Snow: Stamperi – Glamour Paste – Sparkling White, Stickles – Diamond, Cosmic Shimmer – Fluffy Puff

Die Cuts: Joy Crafts – Floral Flourishes – 6002/0191

Tools: MISTI – Most Incredible Stamping Tool, Marvy Uchida – Embossing Heat Tool, Gelly Roll Sakura #8 Pen, Gelly Roll Sakura #10 Pen, 3M VHB – 2 sided tape, Cuttlebug

Image coloured with Copic Markers:

Face: E21, E11, E04, E00, E000, R22, R20, Eyes – Sakura Glaze – Black, Gelly Roll Sakura #8 Pen

Hair: E47, E44, E43

Cape and Dresses:  BG72, BG57, BG34, BG11

Pants: T7, T5, T4, T3

Boots: E55, E50, E29, E27, E25, E23

Kitty: T7, T5, T3, R20, Sakura Glaze – Black, Gelly Roll Sakura #8 Pen

Hat and Antlers: C2, R39, R37, R35

Sky: Gelly Roll Sakura #10 Pen, Gelly Roll Sakura #8 Pen,

Hope you like it and have a great week!

You can find more cards to inspire you at Dreamerland Crafts and Pointer Scrapbooking on the Facebook Fan pages from the rest of our design team.

Babies Are Sweet Beginnings!!!


It’s Wednesday, and this week I’m sharing a Baby Card featuring Sweet Beginnings – S169 from (High Hopes Rubber Stamps). I love this adorable stamp and I also have a few nieces that are pregnant right now. We are all looking forward to seeing pictures of the new little one’s when they are born. Once Covid19 is over, hopefully, we will be able to travel again and see them in person.

To create the card this week, I stamped the image onto Copic Marker X-Press It Blending Card using my MISTI and Memento – Tuxedo Black ink. I fussy cut around the image and then coloured it in with Copic Markers.

I created a card base made from Hammermill – Premium Colour 100 lb. paper, folded to 5.5″ x 4.25″. For the background paper, I cut a piece the same size as the base from Echo Park – Hello Baby – It’s a Girl. I attached this directly to the base with double-sided tape and then inked around the edges using Tim Holtz Distress Ink – Spun Sugar. I popped up the coloured image using 3M VHB – 2 sided tape. Lastly, I added some little embellishments from Forever In Time – Painted Wood Buttons – Patchwork Elephants to finish off the card.

Card Recipe:

Stamp: Sweet Beginnings – S169 (High Hopes Rubber Stamps)

Inks: Memento – Tuxedo Black, Tim Holtz Distress Ink – Spun Sugar

Paper: Copic Marker X-Press It Blending Card, Hammermill – Premium Colour 100 lb., Echo Park – Hello Baby – It’s a Girl (6″x6″)

Embellishments: Forever In Time – Painted Wood Buttons – Patchwork Elephants – SE083C

Tools and Miscellaneous: MISTI – Most Incredible Stamping Tool, Sakura Glaze – Black, 3M VHB – 2 sided tape

Image coloured with Copic Markers:

Banner: R85, RV13, RV11, RV10

Bear: E29, E25, E23, E21, R30, R02, Y35, Y18, Y13, Sakura Glaze – Black – Eyes and Mouth

Bunny: BV23, BV20, B60, R22, R20, BG49, BG23, BG15, BG10, BG11, YG41, G00, G000, Sakura Glaze – Black – Eyes

Kitten: N8, N5, N3, N1, V17, V15, V04, V01, Sakura Glaze – Black – Eyes and Nose

Hope you like it and have a fantastic week!

You can find lots of inspiration from the Design Team Divas at the High Hopes blog, and the High Hopes Rubber Stamps Facebook Fan page plus you can also follow us on
Instagram, Twitter and Pinterest.

Wish You A Merry Christmas


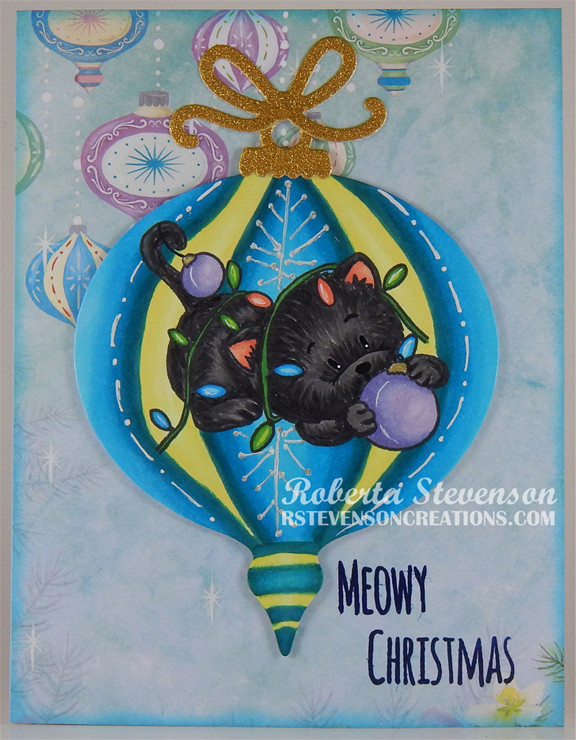
Today, I’m featuring a Christmas card from Dreamerland Crafts new Christmas release called We Wish You A Merry Christmas – D20012. This card features a little kitten helping his friend celebrate the joy of Christmas giving.

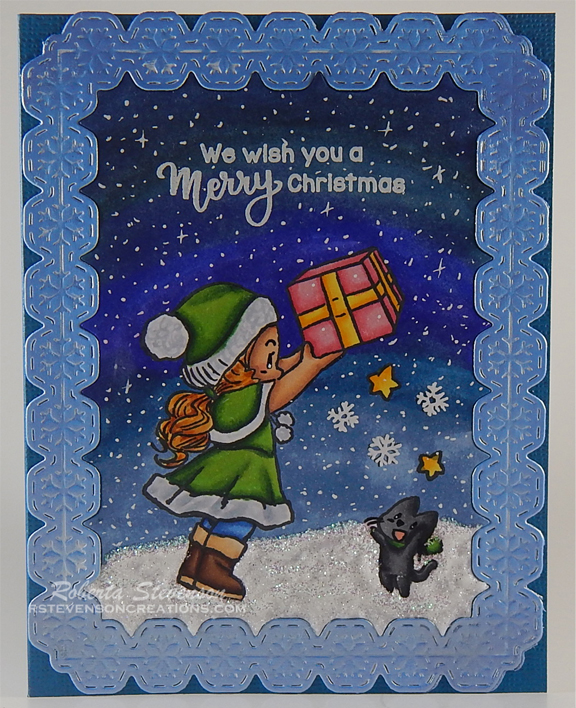
To create this card, I first die-cut some Copic Marker X-Press It Blending Card using my Cuttlebug and Creative Expressions – Festive Frames – Snowball. I separated the 2 pieces of the die-cut and using my MISTI and Memento – Tuxedo Black, I stamped the image onto the paper and  coloured it in with Copic markers. I stamped the sentiment using VersaMark ink. The sentiment was then embossed with Ranger Embossing Powder White – Extra Fine Detail and Marvy Uchida – Embossing Heat Tool was used to heat set the embossing powder. Once this was done, I added all of the snowflakes in the sky using a Gelly Roll Sakura #10 Pen and also Gelly Roll Sakura #8 Pen. For the snow on the ground, I used a mixture of Nuvo Glitter Accents – Fresh Snowfall and Stickles – Crystal. This was then set aside for a few hours to dry.

For the frame, I used Cosmic Shimmer Opal Polish – Summer Sky. It was my first time using this polish and I just love how it turned out. Once the snow on the image was dry, I flipped the 2 die-cuts over and attached them back together using some clear tape on the back.

The card was now ready to assemble. For the card base I used The Paper Studio – Primary Base Colours 4.25″ x 5.5″. I added some double-sided tape and some glue to the backing of the finished frame and image and attached it directly to the card base.

Card Recipe:

Stamp and Sentiment:  We Wish You A Merry Christmas – D20012 (Dreamerland Crafts)

Inks: Memento – Tuxedo Black, VersaMark

Paper: Copic Marker X-Press It Blending Card, The Paper Studio – Primary Base Colours 4.25″ x 5.5″

Opal Polish: Cosmic Shimmer – Summer Sky

Glitter \ Snow: Nuvo Glitter Accents – Fresh Snowfall, Stickles – Crystal

Die Cuts: Creative Expressions – Festive Frames – Snowball – CED3146

Tools: MISTI – Most Incredible Stamping Tool, Marvy Uchida – Embossing Heat Tool, Gelly Roll Sakura #8 Pen, 3M VHB – 2 sided tape, Cuttlebug, Gelly Roll Sakura #10 Pen

Image coloured with Copic Markers:

Face: E21, E11, E04, E00, E000, R22, R20, Eyes – Sakura Glaze – Black, Gelly Roll Sakura #5 Pen

Hair: E15, Y38, Y21, YR23

Hat, Cape and Coat:  G29, YG17, YG05, YG03, BV20, C1, C0

Pants: B26, B23, B21

Boots: E53, E51, E50, E29, E27, E25, E23

Present: R14, R13, R11

Bow and Girl’s Scarf: R59, R39, R37, R35

Kitten and Scarf: N10, N8, N6, N4, N3, G29, YG17, YG05, YG03, R32, R20, Eyes – Sakura Glaze – Black, Gelly Roll Sakura #5 Pen

Present: Y17, Y15, Y08, Y04, Y17, Y15, Y13

Stars: Y17, Y15, Y13

Sky: B99, B97, B79, B69, B39, B37, B34, Gelly Roll Sakura #10 Pen, Gelly Roll Sakura #8 Pen

Hope you like it and have a great week!

You can find more cards to inspire you at Dreamerland Crafts and Pointer Scrapbooking on the Facebook Fan pages from the rest of our design team.

Hug in a Mug!


Coffee Loving Cardmakers is currently hosting the 2020 Fall / Winter Coffee Lovers Blog Hop! For my second entry into this hop, I chose the adorable stamp from (My Creative Time) called Cute Mugs – MCT326. 

To create this card, I first used my Cuttlebug and My Creative Time – Bunch of Fun Circle Dies to cut Copic Marker X-Press It Blending Card paper. The image was stamped onto the die-cut with Memento – Tuxedo Black using my MISTI – Most Incredible Stamping Tool to get a nice clean image. I coloured in the image with Copic markers and then stamped the image again on the same paper that I used for the background and fussy cut around the tea-cup piece. I used a black marker to go around the edges and then paper-pieced it into place using some glue. I die cut the sign using Spellbinders – Shapeabilities S4-322 Grommet Tags and also the background circle using some scrap yellow paper. The sentiment was then stamped on using Versa Fine – Onyx Black ink and Ranger – Clear Super Fine Detail Embossing Powder was applied on top. Then, I used Marvy Uchida – Embossing Heat Tool to heat emboss the powder. I also die cut some red hearts with the die-cut that came with the stamp set.

I cut the background pattern from My Mind’s Eye – Lost and Found paper and then used Tim Holtz Distress Ink – Antique Linen to go around the edges. I also used this ink to go around all of my other die cuts.

The card was now ready to assemble. I adhered the background to a base card of 6″ x 6″. Then using 3M VHB – 2 sided tape, I popped up the 2 circles and sign. I added a couple of brads to the sign before adding the tape. I ran the hearts through my Xyron Create a Sticker to make them into stickers and added them around the kitty to complete my card.

Card Recipe:

Stamp: Cute Mugs (My Creative Time)

Inks: Memento – Tuxedo Black, Versa Fine – Onyx Black, Tim Holtz Distress Ink – Antique Linen

Paper: Copic Marker X-Press It Blending Card, Hammermill – Premium Colour 100 lb., My Mind’s Eye – Lost and Found

Die Cuts: My Creative Time – Bunch of Fun Circle Dies

Embossing Powder: Ranger – Clear Super Fine Detail

Tools and Miscellaneous: MISTI – Most Incredible Stamping Tool, Marvy Uchida – Embossing Heat Tool, 3M VHB – 2 sided tape, Xyron Create a Sticker

Image coloured with Copic Markers:

Kitten: C9, C7, C5, C3, 100, R30, R20

Mug and Saucer: E53, E51, E50, Atayou Spica – Gold 11, Paper-Piercing – My Mind’s Eye – Lost and Found

Saucer: BG15, BG11, BG10, BG000

Spoon and Cocoa: C5, C3, C1, E39, E37, E35

Marshmallows and Whipped Cream: C1, C0, Y32, Y23, Y21, Colorless Blender

Hope you like it and have a fantastic week!

Entered into these challenges:

2020 Fall / Winter Coffee Lovers Blog Hop! #fallwinter2020clh

Dear Santa!


Hi Everyone! I’m participating in the 2020 Cat Lovers Blog Hop (#2020CatLoversHop) this year.

This is my third year joining the fun event. For six years, Her Peaceful Garden has been sponsoring The Cat Lover’s Blog Hop and it is a lot of fun.

Here is a third Christmas card that I have created for the hop using Christmas Kitten – GSD617 (Gerda Steiner Designs) for the main image and sentiment. These little kittens are getting into all kinds of trouble. It reminds me so much of when I had my little fur babies. LOL!

To make my card, I started with a base of 5.5″ x 4.25″. I cut some Copic Marker X-Press It Blending Card the same size and stamped on the fun images. Copic markers were used to colour the images in. Once this was done, I stamped the sentiments using Versa Fine – Onyx Black and applied Ranger – Clear Super Fine Detail embossing powder which I heat set with Marvy Uchida – Embossing Heat Tool.  I adhered the completed image to the base using double-sided tape. To finish off the card, I used some Clear – Wink of Stella to add a little bit of sparkle to all of the baubles and Stickles – Diamond for the hats.

THANK YOU so much to Her Peaceful Garden for hosting this event again this year and also a big THANK YOU to Gerda Steiner Designs for being a sponsor this year as well.

Card Recipe:

Stamp and Sentiment:  Christmas Kitten – GSD617 (Gerda Steiner Designs)

Inks: Memento – Tuxedo Black, Versa Fine – Onyx Black, Tim Holtz Distress Inks – Peeled Paint, Tim Holtz Distress Ink – Pine Needles

Paper: Copic Marker X-Press It Blending Card

Embossing Powder: Ranger – Clear Super Fine Detail embossing powder

Tools: MISTI – Most Incredible Stamping Tool, Diamond Stickles, Marvy Uchida – Embossing Heat Tool

Images coloured with Copic Markers:

Kittens: N8, N6, N4, R30, R22, R02, YG09, YG07, YG03, Sakura Glaze – Black for nose and eyes

Hats: BG49, BG18, BG09, BG07, BG05, BG02, R59, R39, R37, R35, C01, C0, Stickles – Diamond

Bobbles: B18, B06, B05, B04, R59, R39, R37, R35, Pental Sunburst Metalic Med Gel Pen, Clear – Wink of Stella

Pine Needles: G09, G07, G05, Tim Holtz Distress Inks – Peeled Paint, Tim Holtz Distress Ink – Pine Needles

Floor and Shadows: E49, E18, E15, E13, E11, C3

Hope you like it and have a fantastic week!

Meowy Christmas!


Hi Everyone! I’m participating in the 2020 Cat Lovers Blog Hop (#2020CatLoversHop) this year.

This is my third year joining the fun event. For six years, Her Peaceful Garden has been sponsoring The Cat Lover’s Blog Hop and it is a lot of fun.


Here is a second Christmas card that I have created for the hop using Deck The Halls – GSD438 (Gerda Steiner Designs) for the main image and sentiment. I have always had black cats, so that is why I mainly colour all cat images in shades of black. LOL!

To make my card, I started with a base of 5.5″ x 4.25″. I cut some Copic Marker X-Press It Blending Card the same sized and stamped on the main image. Copic markers were used to colour the image in. Then I used some Clear – Wink of Stella to add a little bit of sparkle to both of the baubles. For the background, I started with Copic colours BG01 and BG000. Then I blended in Tim Holtz Distress Inks with a sponge dauber working from the inside to the outside. Once this was done, I stamped the sentiment using Versa Fine – Onyx Black and applied Ranger – Clear Super Fine Detail embossing powder which I heat set with Marvy Uchida – Embossing Heat Tool.

The frame was die cut using my Cuttlebug, Crafter’s Companion Luxury Cardstock – Red cardstock and die cut called Hero Arts – Fancy Dies – Christmas Lights Border Fancy. I added some liquid glue onto the back and placed it on top of my finished image. To complete the card, I attached the main image to the base card.

Card Recipe:

Stamp and Sentiment:  Deck The Halls – GSD438 (Gerda Steiner Designs)

Inks: Memento – Tuxedo Black, Versa Fine – Onyx Black, Tim Holtz Distress Inks – Tumbled Glass, Tim Holtz Distress Inks – Broken China, Tim Holtz Distress Ink – Salty Ocean

Paper: Copic Marker X-Press It Blending Card, Crafter’s Companion Luxury Cardstock – Red – 8.5 x 11″

Die Cuts: Hero Arts – Fancy Dies – Christmas Lights Border Fancy – DI786

Embossing Powder: Ranger – Clear Super Fine Detail embossing powder

Tools: MISTI – Most Incredible Stamping Tool, Cuttlebug, 3M VHB – 2 sided tape, Diamond Stickles, Marvy Uchida – Embossing Heat Tool

Images coloured with Copic Markers:

Kitten: N8, N6, N4, R30, R22, Sakura Glaze – Black for nose and eyes

Lights: B69, B16, B12, BG01, Y35, Y15, Y11, Y08, R37, R35, R30, R22, YG09, YG05, YG01, G09, 100, Colorless Blender

Bobbles: BG09, BG07, BG05, R59, R39, R37, R35, Pental Sunburst Metalic Med Gel Pen, Clear – Wink of Stella

Background: BG01, BG000, Tim Holtz Distress Inks – Tumbled Glass, Tim Holtz Distress Inks – Broken China, Tim Holtz Distress Ink – Salty Ocean

Hope you like it and have a fantastic week!

Define Naughty!


Hi Everyone! I’m participating in the 2020 Cat Lovers Blog Hop (#2020CatLoversHop) this year.

This is my third year joining the fun event. For six years, Her Peaceful Garden has been sponsoring The Cat Lover’s Blog Hop and it is a lot of fun.

This year, I created a Christmas card using  Callie Christmas Kitty – R096 (High Hopes Rubber Stamps) for the main image and Define Naughty – FLL004 (High Hopes Rubber Stamps) for the sentiment. I just love this adorable stamp and it reminds me so much of how my cats used to love playing with the Christmas tree ornaments every year. We definitely learned our lesson after the first time, 2 of our little babes as kittens decided it would be fun to take down the entire tree. After that happened, all ornaments put on the tree were unbreakable and cat friendly. LOL!

To make my card, I started with a base of 6″ x 6″. I cut some Recollections – Cranberry cardstock to the same size and attached it directly to the base. For the main background, I used my Cuttlebug and Creative Expression Craft Dies by Sue Wilson – Noble Dies – Double Pierced Squares – Set B to die cut Recollections – Christmas Pets paper. I inked around all of the edges with Tim Holtz Distress Ink – Weathered Wood and applied it to the base using 2-sided tape.

For smaller background Recollections – Cranberry cardstock was used and Copic Marker X-Press It Blending Card paper for the main image. I used My Creative Time – Rectangle Frame Dies and My Creative Time – Rectangle Frame Layers die cuts. Copic Markers were used for the main image. Once the image was coloured, I stamped the sentiment using Versa Fine – Onyx Black and applied Ranger – Clear Super Fine Detail embossing powder which I heat set with Marvy Uchida – Embossing Heat Tool.

To complete the card, I attached the main image to the red backing with 2-sided tape. Then I popped up the small background with 3M VHB – 2 sided tape. I applied Diamond Stickles all around the frame of the image and added a little green bow and some pop-dots to finish off the card.

Card Recipe:

Stamp:  Callie Christmas Kitty – R096 (High Hopes Rubber Stamps)

Sentiment Background: Define Naughty – FLL004 (High Hopes Rubber Stamps)

Inks: Memento – Tuxedo Black, Tim Holtz Distress Ink – Weathered Wood, Versa Fine – Onyx Black

Paper: Copic Marker X-Press It Blending Card, Recollections – Christmas Pets, Recollections – Cranberry cardstock

Die Cuts: My Creative Time – Rectangle Frame Dies, My Creative Time – Rectangle Frame Layers, Creative Expression Craft Dies by Sue Wilson – Noble Dies – Double Pierced Squares – Set B

Embossing Powder: Ranger – Clear Super Fine Detail embossing powder

Tools: MISTI – Most Incredible Stamping Tool, Cuttlebug, 3M VHB – 2 sided tape, Diamond Stickles, Marvy Uchida – Embossing Heat Tool

Images coloured with Copic Markers:

Kitten: C7, C5, C4, C3, RV02, Sakura Glaze – Black

Tree Branches: G29, G28, YG95,

Bobbles: B06, B05, B02, RV19, RV17, RV02, RV000, Gelly Roll Stardust – Clear

Candy Canes: R59, R39, R37, R35, C1, C0, Colorless Blender

Background: BG72

Hope you like it and have a fantastic week!