Tag Archive | Die-Namics MFT-489 PCD Fishtail Figs STX

Book Worm!!


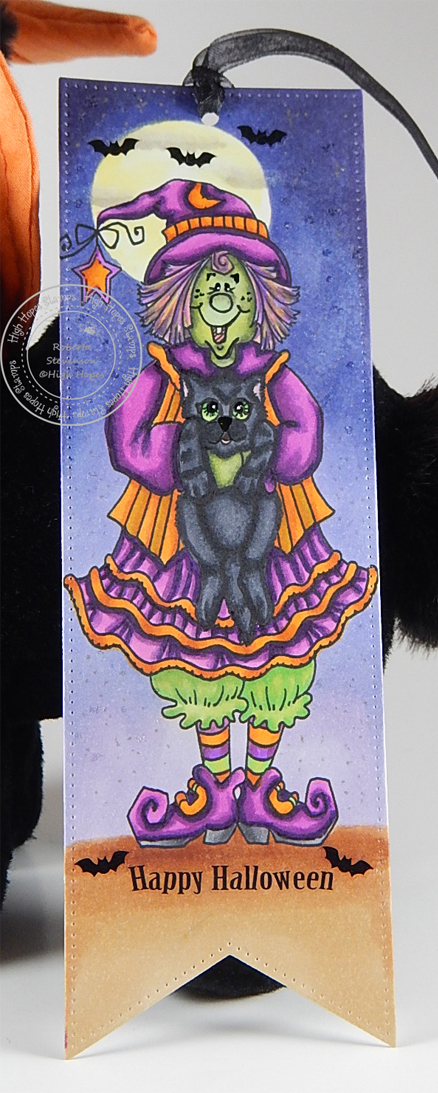
It’s Wednesday, and this week, I couldn’t resist making this very easy bookmark using High Hopes Rubber Stamps Book Worm – P100 for the image. My husband I both love to read and with this adorable image, it is quick to create multiple bookmarks quickly. They would also be a great gift for the readers in your life too!

To make my bookmark this week, I stamped the main image onto Copic Marker X-Press It Blending Card cardstock using my MISTI and Memento – Tuxedo Black ink. I coloured in the image and I wanted the eyes to stand out. I added in a small line with a Pigma Micron #5 – Black pen and then added some colour to the eyes. To finish the eyes,  I added a little dot of white using a Gelly Roll Sakura #8 Pen. The image was then fussy cut with a small white border all around it. Crafts – Designer Paper – 02-3093268 was die cut using Die-Namics MFT-489 PCD Fishtail Figs STX and my Anna Griffin Empress Mini Machine. I punched a hole using We R Memory Keepers Crop-A-Dile Eyelet and Snap Punch at the top of the bookmark. We R Memory Keepers Embellishment Makers Basic Tools-Tassel Loom was used to create the tassel along with 3 yards of twine and then 2 6″ pieces of twine.  I wanted the image to lay flat on the bookmark, so I ran it through my Xyron Create a Sticker and then applied it to the die cut. I tied a knot in the twine to join the tassel to the book mark and then added some Ranger Inkssentials – Glossy Accents to the glass lenses to finish it off.

Card Recipe:

Stamp: Book Worm – P100 (High Hopes Rubber Stamps)

Ink: Memento – Tuxedo Black

Paper: Copic Marker X-Press It Blending Card, Hammermill – Premium Colour 100 lb., Crafts – Designer Paper – 02-3093268 (6″ x 6″)

Die Cuts: Die-Namics MFT-489 PCD Fishtail Figs STX

Tools: MISTI – Most Incredible Stamping Tool, Xyron Create a Sticker, Gelly Roll Sakura #8 Pen, Ranger Inkssentials – Glossy Accents, Pigma Micron #5 – Black, Anna Griffin Empress Mini Machine, We R Memory Keepers Crop-A-Dile Eyelet and Snap Punch, We R Memory Keepers Embellishment Makers Basic Tools-Tassel Loom

Image coloured with Copic Markers:

Worm: YG23, YG11, YG09, R20, R30

Eyes: C1, C0, E25, E23, Y17, W9, Gelly Roll Sakura #8 Pen, Pigma Micron #5 – Black

Glasses and Bow Tie: BV29, BV25, BV23, Ranger Inkssentials – Glossy Accents for the lenses

Book: BV25, BV23, V000

Hope you like it and have a fantastic week!

Check out more adorable images at High Hopes Rubber Stamps!

You can find lots of inspiration from the Design Team Divas at the High Hopes blog, and the High Hopes Rubber Stamps Facebook Fan page plus you can also follow us on
Instagram, Twitter and Pinterest.

Love and Cake!


Sharing a birthday card I made today using KLM Digital Design –  Chef Gnome – Cake from the new June 2022 release. This image also comes with 2 more sentiments, “If we are what we eat, well, I’m pretty sweet!” and “If the cake fits, eat it!”. My mom always made our birthdays very special by creating special cake designs every year for each of our birthdays growing up. As a child, I never liked cake, but my mom used to wrap some change into tin foil and hide it in the cake. When all of my friends left, I would take a knife and cut through the cake to get all of the change out to put into my piggy bank. LOL! Unfortunately for me, I developed a sweet tooth when I got older and met my husband who has a really big sweet tooth. Only difference is he manages to keep the weight off. LOL!

I imported the image and sentiment into Microsoft Word and printed them out onto Copic Marker X-Press It Blending Card. The image was coloured in with Copic markers. I added some Wink of Stella – Clear to the icing and then I fussy cut around the coloured image. Using my Anna Griffin Empress Mini Machine and Die-Namics MFT-489 PCD Fishtail Figs STX dies, I die cut the sentiment and also some Aqua cardstock.

The 5.5″ x 4.25″ card base was created using Hammermill – Premium Colour 100 lb. cardsstock. I cut the patterned paper from Echo Parks Paper Co. – Birthday Wishes to the size of 5.5″ x 3.5″ and attached it to the centre of the base using double-sided tape. Two .5″ strips were cut from Yellow Cardstock and then put through my Xyron with one strip attached at the top and one strip on the bottom of the card. The Aqua die cut was added to the right side using double-sided tape. Tim Holtz Distress Ink – Mustard Seed was used to ink around all of the edges of the card. I applied U-Line double-sided tape to the image and the sentiment and popped them both up onto the background. YNS Gumdrops – Celebration Sparkly Gumdrops were added to the top and bottom strips. Lastly, to finish off my card, I ran Art Impresisons – 5335 – Kitchen Mini Dies through the Anna Griffin Empress Mini die cutting machine using Crafter’s Companion Luxury Cardstock – Silver. I ran the 2 pieces through my Xyron Create a Sticker and attached them both to the sentiment tag.

Card Recipe:

Stamp and Sentiment:  Chef Gnome – Cake – KLM Digital Designs

Inks: HP Printer Grayscale, Tim Holtz Distress Ink – Mustard Seed

Paper: Copic Marker X-Press It Blending Card, Hammermill – Premium Colour 100 lb., Echo Parks Paper Co. – Birthday Wishes by Alisha Gordon – 6″ x 6″ Paper Pads, Crafter’s Companion Luxury Cardstock – Silver – 8.5 x 11″, Aqua and Yellow cardstock

Dies: Art Impresisons – 5335 – Kitchen Mini Dies, Die-Namics MFT-489 PCD Fishtail Figs STX

Miscellaneous: U-Line – 2 sided tape, YNS Gumdrops – Celebration Sparkly Gumdrops, Wink of Stella – Clear, Anna Griffin Empress Mini Machine, Xyron Create a Sticker

Image coloured with Copic Markers:

Skin: E21, E11, E00, E000

Beard: E47, E44, E43, E41

Hat and Chef’s Outfit: BV20, C1, C00, Colorless Blender

Shoes: E29, E27, E25, E23, E21

Cake, Icing and Tray: E29, E27, E25, E23, Y19, Y17, Y13, C5, C3, C1

Hope you like it and have a great week!

You can find more cards to inspire you at KLM Designs, KLM Digital Design Team and KLM Digital Designs on the Facebook Fan page from the rest of our design team.

More Bubbles!


It’s Wednesday, and this week, I made a fun card using  Burts Bath – R103 (High Hopes Rubber Stamps) for the main image and Filled With Bubbles – H119 (High Hopes Rubber Stamps) for the sentiment. Burt sure looks happy as he’s letting all of his troubles float away! LOL!

To make my card this week, I used Hammermill – Premium Colour 100 lb. cardstock for my base folded at 5.5″ x 4.25″. For the main background, I used Doodlebug Design Inc. – Under The Sea paper cut to the same size as the base and attached it using double-sided tape. Tim Holtz Distress Ink – Picked Raspberry was used to ink around all of the edges. Whimsy Stamps – Slimline Pillows Die was used to cut out the shape for the sentiment and Die-Namics My Favourite Things – PCD Fishtail Figs STX for the flag behind the sentiment. I inked around the edges of the sentiment die cut with Copic Marker – BV04 to frame it. Tim Holtz Distress Inks – Peacock Feathers was used to ink around the edges of the flag. Avery Elle – Wonky Stitches Die was used to die cut Copic Marker X-Press It Blending Card.

I stamped the image and sentiment using Memento – Tuxedo Black using my MISTI and coloured in the image using Copic markers. I added 3M VHB – 2 sided tape to the back of the coloured image and attached it to the base card. I ran the flag through my Xyron Create a Sticker as I wanted it to lay completely flat against the background. I attached this to the base and then added 3M VHB – 2 sided tape to the back of the sentiment and attached it over top of the flag and the base. To complete the card, I added a few bubble embellishments from The Robin’s Nest – Peony using Ranger Glossy Accents.

Card Recipe:

Stamp: Burts Bath – R103 (High Hopes Rubber Stamps)

Sentiment Background: Filled With Bubbles – H119 (High Hopes Rubber Stamps)

Inks: Memento – Tuxedo Black, Tim Holtz Distress Inks – Peacock Feathers, Tim Holtz Distress Ink – Picked Raspberry

Paper: Copic Marker X-Press It Blending Card, Doodlebug Design Inc. – Under The Sea – 6″x6″, Hammermill – Premium Colour 100 lb.

Die Cuts: Avery Elle – Wonky Stitches Die – D-04-11, Whimsy Stamps – Slimline Pillows Die – WSD473, My Creative Time – Rectangle Frame Dies, Die-Namics MFT-489 PCD Fishtail Figs STX

Tools: MISTI – Most Incredible Stamping Tool, Cuttlebug, 3M VHB – 2 sided tape, Xyron Create a Sticker, Ranger Glossy Accents, The Robin’s Nest – Peony – dd-8

Images coloured with Copic Markers:

Duck: Y19, Y18, Y15, Y13, Y08, YR16, YR14, YR12, YR07

Brush: E59, E39, E35, E31, Copic Multiliner – Sepia – 0.1

Hat: BG15, BG13, BG11, BV04, BV02, BV00, RV04, RV02, RV000, Y17

Bird Bath: C7, C5, C3, C2, C1, C0

Bubbles: BG15, BG13, BG11, BG10, BV04, BV02, BV00, BV0000, RV02, RV00, RV000, Y11, Y000, Y0000

Grass: YG13, YG11, YG03, YG01

Sky: B02, B01, B00, B000

Wonky Border: BV04, BV02, BG15

Hope you like it and have a fantastic week!

You can find lots of inspiration from the Design Team Divas at the High Hopes blog, and the High Hopes Rubber Stamps Facebook Fan page plus you can also follow us on
Instagram, Twitter and Pinterest.

Grad Nurse!!


My niece graduated last year to become a Registered Nurse. We are so proud of her. She has joined several of my cousins in this profession who are also Nurses and Nurse Practitioners. I made her this card to congratulate her using Cute Nurses from The Paper Shelter and Proud Nurse Set – 4899 (Art Impressions)

I stamped the image of the nurse on the right and inside of the card onto Copic Marker X-Press It Blending Card using my MISTI and Memento Tuxedo Black Ink. For the nurse on the left, I printed the image out on my printer using High Quality Grayscale.  I coloured in the images with Copic markers and then fussy cut around them. I wanted the images on the front of the card to pop, so I ran them through my Xyron Creative Station and attached them to black cardstock. Then I fussy cut around them again. I stamped the sentiment on the inside of the card using Versa Fine – Onyx Black. This was embossed using Ranger – Clear Super Fine Detail embossing powder and my Marvy Uchida – Embossing Heat Tool. The sentiment on the front was printed on my printer, using digital stamp from Graduation Gnome With Diploma (KLM Digital Designs). Then it was die cut using Die-Namics MFT-489 PCD Fishtail Figs STX.

For the inside of the card, I couldn’t resist using this fun image from Proud Nurse Set – 4899 (Art Impressions), because I know especially today, nurses are working really long hours. My niece said the sentiment and was so true when she received her card. LOL! We have to give all of the front-line workers credit for all of the hard work they are doing during these Covid times.

I used Hammermill paper to create the base shape of the card 5.5″ x 4.25″. I cut the background paper from Polkadoodles – Winnie Celebrations 1 – Top Banana Kit to the same size and inked around the edges using Tim Holtz Distress Inks – Peacock Feathers. For the sentiment on the front, I inked around the edges using Tim Holtz Distress Ink – Blueprint Sketch. I popped up images and sentiment with 3M VHB – 2 sided tape. On the inside of the card, I ran the coloured image through my Xyron Creative Station and attached it.

Card Recipe:

Stamps: Cute Nurses (The Paper Shelter), Proud Nurse Set – 4899 (Art Impressions)

Sentiments: Proud Nurse Set – 4899 (Art Impressions), Graduation Gnome With Diploma (KLM Digital Designs)

Inks: Memento – Tuxedo Black, Versa Fine – Onyx Black, Tim Holtz Distress Ink – Blueprint Sketch, Tim Holtz Distress Inks – Peacock Feathers. HP Printer High Quality Grayscale

Paper: Copic Marker X-Press It Blending Card, Hammermill – Premium Colour 100 lb., Polkadoodles – Winnie Celebrations 1 – Top Banana Kit

Embossing Powder: Ranger – Clear Super Fine Detail embossing powder

Die Cut: Die-Namics MFT-489 PCD Fishtail Figs STX

Tools: 3M VHB – 2 sided tape, Xyron Creative Station, Marvy Uchida – Embossing Heat Tool

Image coloured with Copic Markers:

Skin: E000, E00, E04, E11, E22, R22, R20

Hair: E18, E08, YR18, YR14, E47, E44, E43

Eyes: B05, B02, B01

Hat and Outfits: B29, B28, B26, B24, B23, BG49, BG15, BG13, BG11

Cross on Hat: R39, R37, R35

Shoes: B41, B21, B14, B12

Tray and Items: BG34, BG32, R89, R85, R83, R81, E44, E43, E42, E41, E51, E50, BV20

Table and Chairs: E42, E41, E40, C5, C3, C1

Coffee Mugs and Coffee: B05, B04, B02, E57, E55, E53

Stethoscopes: R39, R37, R25, 100 – Black, C3, C1

Shadow: T3, T2, T1


Hope you like it and have a great week!

Greatest Fisherman


It’s Wednesday, and this week, I used Norman – Q038 (High Hopes Rubber Stamps) for the main image and Worlds Greatest Fisherman – H159 (High Hopes Rubber Stamps) for the sentiment. Norman is very happy today as he caught a magnificent Lobster. My dad LOVES fishing and can’t wait to go fishing again. Hopefully, that time will come soon and then he’ll be smiling just like Norman with his big catch of the day!

To make my card this week, I started off with a card base of 5.5″ x 4.25″. I used Belle Blvd – Secrets of the Sea paper for the main background.

I stamped the image onto Copic Marker X-Press It Blending Card and then die cut it with my Cuttlebug and My Creative Time – More Stitched Circles. I cut a slightly larger circle out of Orange cardstock with Lifestyle Crafts Cutting Dies – Nesting Circles and glued it down on top of the background paper. I coloured in the background using a variety of Copic Refill inks, Colorless Blender and a Q-Tip which I used to apply the colours. For the water, I wisped several colours back and forth and then added some Copic Colorless Blender and wisped the colours one last time. Lastly, I added some white caps by dabbing Sharpie Water Based Paint – White – Extra Fine Point onto the surface. I completed colouring in the rest of the image with Copic markers and then popped it and the sentiment using 3M VHB – 2 sided tape. The sentiment was die cut with Die-Namics MFT-489 PCD Fishtail Figs STX.

Card Recipe:

Stamp:  Norman – Q038  (High Hopes Rubber Stamps)

Sentiment: Worlds Greatest Fisherman – H159 (High Hopes Rubber Stamps)

Inks: Memento – Tuxedo Black,

Paper: Copic Marker X-Press It Blending Card, Belle Blvd – Secrets of the Sea – 6″x8″, Orange Cardstock

Die Cuts: My Creative Time – More Stitched Circles, Die-Namics MFT-489 PCD Fishtail Figs STX, Lifestyle Crafts Cutting Dies – Nesting Circles

Tools: MISTI – Most Incredible Stamping Tool, Cuttlebug, 3M VHB – 2 sided tape

Image coloured with Copic Markers:

Skin: E21, E11, E04, E00, E000, R22, R20

Hair: C10, C8, C3, PrismaColor  Premier Pencils Black and White

Coat, Pants and Hat: Y17, Y15, Y13, Y11, C3

Hoody: B26, B23, B21

Shirt: G99, G85, G82

Boots: C10, C8, C5, C4, C3

Lobster: R17, YR18, YR09, YR04

Water: BG72, BG70, B93, B91, B52, B41, B000, C3, Colorless Blender, Q-Tip, Sharpie Water Based Paint – White – Extra Fine Point

Used Copic Refills and Q-Tip to Create Background:

Sand: E30, E31, Colorless Blender

Sky: B0000, B000, Colorless Blender

Hope you like it and have a fantastic week!

You can find lots of inspiration from the Design Team Divas at the High Hopes blog, and the High Hopes Rubber Stamps Facebook Fan page plus you can also follow us on
Instagram, Twitter and Pinterest.

Check out the High Hopes Website for something else to give you a big smile!

Over on the High Hopes Website there is a Store Wide sale, save 20% off right now when you use the coupon Code Love at the checkout!


Witchy Poo Hallowe’en


Welcome High Hopes Rubber Stamps Fans!

It’s Wednesday, and this month at High Hopes Rubber Stamps we are celebrating Hallowe’en.  This week, I used Witchy Poo with Kitty S145 (High Hopes Rubber Stamps) and decided she would make a great bookmark. Witchy Poo is all dressed up in her finest and ready for all of the little trick or treaters coming to visit. Kitty wasn’t overly excited but he’ll be participating too! LOL!

I decided to make it a spooky night sky for the background and added in stars with some Glitter Ink and Hologaphic Embossing. I also drew in the moon and clouds.

Lastly, to finish it off, I used some rub-ons that I had in my craft stash.

Card Recipe:

Stamp: Witchy Poo with Kitty S145 (High Hopes Rubber Stamps)

Sentiment: (High Hopes Rubber Stamps)

Inks: Memento – Tuxedo Black

Paper: Copic Marker X-Press It Blending Card

Die Cut: Die-Namics MFT-489 PCD Fishtail Figs STX

Tools: MISTI – Most Incredible Stamping Tool, Cuttlebug

Image coloured with Copic Markers:

Skin: BG96, BG93, BG90, YG23, G40

Hair: V17, RV04, YG23, YR02, RV93

Hat and Dress: V09, V06, V04, YR18, YR15

Pantaloons: YG09, YG07, YG03

Socks: V06, V04, YR18, YR15, YG07, YG03

Shoes: V09, V06, V04, N4, N6

Cat: C10, C8, C6, C5

Night Sky: BV08, BV04, BV02, BV00, VersaMarker, Ranger Holographic Embossing Powder, Stardust Clear Glittering Gel Ink

Moon: Y000, Y11

Clouds: W3, W1, W00

Ground: E39, E33, E31


Hope you like it and have a spooktacular week!

You can find lots of inspiration from the Design Team Divas at the High Hopes blog, and the High Hopes Rubber Stamps Facebook Fan page plus you can also follow us on
Instagram, Twitter and Pinterest.


Purrr-Fect Day!


Hi There!

Sharing a birthday card that I made using shades of blue.


Stamped image onto Copic Marker X-Press It Blending Card using Memento – Tuxedo Black ink.

Sentiments stamped with Versa Fine – Onyx Black and then embossed with Ranger – Clear Super Fine Detail embossing powder.

Used MISTI – Most Incredible Stamping Tool to get nice clean lines for image and sentiments.

Stamp and Sentiments: Your Next Stamp – Party Pets – CYNS586

Background Paper: Echo Parks Paper Co. – Birthday Wishes by Alisha Gordon – 6″ x 6″ Paper Pads

Die Cut: Die-Namics MFT-489 PCD Fishtail Figs STX

Hope you like it!

Entered into Your Next Stamp Challenges.

http://yournextstamp.com/blog/sketch-and-color-challenge-89-more-inspiration/

YNS Facebook “Challenge 89”

SplitcoastStampers Gallery “your next stamp” and “ynschallenge89”

Tweetie Pie 2 – Bookmark


Sharing another bookmark that I made with Kraftin’ Kimmies – Tweetie Pie Stamp.

My friends always called me Birdie growing up, so I knew I had to make this.

Coloured in with Copic markers. Stamped image using my MISTI – Most Incredible Stamping Tool, Memento – Tuxedo Black and Copic Marker X-Press It Blending Card. Sentiment: Versa Fine – Onyx Black and Ranger – Clear Super Fine Detail embossing powder. Edging: Tim Holtz Distress Ink – Salty Ocean

Die Cut – Die-Namics MFT-489 PCD Fishtail Figs STX

Hope you like it!

Entered into http://kraftinkimmiestamps.blogspot.ca/2018/03/march-skrappy-challenge.html

Tweetie Pie1


Hi There!

Sharing a bookmark that I made with Kraftin’ Kimmies Tweetie Pie Stamp.

My friends always called me Birdie growing up, so I knew I had to make this.


Coloured in with Copic markers. Stamped image using my MISTI – Most Incredible Stamping Tool, Memento – Tuxedo Black and Copic Marker X-Press It Blending Card. Edging: Tim Holtz Distress Ink – Salty Ocean

Die Cut: Die-Namics MFT-489 PCD Fishtail Figs STX

Hope you like it!

Entered into http://kraftinkimmiestamps.blogspot.ca/2018/03/march-skrappy-challenge.html