Archive | December 18, 2021

Grocery Gnomes!!


Sharing a card I made today using KLM Digital Design –  Grocery Gnome – Boy and Grocery Gnome – Girl from the new December release. I love these images as they are great for creating a card for our unspoken heroes who serve us everyday at the grocery stores.

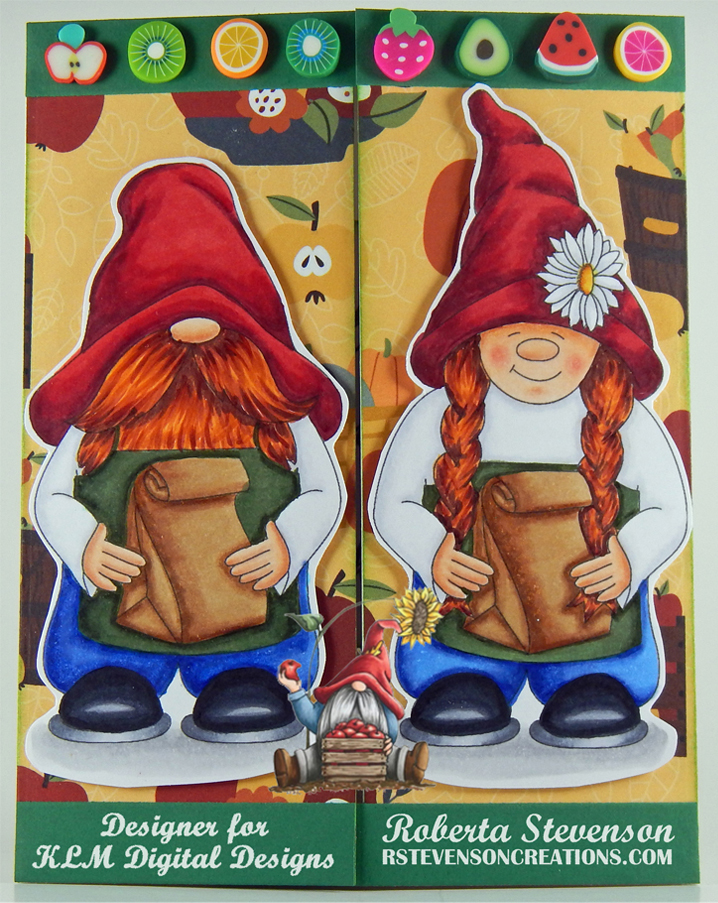
I created the base using Hammermill – Premium Colour 100 lb. cardstock. I cut the paper to the size of 5.5″ x 8.5″. Then I scored each side at 2-1/8″ each and folded them towards the centre. I die cut Photo-Play Autumn Greetings – Fruit Baskets paper using my Cuttlebug and My Creative Time – Rectangle Frame Dies. This die cuts the paper to exactly 5.5″ x 4.25″. I then cut this piece into 2 using my cutter to create 2 equal pieces of 2-1/8″. Tim Holtz Distress Inks – Peeled Paint was used to ink around the edges of the 2 pieces. I applied these directly to the 2 front panels using liquid glue. I wanted to be able to keep the fronts closed, so I used my Cuttlebug and Pink Fresh Dies – Slim Stripes to die cut some green cardstock. I applied 1 longer piece to the left side at the top, 1 long piece to the bottom on the right side using liquid glue. Then I added a stripe on the remaining sides top and bottom with liquid glue to the length of 2-1/8″. On the inside of the card, I applied some 1/8″ tape to a small piece of the green stripes, cut at .5″ x .5″. This allows the longer flaps to slide into them to keep the card closed.

I imported the images and sentiment into Microsoft Word and printed them out onto Copic Marker X-Press It Blending Card. The images were coloured in with Copic markers and then fussy cut with scissors. U-Line double sided tape was applied to the backs of the images and they were popped up onto the card. Finally to finish it off, I applied small embellishments from Dress My Craft – Fruit Salad Slices with liquid glue across the top of the card.

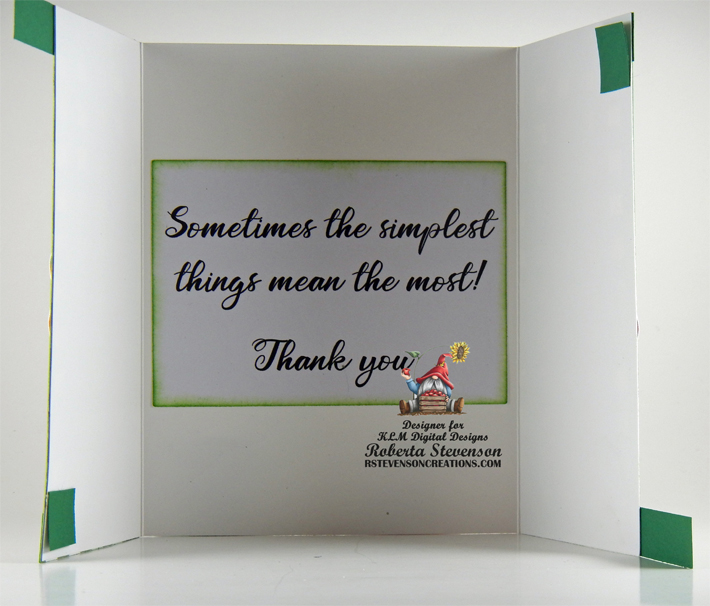
The sentiment was die cut using My Creative Time – Rectangle Frame Dies and my Cuttlebug. Tim Holtz Distress Inks – Peeled Paint was used to ink around the edges and double-sided tape was used to adhere it to the inside of the card.

Card Recipe:

Stamp and Sentiment: Grocery Gnome – Boy – KLM Digital Designs, Grocery Gnome – Girl – KLM Digital Designs

Inks: HP Printer Grayscale, Tim Holtz Distress Inks – Peeled Paint

Paper: Copic Marker X-Press It Blending Card, Hammermill – Premium Colour 100 lb., Photo-Play Autumn Greetings – Fruit Baskets (12″ x 12″), Green Cardstock

Die Cuts: My Creative Time – Rectangle Frame Dies, Pink Fresh Dies – Slim Stripes

Miscellaneous: U-Line – 2 sided tape, Dress My Craft – Fruit Salad Slices, Cuttlebug

Image coloured with Copic Markers:

Skin: E21, E11, E04, E00, E000, R30, R20

Hair: E18, E08, YR18, YR14

Hats: R59, R39, R37, R35

Shirts B60, C1, C00, Colorless Blender

Pants: B26, B23, B21

Shoes: C9, C7, C5, C3, C1

Aprons: G99, G94, G85

Bags: E35, E34, E31

Hope you like it and have a great week!

You can find more cards to inspire you at KLM Designs, KLM Digital Design Team and KLM Digital Designs on the Facebook Fan page from the rest of our design team.

Owl Christmas!!


Sharing a Christmas card I made today using Gerda Steiner DesignsOwl I Want For Christmas. THANK YOU SO MUCH Gerda Steiner for giving me the opportunity to win this super adorable stamp from playing your amazing Advent Calendar this year. This was one of the prizes for door #7. I couldn’t wait to create this card with it.

To make the card, I created the base using Hammermill – Premium Colour 100 lb. to the size of 5.5″ x 4.25″. I cut Creative Memories – Glacier Designer Paper to be the same size as the base and adhered it to the card using double-sided tape. Tim Holtz Distress Ink – Chipped Sapphire was used to ink around all of the edges of the card. The image was imported into Microsoft Word and printed out onto Copic Marker X-Press It Blending Card. Using my Cuttlebug and dies from Creative Expressions Craft Dies by Sue Wilson – Festive Collection – Holly Lattice Frame, I die cut the printed image and also golden background frame using Crafter’s Companion – Luxury Cardstock – Gold paper.

I coloured in the image with Copic markers and also added in the tree trunk. Using a Gelly Roll Sakura #10 Pen, I added snow to the sky, along the branches of the tree and on top of the pine cones. Cosmic Shimmer Fluffy Stuff combined with WOW! Embossing Glitter – White Puff Twinkle were added to the hat and pompom and then heated with a Marvy Uchida – Embossing Heat Tool to make it puff up. U-Line double-sided tape was applied to backs of the image and the gold die cut and both were popped up onto the background. Finally, I added some Stickles – Diamond over top of the snow I created on the tree trunk and pine cones.

For the sentiment, I used a Recollections 1″ circle punch to cut some green cardstock and then using my MISTI, I stamped the sentiment from Penguin Party – Lawn Fawn with VersaFine ink. I added Ranger Embossing Powder White – Extra Fine Detail and heat embossed it with my Marvy Uchida – Embossing Heat Tool. I inked around the edges of the circle with Tim Holtz Distress Ink – Pine Needles. This was popped up with U-Line double-sided tape and I added the embellishment from Recollections – Snowflake Specialty Polyester Glitter. To create the pine cone and pine needles, I used some scraps of brown and green paper and using my Cuttlebug, I die cut the shapes using Sizzix – Tim Holtz – Festive Greens 662425. I used glue to adhere the pieces together and then popped up the completed piece onto the card using U-Line double sided tape.

Card Recipe:

Stamp and sentiment: Owl I Want For Christmas – Gerda Steiner Designs

Stamp and sentiment: Penguin Party – Lawn Fawn

Inks: HP Printer Grayscale, Tim Holtz Distress Ink – Pine Needles, Tim Holtz Distress Ink – Chipped Sapphire

Die Cuts: Sizzix – Tim Holtz – Festive Greens 662425, Creative Expressions Craft Dies by Sue Wilson – Festive Collection – Holly Lattice Frame – CED3125, Recollections 1″ Circle Punch

Paper: Copic Marker X-Press It Blending Card, Hammermill – Premium Colour 100 lb., Creative Memories – Glacier Designer Paper Pack 12 x 12″, Crafter’s Companion – Luxury Cardstock – Gold

Embossing Powder \ Liquid: WOW! Embossing Glitter – White Puff Twinkle, Cosmic Shimmer Fluffy Stuff, Ranger Embossing Powder White – Extra Fine Detail

Miscellaneous: MISTI – Most Incredible Stamping Tool, Marvy Uchida – Embossing Heat Tool, Gelly Roll Sakura #10 Pen, Recollections – Snowflake Specialty Polyester Glitter

Image coloured with Copic Markers:

Owl: E47, E44, E43, YR24, Y38, Y35, Y32, Y23, C9

Hat: R59, R37, R35

Sweater: R59, R37, R35, BG09, BG05, BG02, BG1

Tree, Limb and Pine Cones: E49, E47, E42, E40, E29, E27, E25, E23, G29

Ornaments: R59, R37, R35, R22, BG09, BG05, BG02, BG1, BG000, Y38, Y35, Y32

Sky: B99, B97, B95, B93

Hope you like it and have a great week!

You can find more cards to inspire you at KLM Designs, KLM Digital Design Team and KLM Digital Designs on the Facebook Fan page from the rest of our design team.