Tag Archive | WOW! Embossing Glitter – White Puff Twinkle

Owl Christmas!!


Sharing a Christmas card I made today using Gerda Steiner DesignsOwl I Want For Christmas. THANK YOU SO MUCH Gerda Steiner for giving me the opportunity to win this super adorable stamp from playing your amazing Advent Calendar this year. This was one of the prizes for door #7. I couldn’t wait to create this card with it.

To make the card, I created the base using Hammermill – Premium Colour 100 lb. to the size of 5.5″ x 4.25″. I cut Creative Memories – Glacier Designer Paper to be the same size as the base and adhered it to the card using double-sided tape. Tim Holtz Distress Ink – Chipped Sapphire was used to ink around all of the edges of the card. The image was imported into Microsoft Word and printed out onto Copic Marker X-Press It Blending Card. Using my Cuttlebug and dies from Creative Expressions Craft Dies by Sue Wilson – Festive Collection – Holly Lattice Frame, I die cut the printed image and also golden background frame using Crafter’s Companion – Luxury Cardstock – Gold paper.

I coloured in the image with Copic markers and also added in the tree trunk. Using a Gelly Roll Sakura #10 Pen, I added snow to the sky, along the branches of the tree and on top of the pine cones. Cosmic Shimmer Fluffy Stuff combined with WOW! Embossing Glitter – White Puff Twinkle were added to the hat and pompom and then heated with a Marvy Uchida – Embossing Heat Tool to make it puff up. U-Line double-sided tape was applied to backs of the image and the gold die cut and both were popped up onto the background. Finally, I added some Stickles – Diamond over top of the snow I created on the tree trunk and pine cones.

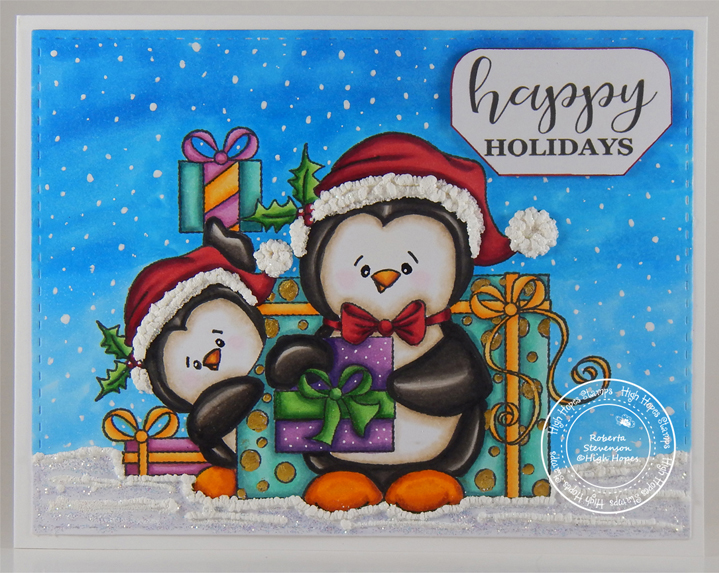
For the sentiment, I used a Recollections 1″ circle punch to cut some green cardstock and then using my MISTI, I stamped the sentiment from Penguin Party – Lawn Fawn with VersaFine ink. I added Ranger Embossing Powder White – Extra Fine Detail and heat embossed it with my Marvy Uchida – Embossing Heat Tool. I inked around the edges of the circle with Tim Holtz Distress Ink – Pine Needles. This was popped up with U-Line double-sided tape and I added the embellishment from Recollections – Snowflake Specialty Polyester Glitter. To create the pine cone and pine needles, I used some scraps of brown and green paper and using my Cuttlebug, I die cut the shapes using Sizzix – Tim Holtz – Festive Greens 662425. I used glue to adhere the pieces together and then popped up the completed piece onto the card using U-Line double sided tape.

Card Recipe:

Stamp and sentiment: Owl I Want For Christmas – Gerda Steiner Designs

Stamp and sentiment: Penguin Party – Lawn Fawn

Inks: HP Printer Grayscale, Tim Holtz Distress Ink – Pine Needles, Tim Holtz Distress Ink – Chipped Sapphire

Die Cuts: Sizzix – Tim Holtz – Festive Greens 662425, Creative Expressions Craft Dies by Sue Wilson – Festive Collection – Holly Lattice Frame – CED3125, Recollections 1″ Circle Punch

Paper: Copic Marker X-Press It Blending Card, Hammermill – Premium Colour 100 lb., Creative Memories – Glacier Designer Paper Pack 12 x 12″, Crafter’s Companion – Luxury Cardstock – Gold

Embossing Powder \ Liquid: WOW! Embossing Glitter – White Puff Twinkle, Cosmic Shimmer Fluffy Stuff, Ranger Embossing Powder White – Extra Fine Detail

Miscellaneous: MISTI – Most Incredible Stamping Tool, Marvy Uchida – Embossing Heat Tool, Gelly Roll Sakura #10 Pen, Recollections – Snowflake Specialty Polyester Glitter

Image coloured with Copic Markers:

Owl: E47, E44, E43, YR24, Y38, Y35, Y32, Y23, C9

Hat: R59, R37, R35

Sweater: R59, R37, R35, BG09, BG05, BG02, BG1

Tree, Limb and Pine Cones: E49, E47, E42, E40, E29, E27, E25, E23, G29

Ornaments: R59, R37, R35, R22, BG09, BG05, BG02, BG1, BG000, Y38, Y35, Y32

Sky: B99, B97, B95, B93

Hope you like it and have a great week!

You can find more cards to inspire you at KLM Designs, KLM Digital Design Team and KLM Digital Designs on the Facebook Fan page from the rest of our design team.

Santa Candy Cane


Today, I’m featuring this adorable Santa image from Conie Fong Art called Holiday Gnomes Bundle By Conie Fong.

For the base card, I used Hammermill – Premium Colour 100 lb. cardstock and cut it and scored it to be 5.5″ x 5.5″. For the background, I cut Craft Smith – Peppermint Twist paper to the same size as the base card and inked around the edges with Tim Holtz Distress Inks – Candied Apple. I adhered this to the base card with double-sided tape. AC – Green cardstock was die cut with my Cuttlebug and Essentials by Tattered Lace Dies – Easel Slider dies. Tim Holtz Distress Inks – Peeled Paint was used to ink around all of the edges and it was popped up onto the base card using U-Line double-sided tape.

The image using HP High Quality Grayscale was printed onto Copic Marker X-Press It Blending Card and die cut using my Cuttlebug and Essentials by Tattered Lace Dies – Easel Slider dies. The image was coloured in with Copic markers and Cosmic Shimmer Fluffy Stuff and WOW! Sparkling Snow Embossing Glitter were added to the brim of the hat and pompom. Ranger – Emboss It Pen Clear was added in parts at the bottom for snow and WOW! Sparkling Snow Embossing Glitter was applied. The hat, pompom and snow were all then heat embossed using my Marvy Uchida – Embossing Heat Tool. Stickles – Crystal was also added to the snow to add a little more sparkle. Lastly, using a Gelly Roll Sakura #10 Pen, I added snow to the background sky. The finished image was popped up onto the green cardstock using U-Line double-sided tape and Kraftin’ Kimmie – Christmas Dots were added to complete the card.

Card Recipe:

Stamp: Holiday Gnomes Bundle by Conie Fong

Inks: HP High Quality Grayscale, Tim Holtz Distress Inks – Candied Apple, Tim Holtz Distress Inks – Peeled Paint

Paper: Copic Marker X-Press It Blending Card, Hammermill – Premium Colour 100 lb., Craft Smith – Peppermint Twist 6×6 in., American Crafts – Green Cardstock

Die Cuts: Essentials by Tattered Lace Dies – Easel Slider

Miscellaneous: U-Line double-sided tape, Stickles – Crystal, Gelly Roll Sakura #10 Pen, Cosmic Shimmer Fluffy Stuff, Marvy Uchida – Embossing Heat Tool

Image coloured with Copic Markers:

Skin: E21, E11, E00, E000, R30, R20

Beard: C2, C1, C0, BV20

Hat and Clothing: R59, R37, R35, WOW! Embossing Glitter – White Puff Twinkle, Cosmic Shimmer Fluffy Stuff, Ranger – Emboss It Pen Clear

Shoes: C9, C7, C5, C3

Candy Cane: C1, C0, C00, Colorless Blender, Spectrum Noir Sparkles – Red Berry, Spectrum Noir Sparkles – Clear

Bow: G14, G07, YG23, YG11

Sky: C7, B99, B97, B95

Snow: B60, C1, Stickles – Diamond, Cosmic Shimmer Fluffy Stuff, WOW! Sparkling Snow Embossing Glitter, Ranger – Emboss It Pen Clear

Hope you like it and have a great week!


Sparkle All The Way!!!


It’s Wednesday, and this week, I made a Christmas card using Snowbear Friends – TDG009 by High Hopes Rubber Stamps for the main image and Sparkle – FDG011 (High Hopes Rubber Stamps) for the sentiment. This month we are celebrating our new Woodland Winter Release at High Hopes Stamps.

To make my card this week, I began with a card base of Hammermill – Premium Colour 100 lb. cardstock, cut and scored to be 5.5″ x 4.25″. I die cut Copic Marker X-Press It Blending Card with my Cuttlebug and My Creative Time – Rectangle Frame Layers. With my MISTI and Memento – Tuxedo Black ink, I stamped the image onto the die cut and the sentiment onto Copic Marker X-Press It Blending Card. I coloured the image in with Copic markers and added in the snow in the sky with Gelly Roll Sakura #10 Pen. I added in the tree decorations using a combination of Nuvo Crystal Drops: Red Berry, Dandelion Yellow and Carribean Dream. Pental Sunburst Metalic Med Gel Pen – Silver and Pental Sunburst Metalic Med Gel Pen – Gold were used to create stripes and colour in circles on the presents. Cosmic Shimmer Fluffy Stuff was applied to the brim of their hats and pom-poms and heat embossed with my Marvy Uchida – Embossing Heat Tool. A little bit of Stickles – Diamond was added onto top of the brims and pompoms to make them sparkly.  I added in the snow on the bottom using a spatula and Nuvo Glimmer Paste – Moonstone and let it dry. Once it was dry, I added in some Cosmic Shimmer Fluffy Stuff to give the snow a little more texture. This too, was heat embossed with my Marvy Uchida – Embossing Heat Tool. I adhered the image to the base card using double-sided tape and Stickles – Diamond was added to the top and side of the sign to complete the card.

Card Recipe:

Stamp: Snowbear Friends – TDG009 (High Hopes Rubber Stamps)

Sentiment: Sparkle – FDG011 (High Hopes Rubber Stamps)

Inks: Memento – Tuxedo Black

Paper: Copic Marker X-Press It Blending Card, Hammermill – Premium Colour 100 lb.

Die Cut: My Creative Time – Rectangle Frame Layers

Nuvo Crystal Drops: Red Berry, Dandelion Yellow, Carribean Dream

Tools: MISTI – Most Incredible Stamping Tool, Marvy Uchida – Embossing Heat Tool, Gelly Roll Sakura #10 Pen, Cosmic Shimmer Fluffy Stuff, Stickles Diamond, Nuvo Glimmer Paste – Moonstone

Image coloured with Copic Markers:

Polar Bears: BV23, BV20, B60, R02, R00, RV00, C9, C7, C5

Hats and Scarves: R59, R46, R37, R35, R14, R08, BG72, BG57, BG32, BG11, BG09, BG05, BG02, BG01, Cosmic Shimmer Fluffy Stuff

Tree: G99, G21, YG67, YG17

Sign: R59, R37, R35, C2, C1, C00

Gifts and Bows: BG72, BG57, BG32, BG11, BG09, BG05, BG02, BG01, R46, R14, R08, E15, Y28, Y26, Y17, Pental Sunburst Metalic Med Gel Pen – Silver, Pental Sunburst Metalic Med Gel Pen – Gold

Sky: B06, B05, B04, B03, B02, B01

Snow: C3, C00, BV20, B000, Nuvo Glimmer Paste – Moonstone, Stickles – Diamond

Hope you like it and have a fantastic week!

You can find lots of inspiration from the Design Team Divas at the High Hopes blog, and the High Hopes Rubber Stamps Facebook Fan page plus you can also follow us on
Instagram, Twitter and Pinterest.

Christmas Penguins!!!


It’s Wednesday, and this week, I made a Christmas card using Christmas Penguins – TDG004 by High Hopes Rubber Stamps for the main image and Happy Holidays – FDG006 (High Hopes Rubber Stamps) for the sentiment. This is just a sneak peek to all of the wonderful images coming soon on Monday, December 6, 2022 as we celebrate our Woodland Winter Release for the month of December at High Hopes Stamps.


To make my card this week, I began with a card base of Hammermill – Premium Colour 100 lb. cardstock, cut and scored to be 5.5″ x 4.25″. I die cut Copic Marker X-Press It Blending Card with my Cuttlebug and My Creative Time – Rectangle Frame Layers. With my MISTI and Memento – Tuxedo Black ink, I stamped the image onto the die cut and the sentiment onto Copic Marker X-Press It Blending Card. I coloured the image in with Copic markers and added in the snow in the sky with Gelly Roll Sakura #10 Pen. I combined Cosmic Shimmer Fluffy Stuff and WOW! Embossing Glitter – White Puff Twinkle for their hats and pom-poms and heat embossed them with my Marvy Uchida – Embossing Heat Tool. I added in the snow on the bottom with Cosmic Shimmer Fluffy Stuff and Sprinkled some WOW! Sparkling Snow Embossing Glitter on as well after using a Ranger – Emboss It Pen Clear in spots. This too, was heat embossed with my Marvy Uchida – Embossing Heat Tool. Lastly, I added in some Stickles – Diamond for snow as well. I love sparkle. LOL! Using double-sided tape, I adhered the finished scene to the base card. I rounded the sentiment with a 1/4″ rounder on the top and cut the 2 bottoms at a diagonal. Copic Marker R37 was used to go around the edges. I popped this onto the finished image using U-Line double-sided tape to complete the card.

Card Recipe:

Stamp: Christmas Penguins – TDG004 (High Hopes Rubber Stamps)

Sentiment: Happy Holidays – FDG006 (High Hopes Rubber Stamps)

Inks: Memento – Tuxedo Black

Paper: Copic Marker X-Press It Blending Card, Hammermill – Premium Colour 100 lb.

Die Cut: My Creative Time – Rectangle Frame Layers

Tools: MISTI – Most Incredible Stamping Tool, U-Line double-sided tape, Marvy Uchida – Embossing Heat Tool, Gelly Roll Sakura #10 Pen, Ranger – Emboss It Pen Clear

Image coloured with Copic Markers:

Penguins: W9, W7, W5, W3, W00, E15, YR14, Y17, Y11, RV00, E43, E42, E41, E40

Hats and Bow for Penguin: R59, R37, R35

Holly and Bow: G14, G07, YG23, YG11

Large Gift and Small Gift: BG72, BG57, BG32, BG11, Y17, Y15, Y13

Medium Gift: V17, V15, V12

Long Gift: RV66, RV63, RV55

Ribbons: Y38, Y35, Y32, RV66, RV63, RV55

Sky: B05, B04, B03, B02

Snow: BV06, Cosmic Shimmer Fluffy Stuff, WOW! Sparkling Snow Embossing Glitter, WOW! Embossing Glitter – White Puff Twinkle, Stickles – Diamond

Hope you like it and have a fantastic week!

You can find lots of inspiration from the Design Team Divas at the High Hopes blog, and the High Hopes Rubber Stamps Facebook Fan page plus you can also follow us on
Instagram, Twitter and Pinterest.

Wishing You All The Best!!


Today, I’m sharing a Christmas card using Dreamerland Crafts stamps called Wishing You All The Best – D20010.  This little girl is on her way to bring you some Christmas Cheer!

To make this card I used a base of 6″ x 6″ using AC Cardstock – White. I cut the background paper to the same size using Recollections – Glisten and Glow paper and then using a Sharpie – Gold Medium Point – Water Based Paint pen, I outlined all sides. This was added directly to the base card using double-sided tape. Using my Cuttlebug and dies from Gina Marie Designs – Loopy Oval, the frame was cut out of Copic Marker X-Press It Blending Card. I stamped the image using my MISTI and Memento – Tuxedo Black ink onto the die cut and then using the Sharpie – Gold Medium Point – Water Based Paint pen, I inked around all of the outside edges. I coloured the image in with Copic markers and then applied Ranger – Emboss It Pen Clear to the fur trims for the hat and clothing. I applied WOW! Sparkling Snow Embossing Glitter to the inked areas and then heat embossed everything with my Marvy Heat Embossing Tool. Using 3M double-sided tape, I popped up the oval onto the main background. To finish off the card, I applied some Stickles – Golden Rod to the centres of some of the larger snowflakes.

Card Recipe:

Stamp: Wishing You All The Best – D20010 – Dreamerland Crafts

Inks: Memento – Tuxedo Black, Ranger – Emboss It Pen Clear

Paper: Copic Marker X-Press It Blending Card, Recollections – Glisten and Glow (6″ x 6″), AC Cardstock – White

Die Cuts: Gina Marie Designs – Loopy Oval

Stickles: Golden Rod

Embossing Powder: WOW! Embossing Glitter – White Puff Twinkle

Tools: MISTI – Most Incredible Stamping Tool, Cuttlebug,  Marvy Heat Embossing Tool, 3M VHB – 2 sided tape, Sharpie – Gold Medium Point – Water Based Paint

Image coloured with Copic Markers:

Skin: E21, E11, E00, E000, R30, R22, R20

Hair: E47, E44, E43

Clothing and Hat: R59, R37, R35, B70, C1

Boots: E27, E25, E23, E21

Flowers and Leaves: G99, YG67, YG17, YG11, G21, R46, R14, R08, Y18

Bow: BG09, BG05, BG02, BG01

Basket: E57, E55, E53, E51

Shadow: Y15, Y13, Y11

Hope you like it and have a great week!

You can find more cards to inspire you at Dreamerland Crafts and Pointer Scrapbooking on the Facebook Fan pages from the rest of our design team.

Our Friendship is Magic!


Welcome High Hopes Rubber Stamps Fans!

It’s Wednesday, and for my last High Hopes card for the year, I’m sharing a couple of good friends just relaxing and taking it easy! Sometimes it is nice to just chill out a bit! LOL! The stamp for the main image is called South Pole Pals R147 (High Hopes Rubber Stamps).

To make my card, I decided to keep it simple. I cut out the frame using Amy Design – Dies – Keep It Cool – Cool Square Frame and Copic Marker X-Press It Blending Card. Next, I stamped the image using my MISTI into the centre of the die cut. I coloured this in with the Copic markers listed below. For the outside of the die cut, I used Tim Holtz Distress Inks – Broken China and sponged on the ink using a dauber.

To create the background for the main image, I re-stamped the main image onto Inkadoo Stamping Mask Paper and fussy cut it out. Then I placed the mask over my coloured image. Next I used a mixture of Tim Holtz Distress Oxide inks, Faded Jeans, Wilted Violet and Festive Berries to create the sky. I have never tried this before, and just love the way it turned out.

For the snow, I stamped the bottom of the image with VersaMark ink and then added WOW! Embossing Glitter – White Puff Twinkle. I heated up the embossing powder with my heat gun and then added some Stickles – Diamond along the top of the snow.

Next I assembled the card onto 5.5″ x 5.5″ white AC Cardstock. I cut out a piece of 5.5″ x 5.5″ Hot Buy Craft Smart – Holiday Glitz Glitter Paper and mounted it with 2 sided tape onto the base. Then I added glue to the back of the frame and centre previously cut and coloured with Zig 2 Way Glue and mounted it onto top of the card.

Lastly, I added the sentiment Magic Friendship F234 (High Hopes Rubber Stamps) and popped it up with 3M VHB – 2 sided tape to finish up the card.

Card Recipe:

Stamp:  South Pole Pals R147 (High Hopes Rubber Stamps)

Sentiment: Magic Friendship F234 (High Hopes Rubber Stamps)

Inks: Memento – Tuxedo Black, Tim Holtz Distress Oxide Festive Berries, Tim Holtz Distress Oxide Faded Jeans, Tim Holtz Distress Oxide Wilted Violet, Tim Holtz Distress Inks – Broken China, Versamark

Paper: Copic Marker X-Press It Blending Card, Hot Buy Craft Smart – Holiday Glitz Glitter Paper 12″ x 12″

Die Cut: Amy Design – Dies – Keep It Cool – Cool Square Frame

Tools: MISTI – Most Incredible Stamping Tool, Cuttlebug, 3M VHB – 2 sided tape, Inkadoo Stamping Mask Paper

Embossing Powder: WOW! Embossing Glitter – White Puff Twinkle

Image coloured with Copic Markers:

Penguin: W9, W7, W5, E15, YR14, Y17, Y15, Y11, E45, E43, E41, Colorless Blender

Polar Bear: W9, W2, W1, W0, R30, R20, Colorless Blender

Hope you like it and have a fantastic week!

You can find lots of inspiration from the Design Team Divas at the High Hopes blog, and the High Hopes Rubber Stamps Facebook Fan page plus you can also follow us on
Instagram, Twitter and Pinterest.


Walking in a Winter Wonderland


Welcome Back Dreamerland Craft Fans!

Today, I’m sharing a card with you that I made using DCS19089 – Mix and Match Clear Stamp  (Dreamerland Crafts Clear Stamps) for the main image and sentiment and 2018 Christmas Trees & Houses – M18312 (Dreamerland Crafts Clear Stamps) for the trees in the background! I thought this little bear was just so adorable, so I thought I would make him pulling his little forest friend on a little walk through the forest!

I used the centre die cut from Creative Expressions by Sue Wilson – Festive Collection – Pointsettia Mini Background – CED3049 to cut out the area I wanted to stamp my image on. I used Copic Marker X-Press It Blending Card, Memento – Tuxedo Black ink and my MISTI to get a nice clean image. The first step was to stamp the bear, sled and bunny. Next I used Inkadoo Stamping Mask Paper and stamped the 3 images again. Next, I added the masked images over top of the images that were previously stamped on the base image.

The second step was to stamp in the trees. I wanted to give the impression that some trees were further back, so I inked the tree stamp with Memento – Bamboo Leaves and stamped once and then immediately again using the same stamp. I performed this several times across the background. Once all of the trees were in place, I removed the masking and was ready to colour in my images.

Before adding snow to the sky, I stamped on the sentiment using VersaMark ink and Ranger Embossing Powder White – Extra Fine Detail. Then I added in the snow flakes using Gelly Roll Sakura #8 Pen.

The colours used for each character and the trees are listed below. The final step for the main image was to add in some sparkle on the trees and snow on the ground. For the glitter on the trees I used Quickie Glue and DecoArt Glamour Dust. For the snow below the trees, sled and bear, I used VersaMark ink and WOW! Embossing Glitter – White Puff Twinkle and touches of Stickles – Diamond.

Lastly, I die cut the background frame using Recollections – Christmas Inkjet Printable Glitter Paper and Creative Expressions by Sue Wilson – Festive Collection – Pointsettia Mini Background. I added glue to the back of the die cut and mounted it on top of Crafts Sparkling Stickers – 02-3068629. Then I popped up the main image in the centre using 3M VHB – 2 sided tape.

Card Recipe:

Stamps: 2018 Christmas Trees & Houses – M18312 (Dreamerland Crafts Clear Stamps), DCS19089 – Mix and Match Clear Stamp (Dreamerland Crafts Clear Stamps)

Sentiments: DCS19089 – Mix and Match Clear Stamp (Dreamerland Crafts Clear Stamps)

Inks: Memento – Tuxedo Black, Memento – Bamboo Leaves, Memento – Rich Cocoa, VersaMark ink

Embossing Powder: Ranger Embossing Powder White – Extra Fine Detail, WOW! Embossing Glitter – White Puff Twinkle

Paper: Copic Marker X-Press It Blending Card, Crafts Sparkling Stickers – 02-3068629, Recollections – Christmas Inkjet Printable Glitter Paper – 8.5 x 11″

Die Cuts: Creative Expressions by Sue Wilson – Festive Collection – Pointsettia Mini Background – CED3049,

Tools: MISTI – Most Incredible Stamping Tool, Cuttlebug, 3M VHB – 2 sided tape, Inkadoo Stamping Mask Paper, Stickles – Diamond

Image coloured with Copic Markers:

Bear: E57, E55, E53, E39, E37, E35, E34, R59, R37, R35, Sakura Glaze – Black (Nose and Eyes), Gelly Roll Sakura #5 Pen

Bunny: E57, E55, E53, E51, R20, R00, Sakura Glaze – Black (Eyes), Gelly Roll Sakura #5 Pen

Sleigh: R59, R37, R35, C3, C2, C1, E39, E37, E35

Trees: BG96, YG67, YG17, G21, G20, G00, G0000

Background Sky: B99, B97, B95, B93, B91


Hope you like it and have a great week!

You can find more cards to inspire you at Dreamerland Crafts on the Facebook Fan page from the rest of our design team.

North Pole Reindeer


Welcome High Hopes Rubber Stamps Fans!

It’s Wednesday, and this month at High Hopes Rubber Stamps we are celebrating Christmas starting off with a brand new release. YAY!!!  This week, I used North Pole Reindeer (High Hopes Rubber Stamps) and North Pole Greetings (High Hopes Rubber Stamps) for the sentiment.

Card Recipe:

Stamp:  North Pole Reindeer (High Hopes Rubber Stamps)

Sentiment: North Pole Greetings (High Hopes Rubber Stamps)

Inks: Memento – Tuxedo Black, Tim Holtz Distress Inks – Candied Apple

Paper: Copic Marker X-Press It Blending Card, Stampin’ Up – Signs of Santa, Green Cardstock

Die Cut: My Creative Time -Stitched Squares Inside and Out

Tools: MISTI – Most Incredible Stamping Tool, Cuttlebug

Image coloured with Copic Markers:

Reindeer: E33, E31, E30, E57, E55, E53, R20, Colorless Blender for texture

Pole: R59, R37, R35, W5, W3, W1, W0, W00, Colorless Blender, Gelly Roll Stardust – Clear

Scarf: BG78, BG18, BG15, BG11, Y38, Y15, Y13

Sky: B06, B05, B04, B02, Gelly Roll Sakura #8 Pen

Snow: Stickles – Icicle, WOW! Embossing Glitter – White Puff Twinkle


Hope you like it and have a fantastic week!

You can find lots of inspiration from the Design Team Divas at the High Hopes blog, and the High Hopes Rubber Stamps Facebook Fan page plus you can also follow us on
Instagram, Twitter and Pinterest.