Archives

Dancing Penguins!


Merry Christmas and A Very Happy, Healthy New Year to everyone! Hope you all have an amazing, safe and wonderful holiday with family and friends!

Sharing my last Christmas card of the year that I made using Spellbinders – Dancin’ Penguin – S3-482 and Dancin’ Christmas Sentiments – STP-216. For the background I used PolkadoodlesTheo Penguin – 10 Precoloured background scenes bundle Winter and Ice Theo Penguin.

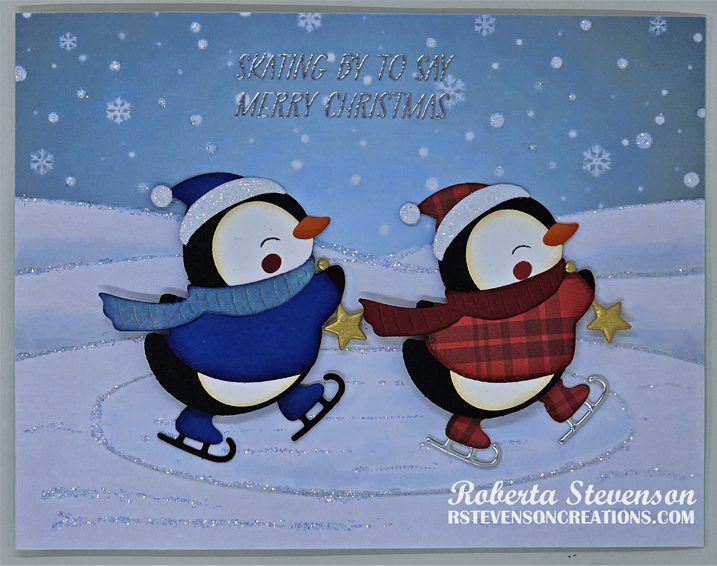
Copic B000 was applied to the snow banks and pond and Stickles Diamond was added to give some sparkle to the snow and ice. Really love the way the skates swing back and forth below the penguins.

The base card was created to the size of 4.25″ x 5.5″ out of Hammermill – Premium 110 lb. cardstock.

Card Recipe:

Stamp Sentiment: SpellbindersDancin’ Christmas Sentiments – STP-216

Paper: Hammermill – Premium Cardstock 110 lb., Small scraps from my paper stash

Die Cuts: Spellbinders – Dancin’ Penguin – S3-482

Background Image: PolkadoodlesTheo Penguin – 10 Precoloured background scenes bundle Winter and Ice Theo Penguin

Embossing Powder: Simon Says Stamp – Ultra Fine Silver

Miscellaneous: My Favourite Things – Spin & Slide Discs, Marvy Uchida – Embossing Heat Tool

Hope you like it and have a great week!

Father’s Day Fishing Gnome!


Today I’m sharing a Father’s Day card using PolkadoodlesFishing Gnome For Men – Bundle that I made for my dad who lives to fish! Happy Father’s Day to all of the father’s out there and I hope you all enjoy your special day!

In Microsoft Word, I created a 5.5″ x 5.5″ outline and then imported the background paper first. Next, I created another box as a guideline and inserted the image into it and centered it on the patterned paper. I then brought in the little bait box and sized it to fit next to the chair. Lastly, I inserted the sentiments from the same digital stamp set and changed the background on them to a blue, leaving the black outline around the text. I moved one sentiment to the top and the other to the bottom. Once I was satisfied on how everything looked, I printed it out onto Copic Marker X-Press It Blending Card with my HP Printer.

The image was coloured in with the Copics listed below and then attached to the base card of 5.5″ x 5.5″. Lastly, I added some stickles to the dragonflies wings to give them a little bit of added sparkle.

Card Recipe:

Stamp and Sentiment:  PolkadoodlesFishing Gnome For Men – Bundle

Inks: HP Printer, Tim Holtz Distress Ink – Faded Jeans

Paper: Copic Marker X-Press It Blending Card, Hammermill – Premium Cardstock 110 lb., Polkadoodles – Gnome Men Fishing – printable paper patterns

Image coloured with Copic Markers:

Skin: E21, E11, E04, E00, E000

Beard: E29, E25, E23, E21

Hat: B99, B97, B95, B91

Shoes: B99, B97, B95, B93, B91, N2, N1, N0

Shirt: B26, B23, B21

Cattails: E27, E25, E23

Fishing Rod and Ball: E59, E57, E55, YR09, YR07, YR04, YG07, YG06, YG03, Y08, Y06

Water: B24, BG13, BG11, BG10, BG02, BG01, BG000

Bag and Bait Box: E89, E87, E84, E81, C3, C2, C1

Grass and Leaves: G19, YG25, YG23, YG21

Chair: E49, E47, E44, E34

Dragonflies: BV00, BV000, BG10, Stickles – Diamond

Sky and Clouds: B01, B00, B000, B0000, BG70, C0, C00, Colorless Blender

Hope you like it and have a great week!

Also entered into
https://polkadoodle.blogspot.com/2024/06/wk-24-card-making-paper-craft-challenge.html

Birthday Present Girl!!


Today, I’m sharing a birthday card that I made using this fun image from Polkadoodles called Surprise Gift Digi – Winnie Celebrations 2.

To make the card, I first imported the image and sentiment into Microsoft Word. I sized the image to fit 3.75″ x 2.5″ and printed it out onto Copic Marker X-Press It Blending Card using my HP Printer. Using my Cuttlebug and My Creative Time – Rectangle Frame Dies, I die-cut the image out. The frame was die cut using Hot Buy – Recollections – Jewel Tones paper and Gina Marie Designs – Loopy Rectangle Die Set. Hammermill – Premium Colour 100 lb. cardstock was used to create the base card at the size of 5.5″ x 4.25″. Doodlebug – hey cupcake paper was cut to the same size as the base and applied using double-sided tape. Tim Holtz Distress Ink – Picked Raspberry and a finger dauber were used to ink around all of the 4 sides of the card.

The image was coloured in with Copic markers and 3M double-sided pop-up tape were applied to the back of the image and Loopy rectangle. Both were attached to the centre of the card. The sentiment was stamped onto Fuschia paper using my MISTI and then die cut with a circle punch. Using a white gel pen, I created stitched lines. 2 layers of 3M double-sided popup tape were added to the back of the circle on one side and then glue on the other half and it was popped up onto the card. Lastly, I added a few Kraftin’ Kimmie – Festive Dots just to add a little bit more colour!

Card Recipe:

Stamp: Surprise Gift Digi Stamp – Winnie Celebrations 2Polkadoodles

Inks: HP Printer Grayscale, Tim Holtz Distress Ink – Picked Raspberry

Paper: Copic Marker X-Press It Blending Card, Hammermill – Premium Colour 100 lb., Doodlebug – hey cupcake (6″x6″) paper pad, Hot Buy – Recollections – Jewel Tones

Die Cuts: Gina Marie Designs – Loopy Rectangle Die Set, My Creative Time – Rectangle Frame Dies

Miscellaneous: Kraftin’ Kimmie – Festive Dots

Image coloured with Copic Markers:

Skin: E21, E11, E00, E000, R22, R20, Eyes (Gelly Roll Sakura #8 Pen, Sakura Glaze – Black)

Hair: E47, E44, E43, E40

Dress and Shoes: BG09,  BG05, BG02, BG01

Ribbons and Dress Trim: RV04, RV02, RV00

Presents and Bows: E15, Y35, Y17, Y08, G02, G00, G000

Shadow: C3, C2, C1, Colorless Blender

Hope you like it and have a great week!

Birthday Wishes!!


Today, I’m sharing a birthday card that I made using Polkadoodles stamp called Winnie – Birthday Tree for my sister-in-law.

To create this card I began by making a base of 5″ x 5″ using Hammermill – Premium Colour 100 lb. cardstock. I applied a combination of Tim Holtz Distress Oxide Ink – Worn Lipstick and Festive Berries around the edges of the card with blending brushes. I imported the image into Microsoft Word and then printed it out using High Quality Grayscale onto Copic Marker X-Press It Blending Card cardstock.

With my Cuttlebug, I die-cut the image and Hot Buy Craft Smart – Holiday Glitz Glitter Paper using Whimsy – Wavy Stitched Squares Die Set. U-Line double-sided tape was attached to the larger die-cut and it was popped up onto the centre of the card. I coloured in the image using Copic markers and then added Cosmic Shimmer Fluffy Stuff to the snow on the bottom. A Marvy Uchida – Embossing Heat Tool was used to puff up the liquid. Stickles – Diamond was added to the snow in between and in some areas on top of the Fluffy stuff. With a UNIPosca PC-3M White marker, I created the snow in the sky. Once the Stickles dried, I popped up the coloured image layer to the card using U-Line double-sided tape as well. YNS Gumdrops – Sparkly Enchanted Garden were added to the centre of the snowflakes to finish off the card.

Card Recipe:

Stamp: Winnie – Birthday Tree – Polkadoodles

Inks: High Quality Grayscale, Tim Holtz Distress Oxide Ink – Worn Lipstick, Tim Holtz Distress Oxide Ink – Festive Berries

Paper: Copic Marker X-Press It Blending Card, Hammermill – Premium Colour 100 lb., Hot Buy Craft Smart – Holiday Glitz Glitter Paper 12″ x 12″

Die Cuts: Whimsy – Wavy Stitched Squares Die Set (WSD371)

Tools and Miscellaneous: U-Line double-sided tape, Cuttlebug, UNIPosca PC-3M White marker, Cosmic Shimmer Fluffy Stuff, Stickles – Diamond, Marvy Uchida – Embossing Heat Tool, Stickles – Diamond

Image coloured with Copic Markers:

Skin: E21, E11, E04, E00, E000, R30, R20

Hair: E47, E44, E43

Coat, Mitts, Hat and Boots: BG72, BG57, BG32, BG11, W9, W7, W5

Cupcake: BG57, BG32, B23, RV17, RV14, RV13

Racoon: W9, W7, W5, W2, W0

Present and Bow: RV14, RV13, RV11, Y28, Y26, Y23, Y15

Tree: G99, G21, G20, YG67, YG17, E49, E27, E25, E23

Sky: B05, B04, B02, B01

Dress, Hat and Coat Trim: C1, C0, C00

Shadows in Snow: BV23, BV20, Colorless Blender

Hope you like it and have a great week!

Delivering Candy Angel!!


Today, I’m sharing a Christmas card that I made using Polkadoodles stamp called Delivering Candy – Winnie Angel. It’s hard to believe that Christmas is only a few days away. This little Christmas angel is all set to make someone’s Christmas very special.

To create this card I began by making a base of 5.5″ x 4.25″ using Hammermill – Premium Colour 100 lb. cardstock. Hot Buy Craft Smart – Holiday Glitz Glitter Paper was cut to the same size and attached to the base card using double-sided tape. I imported the image into Microsoft Word and then printed it out using High Quality Grayscale onto Copic Marker X-Press It Blending Card cardstock. This stops the ink from smudging when you colour the image with your markers.

With my Cuttlebug, I die-cut the image and Recollections – Matte Gold Foil cardstock using Penny Black Creative Dies – Antique Frame. U-Line double-sided tape was attached to the larger die-cut and it was popped up onto the centre of the card. I coloured in the image using Copic markers and then added Stickles – Diamond to the snow on the bottom. With a UNIPosca PC-3M White marker, I created the snow in the sky. Wink of Stella – Clear was applied to the wings and the halo. Once the Stickles dried, I adhered the coloured image layer to the card using U-Line double-sided tape as well.

Card Recipe:

Stamp: Delivering Candy – Winnie Angel – Polkadoodles

Inks: High Quality Grayscale

Paper: Copic Marker X-Press It Blending Card, Hammermill – Premium Colour 100 lb., Hot Buy Craft Smart – Holiday Glitz Glitter Paper 12″ x 12″, Recollections – Matte Gold Foil cardstock

Die Cuts: Penny Black Creative Dies – Antique Frame 51-937

Tools and Miscellaneous: U-Line double-sided tape, Cuttlebug, UNIPosca PC-3M White marker, Wink of Stella – Clear, Stickles – Diamond

Image coloured with Copic Markers:

Skin: E21, E11, E04, E00, E000, R30, R20

Hair: E47, E44, E43, E42

Coat and Leaves: YG23, YG17, YG11

Wings: BG0000, BG000, BV0000, Y00

Purse, Candy Canes and Berries: R59, R39, R37

Candy Canes and Presents: R59, R39, R37, RV14, RV13, RV11, BG57, BG32, BG11, YG09, YG07, YG03

Boots: C9, C7, C5, C3

Halo: Y28

Sky: B05, B04, B02, B01

Shadows in Snow, Hat and Coat: BV20, B0000, Colorless Blender

Hope you like it and have a great week!