Tag Archive | Hot Buy Craft Smart – Holiday Glitz Glitter Paper 12″ x 12″

Birthday Wishes!!


Today, I’m sharing a birthday card that I made using Polkadoodles stamp called Winnie – Birthday Tree for my sister-in-law.

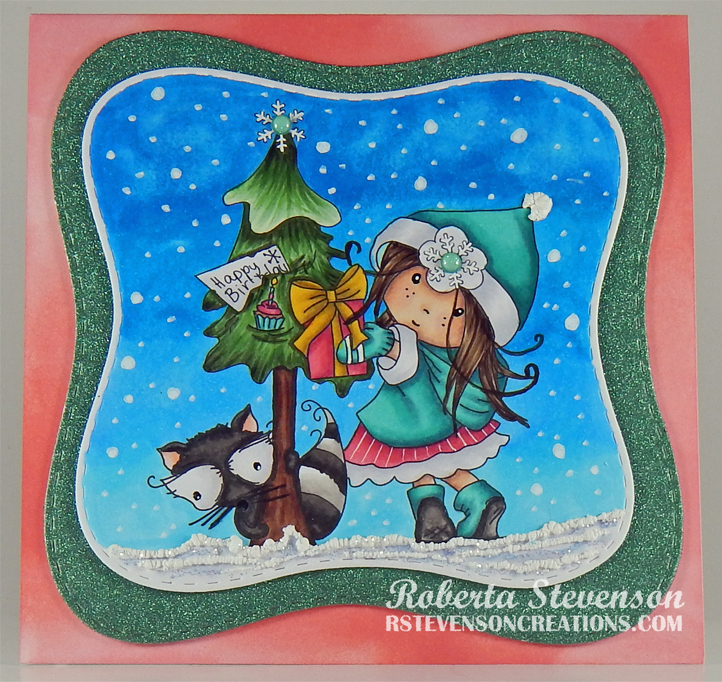
To create this card I began by making a base of 5″ x 5″ using Hammermill – Premium Colour 100 lb. cardstock. I applied a combination of Tim Holtz Distress Oxide Ink – Worn Lipstick and Festive Berries around the edges of the card with blending brushes. I imported the image into Microsoft Word and then printed it out using High Quality Grayscale onto Copic Marker X-Press It Blending Card cardstock.

With my Cuttlebug, I die-cut the image and Hot Buy Craft Smart – Holiday Glitz Glitter Paper using Whimsy – Wavy Stitched Squares Die Set. U-Line double-sided tape was attached to the larger die-cut and it was popped up onto the centre of the card. I coloured in the image using Copic markers and then added Cosmic Shimmer Fluffy Stuff to the snow on the bottom. A Marvy Uchida – Embossing Heat Tool was used to puff up the liquid. Stickles – Diamond was added to the snow in between and in some areas on top of the Fluffy stuff. With a UNIPosca PC-3M White marker, I created the snow in the sky. Once the Stickles dried, I popped up the coloured image layer to the card using U-Line double-sided tape as well. YNS Gumdrops – Sparkly Enchanted Garden were added to the centre of the snowflakes to finish off the card.

Card Recipe:

Stamp: Winnie – Birthday Tree – Polkadoodles

Inks: High Quality Grayscale, Tim Holtz Distress Oxide Ink – Worn Lipstick, Tim Holtz Distress Oxide Ink – Festive Berries

Paper: Copic Marker X-Press It Blending Card, Hammermill – Premium Colour 100 lb., Hot Buy Craft Smart – Holiday Glitz Glitter Paper 12″ x 12″

Die Cuts: Whimsy – Wavy Stitched Squares Die Set (WSD371)

Tools and Miscellaneous: U-Line double-sided tape, Cuttlebug, UNIPosca PC-3M White marker, Cosmic Shimmer Fluffy Stuff, Stickles – Diamond, Marvy Uchida – Embossing Heat Tool, Stickles – Diamond

Image coloured with Copic Markers:

Skin: E21, E11, E04, E00, E000, R30, R20

Hair: E47, E44, E43

Coat, Mitts, Hat and Boots: BG72, BG57, BG32, BG11, W9, W7, W5

Cupcake: BG57, BG32, B23, RV17, RV14, RV13

Racoon: W9, W7, W5, W2, W0

Present and Bow: RV14, RV13, RV11, Y28, Y26, Y23, Y15

Tree: G99, G21, G20, YG67, YG17, E49, E27, E25, E23

Sky: B05, B04, B02, B01

Dress, Hat and Coat Trim: C1, C0, C00

Shadows in Snow: BV23, BV20, Colorless Blender

Hope you like it and have a great week!

Most Exciting Moment!!


Today, I’m sharing a Christmas card that I made using Dreamerland Crafts stamps called The Most Exciting Moment – D18035. This image reminds me so much of me and my brothers opening our gifts together every year in front of the Christmas tree.

To create this card I began by making a base of 6″ x 6″ using AC Cardstock – White. Recollections – Journey To The North Pole was cut to be the same size as the base and then adhered to the card using double-sided tape. Tim Holtz Distress Ink – Rustic Wilderness was applied around the outside edges of the card with a sponge dauber. Using my Cuttlebug and My Creative Time -Stitched Squares Inside and Out, I die cut Recollections – Burgundy and Hot Buy Craft Smart – Holiday Glitz Glitter Paper. U-Line double-sided tape was applied to the backs of each of them and they were both popped up onto the centre of the card. Utilizing the Cuttlebug again and Copic Marker X-Press It Blending Card cardstock, the die-cut for the image and frame was cut out with Lea’bilities – Star Christmas Frame. TCW – Stardust Butter – Champagne was applied to the star frame and I set it aside to dry.

With a MISTI, the main image was stamped onto the centre frame die cut using Memento – Tuxedo Black ink. I coloured it in with Copics and then with Scotch tape applied to the back of the image, rejoined it to the star frame. U-Line double-sided tape was added and the finished piece was popped up onto the centre of the card. YNS Gumdrops – Firefly Magic Sparkly Gumdrops and YNS Gumdrops – Firecracker Sparkly were added to the coloured image. Lastly, I placed the sentiment and 3 poinsettias to the card using Holiday Trendz – Foil Stickers – Seasonal Icons.

Card Recipe:

Stamps: The Most Exciting Moment – D18035 – Dreamerland Crafts

Inks: Memento – Tuxedo Black, Tim Holtz Distress Ink – Rustic Wilderness

Paper: Copic Marker X-Press It Blending Card, AC Cardstock – White, Recollections – Journey To The North Pole (6″ x 6″), Recollections – Burgundy, Hot Buy Craft Smart – Holiday Glitz Glitter Paper 12″ x 12″

Die Cuts: Lea’bilities – Star Christmas Frame (no. 45.0867), My Creative Time -Stitched Squares Inside and Out

Tools and Miscellaneous: MISTI – Most Incredible Stamping Tool, Marvy Uchida – Embossing Heat Tool, U-Line double-sided tape, Cuttlebug, TCW – Stardust Butter – Champagne, Holiday Trendz – Foil Stickers – Seasonal Icons (011-0522), YNS Gumdrops – Firefly Magic Sparkly Gumdrops and YNS Gumdrops – Firecracker Sparkly Gumdrops

Image coloured with Copic Markers:

Skin: E21, E11, E04, E00, E000, R30, R20

Girl’s Hair: E15, Y38, Y21, YR23

Boys’ Hair: E47, E44, E43

Jeans: B26, B23, B21, W1

Boy’s Sweaters: B18, B16, B14, B12, E74, E71, E70

Scarves and Girl’s Pants: BG09, BG05, B0G02, BG01

Girl’s Sweater, Gift and Baubles: R59, R37, R35

Boots and Teddy Bear: E33, E31, E27, E25, E23

Teddy Bear Box: E25, E23, E21

Puppy: E35, E33, E31

Tree: G99, G21, YG67, YG17

Round Gift Box: BG15, BG13, BG11, RV14, RV13, RV11

Star, Garland, Ribbon: Y28, Y26, Y23

Background and Flooring: YG03, Y01, YG00, E53, E51, E50

Hope you like it and have a great week!

You can find more cards to inspire you at Dreamerland Crafts and Pointer Scrapbooking on the Facebook Fan pages from the rest of our design team.

Delivering Candy Angel!!


Today, I’m sharing a Christmas card that I made using Polkadoodles stamp called Delivering Candy – Winnie Angel. It’s hard to believe that Christmas is only a few days away. This little Christmas angel is all set to make someone’s Christmas very special.

To create this card I began by making a base of 5.5″ x 4.25″ using Hammermill – Premium Colour 100 lb. cardstock. Hot Buy Craft Smart – Holiday Glitz Glitter Paper was cut to the same size and attached to the base card using double-sided tape. I imported the image into Microsoft Word and then printed it out using High Quality Grayscale onto Copic Marker X-Press It Blending Card cardstock. This stops the ink from smudging when you colour the image with your markers.

With my Cuttlebug, I die-cut the image and Recollections – Matte Gold Foil cardstock using Penny Black Creative Dies – Antique Frame. U-Line double-sided tape was attached to the larger die-cut and it was popped up onto the centre of the card. I coloured in the image using Copic markers and then added Stickles – Diamond to the snow on the bottom. With a UNIPosca PC-3M White marker, I created the snow in the sky. Wink of Stella – Clear was applied to the wings and the halo. Once the Stickles dried, I adhered the coloured image layer to the card using U-Line double-sided tape as well.

Card Recipe:

Stamp: Delivering Candy – Winnie Angel – Polkadoodles

Inks: High Quality Grayscale

Paper: Copic Marker X-Press It Blending Card, Hammermill – Premium Colour 100 lb., Hot Buy Craft Smart – Holiday Glitz Glitter Paper 12″ x 12″, Recollections – Matte Gold Foil cardstock

Die Cuts: Penny Black Creative Dies – Antique Frame 51-937

Tools and Miscellaneous: U-Line double-sided tape, Cuttlebug, UNIPosca PC-3M White marker, Wink of Stella – Clear, Stickles – Diamond

Image coloured with Copic Markers:

Skin: E21, E11, E04, E00, E000, R30, R20

Hair: E47, E44, E43, E42

Coat and Leaves: YG23, YG17, YG11

Wings: BG0000, BG000, BV0000, Y00

Purse, Candy Canes and Berries: R59, R39, R37

Candy Canes and Presents: R59, R39, R37, RV14, RV13, RV11, BG57, BG32, BG11, YG09, YG07, YG03

Boots: C9, C7, C5, C3

Halo: Y28

Sky: B05, B04, B02, B01

Shadows in Snow, Hat and Coat: BV20, B0000, Colorless Blender

Hope you like it and have a great week!

A Good Guy


Sharing a CAS card I made today using KLM Digital Design –  Fido and Friend Male from the new September 2022 release. This image comes with 2 other sentiments as well, “Thank You for being a wonder friend” and “Every snack you bake, Every meal you bake, Every bit you take, I’ll be watching you”. I think this last sentiment is so true for our furry friends. LOL! I chose the sentiment I used on this card because I know I found my 4 leaf lucky clover and he became my wonderful, kind, caring and loving husband.

To make my card this week, I started with a 5.5″ x 4.25″ card base using Hammermill – Premium Colour 100 lb. cardstock. The image and sentiment were imported into Microsoft Word and printed out onto Copic Marker X-Press It Blending Card. The image and sentiment were cut to be the same size as the base and the image was coloured in. This was then applied to the base card using double-sided tape. Hot Buy Craft Smart – Holiday Glitz Glitter Paper was die cut using my Cuttlebug and Lawn Fawn Cuts – Lucky Clovers. I ran this die cut through my Xyron Create a Sticker and attached it to the card to finish it off.

Card Recipe:

Stamp and Sentiment:  Fido and Friend Male – KLM Digital Designs

Inks: HP Printer Grayscale

Paper: Copic Marker X-Press It Blending Card, Hammermill – Premium Colour 100 lb., Hot Buy Craft Smart – Holiday Glitz Glitter Paper 12″ x 12″

Die Cuts: Lawn Fawn Cuts – Lucky Clovers

Miscellaneous: 2 sided tape, Cuttlebug, Xyron Create a Sticker, Pental Sunburst Metalic Med Gel Pen – Silver

Image coloured with Copic Markers:

Skin: E21, E11, E04, E00, E000

Beard: E47, E44, E43, E41

Overalls and Hat: B26, B23, B21, (Buttons – Pental Sunburst Metalic Med Gel Pen – Silver)

Shirt: E87, E84, E81

Boots: E49, E43, E42, E41, E39, E37, E35, E34, E33, E31

Dog: E55, E53, E51, E50, E49, E47, E29, E27, E25, E23, R30, R29, R24, R20

Ground: E47, E44, E43

Hope you like it and have a great week!

You can find more cards to inspire you at KLM Designs, KLM Digital Design Team and KLM Digital Designs on the Facebook Fan page from the rest of our design team.

Beautiful Day!!


It’s Wednesday, and this week, I made a card using High Hopes Rubber Stamps Winter Kitty – SDG006  for the main image and Beautiful Day – FDG013 for the sentiment. We just had a major snowfall over the last few days and this little kitty is all bundled up and ready to play!

Growing up we had a lot of snow during the winter and couldn’t wait to put on our mitts and snow boots and go out to play. We had huge snow banks in the schoolyard across the street and would toboggan down them or just slide down in our snow suits! LOL! It was sooooo much fun! Sometimes we even made big snow forts in the backyard with tables and chairs made out of ice and snow. We hardly spent anytime indoors and didn’t usually go back into the house until we had to or we were turning blue because it was so cold out, but even then we still wanted to continue playing outdoors. LOL!

To make my card this week, I began with a card base of Hammermill – Premium Colour 100 lb. cardstock, cut and scored to be 5.5″ x 4.25″.  I used Scrapbook.com – Rainbow Smooth Cardstock for the main background paper. It was already the same size as the base, so no cutting had to be done. To get more use out of the same paper, I had cut the oval frame using my Cuttlebug and Hero Arts – Infinity Die Ovals first. Then, I placed the Rainbow cardstock onto the card base using double-sized tape. I die cut the square background using My Creative Time -Stitched Squares Inside and Out and Pebbles – Winter Wonderland paper and the rectangle to the size of 4″ x 4″. The rectangle was cut from from the same paper pack to the size of 1.25″ x 4″. I inked around the edges of both shapes with a sponge dauber and Tim Holtz Distress Ink – Evergreen Bough. Using double-sided tape, I placed both shapes over the pink background and hid where I cut the oval with the square. I cut out a smaller oval using the same Hero Arts – Infinity Die Ovals and Copic Marker X-Press It Blending Card. I also cut out a 1.5″ circle using a circle punch. Lastly, I die cut the scalloped circle using WeR Memory Keepers – Quickutz Nesting Scallops dies and Hot Buy Craft Smart – Holiday Glitz Glitter Paper.

With my MISTI and Memento – Tuxedo Black ink, I stamped the image onto the Copic Marker X-Press It Blending Card cardstock oval and the sentiment onto the circle. I coloured in the image with Copic markers and then added some Ranger – Emboss It Pen Clear to the bottom of the oval and applied WOW! Sparkling Snow Embossing Glitter. I heat embossed this and added more embossing powder several times to create a thicker layer with my Marvy Uchida – Embossing Heat Tool. Then I added some Cosmic Shimmer Fluffy Stuff and heat embossed it as well to puff it up. Gelly Roll Sakura #10 Pen was used to create the snow in the sky. Sakura Glaze – Black and Gelly Roll Sakura #5 Pen were used on the eyes and nose of the cat.

I inked around the edges of the large pink oval and the circle with Tim Holtz Distress Ink – Picked Raspberry. I applied the coloured image directly to the pink oval and the sentiment circle to the scalloped circle using some liquid glue. Both shapes were then popped up onto the card using U-Line double-sided tape. To completed the card and add in some extra sparkle, I applied some YNS Gumdrops – Winter Wonderland to the background patterned paper.

Card Recipe:

Stamp: Winter Kitty – SDG006 (High Hopes Rubber Stamps)

Sentiment: Beautiful Day – FDG013 (High Hopes Rubber Stamps)

Inks: Memento – Tuxedo Black, Tim Holtz Distress Ink – Evergreen Bough, Tim Holtz Distress Ink – Picked Raspberry, Ranger – Emboss It Pen Clear

Paper: Copic Marker X-Press It Blending Card, Hammermill – Premium Colour 100 lb., Scrapbook.com – Rainbow Smooth Cardstock (4.25″ x 5.5″), Pebbles Winter Wonderland 6″ x 6″, Hot Buy Craft Smart – Holiday Glitz Glitter Paper 12″ x 12″

Die Cuts: My Creative Time -Stitched Squares Inside and Out, Hero Arts – Infinity Die Ovals, WeR Memory Keepers – Quickutz Nesting Scallops, 1.5″ Circle Punch

Tools: MISTI – Most Incredible Stamping Tool, U-Line double-sided tape, Gelly Roll Sakura #10 Pen, Gelly Roll Sakura #5 Pen, Sakura Glaze – Black, Cuttlebug, YNS Gumdrops – Winter Wonderland

Image coloured with Copic Markers:

Kitty: N7, N5, N3, R02, R00, RV66, RV63, RV55 (Eyes – Sakura Glaze – Black, Gelly Roll Sakura #5 Pen)

Sky: B05, B04, B02, Gelly Roll Sakura #10 Pen

Snow: WOW! Sparkling Snow Embossing Glitter, Cosmic Shimmer Fluffy Stuff, Marvy Uchida – Embossing Heat Tool

Hope you like it and have a fantastic week!

You can find lots of inspiration from the Design Team Divas at the High Hopes blog, and the High Hopes Rubber Stamps Facebook Fan page plus you can also follow us on
Instagram, Twitter and Pinterest.

Jolly Reindeer Cheers!!


Hi everyone…today we are having a sponsor day over at the Passionate Paper Creations & Friends FB group site with Di’s Digi Stamps!! Today I’m using this adorable reindeer image from Di’s Digi Stamps called Jolly Reindeer Cheers.

For the base card, I used AC Cardstock – White and cut it and scored it to be 6″ x 6″. For the background, I applied Craft Consortium – It’s Snome Time (6″ x 6″) to the base using double-sided tape. Green cardstock cut the size of approximately 1″ was added to the bottom using double-sided tape. I added Crafts – Sparkling Stickers – 02-3068629 – Red to Hammermill – Premium Colour 100 lb. to make it more sturdy and then cut 2 pieces, 1″ x 6″ and .75″ x 6″ to add to the top and bottom. I applied double-sided tape to adhere it the card. I ran some gold cardstock from Forever In Time – Glam Glitter Cardstock – Gold Medley cut to the size of 1.25″ x 6″ through my Xyron Create a Sticker. Using my Cuttlebug and Your Next Stamp – Jingle Bell Border Die, I cut the bells out. I peeled off the sticker backing and applied it to the top of my card. Using Lifestyle Crafts Cutting Dies – Nesting Circles – I cut out a circle 3.75″ from the same cardstock and using U-Line double-sided tape, I popped it up in the centre of the card background. The same dies were also used to cut a 3.5″ circle out of Craft Consortium – Ink Drops Vivid Craft Papers and this was popped up onto the gold circle using U-Line double-sided tape. Hot Buy Craft Smart – Holiday Glitz Glitter Paper was cut and I ran it through my Xyron Creative Station. This was used to die-cut the sentiment with my Cuttlebug and Jolly Quickutz – Deck the Halls limited edition gift set. The sentiment was die-cut 4 times and stacked on top of each other to create a raised embellishment and placed in the centre of the red and green stripe on the bottom of the card.

I printed out the image using HP High Quality Grayscale onto Copic Marker X-Press It Blending Card. The image was coloured in with Copic markers and then fussy cut. It was popped up onto the smaller circle using U-line double sided tape to complete the card.

Card Recipe:

Stamp: Jolly Reindeer Cheers – Di’s Digi Stamps

Sentiment: Jolly Quickutz – Deck the Halls limited edition gift set

Inks: HP High Quality Grayscale

Paper: Copic Marker X-Press It Blending Card, Crafts – Sparkling Stickers – 02-3068629 – Red, Hot Buy Craft Smart – Holiday Glitz Glitter Paper 12″ x 12″, AC Cardstock – White, Craft Consortium – Ink Drops Vivid Craft Papers, Forever In Time – Glam Glitter Cardstock – Gold Medley, Green Cardstock, Craft Consortium – It’s Snome Time (6″ x 6″), Hammermill – Premium Colour 100 lb.

Die Cuts: Your Next Stamp – Jingle Bell Border Die, Lifestyle Crafts Cutting Dies – Nesting Circles, Jolly Quickutz – Deck the Halls limited edition gift set

Miscellaneous: U-Line double-sided tape, Cuttlebug, Xyron Create a Sticker, Xyron Creative Station

Image coloured with Copic Markers:

Reindeer and Antlers: E53, E51, E50, E49, E47, E44, E29, E27, E25, E23, R30

Hat: RV14, R85, R83, G14, YG23, YG11

Collar and Bell: E15, YR24, Y35, Y08, R59, R37, R35

Baubles: G14, YG11, R59, R37, R35, T5

Hope you like it and have a great week!

Come and check us out on Passionate Paper Creations & Friends FB group
as we are currently sponsoring Di’s Digi Stamps  \ DisDigiStamps Fan Page Group for November, 2021.

If you are a member of Passionate Paper Creations & Friends FB group
you can go to the top of the page and get a shopping discount.

If you are not a member just click join. We are a fun loving group with a lot of inspiration.

Baking Snowman!!


Sharing a card I made today using KLM Digital Designs – Baking Snowman from the July release. This image comes with 3 sentiments. I’ve used 1 on my card, but you also have the choice of  “Lovin’ from the oven” and “Wishing you a delicious Holiday”. Christmas at our house always had so many wonderful aromas from my mom baking all kinds of Christmas goodies for everyone!

To make the card, I first imported the image and sentiment into Microsoft Word and printed it out onto Copic Marker X-Press It Blending Card. I die the image and frame using my Cuttlebug and Creative Expression Craft Dies by Sue Wilson – Paper Cuts Collection – Christmas Feast dies. I coloured the image in with Copic markers and then added in the snowflakes for the sky with Gelly Roll Sakura #10 Pen. Black PrismaColor Premier Pencil was used to outline parts of the image. Gina K Designs – Glitz Glitter Gel – Iridescent was added below the snowman to create the sparkling snow and the image was set aside to dry.

The frame for the sentiment die was cut twice using Gina Marie Designs – Nested Scalloped Stitched Rectangles. A cutter was used to remove the frame from the one that contained the sentiment. The edges were then inked with Tim Holtz Distress Ink – Barn Door. Viva Decor – Inka-Gold – Yellowgold was applied to the other 2 frames and then once it was dry, a paper towel was used to buff them up and give the gold some shine. The sentiment was then applied directly to the small frame using double-sided tape.

The card was now ready to assemble. Hammermill – Premium Colour 100 lb. was used to create the card base. It was sized at 8-5/8″ x 7¼” and then scored at 3-5/8″. I used my Couture Creations – Go Power and Emboss to die cut Hot Buy Craft Smart – Holiday Glitz Glitter Paper using PinkFresh Studio Essentials – Slim Stitched Rectangle Dies. The dimensions were the same as the base card. Using glue, I applied the large rectangle die-cut directly to the base card. Next, I used the outside frame for the snowman as a guide to where to place the coloured image. I removed the image and applied glue to the back of it and set it back inside the frame. Once the image was glued down to the base, I added glue to the back of the frame and moved it into place around the coloured image to complete the puzzle. 3M VHB – 2 sided tape was added to the back of the frame for the sentiment and it was added directly to the glitter paper. Lastly, to finish off my card, I removed the button parts from the backs of the buttons from Dress It Up – Holiday Collection – Christmas Cookies using my Tim Holtz scissors and pliers.  Mini Glue Dots were applied to the backs of each of the buttons and they were applied directly to the glitter paper.

Card Recipe:

Stamp and sentiment: Baking Snowman – KLM Digital Designs

Inks: HP Printer Grayscale, Tim Holtz Distress Ink – Barn Door

Paper: Copic Marker X-Press It Blending Card, Hammermill – Premium Colour 100 lb., Hot Buy Craft Smart – Holiday Glitz Glitter Paper 12″ x 12″

Die Cut: Creative Expression Craft Dies by Sue Wilson – Paper Cuts Collection – Christmas Feast, Gina Marie Designs – Nested Scalloped Stitched Rectangles, PinkFresh Studio Essentials – Slim Stitched Rectangle Dies

Miscellaneous: Viva Decor – Inka-Gold – Yellowgold, Gina K Designs – Glitz Glitter Gel – Iridescent, Dress It Up – Holiday Collection – Christmas Cookies, Gelly Roll Sakura #10 Pen, 3M VHB – 2 sided tape, Min Glue Dots – 3/16″, Cuttlebug, Couture Creations – Go Power and Emboss

Image coloured with Copic Markers:

Snowman: B60, C1, C00

Apron: G99, G21, YG67, YG17

Hat: BV20, C0, C00

Gingerbread: E35, E33, E31, R35, YG17, Gelly Roll Sakura #10 Pen

Rolling Pin: E43, E42, E40

Sky: B37, B14, B12

Snow: Gina K Designs – Glitz Glitter Gel – Iridescent

Hope you like it and have a great week!

You can find more cards to inspire you at KLM Designs, KLM Digital Design Team and KLM Digital Designs on the Facebook Fan page from the rest of our design team.

Think Snow!!!


It’s Wednesday, and this week, I made a card using Snowman Stumble – TT014 by High Hopes Rubber Stamps for the main image and Think Snow 2 – FF047 (High Hopes Rubber Stamps) for the sentiment. I grew up skating at the outdoor rink directly across the street from my house. We couldn’t wait to get home from school and throw on our skates. The rinks were always full of children from the neighbourhood. We would either play rink games or hockey. I think there was a rink every couple of blocks. As soon as we’d finish eating, we were back on the ice again. Our parents were always yelling at us to come inside at the end of the day. How times have changed. LOL!

To make my card this week, I began with a card base made from Hammermill – Premium Colour 100 lb. cut and scored to be 5.5″ x 4.25″. My Cuttlebug and My Creative Time – Rectangle Frame Dies were used to die cut Hot Buy Craft Smart – Holiday Glitz Glitter Paper to be the same size as the base card. With a Picket Fence – Blending Brush and a mixture of Tim Holtz Distress Ink – Blueprint Sketch and Tim Holtz Distress Ink – Salty Ocean, I created the background sky. I applied this directly to the glitter background paper. Once this was done, I applied this directly to the base using double-sided tape. Next, Nellie’s Choice – Nature Scene Dies – NSD001 – Mountains were used to die cut the tree scenery using Momenta – Cardstock and using a small dauber I added in some darker touches of green using Tim Holtz Distress Inks – Peeled Paint. The pond was die cut using Whimsy Stamps – Wavy Nested Frame Dies Set and Copic Marker X-Press It Blending Card. I inked the image and sentiment using my MISTI and Memento – Tuxedo Black. Lastly, I die cut the sentiment using Joy Crafts – Labels and Tags and inked around the edges with my Picket Fence – Blending Brush and the ink that was still on it from doing the sky.

I coloured in the image with Copic markers and added in some highlights on the skate blades with Pental Sunburst Metalic Med Gel Pen. I inked the image a second time onto the Hot Buy Craft Smart – Holiday Glitz Glitter Paper for the snowman body and fussy cut around it. Once it was coloured in with Copics, I ran it through my Xyron Create a Sticker and attached it to the base stamped image.

The card was now ready to assemble. Part of the pond was cut off at the top before it was attached it to the sparkly background using glue and double-sided tape. Next, I added some 3M VHB – 2 sided tape to the back of the trees and applied it over top of where the sky ended and the pond met. To create the snow around the pond and in between the trees, pond and snow, I used Cosmic Shimmer Fluffy Stuff and added some DecoArt Glamour Dust while it was still wet. Marvy Uchida – Embossing Heat Tool was used to heat the liquid and make it puff up to look like fluffy snow. I added some Stickles – Diamond to the pompom. Using a Gelly Roll Sakura #10 Pen and Sharpie Water Based Paint – White – Extra Fine Point pen, I created the snow in the sky. Lastly, to finish off the card, I added 3M VHB – 2 sided tape to the sentiment and applied it to the card.

Card Recipe:

Stamp: Snowman Stumble – TT014 (High Hopes Rubber Stamps)

Sentiment: Think Snow 2 – FF047 (High Hopes Rubber Stamps)

Inks: Memento – Tuxedo Black, Tim Holtz Distress Ink – Blueprint Sketch, Tim Holtz Distress Ink – Salty Ocean, Tim Holtz Distress Inks – Peeled Paint

Paper: Copic Marker X-Press It Blending Card, Hammermill – Premium Colour 100 lb., Momenta – Cardstock, Hot Buy Craft Smart – Holiday Glitz Glitter Paper 12″ x 12″

Die Cuts: My Creative Time – Rectangle Frame Dies, Nellie’s Choice – Nature Scene Dies – NSD001 – Mountains, Whimsy Stamps – Wavy Nested Frame Dies Set (WSD382), Joy Crafts – Labels and Tags

Stickles: Diamond

Tools: MISTI – Most Incredible Stamping Tool, 3M VHB – 2 sided tape, Gelly Roll Sakura #10 Pen, Sharpie Water Based Paint – White – Extra Fine Point, DecoArt Glamour Dust, Cosmic Shimmer Fluffy Stuff, Marvy Uchida – Embossing Heat Tool, Cuttlebug, Picket Fence – Blending Brush, Pental Sunburst Metalic Med Gel Pen, Xyron Create a Sticker

Image coloured with Copic Markers:

Snowman: B60, R30, R20, YR21, YR16, YR15, Colorless Blender

Hat: BG72, BG57, BG32, BG11, Gelly Roll Sakura #10 Pen

Mitts and Skates: C3, C2, C1, C00, BG09, BG05, BG02, BG01

Ice: B00, B000, B000

Hope you like it and have a fantastic week!

You can find lots of inspiration from the Design Team Divas at the High Hopes blog, and the High Hopes Rubber Stamps Facebook Fan page plus you can also follow us on
Instagram, Twitter and Pinterest.

The Happy Couple!!


Today, I’m sharing a card that I made using the image from The Paper Shelter called The Happy Couple. I made this card for a colleague who was married recently. Here’s wishing the happy couple a very long and happy marriage!


To make the card, I first imported the image into Microsoft Word and then printed it out on my HP Printer using High Quality Grayscale. The image was printed onto Copic Marker X-Press It Blending Card. I coloured in the image using Copic markers and then fussy cut around it.

Using my Cuttlebug, Spellbinders – S6-138 dies, and I die cut Hammermill – Premium Colour 100 lb. 5 times for the layers and twice for the sides. For the front of the card, I die cut Crafts Pearl Papers – 02-3081416 with the same dies. For the grass, I die-cut Lawn Fawn – Shadow Box Card Park Add-On and Lawn Fawn – Simple Grassy Hillsides using Momenta – Cardstock. Lastly, I die-cut the flag banner using Crafter’s Companion – Luxury Cardstock – Navy Blue and Craftin Desert Diva’s – Flag Banner Dies and the sentiment was die cut 5 times with Hammermill – Premium Colour 100 lb. cardstock and once with Hot Buy Craft Smart – Holiday Glitz Glitter Paper using PaperCrafter Today – 15 Die Cut Sentiment Set.

For the back panel using stencils I had made previously out of Avery Elle – Pierced Clouds Dies, I coloured in the sky using Tim Holtz Distress Ink – Salty Ocean and Tim Holtz Distress Inks – Broken China. Tim Holtz Distress Ink – Mowed Lawn was used to colour in the grass. The card was now ready to put together. I started with the coloured background and added the coloured image to it using 3M VHB – 2 sided tape.

This was adhered to the side panels using double-side tape on both sides.  Working from back to front, I added on the next layer and applied the grass die cut to front of the layer. This was put through the tabs on the side. I added in the next layers in the same manner. A layer with more grass was added to the 4th layer. I added in the next layer and then for the very front I once again cut off the tabs on both sides and then attached it to the sides using double-sided tape. The banner was then added using glue. The paper for the sentiment had been put through my Xyron Creative Station prior to cutting it. This made it easy to peel of the back of the stickers for each layer and assembling them on top of each other. I used the white layers for the bottom of the sentiment and for the final piece, I used the gold. A small jewel dot was used to finish off the dotted “i”.

Card Recipe:

Stamp: The Happy Couple (The Paper Shelter)

Inks: HP Printer Grayscale, Tim Holtz Distress Ink – Salty Ocean, Tim Holtz Distress Inks – Broken China, Tim Holtz Distress Ink – Mowed Lawn

Paper: Copic Marker X-Press It Blending Card, Hammermill – Premium Colour 100 lb., Crafter’s Companion – Luxury Cardstock – Navy Blue, Crafts Pearl Papers – 02-3081416, Momenta – Cardstock, Hot Buy Craft Smart – Holiday Glitz Glitter Paper 12″ x 12″

Die Cuts: Lawn Fawn – Shadow Box Card Park Add-On, Lawn Fawn – Simple Grassy Hillsides, Spellbinders – S6-138, Craftin Desert Diva’s – Flag Banner Dies, PaperCrafter Today – 15 Die Cut Sentiment Set, Avery Elle – Pierced Clouds Die (D-05-01)

Miscellaneous: 3M VHB – 2 sided tape, Xyron Creative Station

Image coloured with Copic Markers:

Skin: E21, E11, E00, E000, R22, R20, B23, B21, Eyes (Gelly Roll Sakura #8 Pen, Sakura Glaze – Black)

Hair: E47, E44, E43, E41

Dress: BG70, C00, Colorless Blender

Suit and Tie: T7, T5, T3, B69, B39, B24

Flowers and Greenery: YG17, YG11, YG03, YG01. Y35, Y08, Y02, Y00

Shoes: C8, C7, C5, C3

Hope you like it and have a great week!

Polar Bear and Friend!!


Sharing this adorable image called Polar Bear and Friend from KLM Digital Designs today from the January release. This set comes with 3 sentiments, “You are Amazing”, “You’re My Sunshine on a Rainy Day” and “Best Friends Forever”, which I used on my card.

To make the card, I printed out the main image onto Copic Marker X-Press It Blending Card using my HP Printer. I used my Brother Scan and Cut to cut around the image and coloured it in with Copic markers. The sentiment was brought into Microsoft Word.  I imported the shape within Microsoft Word and used a weight of 3 for the solid line. Then, I brought the sentiment to the front and centred it in the middle of the shape. I printed this out on Recollections White cardstock and then just fussy cut around it.

I used AC White paper to create the base shape of the card 12″ x 6″. I scored the paper at 6″. I used Recollections – Blue Ombre Cardstock for the main background, cut to the same size as the base card. This was attached using double-sided tape.

Essentials by Tattered Lace Dies – Easel Slider dies and my Cuttlebug were used to die cut Hot Buy Craft Smart – Holiday Glitz Glitter Paper, Hammermill – Premium Colour 100 lb. and Stampin’ Up – Snowflake Splendor Designer Series Paper. Penny Black – Winter Roof die was used to die cut the icicles. The snow drifts on the bottom of the card were die cut using dies from Lawn Fawn – Stitched Hillside Borders. Once the icicles and snow drifts were die cut, I used the Tattered Lace die cut again so that everything would layer to the shape of the smaller rectangle. I used my Cuttlebug and Cuttlebug – Snow Dots stencil twice to create the texture to the larger rectangle. Gina K Designs – Glitz Glitter Gel was added to the icicles and front layer of snow. Stickles – Diamond was used to add texture to the back snow drift. Once everything was dry, I inked around all of the outside edges of the snow, rectangular shapes and main background with Tim Holtz Distress Ink – Blueprint Sketch.

To assemble the card, I used double-sided tape to attach the large rectangle shape directly to the base card. The smaller rectangle shape was assembled separately, then attached to the larger rectangular shape using 3M VHB – 2 sided tape. Tombo glue was used to add the icicles and layers of snow to the smaller rectangluar shape. The image and sentiment were popped up using 3M VHB – 2 sided tape. To complete the card, Stickles – Diamond was added below the bear to create a shadow and also some streaks along the snow.

Card Recipe:

Stamp and Sentiments: Polar Bear and Friend (KLM Digital Designs)

Inks: HP Printer Grayscale, Tim Holtz Distress Ink – Blueprint Sketch

Paper: Copic Marker X-Press It Blending Card, Hammermill – Premium Colour 100 lb., Stampin’ Up – Snowflake Splendor Designer Series Paper, Recollections – Blue Ombre Cardstock, Recollections – White Cardstock, AC White Cardstock, Hot Buy Craft Smart – Holiday Glitz Glitter Paper 12″ x 12″

Die Cut: Essentials by Tattered Lace Dies – Easel Slider, Penny Black – Winter Roof – 51-475, Lawn Fawn – Stitched Hillside Borders

Stencil: Cuttlebug – Snow Dots

Tools: 3M VHB – 2 sided tape, Cuttlebug, Gina K Designs – Glitz Glitter Gel

Image coloured with Copic Markers:

Penguin: W9, W7, W5, W3, E15, Y17, YR16, YR15, E43, E42, E41, E40, R11, RV00, Colorless Blender, White Prismacolor Premier Pencil

Polar Bear: W9, BV20, C1, C00, R24, R22, R11, RV00, E35, E33, E31, C1, Colorless Blender

Hope you like it and have a great week!

You can find more cards to inspire you at KLM Designs, KLM Digital Design Team and KLM Digital Designs on the Facebook Fan page from the rest of our design team.

Check out some special savings for a limited time at KLM!!

Happy Birthday Flower Frame


Today, I’m sharing Floral Window 1 from KLM Digital Designs January Release. The image comes with 3 different sentiments, “You’re so Sweet”, “You’re the Best” and “Happy Birthday”. I really love how the frame comes with this image. It makes it so easy to create cards for multiple occasions and the design makes it so easy to make a quick card for someone special.

To make the card, I printed out the image onto Copic Marker X-Press It Blending Card using my HP Printer. I coloured in the image with Copic markers and then I used my Brother Scan ‘N Cut to cut around the image. A black marker was used to go around all of the edges of the flower and outer leaf. The image frame was coloured in with Sharpie – Gold Medium Point – Water Based Paint.

For the base card, Hammermill – Premium Colour 100 lb. was folded to the size of 5.5″ x 5.5″. I cut Heartfelt Creations – Winter’s Eve Collection paper to the same size as the base card. I inked around the edges with Sharpie – Gold Medium Point – Water Based Paint and adhered it directly to the base using double-sided tape. Hot Buy Craft Smart – Holiday Glitz Glitter Paper was die cut with my Cuttlebug and My Creative Time -Stitched Squares Inside and Out and attached with double-sided tape. The main image was popped up using 3M VHB – 2 sided tape. A little bit of Stickles – Yellow was added to the centre of the flower and some dots were added to finish off the card.

Card Recipe:

Stamp and Sentiment: Floral Window 1 (KLM Digital Designs)

Inks: HP Printer Grayscale

Paper: Copic Marker X-Press It Blending Card, Hammermill – Premium Colour 100 lb., Hot Buy Craft Smart – Holiday Glitz Glitter Paper 12″ x 12″, Heartfelt Creations – Winter’s Eve Collection – HCDP1-281

Die Cuts: My Creative Time -Stitched Squares Inside and Out

Tools: Brother Scan ‘N Cut, Stickles – Yellow, Cuttlebug, 3M VHB – 2 sided tape

Image coloured with Copic Markers:

Flower: R89, R85, R83, R81, Y17, Y15, Y08, R23

Leaves: YG17, YG13, YG03, YG01

Gold Frame: Sharpie – Gold Medium Point – Water Based Paint

Hope you like it and have a great week!

You can find more cards to inspire you at KLM Designs, KLM Digital Design Team and KLM Digital Designs on the Facebook Fan page from the rest of our design team.

Sending You Tidings


Today, I’m featuring a Christmas card by Dreamerland Crafts using their stamp set called Sending You Tidings – D19072. Growing up in the North, we used to get a lot of snow. I always love looking out the window and seeing the snow fall and how beautiful it looks on the houses and trees. Driving in it, not so much, but everything else about winter, I love. LOL!

To make this card, I cut some Copic Marker X-Press It Blending Card to the size of 4.75″ x 3.5″ using my Cuttlebug and My Creative Time – Rectangle Frame Layers Dies. Then using my MISTI and Memento – Tuxedo Black, I stamped the image first onto the paper and then again on to Post-It Note to create a mask. I fussy cut around the mask and placed it to the side to use a little later. I then proceeded to colour in my image with Copic markers.

Once the colouring of the image was complete, I was ready to create the sky. To accomplish this, the mask that I had set aside earlier was placed over top of the coloured image. A mixture of Tim Holtz Distress Inks were then used: Black Soot, Chipped Sapphire, Blueprint Sketch and Dusty Concord inks. Once, the background was completed, I stamped the sentiment from the same stamp set using my MISTI and VersaMark ink. The sentiment was then embossed with Ranger Embossing Powder White – Extra Fine Detail and Marvy Uchida – Embossing Heat Tool was used to heat set the embossing powder.

I was now ready to add the final finishing touches. To do this, I added in the snowflakes and stars using Gelly Roll Sakura #10, #8 and #5 Pens. Stickles – Cool Mint was added to the little lady’s hat, pom-pom and coat cuffs. Gina K Designs – Glitz Glitter Gel was applied with a spatula along the bottom of the card to create some sparkling snow and also to the top of the chimney with a Q-Tip. I also coloured in the little snowflake in the sky with Gelly Roll Sakura #10 pen and then Gelly Roll Stardust – Clear to make it sparkle. I set the card aside to let the glitter dry for a few hours.

For the card base I used Recollections – Winter 4.25″ x 5.5 and edged around all of the sides with Tim Holtz Distress Ink – Iced Spruce. I die cut Hot Buy Craft Smart – Holiday Glitz Glitter Paper to the size 3.75″ x 5″ using My Creative Time – Rectangle Frame Dies and Cuttlebug. This was adhered directly onto the base using 3M VHB – 2 sided tape. Once the glitter was completely dry, I layered the completed image on top of the second layer using 3M VHB – 2 sided tape.

Card Recipe:

Stamp and Sentiment:  Sending You Tidings – D19072 (Dreamerland Crafts)

Inks: Memento – Tuxedo Black, VersaMark, Tim Holtz Distress Ink – Black Soot, Tim Holtz Distress Ink – Chipped Sapphire, Tim Holtz Distress Ink – Blueprint Sketch, Tim Holtz Distress Inks – Dusty Concord, Tim Holtz Distress Ink – Iced Spruce

Paper: Copic Marker X-Press It Blending Card, Hammermill – Premium Colour 100 lb., Hot Buy Craft Smart – Holiday Glitz Glitter Paper 12″ x 12″, Recollections – Winter 4.25″ x 5.5″ (Assorted Box of Cards)

Embossing Powder: Ranger Embossing Powder White – Extra Fine Detail

Die Cuts: My Creative Time – Rectangle Frame Die Layers – MCT-D274, My Creative Time – Rectangle Frame Dies

Tools: MISTI – Most Incredible Stamping Tool, Marvy Uchida – Embossing Heat Tool, Stickles – Cool Mint, Gelly Roll Sakura #8 Pen, 3M VHB – 2 sided tape, Cuttlebug

Image coloured with Copic Markers:

Face: E21, E11, E04, E00, E000, R22, R20, Eyes – Sakura Glaze – Black

Hair: E47, E44, E43

Hat, Jacket, Mitts, Bear’s Scarf:  BG49, BG15, BG13, BG11, Stickles – Cool Mint

Leggings: C7, C5

Boots: E27, E25, E23, E21

Bear: E35, E34, E33, E31, E30, R22, R20, Eyes and Noses – Sakura Glaze – Black

Bow and Girl’s Scarf: R59, R39, R37, R35

Present: Y17, Y15, Y08, Y04

Chimney: E99, E97, E08, E07, E13, C4, C2

Snow: Gina K Designs – Glitz Glitter Gel, Gelly Roll Sakura #8 Pen, Gelly Roll Sakura #5 Pen

Hope you like it and have a great week!

You can find more cards to inspire you at Dreamerland Crafts and Pointer Scrapbooking on the Facebook Fan pages from the rest of our design team.

HoHoHoHoHo!!


Today I’m sharing  Santa Gnome (KLM Digital Designs) image from the new November release. This adorable little Gnome comes with 3 different sentiments. “Believe In The Magic”, “Happy Holidays” and “Christmas Blessing”.

I printed out the main image onto Copic Marker X-Press It Blending Card using my HP Printer. I used my Brother Scan and Cut to cut around the image and coloured it in with Copic markers. The background was die cut using Hot Buy Craft Smart – Holiday Glitz Glitter Paper and Hammermill – Premium Colour 100 lb. paper. I coloured the vines and leaves from the Hammermill die cut with various Tim Holtz Distress inks listed below and then fussy cut them out. Glue was applied to the reverse side of the die cut and then it was placed on top of the original Glitz Paper die cut. Crafts – Self-Adhesive Rhinestones were then applied to the berries on the vine.

For the background, I used the Hammermill paper to create a card base of 5.5″ x 4.25″. Then I applied Crafts – Sparkling Stickers red paper to the base. I then adhered the vine and frame directly to the background using glue. Lastly, I die cut the sentiment 5 times using black cardstock and the 1 time with Tonic Studios – Craft Perfect – Onyx Black Pearlescent. I ran all off the die cuts through my Xyron Create a Sticker to make it easier to apply them on top of each other. This created an embossed effect. I then added this on top of the vine base. The main image was then added to the card using 3M VHB – 2 sided tape.

To finish off the card, I added some Marvy – Liquid Applique to the big pom-pom and heat set it with my Marvy Uchida – Embossing Heat Tool to puff it up. Lastly, some Stickles – Frosted Lace was added to the hat, cuffs and coat trim.

Card Recipe:

Stamp: Santa Gnome (KLM Digital Designs)

Inks: HP Printer Grayscale, Tim Holtz Distress Ink – Evergreen Bough, Tim Holtz Distress Ink – Mowed Lawn, Tim Holtz Distress Ink – Pine Needles

Paper: Copic Marker X-Press It Blending Card, Hammermill – Premium Colour 100 lb., Tonic Studios – Craft Perfect – Onyx Black Pearlescent, Hot Buy Craft Smart – Holiday Glitz Glitter Paper 12″ x 12″, Crafts – Sparkling Stickers – 02-3068629

Die Cut: Poppystamps – Holly Vine Sidekick Frame – Christmas Craft Die

Tools: 3M VHB – 2 sided tape, Stickles – Frosted Lace, Marvy – Liquid Applique, Crafts – Self-Adhesive Rhinestones – 02-3006207, Xyron Create a Sticker, Marvy Uchida – Embossing Heat Tool

Image coloured with Copic Markers:

Skin: E000, E00, E04, E11, E21

Beard: W3, W2, W1, W0, W00

Hat and Coat: E59, E39, E37, E35, Stickles – Frosted Lace, Marvy – Liquid Applique

Mitts: YG67, YG63, G28

Holly Leaves and Stems: Tim Holtz Distress Ink – Evergreen Bough, Tim Holtz Distress Ink – Mowed Lawn, Tim Holtz Distress Ink – Pine Needles, Atayou Spica – Twinkling Like The Stars – Melon – 06, Atayou Spica – Twinkling Like The Stars – Mint – 17, Atayou Spica – Twinkling Like The Stars – Olive – 07

Hope you like it and have a great week!

Check out KLM Designs for some great savings this month.

Wrap up your holiday cards! Offer good until 11/27/20
25% OFF ALL DIGITAL STAMPS
USE COUPON CODE: PRETURKERY

You can find more cards to inspire you at KLM Designs, KLM Digital Design Team and KLM Digital Designs on the Facebook Fan page from the rest of our design team.

Santa in the Chimney!!!


It’s Wednesday, and this week I’m sharing a Christmas card featuring Santa in Chimney – S202 from (High Hopes Rubber Stamps) paired with the sentiment Bold – From One Flake – K201 (High Hopes Rubber Stamps). December is almost here and Santa is on his way to deliver all of the goodies to everyone. Hope your not on the naughty list. LOL!

To create the card this week, I stamped the main image and then coloured it in with Copic Markers. I stamped the image again and used it as a mask. I have a magnetic cutting mat, so I just used a very strong magnet to hold the mask down. Then I used multiple Tim Holtz Distress Inks to create the sky.

Once the sky was created, I removed the mask and used My Creative Time – Rectangle Frame to die cut the image. I added the sentiment using the top half of the sentiment stamp only. To do this, using my MISTI to get a good clean stamped image, I used VersaMark Ink and then embossed it with Ranger Embossing Powder White – Extra Fine Detail. This was then heated using Marvy Uchida – Embossing Heat Tool.

To finish off my background, I added in some snowflakes and stars using Gelly Roll Sakura #10 Pen and Gelly Roll Sakura #5 Pen. For the eyes and notches on the belt, Sakura Glaze – Black ink was used. For the snow on the roof top, Gina K Designs – Glitz Glitter Gel was applied with a little sprinkle of Martha Stewart Crafts – Crystal Fine Glitter. Stickles was added to the hat, collar and cuffs of Santa’s outfit.

To create the layers, I first die cut Hot Buy Craft Smart – Holiday Glitz Glitter Paper with My Creative Time – Rectangle Frame Layers and then the dark blue panel with My Creative Time – Rectangle Frame dies. For the card, I used Hammermill – Premium Colour 100 lb. paper, which was cut at 8.5″ x 5.5″ and then scored at 4.25″ and to create a base card of 4.25″ x 5.5″.

To assemble the remainder of the card. I placed the dark blue layer directly to the base using double-sided tape. The silver layer was applied the same way. The coloured image was then popped up using 3M VHB – 2 sided tape.

Card Recipe:

Stamp: Santa in Chimney – S202 (High Hopes Rubber Stamps)

Sentiment: Bold – From One Flake – K201 (High Hopes Rubber Stamps)

Inks: Memento – Tuxedo Black, Tim Holtz Distress Inks – Black Soot, Dusty Concord, Blueprint Sketch and Chipped Sapphire, VersaMark

Paper: Copic Marker X-Press It Blending Card, Hot Buy Craft Smart – Holiday Glitz Glitter Paper 12″ x 12″, Dark Blue Cardstock, Hammermill – Premium Colour 100 lb.

Die Cuts: My Creative Time – Rectangle Frame Layers, My Creative Time – Rectangle Frame Dies

Embossing Powder: Ranger Embossing Powder White – Extra Fine Detail

Glitter: Martha Stewart Crafts – Crystal Fine Glitter, Gina K Designs – Glitz Glitter Gel, Stickles

Tools and Miscellaneous: MISTI – Most Incredible Stamping Tool, Cuttlebug, Marvy Uchida – Embossing Heat Tool

Image coloured with Copic Markers:

Skin: E21, E11, E04, E00, E000, R22, R21, R20

Hair: W3, W2, W1, W00

Hat and Outfit: R59, R39, R37, R35

Belt: C9, C7, C5, C4, E15, YR24, Y35, Y08

Mitts: C9, C7, C4

Sack: G94, G28, G09, G07, G05, YG67, YG63, YG61

Chimney: E99, E97, E13, E08, T5, T3, T1

Hope you like it and have a fantastic week!

You can find lots of inspiration from the Design Team Divas at the High Hopes blog, and the High Hopes Rubber Stamps Facebook Fan page plus you can also follow us on
Instagram, Twitter and Pinterest.

Little Cup of Cocoa


Coffee Loving Cardmakers is currently hosting the 2020 Fall / Winter Coffee Lovers Blog Hop! For my Fourth entry into this hop, I chose this loveable snowman in a hot tub of Cocoa called Snow Yummy – S182  by High Hopes Rubber Stamps. For the sentiments I used High Hopes Rubber Stamps, Cup of Cocoa – M009 and Holiday All Year – H200.

The image was stamped with Memento – Tuxedo Black ink onto Copic Marker X-Press It Blending Card using my MISTI to give me a nice clean image. The image was coloured with copic markers and then I fussy cut around it. I used a black marker to go around all of the edges where I had cut out the image.

I cut Hammermill – Premium Colour 100 lb. paper to be 4.25″ x 11″. Then I scored the paper at 5.5″ and again at 8.25″. (2.75″ from the original score line). I cut another piece of the cardstock at 4.25″ x 5.5″ to be the front panel. I then cut Stampin’ Up – Snowflake Splendor Designer Series Paper to be 4.25″ x 5″ and used double-side tape to place it directly to the front panel piece. Hot Buy Craft Smart – Holiday Glitz Glitter Paper was used to create the snow. I cut it 4.25″ wide and then just tore a piece across the width to create the shape. I used double-sided tape to adhere this directly to the bottom of the front panel.

The sentiments were then added with Versa Fine – Onyx Black and embossed with Ranger – Clear Super Fine Detail embossing powder. This was then heat set with Marvy Uchida – Embossing Heat Tool. To create the rectangles, I used  My Creative Time – Rectangle Frame Layers  for the patterned paper and My Creative Time – Rectangle Frame Dies for the background rectangle using Hot Buy – Recollections – Jewel Tones. Next, I ran the small sentiment and the coloured image through my Xyron Creative Station to create stickers out of them. This made it easer to adhere the larger image to the background and the smaller sentiment to the larger rectangle.

The card was now ready to assemble. I applied double-sided tape to only the lower half of the scored card and then placed the finished scene panel onto it. I cut another piece of patterned paper at 4-1/8″ x 3″ and adhered it the lower half of the inside card. Then I popped up the sentiment using 3M VHB – 2 sided tape. I added some Wink of Stella – Clear  to the snowman to make him sparkle and Gelly Roll Stardust – Clear and the Wink of Stella – Clear to the large snowflake on the mug. Lastly, I added some Stickles – Diamond to add some texture to the snow.

Card Recipe:

Stamp: Snow Yummy – S182 (High Hopes Rubber Stamps)

Sentiments: Cup of Cocoa – M009 (High Hopes Rubber Stamps)Holiday All Year – H200 (High Hopes Rubber Stamps)

Inks: Memento – Tuxedo Black, Versa Fine – Onyx Black

Embossing Powder: Ranger – Clear Super Fine Detail embossing powder

Paper: Copic Marker X-Press It Blending Card, Hammermill – Premium Colour 100 lb., Stampin’ Up – Snowflake Splendor Designer Series Paper, Hot Buy Craft Smart – Holiday Glitz Glitter Paper 12″ x 12″

Die Cuts: My Creative Time – Rectangle Frame Layers, My Creative Time – Rectangle Frame Dies

Tools: MISTI – Most Incredible Stamping Tool, Cuttlebug, 3M VHB – 2 sided tape, Xyron Creative Station, Wink of Stella – Clear, Stickles – Diamond

Image coloured with Copic Markers:

Snowman: B60, BG000, YR18, YR14, Y08, C9, N8, N5, R30, R27, R24, R22, R20, Colorless Blender, Wink of Stella – Clear

Mug and Hot Cocoa: E23, E25, E27, B37, B14, B12, Wink of Stella – Clear and Gelly Roll Stardust – Clear

Hat and Scarf: C9, C7, C5, R59, R39, R37, R35

Hope you like it and have a great week!

Elf Christmas


It’s Wednesday, and this week I’m sharing a Christmas card featuring Munchin Melvin Elf – M023 from (High Hopes Rubber Stamps) who just isn’t able to resist the delicious Gingerbread cookie, paired with the sentiment Have Your Elf – H094 (High Hopes Rubber Stamps).

I remember my mom baking little Gingerbread men every year when we were little and she even let us decorate some on our own. It was always so much fun! Then it was even more fun when we were aloud to eat them. Yum! Yum!

To create the card this week, I stamped the main image and then coloured it in with Copic Markers. I used my Brother Scan and Cut to cut around the image leaving a small white border. For the sentiment, I stamped it out using Versa Fine – Onyx Black ink and then embossed it using Ranger – Clear Super Fine Detail embossing powder. This was heat set using Marvy Uchida – Embossing Heat Tool. Next, Tim Holtz Distress Ink – Cracked Pistachio ink was used to colour the white paper to match the edging around the base of the card.

For the base card I started out with white cardstock folded in half to create a 6″ x 6″ card. The elf background from Doodlebug – Christmas Magic was cut to the same size as the base and adhered to it using double-sided tape. For the inside paper, Doodlebug – Christmas Magic paper was used again. Using my Cuttlebug and Creative Expressions Festive Collection – Gingerbread Man die I cut the centre piece out. I used the same die to cut out the red border as well. Then I die cut one more piece using just the large border for the white glitter background. Hot Buy Craft Smart – Holiday Glitz Glitter Paper was chosen to do this with.

To assemble the remainder of the card. I first taped the centre piece to the main red piece at the back. This was then glued to the white glitter background. The frame, main image and sentiment were added using 3M VHB – 2 sided tape. To complete the card, I used some embellishments from Dress It Up – Holiday Collection and Carta Bella – Santa’s Workshop.

Card Recipe:

Stamp: Munchin Melvin Elf – M023 (High Hopes Rubber Stamps)

Sentiment: Have Your Elf – H094 (High Hopes Rubber Stamps)

Inks: Memento – Tuxedo Black, Tim Holtz Distress Ink – Cracked Pistachio, Versa Fine – Onyx Black

Paper: Copic Marker X-Press It Blending Card, Doodlebug – Christmas Magic – 6″ x 6″, Hot Buy Craft Smart – Holiday Glitz Glitter Paper 12″ x 12″, Crafter’s Companion Luxury Cardstock – Red – 8.5 x 11″

Die Cuts: Creative Expressions Festive Collection – Gingerbread Man

Embossing Powder: Ranger – Clear Super Fine Detail embossing powder

Embellishments: Dress It Up – Holiday Collection, Carta Bella – Santa’s Workshop

Tools and Miscellaneous: MISTI – Most Incredible Stamping Tool, Cuttlebug, Brother Scan and Cut, Marvy Uchida – Embossing Heat Tool

Image coloured with Copic Markers:

Skin: E21, E11, E04, E00, E000, R22, R20

Hair: E08, YR18, YR15, YR12

Hat and Dress: RV17, RV14, RV11

Shoes: BG49, BG15, BG11, R39, R37, R35, C5, C3, C1

Socks: RV000, R37, R35

Gingerbread Man: E35, E33, E31, E21, R39, R37, R35, G09, G05, G02

Hope you like it and have a fantastic week!

You can find lots of inspiration from the Design Team Divas at the High Hopes blog, and the High Hopes Rubber Stamps Facebook Fan page plus you can also follow us on
Instagram, Twitter and Pinterest.

Sending Warm Hugs


Sharing a card I made today for a challenge using Super Cool Pals  from Kraftin’ Kimmie Stamps. I really love anything Christmas and winter related and who couldn’t resist this adorable snowman and little fox?

To make my card, I started out by stamping the image using my MISTI and Memento Tuxedo Black ink onto Copic Marker X-Press It Blending Card. I coloured the image with Copic markers and then fussy cut around it. I die cut the background paper using My Creative Time – Rectangle Frame Dies. It’s from Stampin Up’, but I received it in a Mystery Box, so I’m not sure what paper pack it comes from. Then I tore up some Recollections – Christmas Inkjet Printable Glitter Paper and taped it to the bottom of the panel.

The snowflake was die cut using Hot Buy Craft Smart – Holiday Glitz Glitter Paper 12″ x 12″ and Tim Holtz – Sizzix Thinlets – Paper Snow Flakes. I ran the paper and my finished coloured image through my Xyron Creative Station and also the Holiday Glitz paper was put through it as well before I die cut it. This allowed me to make stickers out of both items. For the sentiment, I used my MISTI, Versa Fine – Onyx Black and then embossed it with Ranger – Clear Super Fine Detail embossing powder. This was then heat embossed with my Marvy Uchida – Embossing Heat Tool. Once this was done, I die-cut the sentiment with Lifestyle Crafts Cutting Dies – Nesting Circles and edged all around it with Kraftin’ Kimmie – Lovely Lagoon Ink. I also edged all around the snowy background with the same ink.

For the assembly, I started out using the base from Recollections -Christmas Cards and Envelopes set at 5.5″ x 4.25″. Using double-sided tape, I  adhered the snowy background to the base. Then I added my main image and snowflake. The sentiment was popped up using some 3M VHB – 2 sided tape and Stickles – Diamond glitter was added to parts of the snow to finish the card off.

Card Recipe:

Stamp and Sentiment: Super Cool Pals (Kraftin’ Kimmie Stamps)

Inks: Memento – Tuxedo Black, Kraftin’ Kimmie – Lovely Lagoon Ink, Versa Fine – Onyx Black

Embossing Powder: Ranger – Clear Super Fine Detail embossing powder

Paper: Copic Marker X-Press It Blending Card, Hot Buy Craft Smart – Holiday Glitz Glitter Paper 12″ x 12″, Recollections – Christmas Cards and Envelopes Set, Recollections – Christmas Inkjet Printable Glitter Paper – 8.5 x 11″

Die Cuts: Tim Holtz – Sizzix Thinlets – 661599 – Paper Snow Flakes, Lifestyle Crafts Cutting Dies – Nesting Circles, My Creative Time – Rectangle Frame Dies

Tools: MISTI – Most Incredible Stamping Tool, Cuttlebug, 3M VHB – 2 sided tape, Marvy Uchida – Embossing Heat Tool, Stickles – Diamond, Xyron Creative Station

Image coloured with Copic Markers:

Fox: E99, E97, E15, E08, C2, C1, C0, R24, R02, R00

Snowman: C0, BV20, B000, R08, YR18, YR16, YR14

Vest: BG49, BG45, BG34, BG32

Hat and Flower: BG49, BG45, BG34, BG32, C10, C8, C6, R39, R37, R35, G07, G05

Scarf: G09, G07, G05, R59, R39, R37, R35

Hope you like it and have a great week!

Gnome – Merry Christmas!


It’s Wednesday, and this week I’m featuring a Christmas card I made using the image Flying Gnome – TLF008 and sentiment Sm Christmas Script – F051 from (High Hopes Rubber Stamps).  I just love colouring these adorable little gnomes. Also, it’s always good to make Christmas cards a little at a time throughout the year so that you are not rushing to get them all done in December. LOL! Have you started making your Christmas cards yet this year?

To create the card this week, I first used the die cut from Creative Expressions by Sue Wilson – Festive Collection – Pointsettia Mini Background – CED3049 to cut some Copic Marker X-Press It Blending Card using my Cuttlebug. I stamped the main image and then coloured it with Copic Markers. I started off doing the sky first as I didn’t want any of the Reds smearing into it. (This happens sometimes if you are not careful.) Once the image was all coloured in, I used Sakura Glaze – Black and Gelly Roll Sakura #8 Pen to increase the intensity of the eye on the bird. I outlined the entire image with Pigma Micron 03 black marker to make it stand out more against the sky. Lastly, I used a mixture of Gelly Roll Sakura #8 Pen and Gelly Roll Sakura #10 Pen to create the snow and stars in the sky.

For the base of the card, I began with a standard white card base of 4.25″ x 5.5″. I cut another piece of white cardstock the same size and applied the red shimmer topping on it using Crafts – Sparkling Stickers – 02-3068629. I used the same die cut listed above to cut out the intricate design using my Cuttlebug and the gold paper from Hot Buy Craft Smart – Holiday Glitz Glitter Paper. I had put the gold paper through my Xyron Creative Station before I die cut it. This made it easier to just peel and stick onto the base.

For the sentiment, I die cut some spare red cardstock using Craftin Desert Diva’s – Flag Banner Dies. Using my MISTI and VersaMark ink, I stamped the sentiment onto the die cut and embossed it using Ranger Super Fine Gold Embossing powder. This was heated with my Marvy Uchida – Embossing Heat Tool. The image and the sentiment were both popped up with 3M VHB – 2 sided tape to complete the card.

Card Recipe:

Stamp: Flying Gnome – TLF008 (High Hopes Rubber Stamps)

Sentiment: Sm Christmas Script – F051 (High Hopes Rubber Stamps)

Inks: Memento – Tuxedo Black, VersaMark

Paper: Copic Marker X-Press It Blending Card, Hot Buy Craft Smart – Holiday Glitz Glitter Paper 12″ x 12″, Crafts – Sparkling Stickers – 02-3068629

Die Cut: Creative Expressions by Sue Wilson – Festive Collection – Pointsettia Mini Background – CED3049, Craftin Desert Diva’s – Flag Banner Dies (Retired)

Embossing Powder: Ranger Super Fine Gold

Tools and Miscellaneous: MISTI – Most Incredible Stamping Tool, Cuttlebug, Pigma Micron 03 black marker, Xyron Creative Station, Marvy Uchida – Embossing Heat Tool

Image coloured with Copic Markers:

Skin: E21, E11, E04, E00, E000

Beard: W5, W4, W3, W2, W1, W0, W00

Hat and Outfit: R59, R39, R37, R35, YG97, YG95, YG93, G43

Cardinal Bird: R37, R35, R24, R22, R17, R14, R08, R05, R02, R000, YR15, YR12, C3, N10, N8, Gelly Roll Sakura #8 Pen, Sakura Glaze – Black

Leaves and Holly: R59, R37, R24, YG97, YG95, YG93, YG05, G43

Shoe: E34, E33, E31

Sky: B99, B97, B95, B93, Gelly Roll Sakura #8 Pen, Gelly Roll Sakura #10 Pen

Hope you like it and have a fantastic week!

You can find lots of inspiration from the Design Team Divas at the High Hopes blog, and the High Hopes Rubber Stamps Facebook Fan page plus you can also follow us on
Instagram, Twitter and Pinterest.


Peace and Joy!!


Today I’m sharing Candy Cane Corner Frame from KLM Digital Designs new September release. I decided to try something different with this image and printed it out on Recollections – Christmas Inkjet Printable Glitter Paper. Then it was coloured in with Copic Markers. This beautiful stamp comes with the Candy Cane image and 4 sentiments: “Peace & Joy”, “Season’s Greetings”, “Happy Holidays” and “Merry & Bright”.

Started out with a card base of 5.5″ x 4.25″. My Creative Time – Rectangle Frame Dies and My Creative Time – Rectangle Frame Die Layers – MCT-D274 were used to create the various layers. Creative Expressions – Craft Dies by Sue Wilson – Festive Collection – Holly and Berry Border were used to create the small holly and leaves in the right corners using my Cuttlebug and Crafts – Green Glitter Cardstock paper. The top layer was die-cut and then a ruler and craft knife were used to cut the top and bottom of the image.

I popped up all of the layers with 3M VHB – 2 sided tape, except for the bottom layer, which was applied with 2-sided tape.

Card Recipe:

Stamp and Sentiment: Candy Cane Corner Frame (KLM Digital Designs)

Inks: HP Printer Grayscale

Paper: Recollections – Christmas Inkjet Printable Glitter Paper – 8.5″ x 11″, Hot Buy Craft Smart – Holiday Glitz Glitter Paper 12″ x 12″, Crafts – Glitter Cardstock 02-3068425

Die Cuts: Creative Expressions – Craft Dies by Sue Wilson – Festive Collection – Holly and Berry Border, My Creative Time – Rectangle Frame Dies, My Creative Time – Rectangle Frame Die Layers – MCT-D274

Tools: 3M VHB – 2 sided tape,  Cuttlebug

Image coloured with Copic Markers:

Leaves: YG67, YG03, G99

Ribbon: BG18, BG15, BG11

Candy Cane: R59, R29, R24

Hope you like it and have a great week!

You can find more cards to inspire you at KLM Designs, KLM Digital Design Team and KLM Digital Designs on the Facebook Fan page from the rest of our design team.

Happy St. Paddy’s Day!


It’s Wednesday, and I’m back to share this adorable little Leprechaun who is happily sitting on his pot of gold. My grandmother was Irish and so I’ve been celebrating St. Patrick’s Day since I was a little girl. My mom decorates the entire house with Shamrocks and Leprechauns each year to celebrate the occasion. LOL!

To create this card I used Lucky’s Pot O’ Gold – P030 (High Hopes Rubber Stamps) for the main image and Fancy St. Paddy’s – G147 (High Hopes Rubber Stamps) for the sentiment.

I stamped the image and then used Copic markers to colour in the image. For the rainbow, I used a circle from the My Creative Time dies as a stencil and the chisel side of the markers. Once coloured, I mounted all of the various papers and layers onto 5.5″ x 4.25″ card base. The edges were inked with Tim Holtz Distress Ink – Mowed Lawn.

Card Recipe:

Stamp: Lucky’s Pot O’ Gold – P030 (High Hopes Rubber Stamps)

Sentiment: Fancy St. Paddy’s – G147 (High Hopes Rubber Stamps)

Inks: Memento – Tuxedo Black, Tim Holtz Distress Ink – Mowed Lawn

Paper: Copic Marker X-Press It Blending Card, Little Scraps of Heaven – Clover Paper, Hot Buy Craft Smart – Holiday Glitz Glitter Paper 12″ x 12″

Die Cuts: My Creative Time – Scalloped Stitched Oval Dies, My Creative Time – More Stitched Circles

Tools: MISTI – Most Incredible Stamping Tool, Cuttlebug

Image coloured with Copic Markers:

Skin: E21, E11, E04, E00, E000, R22, R20

Hair: YR16, YR14, YR12, YR09

Hat and Outfit:  G09, G07, G05, G03, YG09, YR12, YG21

Shoes: C9, C7, C5, C3, C1

Clover: YG25, YG23, YG21, YG17, YG13, YG11

Pot and Gold:  W9, W8, W7, W5, E15, Y28, Y35, Y17, Y06

Grass: G17, G14, G07

Background and Rainbow: V15, RV17, R14, YR14, Y13, G14, B14, B04, B02, B01, B00, B000

Hope you like it and have a fantastic week!

You can find lots of inspiration from the Design Team Divas at the High Hopes blog, and the High Hopes Rubber Stamps Facebook Fan page plus you can also follow us on
Instagram, Twitter and Pinterest.