Tag Archive | Stickles – Xmas Red

Santa’s Coming!!!


It’s Wednesday, and this week, I made a card using Motorin’ By Santa – T094 by High Hopes Rubber Stamps for the main image and Coming To Town – G271 (High Hopes Rubber Stamps) for the sentiment. Santa’s motoring through town to bring everyone some Christmas Cheer!

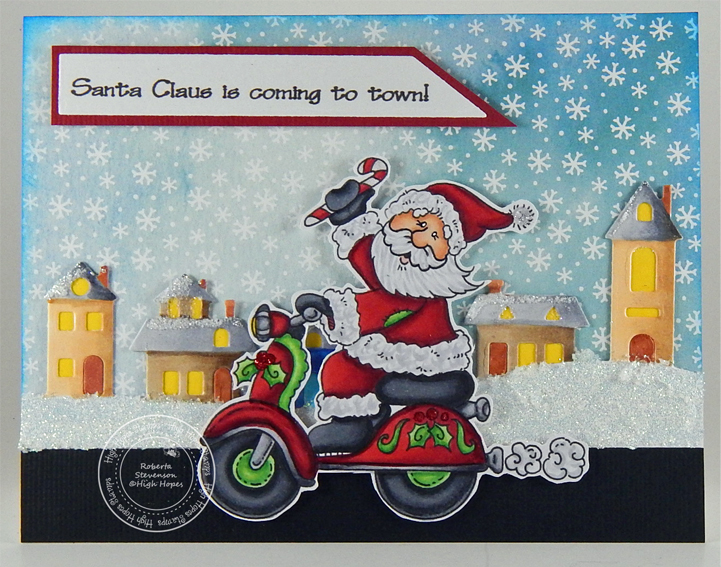
To make my card this week, I began with a card base of Hammermill – Premium Colour 100 lb. cardstock, cut and scored to be 5.5″ x 4.25″. I cut the background paper from Stampin’ Up – Snowflake Splendor Designer Series Paper to be the same size as the base and inked around the edges using Tim Holtz Distress Ink – Salty Ocean. I applied this directly to the base card using double-sided tape. AC – Black cardstock was cut to 5.5″ x .75″ and adhered to the bottom using double-sided tape. I die cut the village using my Cutttlebug, Hammermill – Premium Colour 100 lb. cardstock and Village Edges dies from Elizabeth Craft Designs. I coloured in the homes and put some yellow cardstock behind for the windows. Then I took the little doors, coloured them in and inset them back into the die cuts. Once this was done, I added Gina K Designs – Glitz Glitter Gel – Iridescent to the hills and Stickles – Diamond to the roof tops.

With my MISTI and Memento – Tuxedo Black ink, I stamped both the image and the sentiment onto Copic Marker X-Press It Blending Card. I coloured in the image with Copic markers and then I fussy cut around it. I added Stickles – Xmas Red to the Holly on the motorbike and Stickles – Diamond to the pop pom on Santa’s hat. Using my Cuttlebug, I die cut the sentiment using Whimsy Stamps – Quick Strips Die Set. I ran this through my Xyron Create a Sticker and placed it on some red cardstock. Then using my cutter, I cut around it leaving a slim border.

Once everything was dry, it was time to assemble the remainder of the card. I applied the houses directly to the base over top of the road. The Santa image and sentiment were both popped up onto the background using 3M double-sided tape.

Card Recipe:

Stamp: Motorin’ By Santa – T094 (High Hopes Rubber Stamps)

Sentiment: Coming To Town – G271 (High Hopes Rubber Stamps)

Inks: Memento – Tuxedo Black, Tim Holtz Distress Ink – Salty Ocean

Paper: Copic Marker X-Press It Blending Card, Hammermill – Premium Colour 100 lb., AC – Black, Stampin’ Up – Snowflake Splendor Designer Series Paper (12″ x 12″)

Die Cuts: Elizabeth Craft Designs – 1691 – Village Edges, Whimsy Stamps – Quick Strips Die Set – WSD330

Stickles: Xmas Red and Diamond

Tools: MISTI – Most Incredible Stamping Tool, 3M – 2 sided tape, Gina K Designs – Glitz Glitter Gel – Iridescent, Xyron Create a Sticker

Image coloured with Copic Markers:

Eyes: Sakura Glaze – Black Pen, Gelly Roll Sakura #5 Pen

Skin: E21, E11, E00, E000, R30, R20

Santa Hat, Clothing: R59, R37, R35

Mitts, Seat, Boots and Wheels: C8, C6, C4

Santa’s Beard, Trim and Smoke: C2, C1, C0

Motorcycle, Decorations, Wheel Hubs and Fenders: R59, R37, R35, G14, YG23, YG11, C8, C6, C5, C4, C3, C2, C1, Y08

Houses: C5, C4, C3, C1, C0, E55, E53, E51, E50, E44, E43, E41, E15, E13, BV25, BV13, BV11, BV02, B26, B24, B23

Hope you like it and have a fantastic week!

You can find lots of inspiration from the Design Team Divas at the High Hopes blog, and the High Hopes Rubber Stamps Facebook Fan page plus you can also follow us on
Instagram, Twitter and Pinterest.

Happy Xmas Couple!!!


It’s Wednesday, and this week, I made a card using Happy Together – TT007 by High Hopes Rubber Stamps for the main image and Holiday All Year – H200 (High Hopes Rubber Stamps) for the sentiment. This month High Hopes Rubber Stamps is celebrating Christmas in July! Have you started your Christmas cards yet for this year?

To make my card this week, I began with a card base made from AC White Cardstock cut and scored to be 6″ x 6″. I inked around the edges of American Crafts – “Holiday” paper cut to the same size with Sharpie – Gold Medium Point – Water Based Paint. Then I applied it directly to the base card with double-sided tape. The larger oval was die cut using my Cuttlebug, Forever In Time – Texture Rouge paper and Gina Marie Designs – Big and Little Pierced Chain Oval Layered Dies. Using VersaMark ink, I inked around all of the edges of the oval and then applied Stampendous Stamp-n Stuff – Gold Tinsel and heat embossed it with Marvy Uchida – Embossing Heat Tool. This was then applied directly to the base card using Forever In Time – Double-sided foam tape. I die cut the Copic Marker X-Press It Blending Card paper using oval dies from the same set and Whimsy Stamps – Bookmark and Tags Die Set was used to die cut Lawn Fawn – Watercolor Wishes Rainbow paper.

The image was stamped using my MISTI and Memento – Tuxedo Black ink onto the smaller oval. I coloured in the image with Copic markers. The sentiment is actually 2 lines, but I wanted it to fit inside the gift die, so I used Scotch tape to mask off the words I didn’t want to show each time. I used my MISTI to do the stamping and Versa Fine – Onyx Black and Ranger – Clear Super Fine Detail embossing powder to emboss it. I used my Marvy Uchida – Embossing Heat Tool to emboss the powder. I cleaned off the stamp and then repositioned it again, repeating the previous steps. I did this 4 times. To finish off the sentiment give box, I applied some VersaMark ink to the bow and around all of the edges of the die cut. Next, I added Stampendous Stamp-n Stuff – Gold Tinsel embossing powder and heat embossed everything using my heating tool.

To assemble the card, I added 3M VHB – 2 sided tape to the back of the coloured image and Forever In Time – Double-sided foam tape to the back of the sentiment and applied them both to the card. To finish everything off and give it a little bit of sparkle, I added some dots on the holly using Stickles – Xmas Red.

Card Recipe:

Stamp: Happy Together – TT007 (High Hopes Rubber Stamps)

Sentiment: Holiday All Year – H200 (High Hopes Rubber Stamps)

Inks: Memento – Tuxedo Black, VersaMark, Versa Fine – Onyx Black

Paper: Copic Marker X-Press It Blending Card,  Forever In Time – Texture Rouge, American Crafts – “Holiday” – 6″ x 6″ paper pad, Lawn Fawn – Watercolor Wishes Rainbow – 6″ x 6″

Die Cuts: Gina Marie Designs – Big and Little Pierced Chain Oval Layered Dies, Whimsy Stamps – Bookmark and Tags Die Set

Embossing Powder: Stampendous Stamp-n Stuff – Gold Tinsel, Ranger – Clear Super Fine Detail

Tools: MISTI – Most Incredible Stamping Tool, 3M VHB – 2 sided tape, Sharpie – Gold Medium Point – Water Based Paint, Forever In Time – Double-sided foam tape, Stickles – Xmas Red

Image coloured with Copic Markers:

Skin: E21, E11, E00, E000, R30, R20

Hair: E47, E44, E43, E40, E15, Y38, Y21, YR23, E29, E25, E23, E21

Dress and Ribbon: R39, R37, R35, C1

Vest, Holly, Flower Wrap: G46, G28, G24

Pants: C9, C7, C5

Shoes: 100, C7, C5, C3

Flowers: R39, R37, R35, R24, C1

Background: G02, G00, G000, G0000

Hope you like it and have a fantastic week!

You can find lots of inspiration from the Design Team Divas at the High Hopes blog, and the High Hopes Rubber Stamps Facebook Fan page plus you can also follow us on
Instagram, Twitter and Pinterest.