Tag Archive | Holiday All Year (H200) (High Hopes Rubber Stamps)

Happy Xmas Couple!!!


It’s Wednesday, and this week, I made a card using Happy Together – TT007 by High Hopes Rubber Stamps for the main image and Holiday All Year – H200 (High Hopes Rubber Stamps) for the sentiment. This month High Hopes Rubber Stamps is celebrating Christmas in July! Have you started your Christmas cards yet for this year?

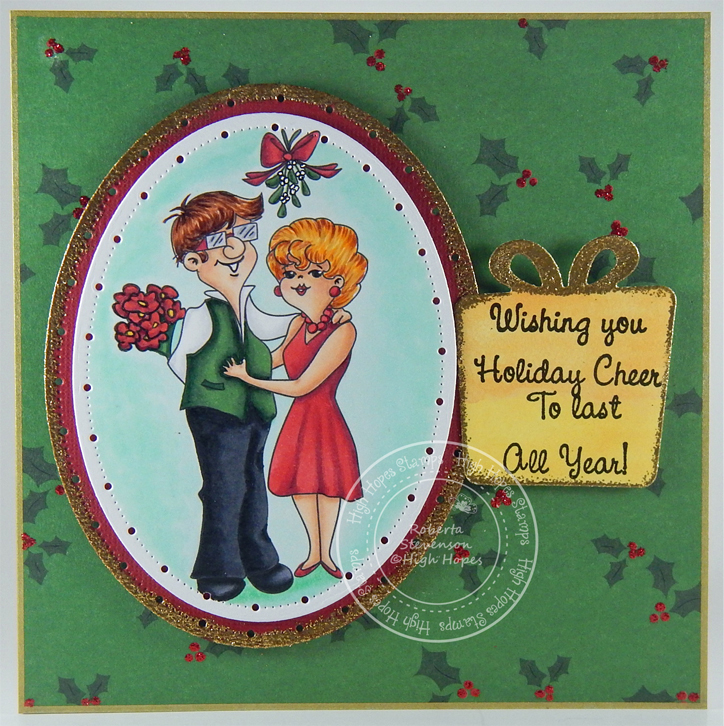
To make my card this week, I began with a card base made from AC White Cardstock cut and scored to be 6″ x 6″. I inked around the edges of American Crafts – “Holiday” paper cut to the same size with Sharpie – Gold Medium Point – Water Based Paint. Then I applied it directly to the base card with double-sided tape. The larger oval was die cut using my Cuttlebug, Forever In Time – Texture Rouge paper and Gina Marie Designs – Big and Little Pierced Chain Oval Layered Dies. Using VersaMark ink, I inked around all of the edges of the oval and then applied Stampendous Stamp-n Stuff – Gold Tinsel and heat embossed it with Marvy Uchida – Embossing Heat Tool. This was then applied directly to the base card using Forever In Time – Double-sided foam tape. I die cut the Copic Marker X-Press It Blending Card paper using oval dies from the same set and Whimsy Stamps – Bookmark and Tags Die Set was used to die cut Lawn Fawn – Watercolor Wishes Rainbow paper.

The image was stamped using my MISTI and Memento – Tuxedo Black ink onto the smaller oval. I coloured in the image with Copic markers. The sentiment is actually 2 lines, but I wanted it to fit inside the gift die, so I used Scotch tape to mask off the words I didn’t want to show each time. I used my MISTI to do the stamping and Versa Fine – Onyx Black and Ranger – Clear Super Fine Detail embossing powder to emboss it. I used my Marvy Uchida – Embossing Heat Tool to emboss the powder. I cleaned off the stamp and then repositioned it again, repeating the previous steps. I did this 4 times. To finish off the sentiment give box, I applied some VersaMark ink to the bow and around all of the edges of the die cut. Next, I added Stampendous Stamp-n Stuff – Gold Tinsel embossing powder and heat embossed everything using my heating tool.

To assemble the card, I added 3M VHB – 2 sided tape to the back of the coloured image and Forever In Time – Double-sided foam tape to the back of the sentiment and applied them both to the card. To finish everything off and give it a little bit of sparkle, I added some dots on the holly using Stickles – Xmas Red.

Card Recipe:

Stamp: Happy Together – TT007 (High Hopes Rubber Stamps)

Sentiment: Holiday All Year – H200 (High Hopes Rubber Stamps)

Inks: Memento – Tuxedo Black, VersaMark, Versa Fine – Onyx Black

Paper: Copic Marker X-Press It Blending Card,  Forever In Time – Texture Rouge, American Crafts – “Holiday” – 6″ x 6″ paper pad, Lawn Fawn – Watercolor Wishes Rainbow – 6″ x 6″

Die Cuts: Gina Marie Designs – Big and Little Pierced Chain Oval Layered Dies, Whimsy Stamps – Bookmark and Tags Die Set

Embossing Powder: Stampendous Stamp-n Stuff – Gold Tinsel, Ranger – Clear Super Fine Detail

Tools: MISTI – Most Incredible Stamping Tool, 3M VHB – 2 sided tape, Sharpie – Gold Medium Point – Water Based Paint, Forever In Time – Double-sided foam tape, Stickles – Xmas Red

Image coloured with Copic Markers:

Skin: E21, E11, E00, E000, R30, R20

Hair: E47, E44, E43, E40, E15, Y38, Y21, YR23, E29, E25, E23, E21

Dress and Ribbon: R39, R37, R35, C1

Vest, Holly, Flower Wrap: G46, G28, G24

Pants: C9, C7, C5

Shoes: 100, C7, C5, C3

Flowers: R39, R37, R35, R24, C1

Background: G02, G00, G000, G0000

Hope you like it and have a fantastic week!

You can find lots of inspiration from the Design Team Divas at the High Hopes blog, and the High Hopes Rubber Stamps Facebook Fan page plus you can also follow us on
Instagram, Twitter and Pinterest.

Little Cup of Cocoa


Coffee Loving Cardmakers is currently hosting the 2020 Fall / Winter Coffee Lovers Blog Hop! For my Fourth entry into this hop, I chose this loveable snowman in a hot tub of Cocoa called Snow Yummy – S182  by High Hopes Rubber Stamps. For the sentiments I used High Hopes Rubber Stamps, Cup of Cocoa – M009 and Holiday All Year – H200.

The image was stamped with Memento – Tuxedo Black ink onto Copic Marker X-Press It Blending Card using my MISTI to give me a nice clean image. The image was coloured with copic markers and then I fussy cut around it. I used a black marker to go around all of the edges where I had cut out the image.

I cut Hammermill – Premium Colour 100 lb. paper to be 4.25″ x 11″. Then I scored the paper at 5.5″ and again at 8.25″. (2.75″ from the original score line). I cut another piece of the cardstock at 4.25″ x 5.5″ to be the front panel. I then cut Stampin’ Up – Snowflake Splendor Designer Series Paper to be 4.25″ x 5″ and used double-side tape to place it directly to the front panel piece. Hot Buy Craft Smart – Holiday Glitz Glitter Paper was used to create the snow. I cut it 4.25″ wide and then just tore a piece across the width to create the shape. I used double-sided tape to adhere this directly to the bottom of the front panel.

The sentiments were then added with Versa Fine – Onyx Black and embossed with Ranger – Clear Super Fine Detail embossing powder. This was then heat set with Marvy Uchida – Embossing Heat Tool. To create the rectangles, I used  My Creative Time – Rectangle Frame Layers  for the patterned paper and My Creative Time – Rectangle Frame Dies for the background rectangle using Hot Buy – Recollections – Jewel Tones. Next, I ran the small sentiment and the coloured image through my Xyron Creative Station to create stickers out of them. This made it easer to adhere the larger image to the background and the smaller sentiment to the larger rectangle.

The card was now ready to assemble. I applied double-sided tape to only the lower half of the scored card and then placed the finished scene panel onto it. I cut another piece of patterned paper at 4-1/8″ x 3″ and adhered it the lower half of the inside card. Then I popped up the sentiment using 3M VHB – 2 sided tape. I added some Wink of Stella – Clear  to the snowman to make him sparkle and Gelly Roll Stardust – Clear and the Wink of Stella – Clear to the large snowflake on the mug. Lastly, I added some Stickles – Diamond to add some texture to the snow.

Card Recipe:

Stamp: Snow Yummy – S182 (High Hopes Rubber Stamps)

Sentiments: Cup of Cocoa – M009 (High Hopes Rubber Stamps)Holiday All Year – H200 (High Hopes Rubber Stamps)

Inks: Memento – Tuxedo Black, Versa Fine – Onyx Black

Embossing Powder: Ranger – Clear Super Fine Detail embossing powder

Paper: Copic Marker X-Press It Blending Card, Hammermill – Premium Colour 100 lb., Stampin’ Up – Snowflake Splendor Designer Series Paper, Hot Buy Craft Smart – Holiday Glitz Glitter Paper 12″ x 12″

Die Cuts: My Creative Time – Rectangle Frame Layers, My Creative Time – Rectangle Frame Dies

Tools: MISTI – Most Incredible Stamping Tool, Cuttlebug, 3M VHB – 2 sided tape, Xyron Creative Station, Wink of Stella – Clear, Stickles – Diamond

Image coloured with Copic Markers:

Snowman: B60, BG000, YR18, YR14, Y08, C9, N8, N5, R30, R27, R24, R22, R20, Colorless Blender, Wink of Stella – Clear

Mug and Hot Cocoa: E23, E25, E27, B37, B14, B12, Wink of Stella – Clear and Gelly Roll Stardust – Clear

Hat and Scarf: C9, C7, C5, R59, R39, R37, R35

Hope you like it and have a great week!

Snow Yummy!


It’s Wednesday, and this month at High Hopes Rubber Stamps we are continuing to celebrating Christmas. This little snowman is enjoying his hot tub of warm cocoa outdoors in the snow. I’m sure he’s feeling so refreshed! LOL!

I stamped the image Snow Yummy (S182) (High Hopes Rubber Stamps), coloured it in with Copics and then fussy cut around it. You can’t see it in this photo, but I added glitter on the big snowflake too. I then embossed the background and popped up the die cut of the big mug with some pop-up tape. Lastly, I popped up the image as well and then finished off the card with the sentiment Holiday All Year (H200) (High Hopes Rubber Stamps) which I heat embossed onto some shiny blue cardstock.

Card Recipe:

Stamp: Snow Yummy (S182) (High Hopes Rubber Stamps)

Sentiment: Holiday All Year (H200) (High Hopes Rubber Stamps)

Inks: Memento – Tuxedo Black, Tim Holtz Distress Ink – Chipped Sapphire, Tim Holtz Distress Inks – Ground Espresso, Versamark

Die Cuts: My Creative Time – You Deserve A Break

Embossing Folder: Creative Expressions by Sue Wilson – Wintery Frame EF-076

Embossing Powder: Ranger Embossing Powder White – Extra Fine Detail

Paper: Copic Marker X-Press It Blending Card, American Crafts – Jack Frost, Hot Buy Craft Smart – Holiday Glitz Glitter Paper 12″ x 12″, Crafter’s Companion Luxury Glitter Cardstock – Navy Blue PackCrafter’s Companion Luxury Glitter Cardstock – Navy Blue Pack

Tools: MISTI – Most Incredible Stamping Tool, Cuttlebug

Image coloured with Copic Markers:

Mug: B39, B37, B34, B32

Hat and Scarf: C10, C8, C6, C4, R59, R37, R35

Nose: E15, YR18, YR16, YR12

Buttons, Eye Brows: C10, C8, C6

Snowman and Marshmallows: BV20, C1, B000, Colorless Blender

Hot Chocolate: E29, E27, E25, E123

Hope you like it and have a fantastic week!

You can find lots of inspiration from the Design Team Divas at the High Hopes blog, and the
High Hopes Rubber Stamps Facebook Fan page plus you can also follow us on
Instagram, Twitter and Pinterest.