Tag Archive | Tim Holtz Distress Ink – Salty Ocean

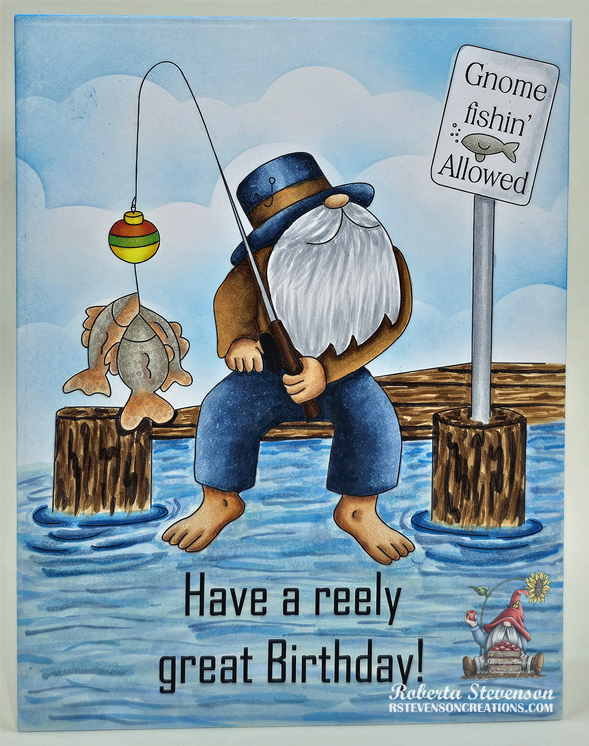
Fishing Gnome!


Today I’m sharing a Birthday card using KLM Digital DesignFisherman Gnome from the new April 2024 release that I made for my dad. This image also comes with 2 more sentiments, “May all your fishes come true” and “…I’m hooked on you”. My dad loves fishing and goes every chance he gets!

The image and sentiment were imported into Microsoft Word and printed out onto Copic Marker X-Press It Blending Card. I had created a 5.5″ x 4.25 frame around the image before printing it out with a HP Printer. I also printed out a second image onto plain photocopy paper and fussy cut around it. I attached the mask that I had created out of the plain paper over top of the coloured image. Using some stencils that I had created previously with Avery Elle – Pierced Clouds Dies and Tim Holtz Distress Ink – Salty Ocean, I created the clouds with a blender brush.

The image was coloured in with the Copics listed below and then attached to the base card.

Card Recipe:

Stamp and Sentiment:  KLM Digital DesignFisherman Gnome

Inks: HP Printer Grayscale, Tim Holtz Distress Ink – Salty Ocean

Paper: Copic Marker X-Press It Blending Card, Hammermill – Premium Cardstock 110 lb.

Dies \ Stencil: Avery Elle – Pierced Clouds Die (D-05-01)

Image coloured with Copic Markers:

Skin: E21, E11, E04, E00, E000

Beard: C3, C2, C1,C0

Jeans and Hat: B99, B97, B95, B91

Shirt: E57, E55, E53

Dock: E79, E57, E53, E23

Fish: YR61, YR02, YR00, R02, W3, W2, W1, Y35, E93

Pole and Sign: C2, C1,C0, C00, W3, W2, W1, Colorless Blender

Fishing Rod and Ball: E27, E25, E23, YR09, YR07, YR04, YG07, YG06, YG03, Y08, Y06, Y04

Water: B93, B91, B45, B41, B32, B05, B02, BG10

Hope you like it and have a great week!

You can find more cards to inspire you at KLM Designs, KLM Digital Design Team and KLM Digital Designs on the Facebook Fan page from the rest of our design team.
Old Fart!


Today I’m sharing a birthday card using Whimsy StampsOld Geezer and sentiments from their Old Fart stamp set and Old Fart Word Die that I made for my younger brother this week! Couldn’t resist teasing him about getting older and entering into his 60’s!. LOL!

I began making my card by creating a 5.5″ x 4.25″ base made from Hammermill – Premium Colour 100 lb. cardstock. I used 3 circles that were cut out with Photo-Play – Circle Windows Etched Dies and Echo Park – Birthday Girl – Bouncing Balloons from a previous card that I made. Tim Holtz Distress Inks: Salty Ocean and a blender brush were used to colour the white circle and then the same ink was used to ink the edges around the other 2 circles and card base.

The image was stamped onto Copic Marker X-Press It Blending Card with Memento – Tuxedo Black ink and a MISTI. It was coloured in with the Copics listed below and then fussy cut. Using the MISTI again for placement, I stamped the sentiments using Versa Fine – Onyx Black ink. This was then embossed with Ranger – Clear Super Fine Detail embossing powder and then heat embossed with a Marvy Uchida – Embossing Heat Tool. With a Cuttlebug and dies from Whimsy Stamps – Old Fart Word die set and Art ImpressionsJournal Letter Die Set, I die cut out the sentiments with black cardstock.

To assemble the card, I used liquid glue to attach the die cut wording and “60” onto the circles. All of the circles were applied to the base card using liquid glue. The main image was popped up onto the base card using U-Line Double-Sided Foam Tape. I also added a few more fun sentiments from the same stamp sets on the inside of the card too! LOL!  My brother loved his card and I hope you do too!

Card Recipe:

Stamp and Sentiments:  Whimsy StampsOld Geezer and Old Fart

Inks: Memento – Tuxedo Black, Tim Holtz Distress Inks: Salty Ocean, Versa Fine – Onyx Black

Paper: Copic Marker X-Press It Blending Card, Hammermill – Premium Colour 100 lb., Echo Park – Birthday Girl – Bouncing Balloons

Dies: Whimsy Stamps – Old Fart Word, Photo-Play – Circle Windows Etched Dies (#SIS2379),  Art ImpressionsJournal Letter Die Set (5562)

Embossing Powder: Ranger – Clear Super Fine Detail embossing powder

Miscellaneous: U-Line Double-Sided Foam Tape, Marvy Uchida – Embossing Heat Tool

Image coloured with Copic Markers:

Skin: E21, E11, E00, E000

Hair: YR12, C1, C00

Clothing and Slippers: B37, B14, B12, B00, C9

Toot: C1, C1, C00

Hope you like it and have a great week!

Let’s Go Camping!


Today I’m sharing an outdoors camping card using KLM Digital DesignCamper Girl from the new March 2024 release. This image also comes with 2 more sentiments, “Make S’more memories” and “Work hard, travel harder“. As a child, I used to love going camping and sitting around the campfire at night with the family. How about you?

I began making my card by creating a 5.5″ x 4.25″ base made from Hammermill – Premium Colour 100 lb. cardstock. With blending brushes and Concord & 9th – Cardscapes (C9 Summer Camp) stencils I created the background. I first created the sky using the mountain stencil from the set and Tim Holtz Distress Ink – Salty Ocean. I traced the stencil onto some regular copy paper and cut it out with some scissors to get the reverse of the stencil. This was placed over the sky and Tim Holtz Distress Ink – Lost Shadow was applied onto the scene. With the same stencil as before, I used the opposite side and added in the next layer using Tim Holtz Distress Ink – Hickory Smoke. Lastly, for the bottom mountains, I just inked over everything with Tim Holtz Distress Ink – Pumice Stone. I taped off the bottom of the card and applied Tim Holtz Distress Ink – Mowed Lawn up to the base of the mountains. From the same set, I applied the evergreen trees using Tim Holtz Distress Ink – Rustic Wilderness.

The image and sentiment were imported into Microsoft Word and printed out onto Copic Marker X-Press It Blending Card. The image was coloured in with the Copics listed below and then fussy cut. The edges were all inked with black marker. The sentiment was cut using a cutter. With a blending brush and green ink left over from the forest and trees, I blended some ink over top of the sentiment. U-Line Double-Sided Foam Tape was applied to the image and sentiment and they were both popped up onto the card. I added in some small shadows and grass using some water, #1 Paintbrush liner and some ink from Tim Holtz Distress Ink – Rustic Wilderness to complete the card.

Card Recipe:

Stamp and Sentiment:  KLM Digital DesignCamper Girl

Inks: HP Printer Grayscale, Tim Holtz Distress Inks: Salty Ocean, LostShadow, Hickory Smoke, Pumice Stone, Mowed Lawn and Rustic Wilderness

Paper: Copic Marker X-Press It Blending Card, Hammermill – Premium Colour 100 lb.

Stencils: Concord & 9th – Cardscapes (C9 Summer Camp)

Miscellaneous: U-Line Double-Sided Foam Tape

Image coloured with Copic Markers:

Skin: E21, E11, E00, E000

Hair: YR23, Y15, Y11, Y00

Sweater and Vest: BV04, BV02, BV00, V09, V06, V04

Jeans: B26, B23, B21

Shoes: C9, C7, C5

Trailer: B69, B66, B63, C9, C7, C5, C3, C2, C1, C0, C00, Colorless Blender, White PrismaColor Premier Pencil – PC938 (Windows)

Basket: E15, YR27, YR24, Y35, Y08

Drapes: BG18, BG15, BG13, BG10

Trailer Inside: Y23, Y21, Y00

Trailer Hitch, Door Handle, Curtain Rod: C5, C3, C1

Hope you like it and have a great week!

You can find more cards to inspire you at KLM Designs, KLM Digital Design Team and KLM Digital Designs on the Facebook Fan page from the rest of our design team.

Happy Chinese New Year Dragon 2024!!!


Today I’m sharing Chinese New Year cards I created for my friends and some co-workers using Whimsy StampsBirfday Party Dragons – DP1055, Craftin Desert Diva’s Dragon Festival Stamps (Retired),  SVG Year of the Dragon Alphabet by Sarah Christie and  Gina Marie Designs – Ric Rac Nested Circle Dies.

The same procedure below was used to create 10 semi-identical cards.

Recollections – Christmas Cards and Envelopes Set cardstock was used to create a 6.5″ x 5″ card base. Using my MISTI Craftin Desert Diva’s Dragon Festival Stamps and VersaMark ink, I stamped the dragons and sentiment at the top of the card and then embossed the ink with Ranger Super Fine Gold Embossing powder. This was then heat embossed with Marvy Uchida – Embossing Heat Tool. The MISTI really helped speed up this process because once I had positioned the stamps for the first card on the MISTI, I just had to keep adding and stamping each additional card.

For the next step, I die cut all of my gold scallops using Recollections – Matte Gold Foil cardstock and Copic Marker X-Press It Blending Card using my Cuttlebug and Gina Marie Designs – Ric Rac Nested Circle Dies. I stamped out one more image onto a piece of Post-It Note paper and fussy cut around it to create a mask. The mask was  applied over top of the dragon image. Next using a blender brush, Tim Holtz Distress Ink – Salty Ocean and stencils made from Avery Elle – Pierced Clouds Die (retired), I created the cloudy background sky. Once this was completed, I coloured in the image with the Copic markers listed below. U-Line Double-Sided Foam Tape was applied to the backs of each of the scallops. I applied the gold and coloured pieces together and then popped them up onto the centre of the cards.

Lastly, I used a freebie from Extraordinarychaos –  SVG Year of the Dragon Alphabet by Sarah Christie. I was so happy when I had seen this, as I knew I just had to used it on my cards this year. I uploaded the .SVG file into Cricut Design space and sized the numbers. The numbers were cut out on my Cricut Explore using Recollections – Matte Gold Foil cardstock. The die cut numbers were applied with glue and attached to the each of the cards to finish them off.

Card Recipe:

Stamps: Whimsy StampsBirfday Party Dragons – DP1055, Craftin Desert Diva’s Dragon Festival Stamps (Retired)

Inks: Memento – Tuxedo Black, VersaMark, Tim Holtz Distress Ink – Salty Ocean

Paper: Copic Marker X-Press It Blending Card, Recollections – Christmas Cards and Envelopes Set, Recollections – Matte Gold Foil cardstock

Dies: SVG Year of the Dragon Alphabet by Sarah ChristieGina Marie Designs – Ric Rac Nested Circle Dies, Avery Elle – Pierced Clouds Die (D-05-01) (Retired)

Embossing Powder: Ranger Super Fine Gold Embossing powder

Miscellaneous: MISTI – Most Incredible Stamping Tool, Marvy Uchida – Embossing Heat Tool, U-Line Double-Sided Foam Tape

Dragon: YR24, YR23, YR21, R56, R39, R37, R35

Balloons: YR24, YR23, YR21, YR20, R37, R27, R24

Hope you like it and have a great week!

Flower Pot Gnome – Girl!


Today I’m sharing a Thank You card using KLM Digital DesignFlower Pot Gnome – Girl from the new February 2024 release. This image also comes with 2 more sentiments, “You are loved” and “Carry on with courage“.

The image and sentiment were imported into Microsoft Word and printed out onto Copic Marker X-Press It Blending Card. I had created a 5.5″ x 4.25 frame around the image before printing it out with a HP Printer. I also printed out a second image onto plain photocopy paper and fussy cut around it. The image was coloured in with the Copics listed below and then I attached the mask that I had created out of the plain paper over top of the coloured image. Using some stencils that I had created previously with Avery Elle – Pierced Clouds Dies and Tim Holtz Distress Ink – Salty Ocean, I created the clouds with a blender brush. Once this was done, I coloured in the grass. The image was then cut to the size of 5.5″ x 4.25 and attached with double-sided tape to a card base of the same size using Hammermill – Premium Cardstock 110 lb.

Card Recipe:

Stamp and Sentiment:  KLM Digital DesignFlower Pot Gnome – Girl

Inks: HP Printer Grayscale, Tim Holtz Distress Ink – Salty Ocean

Paper: Copic Marker X-Press It Blending Card, Hammermill – Premium Cardstock 110 lb.

Dies: Avery Elle – Pierced Clouds Die (D-05-01)

Image coloured with Copic Markers:

Skin: E21, E11, E04, E00, E000

Hair: E08, YR18, YR16, YR12

Jeans and Hat: B26, B23, B21

Shoes: E27, E25, E23, E21

Shirt: BG72, BG57, BG32, BG11

Flower Pot, Flowers, Leaves: E13, E09, E08, V04, V01, V000, Y17, Y04, G16, YG25, YG23

Grass: G16, YG25, YG23, YG03, YG01

Hope you like it and have a great week!

You can find more cards to inspire you at KLM Designs, KLM Digital Design Team and KLM Digital Designs on the Facebook Fan page from the rest of our design team.

Flower Pot Gnome!


Today I’m sharing a card using KLM Digital DesignFlower Pot Gnome from the new January 2024 release. This image also comes with 2 more sentiments, “Something about you made me feel a little more alive and a far less lost” and “You will forever be my always”. I love these sentiments because they can be used for Valentine’s Day, anniversaries or just to say “I love you”.

The image and sentiment were imported into Microsoft Word and printed out onto Copic Marker X-Press It Blending Card. I had created a 5.5″ x 4.25 frame around the image before printing it out with a HP Printer. I also printed out a second image onto plain photocopy paper and fussy cut around it. The image was coloured in with the Copics listed below and then I attached the mask that I had created out of the plain paper over top of the coloured image. Using some stencils that I had created previously with Avery Elle – Pierced Clouds Dies and Tim Holtz Distress Ink – Salty Ocean, I created the clouds with a blender brush. Once this was done, I coloured in the grass. The image was then cut to the size of 5.5″ x 4.25 and attached with double-sided tape to a card base of the same size using Hammermill – Premium Cardstock 110 lb.

Card Recipe:

Stamp and Sentiment:  KLM Digital DesignFlower Pot Gnome

Inks: HP Printer Grayscale, Tim Holtz Distress Ink – Salty Ocean

Paper: Copic Marker X-Press It Blending Card, Hammermill – Premium Cardstock 110 lb.

Dies: Avery Elle – Pierced Clouds Die (D-05-01)

Image coloured with Copic Markers:

Skin: E21, E11, E04, E00, E000

Beard: E08, YR18, YR16, YR12

Jeans and Hat: B26, B23, B21

Shoes: E27, E25, E23, E21

Shirt: BG72, BG57, BG32, BG11

Letter: C1, C00, Colorless Blender

Flower Pot, Ribbon, Flowers, Wrapping and Leaves: E95, E25, E19, E17, E16, E13, V04, V01, V000, Y17, Y15, Y08, Y04

Grass: G16, YG25, YG23, YG21, YG03, YG01

Hope you like it and have a great week!

You can find more cards to inspire you at KLM Designs, KLM Digital Design Team and KLM Digital Designs on the Facebook Fan page from the rest of our design team.

Birthday Ssschmirth-day!


Today, I’m sharing a fun birthday card using Whimsy StampsMe-Wow Cat Birthday that I made for my father-in-laws 80th Birthday. He’s wasn’t too keen on turning 80 so I thought I would make this fun card for him! He loved it and I hope that you do too!

To create the card, I began with a card base of 5.5″ x 5.5″ using Hammermill – Premium Colour 100 lb. cardstock. Echo Park Paper Co. – Happy Birthday Boy paper was cut to the same size as the base and adhered with double-sided tape. Using my Cuttlebug and My Creative Time – Stitched Squares Inside and Out, I die cut a 3.5″ x 3.5″ square out of Copic Marker X-Press It Blending Card and a 4″ x 4″ square out of Recollections – Black cardstock.

Using my MISTI and Memento – Tuxedo Black ink, I stamped the image from Whimsy StampsMe-Wow Cat Birthday. The image was coloured in with Copic markers and then I stamped the image again onto a Post-It note and fussy cut around the balloon and upper half of the kitty to use it as a mask. I placed it over top of the coloured image and created the party background using Tim Holtz Distress Ink – Salty Ocean, Tim Holtz Distress Ink – Squeezed Lemonade and Tim Holtz Distress Ink – Wilted Violet which I applied using Blending Brushes. After the first layers were added, I used the same colours,  but this time I used Hero Arts – Party Confetti Stencil (Crop & Create Exclusive) to create the streamers. I removed the mask and put the image into my MISTI once again and this time, I stamped the sentiment from the same stamp set using Versa Fine – Onyx Black ink and then heat embossed it using Ranger – Clear Super Fine Detail embossing powder and Marvy Uchida – Embossing Heat Tool. Lastly, U-Line double-sided tape was applied to the back of the image and the black square. These were then popped up onto the centre of the card.

Card Recipe:

Stamp: Whimsy StampsMe-Wow Cat Birthday – C1386

Inks: Memento – Tuxedo Black, Versa Fine – Onyx Black, Tim Holtz Distress Ink – Salty Ocean, Tim Holtz Distress Ink – Squeezed Lemonade and Tim Holtz Distress Ink – Wilted Violet

Paper: Copic Marker X-Press It Blending Card, Hammermill – Premium Colour 100 lb., Recollections – Black cardstock, Echo Park Paper Co. – Happy Birthday Boy 6″ x 6″

Dies: My Creative Time – Stitched Squares Inside and Out

Stencil: Hero Arts – Party Confetti Stencil (Crop & Create Exclusive)

Embossing Poweder: Ranger – Clear Super Fine Detail

Miscellaneous: U-Line double-sided tape, Marvy Uchida – Embossing Heat Tool, MISTI – Most Incredible Stamping Tool, Blending Brushes

Image coloured with Copic Markers:

Cat: C10, C8, C7, C6, C5, C4, R22, R02, 100, YG09, YG07, YG05

Hat: BG15, BG11, BG10, BG09, BG05, BG02, BG01

Balloon: BG09, BG05, BG02, BG01, BG0000

Lawn: YG25, YG23, YG21, YG03, YG01

Hope you like it and have a great week!

Happy Pride Day!


Today, I’m sharing a Happy Pride Day card using Craft With SarahRainbow Gnomes from the free SVG April 21st – April 30th, 2023 Gnome Craft Countdown event. The Rainbow Gnomes were offered on day 6. The sentiment is a free sentiment that can be found on Cricut Design Space. My friend and his partner are celebrating this month along with many of their friends and I’m hoping this card puts an added smile on their faces.

To create the card, I began with a card base of 4.25″ x 5.5″ using Hammermill – Premium Colour 100 lb. cardstock.  Using Lawn Fawn CutsCloudy Stencil, multiple blending brushes and multiple Tim Holtz Distress Inks, I created the clouds. With Tim Holtz Distress Ink – Mowed Lawn, I gently blended the grass into the base of the clouds.

I imported the .SVG file into Cricut Design Space and created a mirror image of the .svg so that I could have the gnomes facing in opposite directions. I cut out all of the different layers using various cardstock colours along with the sentiment with my Cricut Explore. Once the pieces were all cut out, I glued them all together as per the instructions from Craft With Sarah instructions associated with the .SVG file. These were then added to the front of the card to finish it off.

Card Recipe:

Cricut Explore, Cricut Design Space – WWW.CRAFTWITHSARAH.COM \ Gnomes – gcc-day-06-rainbow (W2.944 x H3.211, Happy Pride Day (#M278417D3) (1.755 x 1.755)

Inks: Grass: Tim Holtz Distress Ink – Mowed Lawn, Sky: Tim Holtz Distress Ink – Salty Ocean, Aged Mahagony, Squeezed Lemonade, Wilted Violet

Paper: Hammermill – Premium Colour 100 lb., miscellaneous card stock

Die Cuts: Lifestyle Crafts Cutting Dies – Nesting Circles – Size 2″

Stencil: Lawn Fawn Cuts Cloudy Stencil

Miscellaneous: Cricut Explore, Cuttlebug, Blending Brushes

Hope you like it and have a great week!

Hero Dad!


Today I’m sharing a Father’s Day card using KLM Digital DesignWheelbarrow Gnome from the new April 2023 release. This image also comes with 2 more sentiments, “Dad, you’re someone to look up to no matter how tall I grow!” and “Any man can be a Father, but it takes someone special to be a Dad”. I know that my dad will always be my hero no matter how old I get. 🙂

Hammermill – Premium Colour 100 lb. cardstock was used to create a 5.5″ x 5.5″ card base. Using my Cuttlebug and My Creative Time -Stitched Squares Inside and Out dies, I die cut a 5″ x 5″ square out of Recollections – Black cardstock and a 4″ x 4″ square out of Copic Marker X-Press It Blending Card. The black square was applied directly to the base card using double-sided tape.

The image and sentiment were imported into Microsoft Word and printed out onto Copic Marker X-Press It Blending Card prior to me cutting out the 4″ square. The image was coloured in with Copic markers. I decided I wanted some puffy clouds, so I printed out the image again, but this time it was printed onto regular copy paper and then I fussy cut around the top part of it. It was placed over top of the coloured image with some washi tape to secure it in place. I took another piece of paper and created a wavy background and placed that down over the image too! Then, with Tim Holtz Distress Ink – Salty Ocean and a blender brush, I proceeded to create the cloudy sky using a stencil that I had made earlier using Avery Elle – Pierced Clouds Dies. Once the sky was complete, I added in the dirt path and the farm field to finish off the image. U-Line double-sided tape was added to the back of the completed coloured image and it was popped up onto card to finish it off.

Card Recipe:

Stamp and Sentiment:  Wheelbarrow Gnome – KLM Digital Designs

Inks: HP Printer Grayscale. Tim Holtz Distress Ink – Salty Ocean

Paper: Copic Marker X-Press It Blending Card, Hammermill – Premium Colour 100 lb., Recollections – Black cardstock

Dies: My Creative Time -Stitched Squares Inside and Out, Avery Elle – Pierced Clouds Die (D-05-01)

Miscellaneous: U-Line double-sided tape, Cuttlebug, Blending Brush

Image coloured with Copic Markers:

Skin: E21, E11, E00, E000

Beard: E29, E27, E25, E23

Hats and Boots: C8, C6, C4, C2

Shirts: BG72, BG57, BG32, BG11

Jeans: B26, B23, B21, E23

WheelBarrow: C10, C8, C6, C3, C2, C1, R56, R37, R35, E29, E25, E23

Lawn \ Farm Field: YG25, YG23, YG21, YG17, YG13, YG03, YG01

Dirt Path: E37, E35, E33, E31

Hope you like it and have a great week!

You can find more cards to inspire you at KLM Designs, KLM Digital Design Team and KLM Digital Designs on the Facebook Fan page from the rest of our design team.

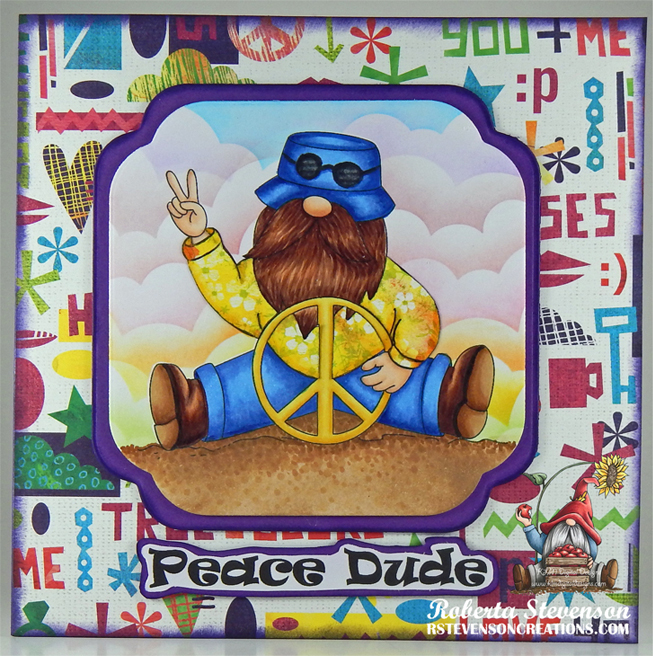
Peace Dude!


Today I’m sharing an inspirational \ birthday card using KLM Digital DesignPeace Gnome from the new March release. This image also comes with 2 more sentiments, “Peace begins with a smile” and “There is peace even in the storm”. Seeing this image made me feel nostalgic for my younger days in the 60’s and 70’s. I still remember how excited I was to get my very first pair of GWG bell bottom jeans and then LEVIS. LOL! Flower power was all the rage and there were flowers and peace signs everywhere. I was still young, but it was a really cool time to grow up.

AC Cardstock – White was used to create a 6″ x 6″ card base. BasicGrey – Lauderdale Patterned paper was cut to the same size as the base card and adhered with double-sided tape. Tim Holtz Distress Inks – Villainous Potion was used to ink around all of the edges.

The image and sentiment were imported into Microsoft Word and printed out onto Copic Marker X-Press It Blending Card and 2 extra copies of the image were printed onto plain copy paper to be used for masking later. With my Cuttlebug, I die cut the image and the purple background layer using Quickutz Nesting Frame 7 dies. I fussy cut around the sentiment and then inked it very lightly with some purple that I had left on my blending brush. I ran it through my Xyron Create a Sticker and attached it to a scrap piece of Recollections – Purple Passions paper. Once again, I fussy cut around the sentiment. The larger frame and sentiment edges were inked around the edges with the same ink as the base card.

The image was coloured in with Copic Markers listed below. The top portion of the image was fussy cut and I applied some Washi Tape to the back of it to create a hinge and to mask the image. Using blender brushes and multiple Tim Holtz Distress Inks, I created the clouds in the sky with Lawn Fawn Cuts – Cloudy Stencil.

Once I completed the sky, I used second image that I had printed out onto the copy paper for 2 purposes. The first purpose was to use a stylus and tracing paper to transfer the image onto the patterned paper from BasicGrey – Lauderdale Paper Pad for paper piecing the gnome’s shirt. I loved the wild flower pattern and thought it was perfect for this hippie gnome. Once the pattern was transfered, I fussy cut it out. I used my Copic markers to create a small shadow on various parts of the shirt. With a Pigma Micron 03 black marker, I drew the lines in darker so that they would stand out on the shirt and then used a black marker to go around all of the pieces. Once completed, all of the pieces were put through a Xyron Create a Sticker to make it easier to stick to them to the coloured image and also so that they would lay flat. I then added the pieces to the main image.

The printed image was then fussy cut and the sand was added using a blender brush, Krafty Kolours – Sandy Shores for the base and a mixture of Copic markers listed below.

The remainder of the card was now ready to assemble. I added U-Line double-sided tape to the backs of the sentiment, large purple frame and image. They were all then popped up onto card.

Card Recipe:

Stamp and Sentiment:  Peace Gnome – KLM Digital Designs

Inks: HP Printer Grayscale, Tim Holtz Distress Inks – Salty Ocean, Wilted Violet, Aged Mahagony, Abandoned Coral, Kitsch Flamingo, Spiced Marmalade, Mustard Seed, Twisted Citron, Villainous Potion, Krafty Kolours – Sandy Shores

Paper: Copic Marker X-Press It Blending Card, AC Cardstock – White, BasicGrey – Lauderdale Paper Pad (6″ x 6″), Recollections – Purple Passions 8.5″ x 11″

Dies: Quickutz Nesting Frame 7

Stencils: Lawn Fawn Cuts – Cloudy Stencil

Miscellaneous: U-Line double-sided tape, Cuttlebug, Blending Brushes, Xyron Create a Sticker

Image coloured with Copic Markers:

Skin: E21, E11, E04, E00, E000

Beard: E29, E27, E25, E23, E21

Jeans and Hat: B26, B23, B21

Boots: E49, E35, E34, E31, E29, E27, E25, E23, E21

Shirt: Y17, Y11 (Lauderdale – Basic Grey Designer Paper)

Peace Sign: Y19, Y15, Y11

Sand: E37, E35, E34, E33, E31, E30 and Krafty Kolours – Sandy Shores for base

Glasses: N10, N9, N7, Colorless Blender

Hope you like it and have a great week!

You can find more cards to inspire you at KLM Designs, KLM Digital Design Team and KLM Digital Designs on the Facebook Fan page from the rest of our design team.

Do Not Stop!


Today I’m sharing an inspirational card using KLM Digital DesignSlow Ride Gnome from the new February release. This image also comes with 2 more sentiments, “Travel at your own pace” and “Life is a journey, not a race”.  It was hard for me to pick which sentiment to use as I loved them all. They are all so true to life.

Hammermill – Premium Colour 100 lb. cardstock was used to create a 5.5″ x 4.25″ card base. I had found Crafts Designer Paper – 02-3080678 at Dollarama and thought this paper was perfect for this card. It was cut to the same size as the base card and adhered with double-sided tape.

The image and sentiment were imported into Microsoft Word and printed out onto Copic Marker X-Press It Blending Card. With my Cuttlebug, I die cut the image using My Creative Time – Bunch of Fun Circle 3.25″ Dies. The larger circle was die cut using Recollections – Blue Ombre Cardstock and Lifestyle Crafts Cutting Dies – Nesting 3.5″ Circle. I trimmed down the sentiment to be 2.25″ x 1.5″. Using what was left on a blending brush that I used for blues, I lightly went over the paper to give it a light blue hue. Tim Holtz Distress Ink – Salvaged Patina was then inked around the 3 edges.

The image was coloured in with Copic Markers listed below. I printed out another copy of the image onto plain paper and fussy cut around the top portion. I applied some Washi Tape to the back of it to create a hinge and to mask the image. Using a blender brush, Tim Holtz Distress Ink – Salty Ocean and Lawn Fawn Cuts – Cloudy Stencil, I created the clouds in the sky.

For the assembly of the card, I added double-sided tape to the back of the sentiment and adhered it directly to the card. U-Line double-sided tape was added to the backs of the larger and smaller circle and both were popped up onto each other and the card. Lastly, to finish off everything, I added in some YNS Gumdrops – Tropical Paradise.

Card Recipe:

Stamp and Sentiment:  Slow Ride Gnome – KLM Digital Designs

Inks: HP Printer Grayscale, Tim Holtz Distress Ink – Salty Ocean, Tim Holtz Distress Ink – Salvaged Patina

Paper: Copic Marker X-Press It Blending Card, Hammermill – Premium Colour 100 lb., Crafts Designer Paper – 02-3080678, Recollections – Blue Ombre Cardstock

Dies: My Creative Time – Bunch of Fun Circle Dies, Lifestyle Crafts Cutting Dies – Nesting Circles

Stencils: Lawn Fawn Cuts – Cloudy Stencil

Miscellaneous: U-Line double-sided tape, Cuttlebug, Blending Brush, YNS Gumdrops – Tropical Paradise

Image coloured with Copic Markers:

Skin: E21, E11, E04, E00, E000

Beard: E08, YR18, YR16, YR12

Jeans: B26, B23, B21

Shoes: C9, C7, C5, C1

Shirt: B69, B63, C3, R46

Hat: BG09, BG05, BG02, BG01

Turtle: E47, E44, E43, E42, E40, BG99, BG96, BG93, BG90, G07, YG07, Y35, C1, C00, 100

Sand: E37, E35, E33, E31

Flower and Stem: G14, YG23, YG11, E33, Y38, Y35, Y32

Hope you like it and have a great week!

You can find more cards to inspire you at KLM Designs, KLM Digital Design Team and KLM Digital Designs on the Facebook Fan page from the rest of our design team.

Have A Hoppy Day!!


Sharing a birthday card that I made today using KLM Digital Design –  Hang In There Frog from the new November 2022 release. This image also comes with 2 more sentiments, “Take a leap of faith” and “Hang in there”.

The image and sentiment were imported into Microsoft Word and printed out onto Copic Marker X-Press It Blending Card. I coloured the image in and then fussy cut around it. Using a black marker, I inked around the image.

Hammermill – Premium Colour 100 lb. cardstock was used to create a 5″ x 4.25″ card base. Using multiple Tim Holtz Distress Inks and a blender brush, I created the background sky directly on the card base. The leafy border was die cut using Copic Marker X-Press It Blending Card, a Cuttlebug and Lawn Fawn – Tropical Leaves Backdrop dies. With multiple Tim Holtz inks and a blender brush I inked over the die cut and some extra leaves from the same die set. Then with Copic markers, I made some of the leaves a little darker to give the background some contrast.

Scrapbook Adhesives – 3D Foam Strips were attached to the back of the large die cut. I applied some glue to the ends of the vine for the frog and attached them to the leaves. Once the glue was dry, I added more Scrapbook Adhesives – 3D Foam Strips to the back of the coloured image. Both pieces were now attached to the base card. I applied some glue to the individual leaves and applied them directly to the base card underneath the die cut. Lastly, I die cut the sentiment using a Cuttlebug and Poppystamps – Christmas Quotes die. I inked around the edges of the die cut with a black marker and then glued it to the tops of the leaves to finish off the card.

Card Recipe:

Stamp and Sentiment:  Hang In There Frog – KLM Digital Designs

Inks: HP Printer Grayscale, Tim Holtz Distress Inks – Saltwater Taffy, Squeezed Lemonade, Tumbled Glass, Salty Ocean, Forest Moss, Rustic Wilderness, Mowed Lawn and Peeled Paint

Paper: Copic Marker X-Press It Blending Card, Hammermill – Premium Colour 100 lb.

Dies: Lawn Fawn – Tropical Leaves Backdrop, Poppystamps – Christmas Quotes

Miscellaneous: Scrapbook Adhesives – 3D Foam Strips, Blender Brushes

Image coloured with Copic Markers:

Frog: YG17, YG06, YG03, YG00, E81, C1, C0, Black (Eyes: G19, G16, YG03, Y38, C1, C00, Gelly Roll Sakura #5 Pen)

Leaves: G19, G16, G03

Vine: G99, YG67, YG63, YG61

Hope you like it and have a great week!

You can find more cards to inspire you at KLM Designs, KLM Digital Design Team and KLM Digital Designs on the Facebook Fan page from the rest of our design team.

Present Gnomes


Sharing a Christmas card I made today using KLM Digital Design –  Pre-Colored – Present Gnome – Blue and Pre-Coloured – Present Gnome – Yellow from the new October 2022 release. Christmas is not that far away now and it’s time for me to create more cards for the holidays.

To make my card this week, I started with a 5.5″ x 4.25″ card base using Hammermill – Premium Colour 100 lb. cardstock. I cut the background paper from PhotoPlay – Gnome for the Holidays Christmas to be the same size and attached it to the base card with double-sided tape. I cut some green cardstock to the size of 4-7/8″ x 3-5/8″. U-line double-sided tape was attached to the piece and it was popped up onto the centre of the card. Stampin’ Up – Snowflake Splendor Designer Series Paper was cut to the size of 4.75″ x 3.5″. Using Tim Holtz Distress Ink – Salty Ocean, I inked around the base card and the snowflake piece.

The images were imported into Microsoft Word and I layered them together before I printed them out and fussy cut around them leaving a thin white border. I cut the snow piece to be 4.75″ x 1″ using Lawn Fawn – Sparkle Cardstock in “Pixie Dust” and then tore it look like drifting snow. I glued along the bottom of this piece with liquid glue and adhered it to the snowflake patterned paper. Using liquid glue, I attached the gnomes on top and behind the snow. I applied liquid glue to the finished piece and centred it onto the green cardstock. I stamped the sentiment on to a scrap piece of blue cardstock using Versamark ink and then applied Ranger Embossing Powder White – Extra Fine Detail. This was heat embossed with a Marvy Uchida – Embossing Heating Tool. I die cut the circle using a 1″ Circle punch and then applied Tim Holtz Distress Ink – Salty Ocean around it. U-Line double-sided tape was applied to the back of the sentiment and it was popped up onto the card. Lastly, to finish everything off, some Stampin’ Up – Snowflake Sequins were added around the sentiment.

Card Recipe:

Stamps: Pre-Colored – Present Gnome – Blue – KLM Digital Designs and Pre-Coloured – Present Gnome – Yellow – KLM Digital Designs

Sentiment: Lawn Fawn – Reveal Wheel Holiday Sentiments

Inks: HP Printer Grayscale, Tim Holtz Distress Ink – Salty Ocean, Versamark

Paper: Copic Marker X-Press It Blending Card, Hammermill – Premium Colour 100 lb., PhotoPlay – Gnome for the Holidays Christmas, Stampin’ Up – Snowflake Splendor Designer Series Paper, Lawn Fawn – Sparkle Cardstock in “Pixie Dust” (8.5″ x 11″)

Die Cuts: 1″ Circle Punch

Embossing Powder: Ranger Embossing Powder White – Extra Fine Detail

Miscellaneous: U-Line double-sided tape, Stampin’ Up – Snowflake Sequins, Marvy Uchida – Embossing Heat Tool

Hope you like it and have a great week!

You can find more cards to inspire you at KLM Designs, KLM Digital Design Team and KLM Digital Designs on the Facebook Fan page from the rest of our design team.

Merry Christmoose, Eh!!


It’s Wednesday, and this week, I made a Christmas card for some friends overseas using High Hopes Rubber Stamps Canadian Christmas Greeting – R048 for the main image and Merry Christmoose, Eh! for the sentiment. The trees were added in using High Hopes Rubber Stamps Evergreen Tree HLF001 and Evergreen Tree 2 HLF002.

To make my card this week, I began with a card base of Hammermill – Premium Colour 100 lb. cardstock, cut and scored to be 5.5″ x 4.25″. The sky was added directly to the front of the base panel with a mixture of Tim Holtz Distress Inks – Salty Ocean, Tumbled Glass and Broken China and a Gina K. Designs blending brush. Lawn Fawn – Snowy Sky stencil and Stampin Up – Winter White were added next to create some falling snow in the background. Then, using the same stencil again, Brutus Monroe – Snow Paste was applied to add some glittering snowflakes. The sentiment was stamped onto Recollections Christmas Ink Jet Printable Glitter Paper using my MISTI and Memento – Tuxedo Black. The paper was then cut to be 5.5″ x 1″ and I tore along the top of the paper to create snow drifts. I did this once again with a larger size (5.5″ x 2.5″) to create some dimension. U-Line double-sided tape was added to both pieces, with a double-layer on the sentiment piece and they were both popped up onto the base card.

The images were stamped onto Copic Marker X-Press It Blending Card using my MISTI – Most Incredible Stamping Tool, Memento – Tuxedo Black for the main image and Memento – Cottage Ivy for the trees. After colouring the images, I fussy cut around all of them and popped up the main image behind the 1st snow hill. Liquid glue was applied behind the trees and they were tucked in behind the larger hill to complete the card.

Card Recipe:

Stamps: Canadian Christmas Greeting – R048 (High Hopes Rubber Stamps), Evergreen Tree HLF001 (High Hopes Rubber Stamps) and Evergreen Tree 2 HLF002 (High Hopes Rubber Stamps)

Sentiment: Merry Christmoose, Eh! (High Hopes Rubber Stamps)

Inks: Memento – Tuxedo Black, Memento – Cottage Ivy, Tim Holtz Distress Ink – Salty Ocean, Tim Holtz Distress Inks – Tumbled Glass, Tim Holtz Ranger Distress Ink – Broken China, Stampin Up – Winter White

Paper: Copic Marker X-Press It Blending Card, Hammermill – Premium Colour 100 lb., Recollections Christmas Ink Jet Printable Glitter Paper

Stencil: Lawn Fawn – Snowy Sky

Tools: MISTI – Most Incredible Stamping Tool, U-Line double-sided tape, Gelly Roll Sparkle Pen, Pental Sunburst Metalic Med Gel Pen – Silver, Cosmic Shimmer Fluffy Stuff

Image coloured with Copic Markers:

Moose: E53, E51, E50, E39, E37, E35, E34, E33, R30, Eyes (Sakura Glaze – Black)

Beaver: E49, E29, E27, E25, E23, Stickles – Diamond

Wreath, Holly Leaves and Bow: G99, YG67, YG63, YG61, R59, R37, R35

Belt: 100, T9, T7, T5, E15, Y38, Y35, Y15

Tambourine: E15, Y38, Y35, Y15, R59, R37, R35

Hat: R59, R37, R35, BV20, Colorless Blender, Stickles – Diamond

Baubles: V17, V15, V12, C3, C2, C0, Gelly Roll Sparkle Pen, Pental Sunburst Metalic Med Gel Pen – Silver, Stampin Up – Winter White, Brutus Monroe – Snow Paste

Candy Cane: R59, R37, R35, Gelly Roll Sparkle Pen

Beard: Cosmic Shimmer Fluffy Stuff

Sky: B99, B97, B95, B93, Brutus Monroe – Snow Paste, Stampin Up – Winter White

Hope you like it and have a fantastic week!

You can find lots of inspiration from the Design Team Divas at the High Hopes blog, and the High Hopes Rubber Stamps Facebook Fan page plus you can also follow us on
Instagram, Twitter and Pinterest.

The Best Dirt!


It’s Wednesday, and this week, I made a card using High Hopes Rubber Stamps Gordon Groundhog – R123 for the image and The Best Dirt – F221 for the sentiment. My husband loves gardening and this makes me think of him! LOL! We have a few little squirrels that like to raid his garden, eat the tomatoes and dig up the potatoes. Luckily, my husband is good natured and says he can’t get mad at them for what comes natural. We call our back yard the Stevenson’s oasis for wild animals. We have bunnies, squirrels, racoons, possums and a mole that seem to like our vegetables and sometimes we’ve even caught them sleeping up on the furniture under the Gazebo. My husband has now installed a backyard web cam so that we can now capture some of what goes on at night while we are sleeping.

To make my card this week, I began with a card base of Hammermill – Premium Colour 100 lb., cut and scored to be 5.5″ x 4.25″. Echo Park – New Day Beautiful Blooms Paper was cut to be the same size as the base and applied using double-sided tape. Tim Holtz Distress Ink – Mowed Lawn and a finger dauber were used to ink around all of the edges of the card. Anna Griffin Empress Mini Cutting Machine and My Favourite Things Die-Namics – Single Stitch Line Rounded Rectangle Frames were used to die cut Stampin’ UP! – Regals Designer Series Paper, Copic Marker X-Press It Blending Card and Hammermill – Premium Colour 100 lb. cardstock.

The clouds in the sky were created using the inner part of the die-cut from the Hammermill – Premium Colour 100 lb. cardstock and a mid-size Gina K Designs Blender Brush, Tim Holtz Distress Ink – Salty Ocean and stencils that I created using Avery Elle – Pierced Clouds Die. Once this was done, I used regular tape to piece the outer die cut from the Stampin’ UP! – Regals Designer Series Paper and the clouds piece together from the back side. I stamped the image onto the inner frame of the Copic Marker X-Press It Blending Card using Memento – Tuxedo Black ink and my MISTI. Once the image was coloured, it was fussy cut around the top part of the image. I applied U-Line double-sided tape to the image and background pieces that I had joined together and popped them both up onto the card.

The sentiment was also stamped using my MISTI onto the same cardstock and then cut with a small cutting device. I ran this through my Xyron Create a Sticker and adhered it to Recollections – Black cardstock. Once again, I cut around the sentiment, leaving a slim border. U-Line double-sided tape was applied to the back of this and it was popped up onto the card. Lastly, to finish it off, I added some Doodlebug Design Inc. Braddies with Glue Dots – Mini.

Card Recipe:

Stamps: Gordon Groundhog – R123 (High Hopes Rubber Stamps)

Sentiment: The Best Dirt – F221 (High Hopes Rubber Stamps)

Inks: Memento – Tuxedo Black, Tim Holtz Distress Ink – Mowed Lawn, Tim Holtz Distress Ink – Salty Ocean

Die Cuts: My Favourite Things Die-Namics – Single Stitch Line Rounded Rectangle Frames, Avery Elle – Pierced Clouds Die (D-05-01)

Paper: Copic Marker X-Press It Blending Card, Hammermill – Premium Colour 100 lb., Stampin’ UP! – Regals Designer Series Paper Stack (12″ x 12″), Echo Park – New Day Beautiful Blooms (12″ x 12″), Recollections – Black

Embellishments: Doodlebug Design Inc. Braddies – Bubble Blue Blossoms and Tangerine Blossoms

Tools: MISTI – Most Incredible Stamping Tool, U-Line double-sided tape, Anna Griffin Empress Mini Machine, Glue Dots – Mini, Xyron Create a Sticker, Sakura Glaze – Black

Image coloured with Copic Markers:

Groundhog: E29, E27, E25, E23, (Nose and Eyes – Sakura Glaze – Black)

Jeans: B26, B23, B21, E31

Hard Hat: Y17, Y15, Y08

Dirt, Stones, Stem and Grasses: E37, E35, E33, E31, W7, W5, W3, YG23, YG17, YG11, YG09

Flower: E15, Y38, Y35, Y32, Y17, Y08

Hope you like it and have a fantastic week!

Check out more adorable images at High Hopes Rubber Stamps!

You can find lots of inspiration from the Design Team Divas at the High Hopes blog, and the High Hopes Rubber Stamps Facebook Fan page plus you can also follow us on
Instagram, Twitter and Pinterest.

Dance With Me!!


Today, I’m sharing a card that I made using Dreamerland Crafts stamps called Just Dance With Me – DCS17037. Sometimes just dancing with our partners or friends can bring such joy to us. No matter where you may be, just hear the music and dance no like no one is watching!

To create this card I began by making a base of 5.5″ x 4.25″ using Hammermill – Premium Colour 100 lb. cardstock. The sky was created using Lawn Fawn Cuts – Cloudy Stencil, a  blender brush and Tim Holtz Distress Inks – Salty Ocean and Broken China. To create the grass, I first cut 2 pieces of DCWV – Pocket Blossom designer paper to the sizes of 5.5″ x 2.5″ and 5.5″ x 1-5/8″.  Lawn Fawn – Grassy Hillside Borders die cuts and my Anna Griffin Empress Mini Cutting Machine were used to die cut the 2 pieces. Using a blender brush and Tim Holtz Distress Ink – Rustic Wilderness, I inked over top of the blades of grass and then around the other 3 edges.

The main image was stamped using my MISTI and Memento – Tuxedo Black ink onto Copic Marker X-Press It Blending Card. I coloured in the image and then fussy cut around it leaving a slim white border. U-Line double-sided tape was added to the back of the image. I then placed the image onto the card before removing the tape backing to see where to place the sentiment. Using my MISTI again and Versa Fine – Onyx Black ink, I applied the sentiment onto the base card. Ranger – Clear Super Fine Detail embossing powder was then applied to it and it was heat embossed with Marvy Uchida – Embossing Heat Tool.

The final pieces of the card were now ready to assemble. I peeled off the tape backings from the large die-cut and added some liquid glue to allow me to move it into the correct position over top of the grass I had placed down earlier onto the base card. After popping up the top grass cut, I then repeated the same process and popped up the image in between the blades of grass. Finally, I added in some butterflies from the same stamp set using Tim Holtz Distress Ink – Wilted Violet. I had made them lighter by first stamping off of the page and then onto the card.

Card Recipe:

Stamps: Just Dance With Me – DSC17037 – Dreamerland Crafts

Inks: Memento – Tuxedo Black, Tim Holtz Distress Ink – Rustic Wilderness, Wilted Violet, Salty Ocean and Broken China, Versa Fine – Onyx Black

Paper: Copic Marker X-Press It Blending Card, Hammermill – Premium Colour 100 lb., DCWV – Pocket Blossom – 12″X12″ (30.5cmx30.5cm)

Die Cuts: Lawn Fawn – Grassy Hillside Borders

Stencil: Lawn Fawn Cuts – Cloudy Stencil

Embossing Powder: Ranger – Clear Super Fine Detail embossing powder

Tools: MISTI – Most Incredible Stamping Tool, Marvy Uchida – Embossing Heat Tool, U-Line double-sided tape, Anna Griffin Empress Mini Machine, Gelly Roll Sakura #10 Pen

Image coloured with Copic Markers:

Skin: E21, E11, E04, E00, E000, R30, R30, R20

Hair: E47, E44, E43, E41

Dress: V06, V04, V01, V0000, Gelly Roll Sakura #10 Pen

Shirt: BG72, BG57, BG32, BG11

Jeans: B26, B23, B21

Hope you like it and have a great week!

You can find more cards to inspire you at Dreamerland Crafts and Pointer Scrapbooking on the Facebook Fan pages from the rest of our design team.

Play In The Puddles!!!


Sharing a card I made today using KLM Digital Design –  Rain Gnome from the new July 2022 release. This image also comes with 2 more sentiments, “There’s Always Room For You Under My Umbrella” and “If you want a rainbow, you’ve got to deal with a little rain”.

I imported the image and sentiment into Microsoft Word and printed them out onto Copic Marker X-Press It Blending Card. The image was coloured in with Copic markers. I fussy cut around the image and added U-Line double-sided tape to the back of it. Using Tonic Studios Craft Perfect – Iridescent Mirror Card – Tidal Wave cardstock, I cut out 6 little droplets of water. Using my Anna Griffin Empress Mini Machine and Whimsy Stamps – Wavy Nested Frame Dies Set, I die cut the puddle out of the same paper. Just love how this paper looks like water. I ran the water pieces through my Xyron Create a Sticker and then adhered them to Scrapbook.com – Jewels Smooth Cardstock. I popped the image on top of the main puddle. Once this was all done, I fussy cut around the image and water droplets and added U-Line double-sided tape to the backs of all of the pieces and set them aside.

I created a 5.5″ x 4.25″ card base using Hammermill – Premium Colour 100 lb. cardsstock. I cut the background paper using Forever In Time – Splish Splash (SP344U) paper and adhered it to the base using double-sided tape. I used my cutter to cut around the sentiment and then a corner rounder for the 4 corners. I applied some Tim Holtz Distress Ink – Salty Ocean around the edges with a sponge dauber and then added U-Line double-sided tape to the back of it. I popped this up onto the base at the bottom of the card and then popped up the image and splash marks to finish off the card.

Card Recipe:

Stamp and Sentiment:  Rain Gnome – KLM Digital Designs

Inks: HP Printer Grayscale, Tim Holtz Distress Ink – Salty Ocean

Paper: Copic Marker X-Press It Blending Card, Hammermill – Premium Colour 100 lb., Tonic Studios Craft Perfect – Iridescent Mirror Card – Tidal Wave, Scrapbook.com – Jewels Smooth Cardstock (4.25″ x 5.5″), Forever In Time – Splish Splash (SP344U)

Die Cut: Whimsy Stamps – Wavy Nested Frame Dies Set (WSD382)

Miscellaneous: U-Line – 2 sided tape, Xyron Create a Sticker, Anna Griffin Empress Mini Machine

Image coloured with Copic Markers:

Skin: E21, E11, E00, E000

Beard: E47, E44, E43, E41

Hat, Coat and Boots: Y38, Y35, Y08

Pants: B26, B23, B21

Umbrella: B99, B97, B95, B02, B01, B00, B000, T9, T5

Hope you like it and have a great week!

You can find more cards to inspire you at KLM Designs, KLM Digital Design Team and KLM Digital Designs on the Facebook Fan page from the rest of our design team.

Better at the Beach!!!


Sharing a card I made today using KLM Digital Design –  Beach Gnome – Girl from the new June 2022 release. This image also comes with 2 more sentiments, “Good times & tan lines” and “Girls just wanna have sun”.

I imported the image and sentiment into Microsoft Word and printed them out onto Copic Marker X-Press It Blending Card and the image again onto regular copy paper. Using My Creative Time – Rectangle Frame Dies and my Cuttlebug, I die cut the image. The image was coloured in with Copic markers. I fussy cut around the image printed out of regular copy paper to create a mask and applied it over top of the coloured image using repositionable tape. Using several Picket Fence – Blending Brushes and multiple Tim Holtz Distress Inks and Krafty Kolours – Sandy Shores, I created the sand, water and clouds using Lawn Fawn – Ocean Waves Stencils, Lawn Fawn – Clippings – Slimline Hillside Stencils and Lawn Fawn Cuts – Cloudy Stencil.

I created a 5.5″ x 4.25″ card base using Hammermill – Premium Colour 100 lb. cardsstock. U-Line – 2 sided tape was added to the back of the image and it was popped up onto the base card. To finish the card off, I added in a few seashells using 2 layers of U-Line – 2 sided tape.

Card Recipe:

Stamp and Sentiment:  Beach Gnome – Girl – KLM Digital Designs

Inks: HP Printer Grayscale, Krafty Kolours – Sandy Shores, Tim Holtz Distress Ink – Salty Ocean, Mermaid Lagoon, Salvaged Patina, Peacock Feathers, Broken China

Paper: Copic Marker X-Press It Blending Card, Hammermill – Premium Colour 100 lb.

Die Cut: My Creative Time – Rectangle Frame Dies

Stencils: Lawn Fawn – Ocean Waves Stencils, Lawn Fawn – Clippings – Slimline Hillside Stencils and Lawn Fawn Cuts – Cloudy Stencil

Miscellaneous: U-Line – 2 sided tape, Picket Fence – Blending Brushes

Image coloured with Copic Markers:

Skin: E21, E11, E04, E00, E000

Hair: E47, E44, E43, E41

Clothing, Hat and Sandals: RV09, RV06, RV04, RV02, B79, B69, B66

Towel, Flower, Pail: V12, V09, V06, V04

Hope you like it and have a great week!

You can find more cards to inspire you at KLM Designs, KLM Digital Design Team and KLM Digital Designs on the Facebook Fan page from the rest of our design team.

Big Hugs!!


Today, I’m sharing a card using this super adorable image from Dreamerland Crafts stamps called Big Hug – D19025. Great big in person hugs or even virtual hugs are always nice to have or to give to someone or something that you love. Have you hugged someone today?

To make this card I created a base card of 5.5″ x 4.25″ using Hammermill – Premium Colour 100 lb. cardstock. With Tim Holtz Distress Ink – Salty Ocean, a Picket Fence Studio Blender Brush and Lawn Fawn – Cloudy Stencil, I created the clouds. Then, using a combination of Tim Holtz Distress Inks – Mowed Lawn, Tim Holtz Distress Ink – Bundled Sage, a Picket Fence Studio Blender Brush and a mixture of Lawn Fawn – Clippings – Simple Hillside Stencils and Lawn Fawn – Clippings – Slimline Grassy Hillside Stencils, I created the grass. With my Anna Griffin Empress Die-Cutting Mini Machine, Lawn Fawn – Giant Sending Big Hugs was die cut twice using Recollections – Black cardstock. Liquid glue was used to fuse the 2 pieces together. I applied glue to the back of the combined pieces and attached it directly to the base of the card.

Using my MISTI and Memento – Tuxedo Black ink, I stamped the main image onto Copic Marker X-Press It Blending Card and coloured it in with Copic markers. Ranger Inkssentials – Glossy Accents was added to the glasses. The coloured image was fussy cut with scissors leaving a slim white border around it. This was then applied directly to the base card using U-Line – double-sided tape.

Card Recipe:

Stamp: Big Hug – D19025 – Dreamerland Crafts

Inks: Memento – Tuxedo Black, Tim Holtz Distress Ink – Salty Ocean, Tim Holtz Distress Inks – Mowed Lawn, Tim Holtz Distress Ink – Bundled Sage

Paper: Copic Marker X-Press It Blending Card, Hammermill – Premium Colour 100 lb., Recollections – Black cardstock

Die Cuts: Lawn Fawn – Giant Sending Big Hugs

Stencils: Lawn Fawn – Cloudy Stencil, Lawn Fawn – Clippings – Simple Hillside Stencils, Lawn Fawn – Clippings – Slimline Grassy Hillside Stencils

Tools: MISTI – Most Incredible Stamping Tool, Anna Griffin Empress Mini Machine, Picket Fence Studio Blender Brushes, Ranger Inkssentials – Glossy Accents

Image coloured with Copic Markers:

Skin: E21, E11, E04, E00, E000, R30, R20

Hair: E47, E44, E43, E41

Shirt: B16, B12, B05

Tie: V06, V04, V01

Jeans: B26, B23, B21

Shoes: N9, N7, N5, N4

Cat:  N9, N7, N5

Hope you like it and have a great week!

You can find more cards to inspire you at Dreamerland Crafts and Pointer Scrapbooking on the Facebook Fan pages from the rest of our design team.

Born to Be Wild!!


Sharing a card that I made today using KLM Digital Design –  Pre-Colored MotorCycle Gnome from the new May 2022 release.  I remember how refreshing it was when I was younger going for rides on a motorcycle during hot weather!

Using Hammermill – Premium Colour 100 lb. cardstock, I created a base card of 5.5″ x 4.25″. I cut a panel to be the same size out of the same cardstock. The mountains were created using Kraftin’ Kimmie – Krafty Scenery 2 and Tim Holtz Distress Ink – Vintage Photo, Picket Fence – Blending Brush and blocking off the base of the mountains with a long Post-It Note. Once the mountains were in place, I created the clouds using Lawn Fawn Cuts – Cloudy Stencil, Tim Holtz Distress Ink – Salty Ocean and a Picket Fence – Blending Brush. I die cut the road using my Anna Griffin Empress Mini Machine, My Favourite Things – Die-Namics – Open Road MFT-1138 out of Recollections – Black paper. I measured it to the line of the mountains and cut it. Using this as a guide, with Tim Holtz Distress Inks – Mowed Lawn and a Picket Fence – Blending Brush, I created the grass.

Using my Anna Griffin Empress Mini Machine and Stampin’ Cut & Emboss – Pine Wood Dies, I die cut all of the trees using Scrapbook.com – Jewels Smooth Cardstock and Lawn Fawn – Watercolor Wishes Rainbow. I coloured the trunks using Copic marker E27. I applied the bottom trees with glue and then popped up the front trees with Scrapbook Adhesives – 3D Foam Strips. I imported the image into Microsoft Word and printed it out onto Copic Marker X-Press It Blending Card. I fussy cut around the image and added 2 layers of U-Line double-sided tape to it and popped it up onto the road to complete the card.

Card Recipe:

Stamp:  Pre-Colored Motorcycle Gnome – KLM Digital Designs

Sentiment: Art Impressions – Born To Ride Set – 5044

Inks: HP Printer Grayscale, Tim Holtz Distress Ink – Salty Ocean, Tim Holtz Distress Ink – Rustic Wilderness, Tim Holtz Distress Ink – Vintage Photo

Paper: Copic Marker X-Press It Blending Card, Hammermill – Premium Colour 100 lb., Scrapbook.com – Jewels Smooth Cardstock (4.25″ x 5.5″), Scrapbook.com – Jewels Smooth Cardstock (4.25″ x 5.5″), Tim Holtz Distress Inks – Mowed Lawn, Recollections – Black, Lawn Fawn – Watercolor Wishes Rainbow – 6″ x 6″

Dies: Stampin’ Cut & Emboss – Pine Wood Dies, My Favourite Things – Die-Namics – Open Road MFT-1138

Stencil: Lawn Fawn Cuts – Cloudy Stencil, Kraftin’ Kimmie – Krafty Scenery 2

Miscellaneous: U-Line – 2 sided tape, Anna Griffin Empress Mini Machine, Picket Fence – Blending Brushes, Scrapbook Adhesives – 3D Foam Strips

Hope you like it and have a great week!

You can find more cards to inspire you at KLM Designs, KLM Digital Design Team and KLM Digital Designs on the Facebook Fan page from the rest of our design team.