Tag Archive | Tim Holtz Distress Ink – Tea Dye

Dam Good Birthday!


Sharing a card I made for my younger brother’s birthday. He sometimes likes to use “choice” words, so I couldn’t resist  these little characters and sentiment from Whimsy Stamps called Beaver Birthday Clear Stamps. LOL! The little tree stump and stacked logs are from Your Next Stamp – Autumn Animals (CYNS605) and the larger log is from Craftin Desert Diva’s – Build A Scene (Retired).

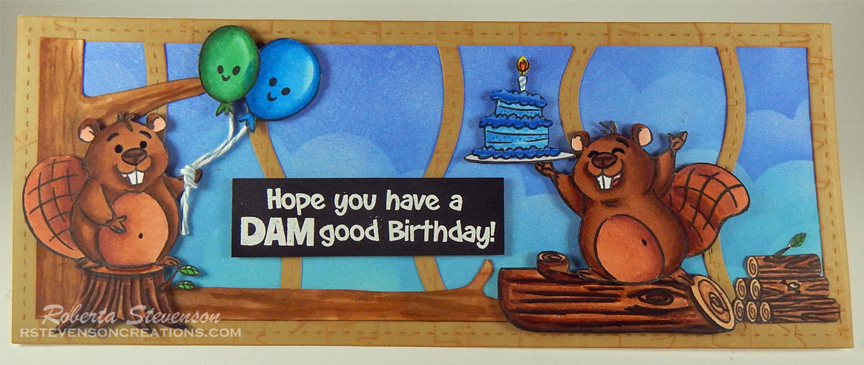
To make this card, I first stamped all of the images onto Copic Marker X-Press It Blending Card using Memento – Tuxedo Black and my MISTI.  My Brother Scan and Cut was used to cut around all of the images, which were then coloured with copic markers. The sentiment was stamped with VersaMark ink and then heat embossed with Ranger Embossing Powder White – Extra Fine Detail and Marvy Uchida – Embossing Heat Tool.

The base card was created using Hammermill – Premium Colour 100 lb. cardstock folded to the size of 8-1/4″ x 3-1/4″. To create the clouds in the background, I used the same paper cut to the same size as the base and using a template that I had previously created using Whimsy Stamps – Grass and Cloud Edger Die Set and Tim Holtz Distress Oxide Inks – Broken China and Blueprint Sketch. For the slim-line die cut, I used Whimsy Stamps – Slimline Wave Dies and Craftsmart Hot Buy – Christmas Embossed paper. Then I inked around the entire die cut with Tim Holtz Distress Ink – Tea Dye to make it pop more. The tree along the left side and the long log along the bottom were drawn free hand and then coloured in with Copic markers.

To assemble the card, I first attached the cloudy background to the base of the card using double-sided tape. Next, I attached the slim-line die cut using some glue. The large tree, long log and small log pile were all attached using glue. The remainder of the images and sentiment were all attached using 3M VHB – 2 sided tape. I added some twine to the balloons and beaver to finish it off.

Card Recipe:

Stamp and Sentiments: Whimsy Stamps – Beaver Birthday (KHB157), Your Next Stamp – Autumn Animals (CYNS605), Craftin Desert Divas – Build A Scene (Retired)

Inks: Memento – Tuxedo Black, Tim Holtz Distress Ink – Tea Dye, Tim Holtz Distress Ink – Gathered Twigs, Tim Holtz Distress Oxide Ink – Broken China, Tim Holtz Distress Oxide Ink – Blueprint Sketch

Paper: Copic Marker X-Press It Blending Card, Craftsmart Hot Buy – Christmas Embossed, Hammermill – Premium Colour 100 lb.

Die Cuts: Whimsy Stamps – Slimline Wave Dies, Whimsy Stamps – Grass and Cloud Edger Die Set

Tools: MISTI – Most Incredible Stamping Tool, Couture Creations – Go Power and Emboss, 3M VHB – 2 sided tape, AC Premium Ribbon, Tombow – Multi Mono Liquid Glue

Beavers: E99, E97, E37, E35, E34, E33, E29, E25, E15, E09, E08, R30, R20

Balloons: B06, B04, B02, B00, G09, G07, G02, G00

Cake and Candle: YR19, Y08, R24, B28, B24, B14, B12, B04, B02, AtyouSpica: Skyblue (09), Baby Blue (18)

Logs and Stump: E49, E27, E25, E23, E21

Tree and Log along the bottom: E37, E35, E33, Tim Holtz Distress Ink – Gathered Twigs

Hope you like it and have a great week!

Three Kings Bringing Joy


It’s Wednesday, and this week I’m sharing a Christmas card featuring the adorable image Three Kings – T201 from (High Hopes Rubber Stamps) with the sentiment Joy To The World – GLL012 (High Hopes Rubber Stamps).  Have you started your Christmas cards yet?

To create the card this week, I stamped the main image and then coloured it in with Copic Markers. I used my Brother Scan and Cut to cut around the image and then used a black marker to go around all of the edges. For the sentiment, I stamped it out and then used My Creative Time: Fun Vertical Greetings to die cut it.

For the base card I used Hammermill – Premium Colour 100 lb. to create my background at 5.5″ x 4.25″ and also the base card.  I used various Tim Holtz inks listed below to create the night sky and earth at the bottom. After the basic blending was done, I layered Kraftin’ Kimmie – Twinkle Little Stars stencil over top of the base and applied Stampin Up – Whisper White using a sponge dauber. I removed the stencil and cleaned it off. Then placed it on top again. This time, I used a sponge dauber and FolkArt – Extreme Glitter Acrylic Paint to give the stars some sparkle. Note: A little dab of this paint goes a long way. Marvy Uchida – Embossing Heat Tool was used to help speed up the drying process.

Once the paint was all dry, the card was ready to be assembled. I cropped the background to 5.25″ x 4″ and placed it directly onto the base. Then the main image and sentiment were added using 3M VHB – 2 sided tape.

Card Recipe:

Stamp: Three Kings – T201 (High Hopes Rubber Stamps)

Sentiment: Joy To The World – GLL012 (High Hopes Rubber Stamps)

Inks: Memento – Tuxedo Black, Tim Holtz Distress Ink – Chipped Sapphire, Blueprint Sketch, Salty Ocean, Tumbled Glass, Vintage Photo, Gathered Twigs, Tea Dye, Wild Honey, Stampin Up – Whisper White

Paper: Copic Marker X-Press It Blending Card, Hammermill – Premium Colour 100 lb.

Die Cuts: My Creative Time: Fun Vertical Greetings

Stencil: Kraftin’ Kimmie – Twinkle Little Stars

Tools and Miscellaneous: MISTI – Most Incredible Stamping Tool, Cuttlebug, FolkArt – Extreme Glitter Acrylic Paint, Brother Scan and Cut

Image coloured with Copic Markers:

Skin: E21, E11, E04, E00, E000, R22, R20

Hair: Black, C9, C7, C5, C3, C2, C1

Shoes: C5, C3

Left King Clothing and Urn: V28, V25, V22, E15, YR24, Y35, Y08, R39, R37, R35

Centre King Clothing and Bag: B69, B28, B24, B18, B16, B14, B12, E89, E87, E84, E55, E53, E51, E50, E15, YR24, Y35, Y08

Right King Clothing and Bottle: R59, R39, R37, R35, E15, YR24, Y35, Y08, G19, G17, G14, YG09, YG07, YG03

Hope you like it and have a fantastic week!

You can find lots of inspiration from the Design Team Divas at the High Hopes blog, and the High Hopes Rubber Stamps Facebook Fan page plus you can also follow us on
Instagram, Twitter and Pinterest.

Birthday Girl – Fearless!


Hello There! Sharing a card with you today that I made for a very special co-worker who works non-stop to please everyone in our office as she manages everything from booking flights, creating Purchase Orders, setting up meetings, etc. The list goes on forever. She goes above and beyond her position and we all love her dearly for it. She takes our cubicles apart and rebuilds them all when the need arises or adds in new cubicles for new hires, decorated all of the offices for management and at times you can even see her up on a ladder fixes ceiling tiles or changing lightbulbs. LOL!

So for this year, I just had to make birthday card featuring the stamp from Kraftin’ Kimmie called “Fearless Farah“. I used both the image and sentiment from this collection. The sentiment couldn’t have described her any better. LOL!

To create the texture for the brick wall, I ran the Darice – Brick Wall embossing folder through my Cuttlebug using Bristol paper. Then ran Tim Holtz Distress Ink – Rusty Hinge across the top of the paper. Next I used a watercolour brush and a mixture of Tim Holtz Distress Ink – Tea Dye, Tim Holtz Distress Ink – Vintage Photo and Tim Holtz Distress Ink – Rusty Hinge to create the texture.

To make the sign I first embossed the sentiment and then used Craftin Desert Diva’s Fancy Frames die to cut it out. Edged around with Tim Holtz Distress Ink – Wild Honey.


Copic Markers Used:

Hair: E51, E35, E29, E25

Skin: E000, E00, E21, E11, E04, R22, R20

Eyes: E35, E15, E37, E29, E49, 100, R00, Colourless Blender, W1, R02, Gelly Roll Sakura #8 Pen

Pants: B06, B04, B02

Shirt / Bandana: BG13, BG11, BG10

Bricks: E97, E19, E08

Drill: C9, C5, C3, C1, R27, R24, Y17, Y08

Embossing Folder: Darice – Brick Wall

Inks: Tim Holtz Distress Ink – Tea Dye, Tim Holtz Distress Ink – Vintage Photo, Tim Holtz Distress Ink – Rusty Hinge, Tim Holtz Distress Ink – Wild Honey, Memento – Tuxedo Black, VersaMark – Black Onyx

Die Cuts: PaperCrafter Today – 15 Die Cut Sentiment Set, Craftin Desert Diva’s Fancy Frames

Paper: Copic Marker X-Press It Blending Card

Tools: Cuttlebug, MISTI – Most Incredible Stamping Tool