Tag Archive | Tim Holtz Distress Oxide Ink – Blueprint Sketch

Fido’s Hallowe’en


Sharing a Hallowe’en slim line card I made today using KLM Digital DesignFido – Hallowe’en Freebie from the new October 2022 release.  Fido is all set for Trick or Treating with his little “Bee” outfit. Do you dress up your pets for Hallowe’en too?

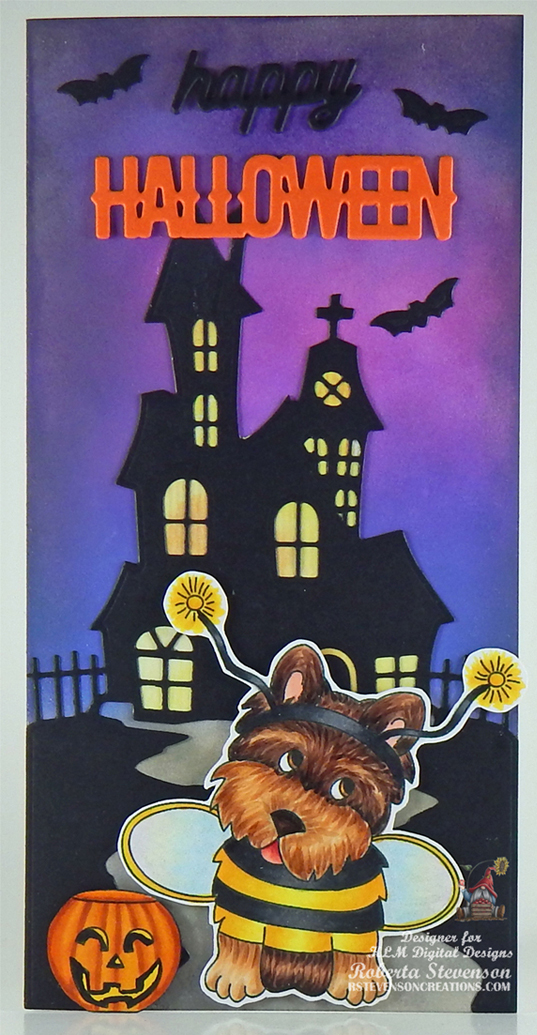
To make my card this week, I started with a 7″ x 7″ card base using Hammermill – Premium Colour 100 lb. cardstock. I scored this at 3.5″, so that the final card base measured 3.5″ x 7″. To create my background, I die cut the haunted house and path using an Anna Griffin Empress Mini cutting Machine, Recollections – Black cardstock and Say It With Stamps – #6 Haunted House Coverplate Die. The little bats were cut from the same die set at the same time. For the yellow behind the windows I cut a solid piece using Momenta – Cardstock. I glued this into place on the back of the die cut using liquid glue. I love how the Momenta paper had the colour variations of yellow. Using the die cut as a reference as to where to place the background colours, I applied a mixture of Tim Holtz Distress Oxide inks for the sky listed below and Tim Holtz Distress Inks for the path with Gina K. Designs blending brushes. Once the background was coloured in, I applied glue to the back of the die cut and adhered it to the card. Using the same cutting machine again, I die cut the sentiments 3 times using scrap pieces of orange and black cardstock which I had run through my Xyron Create a Sticker first so that it would be easier to attach them on top of each other later. I pieced them all together and attached them to the card. The 3 bats were then placed around the sentiment.

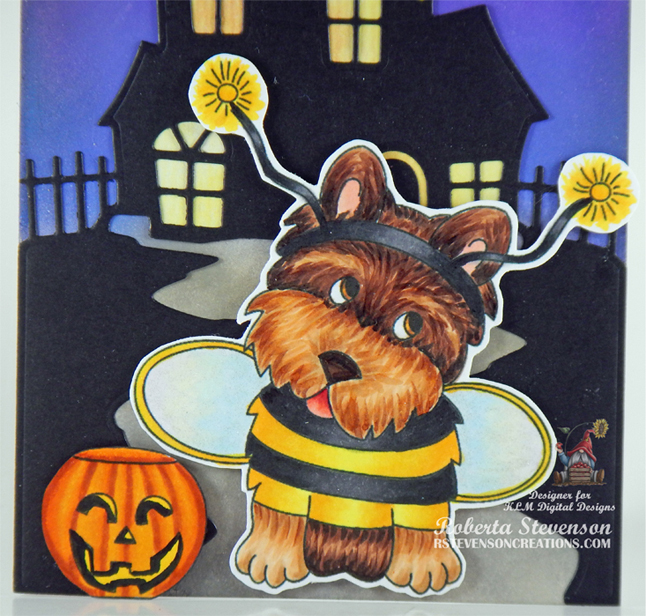
The image was imported into Microsoft Word and printed out onto Copic Marker X-Press It Blending Card. The images were coloured in and then Wink of Stella – Clear was applied to the wings to make them sparkly.  Both images were fussy cut and U-Line double-sided tape was applied to both and they were popped up onto the card to finish it off.

Card Recipe:

Stamp:  Fido – Hallowe’en Freebie – KLM Digital Designs

Inks: HP Printer Grayscale, Tim Holtz Distress Ink – Pumice Stone, Hickory Smoke, Tim Holtz Distress Oxide Ink – Wilted Violet, Seedless Preserves, Villainous Potion, Faded Jeans, Blueprint Sketch, Black Soot

Paper: Copic Marker X-Press It Blending Card, Hammermill – Premium Colour 100 lb., Recollections – Black cardstock, Momenta – Cardstock

Die Cuts: Say It With Stamps – #6 Haunted House Coverplate Die, Halloweeen – MSPCI

Miscellaneous: U-Line double-sided tape, Anna Griffin Empress Mini Machine, Xyron Create a Sticker, Gina K. Designs blending brushes, Wink of Stella – Clear

Image coloured with Copic Markers:

Dog: E55, E53, E51, E50, E49, E47, E29, E27, E25, E23, R30, R29, R24, R20, C00, Colorless Blender

Costume and Wings: Y17, Y15, Y08, Y04, 100, N0, N7, N5, B0000, BG0000, Y0000, RV0000, Wink of Stella – Clear

Pumpkin: YR18, YR16, YR14, YR12, Y08, C9

Sky: Tim Holtz Distress Oxide Ink – Wilted Violet, Seedless Preserves, Villainous Potion, Faded Jeans, Blueprint Sketch, Black Soot

Pathway: Tim Holtz Distress Ink – Pumice Stone, Hickory Smoke

Hope you like it and have a great week!

You can find more cards to inspire you at KLM Designs, KLM Digital Design Team and KLM Digital Designs on the Facebook Fan page from the rest of our design team.

Vampire Treat!!!


It’s Wednesday, and this week, I made a card using Vampire Treat – TT022 by High Hopes Rubber Stamps for the main image and Happy Halloween – H232 (High Hopes Rubber Stamps) for the sentiment. Hard to believe Hallowe’en is just around the corner.

To make my card this week, I began with a card base made from Hammermill – Premium Colour 100 lb. cut and scored to be 5.5″ x 4.25″. I die-cut the bat background paper from Echo Park – I Love Halloween paper pad using my Cuttlebug and My Creative Time – Rectangle Frame Dies. The edges were inked with Tim Holtz Ranger Distress Oxide – Black Soot and then this piece was adhered directly to the base card using double-sided tape. The same dies were used to cut the orange cardstock and the edges were inked with Tim Holtz Distress Ink – Carved Pumpkin. Double-sided tape was added to the back of this piece and it was added directly to the bat background paper. Copic Marker X-Press It Blending Card was die cut with My Creative Time – Rectangle Frame Layers and the sentiment shape was die cut with Whimsy Stamps – Quick Strips Die Set. Tim Holtz Ranger Distress Oxide – Fossilized Amber was used to ink around the sentiment shape edges.

The image and sentiment were then stamped using my MISTI and Memento – Tuxedo Black ink. I coloured in the image with copic markers. I stamped out the image a second time and used my Brother Scan and Cut to cut it out so that I could use it as a mask to put over the coloured image. I also die cut a 1″ circle out of Inkadoo Stamping Mask Paper for the moon. I placed both masks onto the coloured image. I tore some masking tape in half vertically to create the grass pattern and then used the reverse to mask the grass while I did the sky. I saw this on a you-tube video and thought it was a cool technique. A mixture of Tim Holtz Ranger Distressed inks listed below were used to create the ground and sky. I removed all of the masks and then for the circle I used the reverse mask to section out just the circle centre and coloured in the moon with my Copic markers. To finish off the card, I applied 3M VHB – 2 sided tape to the back of the image and sentiment and popped them both up on the card.

Card Recipe:

Stamp: Vampire Treat – TT022 (High Hopes Rubber Stamps)

Sentiment: Happy Halloween – H232 (High Hopes Rubber Stamps)

Inks: Memento – Tuxedo Black, Tim Holtz Ranger Distress Oxide: Fossilized Amber, Blueprint Sketch, Wilted Violet, Twisted Citron, Peeled Paint, Black Soot and Seedless Preserves, Tim Holtz Distress Ink – Carved Pumpkin

Paper: Copic Marker X-Press It Blending Card, Hammermill – Premium Colour 100 lb., Echo Park – I Love Halloween (6″x6″), Orange cardstock

Die Cuts:  My Creative Time – Rectangle Frame Dies, My Creative Time – Rectangle Frame Layers, Whimsy Stamps – Quick Strips Die Set – WSD330

Tools: MISTI – Most Incredible Stamping Tool, 3M VHB – 2 sided tape, Sakura Glaze – Black, Pen Gelly Roll Sakura #5 Pen, Brother Scan and Cut, Inkadoo Stamping Mask Paper

Image coloured with Copic Markers:

Skin: E21, E11, E04, E00, E000, R30, R20 (Eyes: Sakura Glaze – Black, Pen Gelly Roll Sakura #5 Pen) (Teeth: Pen Gelly Roll Sakura #5 Pen)

Hair: BV29, BV25, BV23, C1

Cape and Bat Bow-Tie: R59, R29, R27, R24

Coat and Bat: BV29, BV25, BV23

Dracula Bow-Tie: C1, C00, Colorless Blender

Coffin Inside: V09, V06, V04, V01

Coffin: E29, E27, E25, E23

Trick or Treat Bag and Strap: YG17, E08, YR18, YR16, YR12

Shadow Under Coffin: C3, C2

Moon: Y000, Y02, BV20, C0, C00

Hope you like it and have a fantastic week!

You can find lots of inspiration from the Design Team Divas at the High Hopes blog, and the High Hopes Rubber Stamps Facebook Fan page plus you can also follow us on
Instagram, Twitter and Pinterest.

Dam Good Birthday!


Sharing a card I made for my younger brother’s birthday. He sometimes likes to use “choice” words, so I couldn’t resist  these little characters and sentiment from Whimsy Stamps called Beaver Birthday Clear Stamps. LOL! The little tree stump and stacked logs are from Your Next Stamp – Autumn Animals (CYNS605) and the larger log is from Craftin Desert Diva’s – Build A Scene (Retired).

To make this card, I first stamped all of the images onto Copic Marker X-Press It Blending Card using Memento – Tuxedo Black and my MISTI.  My Brother Scan and Cut was used to cut around all of the images, which were then coloured with copic markers. The sentiment was stamped with VersaMark ink and then heat embossed with Ranger Embossing Powder White – Extra Fine Detail and Marvy Uchida – Embossing Heat Tool.

The base card was created using Hammermill – Premium Colour 100 lb. cardstock folded to the size of 8-1/4″ x 3-1/4″. To create the clouds in the background, I used the same paper cut to the same size as the base and using a template that I had previously created using Whimsy Stamps – Grass and Cloud Edger Die Set and Tim Holtz Distress Oxide Inks – Broken China and Blueprint Sketch. For the slim-line die cut, I used Whimsy Stamps – Slimline Wave Dies and Craftsmart Hot Buy – Christmas Embossed paper. Then I inked around the entire die cut with Tim Holtz Distress Ink – Tea Dye to make it pop more. The tree along the left side and the long log along the bottom were drawn free hand and then coloured in with Copic markers.

To assemble the card, I first attached the cloudy background to the base of the card using double-sided tape. Next, I attached the slim-line die cut using some glue. The large tree, long log and small log pile were all attached using glue. The remainder of the images and sentiment were all attached using 3M VHB – 2 sided tape. I added some twine to the balloons and beaver to finish it off.

Card Recipe:

Stamp and Sentiments: Whimsy Stamps – Beaver Birthday (KHB157), Your Next Stamp – Autumn Animals (CYNS605), Craftin Desert Divas – Build A Scene (Retired)

Inks: Memento – Tuxedo Black, Tim Holtz Distress Ink – Tea Dye, Tim Holtz Distress Ink – Gathered Twigs, Tim Holtz Distress Oxide Ink – Broken China, Tim Holtz Distress Oxide Ink – Blueprint Sketch

Paper: Copic Marker X-Press It Blending Card, Craftsmart Hot Buy – Christmas Embossed, Hammermill – Premium Colour 100 lb.

Die Cuts: Whimsy Stamps – Slimline Wave Dies, Whimsy Stamps – Grass and Cloud Edger Die Set

Tools: MISTI – Most Incredible Stamping Tool, Couture Creations – Go Power and Emboss, 3M VHB – 2 sided tape, AC Premium Ribbon, Tombow – Multi Mono Liquid Glue

Beavers: E99, E97, E37, E35, E34, E33, E29, E25, E15, E09, E08, R30, R20

Balloons: B06, B04, B02, B00, G09, G07, G02, G00

Cake and Candle: YR19, Y08, R24, B28, B24, B14, B12, B04, B02, AtyouSpica: Skyblue (09), Baby Blue (18)

Logs and Stump: E49, E27, E25, E23, E21

Tree and Log along the bottom: E37, E35, E33, Tim Holtz Distress Ink – Gathered Twigs

Hope you like it and have a great week!