Tag Archive | Creative Memories – Mermaid Cove Designer Paper Pack

Birthday Wishes!!


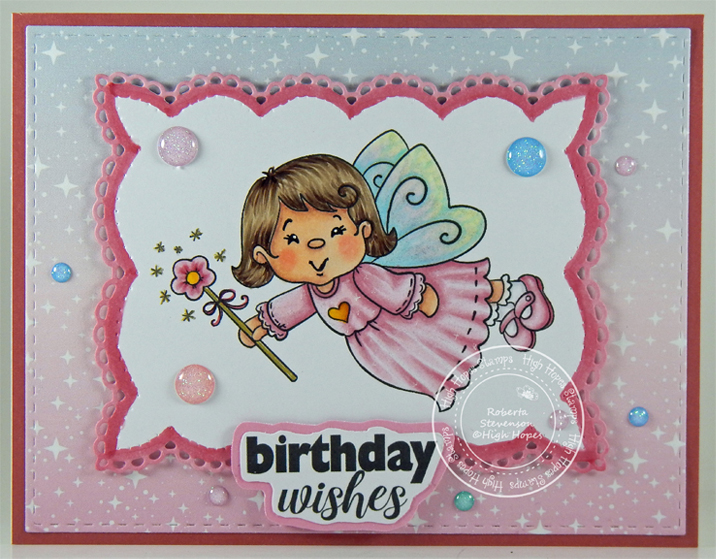
It’s Wednesday, and this week, I made a card using High Hopes Rubber Stamps Fairy Flight – SLF036  for the image and Birthday Wishes – FDG024  for the sentiment. There are a lot of birthdays in our family during March, friends too, and this little birthday fairy is on her way to grant one of them their special birthday wishes.

To make my card this week, I began with a card base of Hammermill – Premium Colour 100 lb. cardstock, cut and scored to be 5.5″ x 4.25″. Scrapbook.com – Roses Smooth Cardstock was adhered to the base using double-side tape.  I die cut Creative Memories – Mermaid Cove Designer Paper Pack using my Cuttlebug and My Creative Time – Rectangle Frame Layers and adhered it to the rose background using double-sided tape. Using Gina Marie Designs – Petite Looped Lace Rectangle Die Set, I die cut Copic Marker X-Press It Blending Card.

The image and sentiment were then stamped with my MISTI and Memento – Tuxedo Black ink onto the Copic Marker X-Press It Blending Card cardstock. The image was coloured in with Copic Markers. I added some stars onto the dress with Gelly Roll Sakura #5 Pen and then used Wink of Stella – Clear over top of the flower, dress, shoes and wings. Using R85 and R83 Copic markers, I went around the edges of the die cut for the image to create a solid border. I fussy cut around the sentiment and ran it through my Xyron Create a Sticker. I attached the sentiment to Scrapbook.com – Peppermint Smooth Cardstock and fussy cut around it again. The card was now ready to finish being assembled. I applied U-Line double-sided tape to the back of the coloured image and sentiment and popped them up onto the card. Lastly, I added in some YNS Gumdrops to complete the card.

Card Recipe:

Stamps: Fairy Flight – SLF036 (High Hopes Rubber Stamps)

Sentiment: Birthday Wishes – FDG024 (High Hopes Rubber Stamps)

Inks: Memento – Tuxedo Black

Paper: Copic Marker X-Press It Blending Card, Hammermill – Premium Colour 100 lb., Scrapbook.com – Peppermint Smooth Cardstock – 4.25″ x 5.5″, Scrapbook.com – Roses Smooth Cardstock – 4.25″ x 5.5″, Creative Memories – Mermaid Cove Designer Paper Pack

Die Cuts: My Creative Time – Rectangle Frame Layers, Gina Marie Designs – Petite Looped Lace Rectangle Die Set

Tools: MISTI – Most Incredible Stamping Tool, U-Line double-sided tape, Cuttlebug, Wink of Stella – Clear, Pental Sunburst Metalic Med Gel Pen – Gold, Gelly Roll Sakura #5 Pen, Xyron Create a Sticker, YNS Gumdrops

Image coloured with Copic Markers:

Skin: E21, E11, E04, E00, E000, R22, R20, (Eyes – Gelly Roll Sakura #5 Pen)

Hair: E47, E44, E43, E41

Dress, Shoes and Heart: R85, R83, R81, RV00, RV000, E15, YR24, Y35, Y08, Wink of Stella – Clear, Gelly Roll Sakura #5 Pen

Wings: B000, BG000, RV0000, V0000, Y000, Wink of Stella – Clear

Wand and Flower: R85, R83, R81, RV00, RV000, E15, YR24, Y35, Y19, Y08, Wink of Stella – Clear, Pental Sunburst Metalic Med Gel Pen – Gold

Socks: C1, C00

Hope you like it and have a fantastic week!

You can find lots of inspiration from the Design Team Divas at the High Hopes blog, and the High Hopes Rubber Stamps Facebook Fan page plus you can also follow us on
Instagram, Twitter and Pinterest.

Christmas Dragon


Come and check us out on Passionate Paper Creations & Friends FB group
as we are currently sponsoring Lee Holland ArtLee Holland Illustration Inspiration Facebook Group for the month of November.

Check out the Etsy store for more fantastic designs from Lee Holland Art. You can click on any of the links above or you can click here too:  https://www.etsy.com/ca/shop/leehollandart. There is a 50% off Black Friday sale going on. You should check it out!

Jump over to Passionate Paper Creations & Friends. Not a Member? Come Join! https://bit.ly/2VwG9iz.

If you are not a member just click join. We are a fun loving group with a lot of inspiration.

Lee Holland Art has been sponsoring us throughout the month of November at  Passionate Paper Creations & Friends FB group site!! Today, I’m featuring this adorable dragon image from Lee Holland Art called Reindeer Antlers Christmas Dragon. Thank you Lee Holland Art for sponsoring us and having such amazing fun designs to choose from. I love all of your little dragons.


For the base card, I used AC Cardstock – White and cut it and scored it to be 6″ x 6″. For the background, I cut Creative Memories – Mermaid Cove Designer Paper to the same size as the base card. The image using HP High Quality Grayscale was printed onto Copic Marker X-Press It Blending Card. Using my Cuttlebug and Essentials by Tattered Lace Dies – Easel Slider dies, the printed image and Hot Buy – Recollections Ombre Brights Paper were both die cut. The sentiment was stamped using my Misti, VersaMark Ink and sentiment stamps from Lawn Fawn – “Offset Sayings – Christmas” and Lawn Fawn “Winter Skies”. Ranger Super Fine Gold Embossing powder was applied to the stamped sentiments and then heat set with a Marvy Uchida – Embossing Heat Tool.

I cut the sentiment down to be 3-3/8″ x 1-2/8″ and then used W R Memory Keepers – Crop-A-Dile Corner Chomper to create .25″ corners. Using a Sharpie – Gold Medium Point – Water Based Paint pen, I went around all of the edges of the cuts with the exception of the image die cut. The image was coloured in with Copic markers and then I used a Gelly Roll Sakura #10 Pen to create the snow in the sky and a combination of Stickles – Crystal, Stickles – Waterfall and Cosmic Shimmer Fluffy Stuff which was applied prior to the Stickles being added.

The card was now ready to be assembled. I applied U-Line double-sided tape to the backs of the coloured image and cut frame to pop them up. I doubled up the tape for behind the sentiment. The base paper was applied directly to the card base using double-sided tape. I peeled off the tape from the backings of the elements and popped them all up onto the base card to finish it off.

Card Recipe:

Stamp: Reindeer Antlers Christmas Dragon – Lee Holland Art

Sentiments: Offset Sayings – Christmas – Lawn Fawn,  Winter Skies – Lawn Fawn

Inks: HP High Quality Grayscale, Versamark

Paper: Copic Marker X-Press It Blending Card, AC Cardstock – White, Creative Memories – Mermaid Cove Designer Paper Pack, Hammermill – Premium Colour 100 lb., Hot Buy – Recollections Ombre Brights Paper Pack (12″ x 12″)

Die Cuts: Essentials by Tattered Lace Dies – Easel Slider

Miscellaneous: U-Line double-sided tape, Sharpie – Gold Medium Point – Water Based Paint, Stickles – Crystal, Stickles – Waterfall, Gelly Roll Sakura #10 Pen, W R Memory Keepers – Crop-A-Dile Corner Chomper Cosmic Shimmer Fluffy Stuff, Marvy Uchida – Embossing Heat Tool

Image coloured with Copic Markers:

Dragon: BG72, BG57, BG32, BG11, BG09, BG05, BG02, BG01, V15, V12, V06. V000, G14, YG23, YG11, YG03, YG01

Box: E27, E25, E23

Ornaments: R59, R37, R35, E15, Y35, YR24, Y08, YG67, YG17, YG21, E35, E34, E33, E31

Sky: B05, B04, B02, B01, Gelly Roll Sakura #10 Pen

Snow: B60, C1, Stickles – Crystal, Stickles – Waterfall, Cosmic Shimmer Fluffy Stuff

Hope you like it and have a great week!

Magical Day!


Hi There! Today, I’m sharing this month’s lesson all completed from Kit and Clowder July 2020 Markers class called “Once Upon a Time”.  The image is by artist Connie Fong. There were so many new techniques learned in this month’s video taught by Alyce Keegan. I love these lessons, because you can stop and start the videos at any time and repeat what Alyce is teaching you.

I had fun colouring in all of the background, but, then my worst nightmare started. I had cleaned all of my markers and made sure they were all full before clouring in the dress, hair and skin. Unfortunately, I ran into a few problems with my markers when I went to colour in the skin tones. For some crazy reason, they decided to get icky when blending the colours. First I tried using a Copic Colorless blender to fix it, but that didn’t really help. I really didn’t want to start over from the very beginning, so I looked up the conversion chart on the Kit and Clowder site for Copic Markers to Prismacolor Pencils. I used that conversion and coloured over the markers with the pencils for the skin tones. Then, I re-outlined her face and arms with a Pigma Micron 005 black marker after all of the colouring was completed.

I also used a PrismaColor Primiere White pencil to make some of the highlights in the folds brighter on the edges.

To put the card together, I used Kraftin’ Kimmie – Magical Friends for the sentiment. I really love the Creative Memories – Mermaid Cove Designer Paper Pack background for this image. It blended in so well. I edged around the card with Sharpie – Gold Medium Point – Water Based Paint. Lastly, to finish off the card, I fussy cut around the image and popped it up with 3M VHB – 2 sided tape and added Craft – Rhinestone Stickers – 02 -3048783 on top of the card in random places to give it some bling.

Hope you like it!